![]()
YAMAHA DRUMS
・Assembly Manual

Thank you for purchasing the Yamaha Drum Set. From this day forward you can be assured of playing a high-quality full drum set.
Please read this owner’s manual thoroughly before use and refer to it throughout the continued use of the drum set.
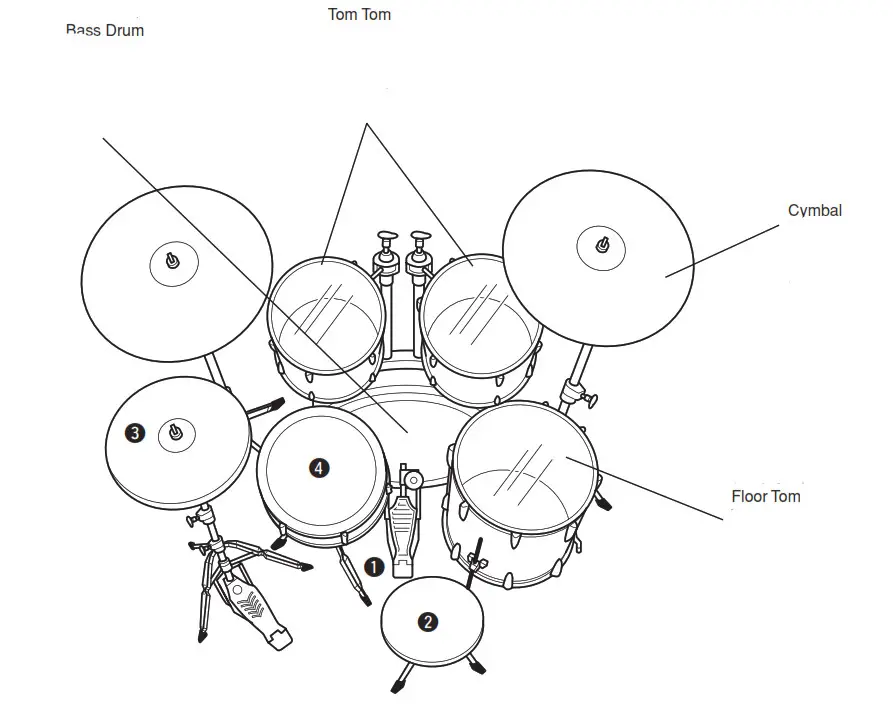
Bass Drum Assembly

TomTom Installation
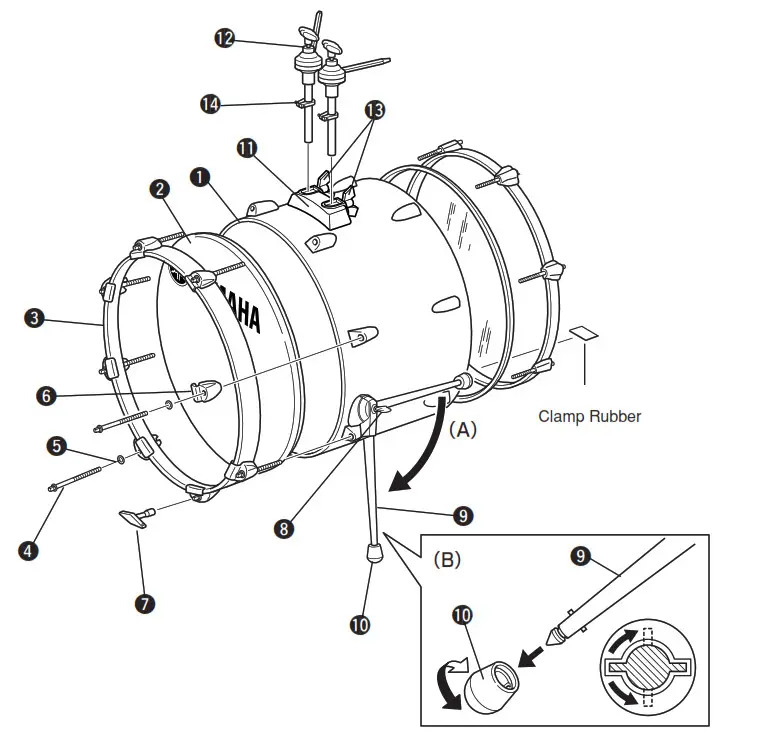
- Place the head 2 then the hoop 3 onto shell 1. Use the bass drum bolts 4, washers 5 and the bass drum hooks 6 to secure the head and the hoop to the shell by tightening each bolt gradually in a diagonal fashion.
NOTE: Loosely tighten the bolt 2 or 3 turns with your fingers, then use the tuning key 7 to tighten the bolts until secure. (Refer to the “Drum Head Tightening Procedure” for complete instructions on tightening the drum head.) - Loosen the bass drum leg bolts 8 and rotate the bass drum legs 9, (Fig. A) then loosely secure the leg in place.
Once you have determined the position of the leg, tighten the bass drum bolts 8 to secure the leg in place. (An alignment gauge is supplied on the bass drum leg base and bass drum leg o to aid in setting leg angles.) Rotate the leg rubber 9 in either direction to secure the rubber to the bass drum leg 9. (Fig. B) - Insert the tom clamp 12 into the pipe clamp 11and firmly tighten the tom holder bolt13.
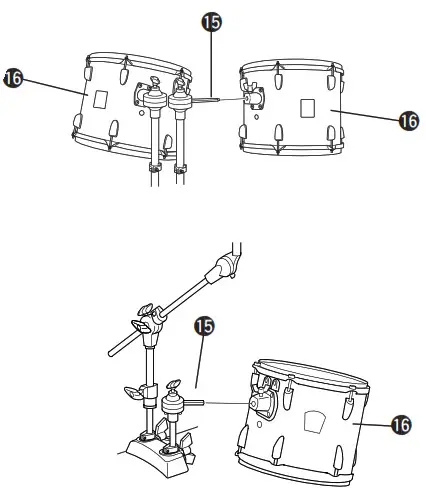
❈ About the Memory Clamps14
Once the desired tom height has been determined, securing the memory clamp onto the mounting pipe of the tom clamp and pipes will mark the setting for future setups.
❈ About the Ball Clamp15
The angle of the tom16 can be freely varied using the ball clamp.
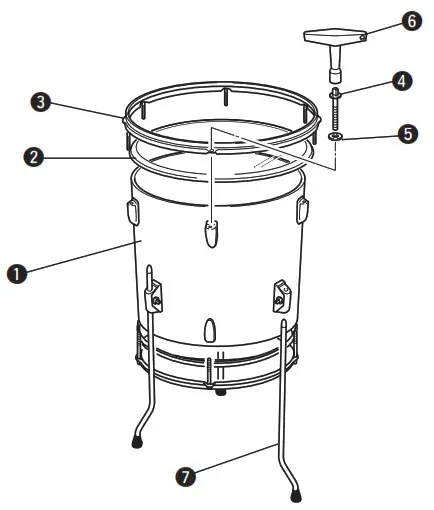
Floor Tom Assembly
- Just as you did on the bass drum, put the head 2 and then the hoop 3 onto the tom shell 1, attach the floor tom bolts 4 and washers 5, and tighten. Use the tuning key 6 throughout, and tighten each bolt a little at a time in a diagonal fashion.(Refer to the “Drum Head Tightening Procedure” for complete instructions on tightening the drum head.)
- Install the floor tom legs 7. To firmly stabilize the assembly, make sure the legs extend outward at right angles to the circumference of the drum.
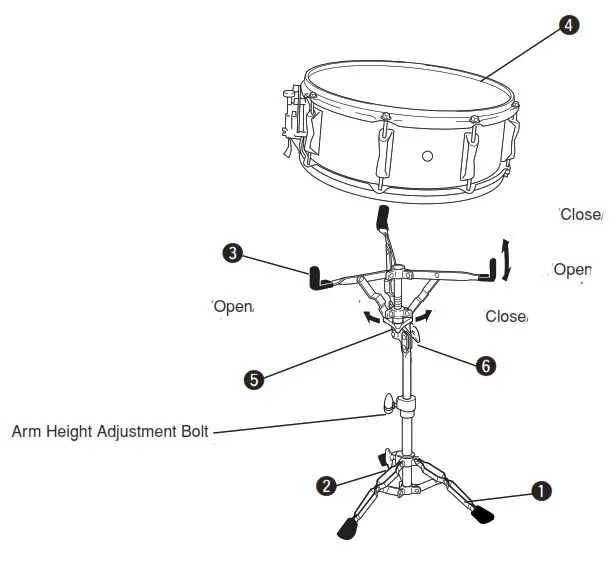
Snare Stand Assembly
 Open leg section 1 and secure the legs in place with the leg section wing bolt 2.
- Raise the arm section and open the arms 3.
- Rest the snare drum 4 on the arm section. Use the rotary nut 5 to gradually close the arm section until the snare is held firmly in place.
- Use the wing nut 6 to adjust the snare to a comfortable playing angle for performance.
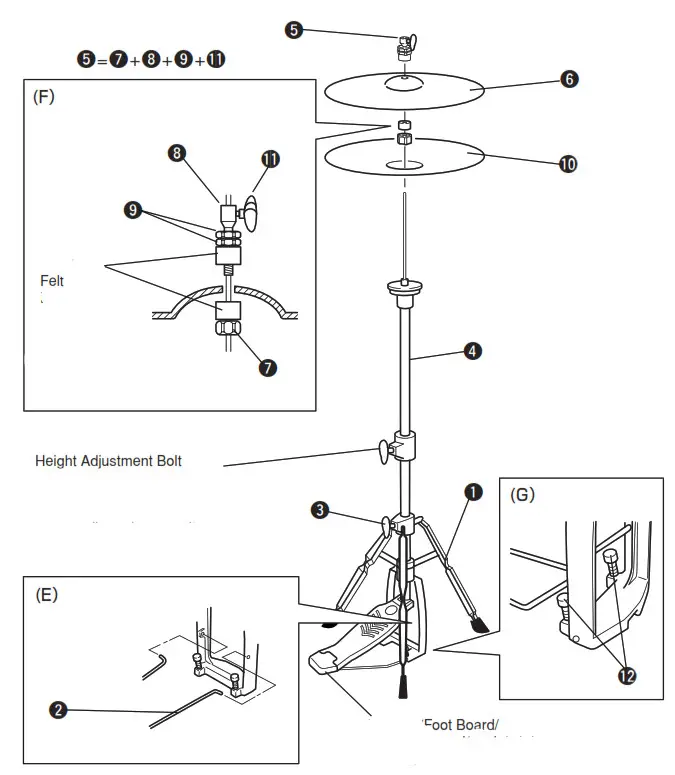
Hi-Hat Stand Assembly
- After opening leg section 1, insert the footboard linkage rods 2 (Fig. E) into the holes on the footboard frame assembly, and tighten the leg section wing bolt 3.
- Remove the clutch 5 from the upper piper 4.
- Attach the clutch 5 to the upper hi-hat cymbal 6. Tighten the clutch nut u and clutch bolt 7 from above and below the cymbal, and tighten the lock nuts 8 to secure the upper hi-hat cymbal 6. (Fig. F)
- After placing the lower hi-hat cymbal 10 on the hi-hat stand, set the upper hi-hat cymbal with the clutch attached, and secure with the clutch wing bolt 11.
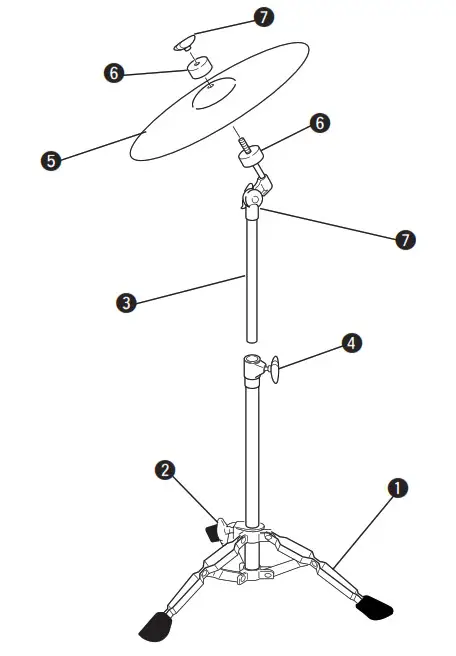
Cymbal Stand Assembly
- Open leg section 1 and secure with the leg section wing bolt 2.
- Insert the upper pipe 3 into leg section 1 and secure it into position with the connector wing bolt 4.
- Place the cymbal 5 between the felts 6 and secure into position with the wing nut 7.
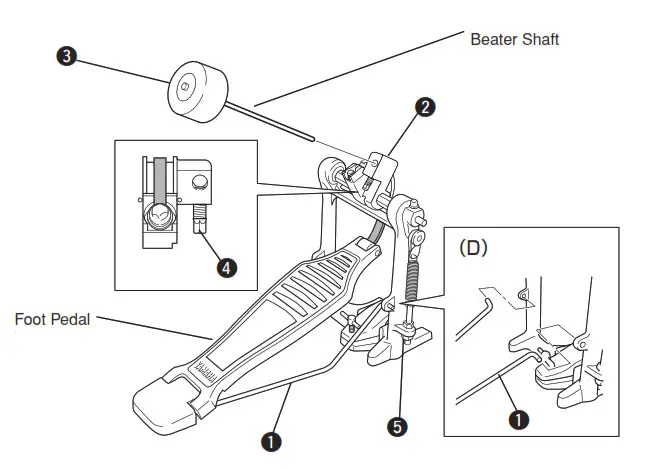
Foot Pedal Assembly
- Similar to the hi-hat assembly, attach the foot pedal linkage rods 1 to the foot pedal frame assembly. (Fig. D)
- Attach the beater 3 to the beater shaft attachment w and secure with bolt 4.
❈ About Spring Adjustment 5
Spur length is adjusted with the spur adjustment bolts. The spring adjustment nut is used to adjust spring tension.
Setting Up
- The front of the bass drum should be raised slightly (about 1/2″).
- Make sure the foot pedal 1 is flat on the floor.
- The height of the drum stool 2 should be set so that the knee is a little lower than the upper thigh when the player’s foot is on the foot pedal.
- The hi-hat 3 should be 5 to 7 inches higher than the top of the snare drum 4.
Keep a 1 to 2-inch clearance between the upper and lower cymbals of that. In addition, for optimal sound, tilt the lower cymbal slightly. - The height of the floor tom and the snare drum should be about the same. Keep about a one-foot space between the two instruments.
This covers the basic setup of the drum equipment.
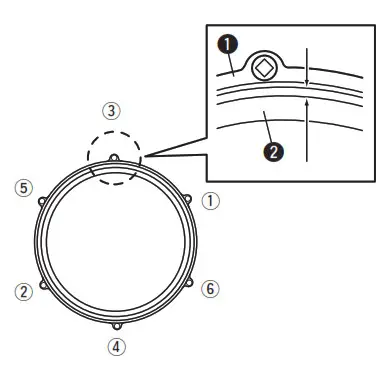
Drum Head Tightening Procedure
 Drum Head Tightening Procedure
First, lightly tighten all the hoop bolts two turns each. Then, in a diagonal fashion following the numerical order shown in the diagram below, begin to more firmly tighten each bolt a little at a time. As a guide during tightening, the space between hoop 1 and shell 2 should be the same everywhere.
New Drum Head Conditioning
New Drum Head Conditioning
For new drums, it may take some time to break in the head and the shell. A properly stretched head will have a good sound. Periodically check for proper tension by firmly pressing on the middle of the head. It is possible to feel areas where the drum head is not correctly stretched.
Note
Left for an extended time inside of an automobile, exposed to direct sunlight, or exposed to high temperatures can damage the wrap covering (polyvinyl chloride sheet)
or ruin the drum’s performance.
Do not leave the drums in places with high temperatures or high humidity.
![]()
YAMAHA CORPORATION
P.O. Box 1, Hamamatsu, Japan
Printed in Indonesia