Airtime Pro 2 SE Truly Wireless Earbuds User Manual

Introduction
Welcome to truly wireless audio with 25 hours * of combined battery life and wireless charging case.
Simple Pairing
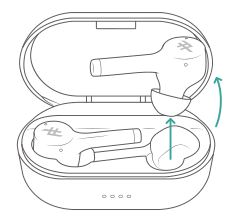
- Remove earbuds from case and remove protective cover from contacts. Place earbuds in charging case and allow 5 minutes to charge.
- Open case and remove earbuds to initiate Bluetooth ® pairing.
- On your device’s Bluetooth menu, select “IFROGZ Airtime Pro 2 SE.”


Touch Controls

Using the Earbuds
Airtime Pro 2 SE true wireless earbuds have built-in touch navigational controls. Just tap on the end of the earbud (on the IFROGZ logo) to navigate.
Turning Earbuds On/Off
To turn the earbuds on, simply remove the buds from the case. To turn the earbuds off, simply return them to the case.
The earbuds will go into hibernation mode if not used for 20 minutes.
Getting the Best Fit
To get the best sound out of your earbud, you need to have the right size ear tip to form a good seal. That’s why we provide different-sized tips.
If your ear tip feels loose, try a larger size. If you feel too much pressure, or if the ear tip doesn’t fit inside your ear, try a size smaller.
Note: each of your ears may require a different-sized tip.
To see if you’ve got a good seal, try the yawn test. Put in your earbuds and give a nice yawn; if your earbuds don’t wiggle and don’t break the seal, then you’ve got a good fit.
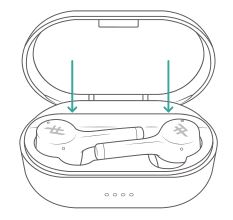
Charging the Wireless Earbuds
The case carries enough power to charge the earbuds up to 4 times * .
- Place the earbuds in the charging case. You’ll feel them magnetically click into place.
- A red light on the earbuds will indicate charging.
Charging the Case
Your case comes charged and ready to go. You can re-charge the case wirelessly using a wireless charging pad, or charge the case manually using the included USB-C ® cable.
Wireless Charging
- Simply drop the charging case on a compatible wireless charging pad.
- The Battery Indicator lights on the front of the case will flash according to its current battery level. This indicates your case is charging. When the case is fully charged, all four lights will turn off.
Manual Charging
- Connect the included USB-C charging cable to the port on the side of your case.
- Connect the USB-A end of the cable to your preferred 5V USB outlet.
- The Battery Indicator light will flash according to its current battery level. This indicates your case is charging. When the case is fully charged, all four lights will illuminate and then turn off.
- Disconnect the charging cable.
Quick Charge Feature
Get one more hour of playtime by nesting the earbuds in the charging case for ten minutes.
Checking the Battery Level
Your case carries enough power to charge your wireless earbuds 4 times for a total of 25 hours. To check how much power your case still has, place the earbuds in the case. The LED on the front of the case will illuminate, indicating how much battery remains in the case:
" sizes="(max-width: 247px) 100vw, 247px" alt="Airtime Pro 2 SE Truly Wireless Earbuds - Checking the Battery Level" width="247" height="344" data-ezsrcset="https://manuals.plus/wp-content/uploads/2021/01/Airtime-Pro-2-SE-Truly-Wireless-Earbuds-Checking-the-Battery-Level.jpg 247w,https://manuals.plus/wp-content/uploads/2021/01/Airtime-Pro-2-SE-Truly-Wireless-Earbuds-Checking-the-Battery-Level-215x300.jpg 215w" data-ezsrc="https://manuals.plus/wp-content/uploads/2021/01/Airtime-Pro-2-SE-Truly-Wireless-Earbuds-Checking-the-Battery-Level.jpg" />
This device complies with Part 15 of the FCC Rules.
Operation is subject to the following two conditions: (1) this device may not cause harmful interference, and (2) this device must accept any interference received, including interference that may cause undesired operation.
THE MANUFACTURER IS NOT RESPONSIBLE FOR ANY RADIO OR TV INTERFERENCE CAUSED BY UNAUTHORIZED MODIFICATIONS OR CHANGE TO THIS EQUIPMENT. SUCH MODIFICATIONS OR CHANGE COULD VOID THE USER’S AUTHORITY TO OPERATE THE EQUIPMENT.
This equipment has been tested and found to comply with the limits for a Class B digital device, pursuant to part 15 of the FCC Rules. These limits are designed to provide reasonable protection against harmful interference in a residential installation. This equipment generates, uses and can radiate radio frequency energy and, if not installed and used in accordance with the instructions, may cause harmful interference to radio communications. However, there is no guarantee that interference will not occur in a particular installation. If this equipment does cause harmful interference to radio or television reception, which can be determined by turning the equipment off and on, the user is encouraged to try to correct the interference by one or more of the following measures:
- Reorient or relocate the receiving antenna.
- Increase the separation between the equipment and receiver.
- Connect the equipment into an outlet on a circuit different from that to which the receiver is connected.
- Consult the dealer or an experienced radio/TV technician for help.
This equipment complies with FCC radiation exposure limits set forth for an uncontrolled environment. End user must follow the specific operating instructions for satisfying RF exposure compliance. This transmitter must not be co-located or operating in conjunction with any other antenna or transmitter
- Drivers: 6mm
- Resistance: 16 Ohms ± 15%
- Sensitivity: 100dB ± 3dB
- Frequency: 50Hz – 20KHz
- Working Time: 5+20hrs
- Charging Time: 1.5-2h
Warranty information available at www.zagg.com/warranty-policies
©2020 ZAGG Inc All Rights Reserved | NASDAQ: ZAGG | MADE IN CHINA
The Bluetooth ® word mark and logos are registered trademarks owned by Bluetooth SIG, Inc. and any use of such marks by ZAGG Inc is under license. USB-C is a trademark of USB Implementers Forum. Other trademarks are property of ZAGG.
*All hours usage and charging claims are estimates based on internal testing and will vary based on individual usage.

314-00849 | 07/15/20
Factory Reset
If you have functionality issues, a factory reset can help. Here’s how to perform one.
- Place both buds in the case.
- Reset the right bud.
- Remove the right bud from the case.
- Tap and hold for 10 seconds until light flashes red and turns off.
- Wait 10 seconds after red flashing light.
- Tap and hold for five seconds until light turns on and flashes red and white.
- Quickly tap the bud six times; the light will turn off.
- Return the bud to the case.
- Reset the left bud.
- Repeat steps above, same as right bud.
- Connect the left and right earbuds by removing them from the case and allowing them to connect to each other for about five seconds. Once connected to each other, earbuds will flash red and white indicating pairing mode. Remove the right bud from the case.
- The earbuds are now reset to factory settings. You will need to remove the previous pairing from your device’s Bluetooth ® settings. Once removed, follow pairing instructions at the beginning of this quick start guide.
Having Trouble?
Our IFROGZ customer support team is available should you have any needs:
Online: www.support.zagg.com Or give us a call at: 1-800-700-9244