Installation Manual

Honeywell Wi-Fi Touchscreen Programmable Thermostat
Model: RTH8580WF
Other Honeywell Pro Thermostat Manuals:
- T4 Pro
- T6 Pro
- RTH5160 Non-Programmable Thermostat
- WiFi Touchscreen Thermostat Installation Manual
- WiFi Color Touchscreen Thermostat
- VisionPRO WiFi Thermostat
In the box you will find
- Thermostat
- Wallplate (attached to thermostat)
- Screws and anchors
- Coin cell battery (inside the back of the thermostat)
- Quick Start Guide
- Thermostat ID Card
- Wire labels
- User Guide
Welcome
Congratulations on your purchase of a Honeywell Wi-Fi touchscreen programmable thermostat. When registered to Honeywell’s Total Connect Comfort Solutions, you can remotely monitor and control the heating and cooling system in your home or business— you can stay connected to your comfort system wherever you go.
Honeywell’s Total Connect Comfort is the perfect solution if you travel frequently, own a vacation home, a business or manage an Investment property or if you are simply looking for peace of mind.
Caution: This thermostat works on 24 volt systems. It will NOT work on 120/240 volt systems.
Caution: This thermostat contains a Lithium battery which may contain Perchlorate material.
Perchlorate Material—special handling may apply.
See www.dtsc.ca.gov/hazardouswaste/perchlorate
MERCURY NOTICE: Do not place your old thermostat in the trash if it contains mercury in a sealed tube. Contact the Thermostat Recycling Corporation at www.thermostat-recycle.org or 1-800-238-8192 for information on how and where to properly and safely dispose of your old thermostat.
NOTICE: To avoid possible compressor damage, do not run air conditioner if the outside temperature drops below 50°F (10°C).
Need help?
Visit wifithermostat.com or call 1-855-733-5465 for assistance before returning the thermostat to the store.
Features of your Wi-Fi thermostat
With your new thermostat, you can:
- Connect to the Internet to monitor and control your heating/cooling system
- View and change your heating/cooling system settings
- View and set temperature and schedules
- Receive alerts via email and get automatic upgrades
Your new thermostat provides:
- Smart Response Technology
- Compressor protection
- Heat/cool auto changeover
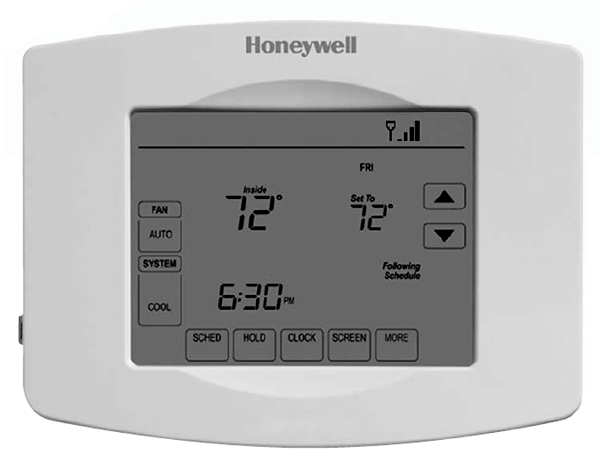
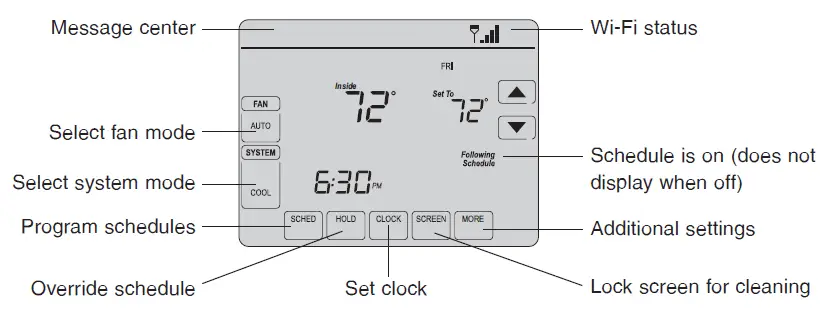
Home screen quick reference
Once your Wi-Fi thermostat is installed, it will display the home screen. Portions of this display will change depending on how you are viewing it. To change settings, simply press the appropriate area lightly with your finger.
Unless you change the lighting function, the screen is always lit at low intensity. When you touch the screen, the screen brightens.
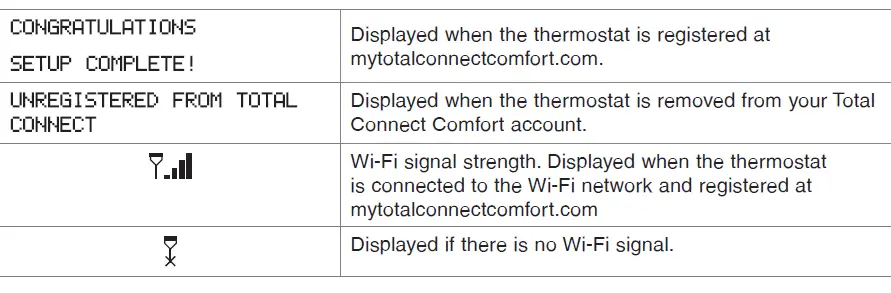
Message center messages
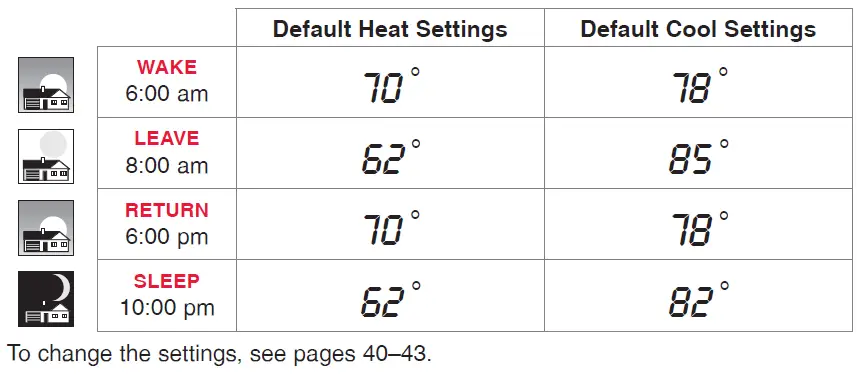
Preset energy-saving schedules
This thermostat is pre-set with energy-saving program settings for four time periods. Using the default settings can reduce your heating/cooling expenses by as much as 33% if used as directed. Savings may vary depending on geographic region and usage.
Setting up your thermostat
Setting up your Wi-Fi programmable touchscreen thermostat is easy. It is preprogrammed and ready to go as soon as it is installed and registered.
- Install your thermostat.
- Connect it to your home wireless network.
- Register online for remote access.
Before you begin, you may want to watch a brief installation video. Use the QR Code® at the front of this guide, or go to wifithermostat.com.
Installing your thermostat
You might need the following tools to install this thermostat:
- No. 2 Phillips screwdriver
- Small pocket screwdriver
- Pencil
- Level (optional)
- Drill and bits (3/16” for drywall, 7/32” for plaster) (optional)
- Hammer (optional)
- Electrical tape (optional)
- Switch OFF power.
To protect your equipment, switch OFF the power to your heating/cooling system at the breaker box or the system switch.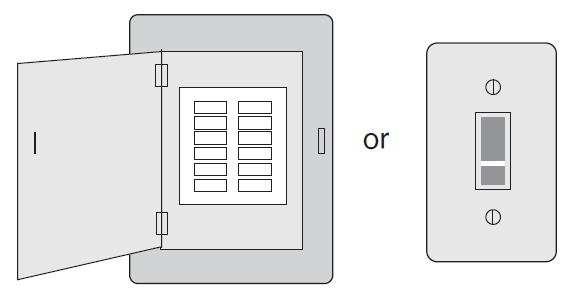
- Remove old thermostat.
Remove the old thermostat while leaving the wallplate and wiring in place.Take a picture of the wires on your old thermostat for later reference.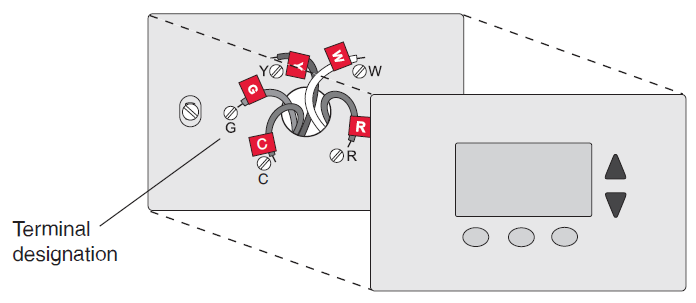
If you have an older thermostat with a sealed mercury tube, turn to page 2 for proper disposal instructions.
- Label wires.
Use the supplied sticky tags to label each wire as you disconnect it. Label wires according to the old thermostat terminal designations, not by wire color.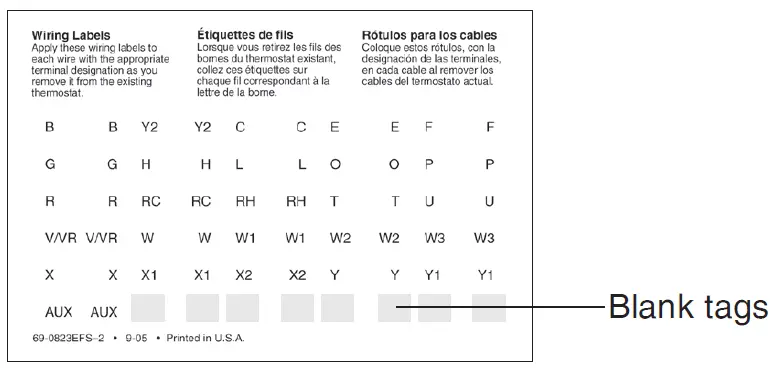
- Remove wallplate.
Remove the old wallplate from the wall after all wires have been labeled and disconnected.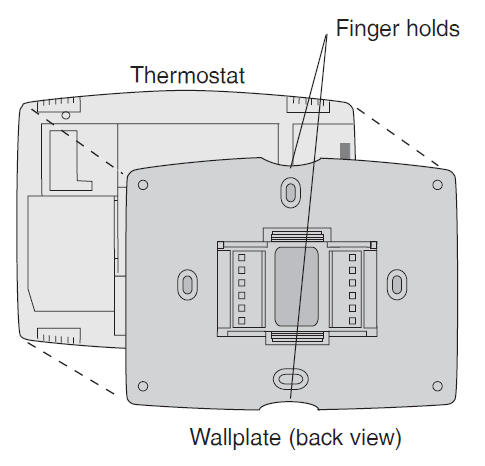
- Separate Wi-Fi thermostat and its wallplate.
On your new thermostat, grasp the finger holds on the top and bottom of the wallplate with one hand and the thermostat (front) with the other hand. Pull pieces apart. - Mount wallplate for Wi-Fi thermostat.
Mount your new wallplate using screws and anchors included with the thermostat.
If necessary:
Drill 3/16-in holes for drywall.
Drill 7/32-in holes for plaster.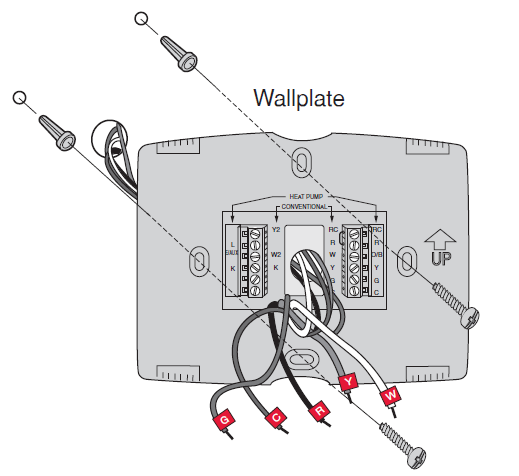
- Looking for an unused wire that is pushed into the wall. Connect that wire to C and check that it is connected to the 24 VAC common at your heating/cooling system. Check the video section at wifithermostat.com.
- Installing a new wire. If required, contact a contractor to install a new wire (go to wifithermostat.com to locate a contractor in your area).
Wiring
For conventional heating/cooling systems (natural gas, oil or electric furnace, air conditioner), see page 16. See “Glossary” on page 65 for further definition.
For a heat pump system, see page 17. See “Glossary” on page 65 for further definition. - Wiring (conventional system)
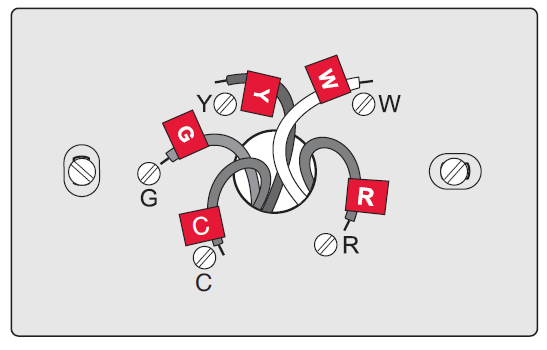
7A. Connect wires.
Wire the Wi-Fi thermostat to your conventional system.a. Match the labels on the wires to the terminal labels. You must have a C wire. See page 15.
b. Loosen screws, insert wires into holes on inside edge of terminals, then tighten screws.
c. Push any excess wire back into the wall opening.
d. Continue to page 22.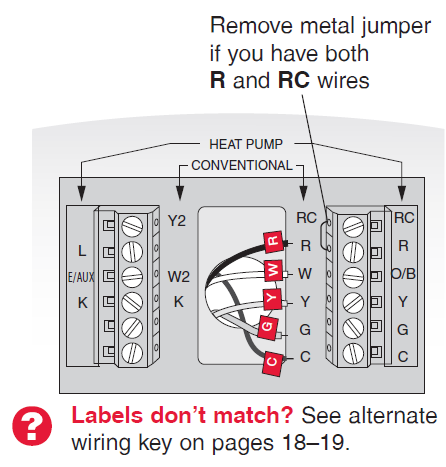
Wiring (heat pump system only)
7B. Connect wires.
Wire Wi-Fi thermostat to your heat pump.
a. Match the labels on the wires to the terminal labels on the new thermostat. You must have a C wire. See page 15.
b. Loosen screws, insert wires into holes on inside edge of terminals, then tighten screws.
c. If old thermostat has separate wires on AUX and E, place both wires into the
E/AUX terminal. If old thermostat has wire on AUX with a jumper to E, place wire on E/AUX terminal. No jumper is required.
d. Push any excess wire back into the wall opening.
e. Continue to page 22.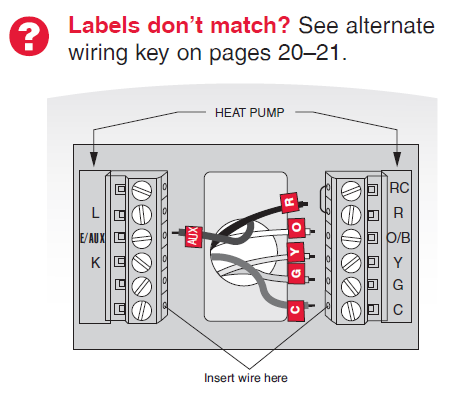
Alternate wiring (heat pump system only)
Use this if your wire labels don’t match the terminal labels.Note: You must have a C wire or equivalent. See page 15.
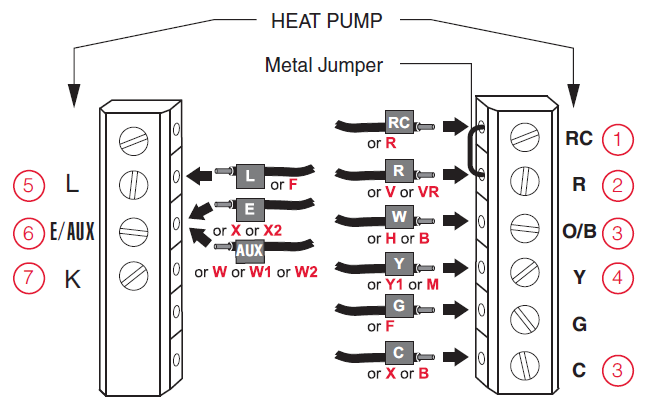
Alternate wiring key (heat pump system only)
1. Leave metal jumper between R and RC terminals in place.
2. If your old thermostat had both V and VR wires, check wifithermostat.com for help.
3. If your old thermostat had separate O and B wires, attach the B wire to the C terminal. If another wire is attached to the C terminal, check wifithermostat.com for help. Attach the O wire to the O/B terminal. Set System Function 0190 to 0 (see page 55).
4. If your old thermostat had an O wire and not a B wire, attach the O wire to the O/B terminal.
5. If your old thermostat had separate Y1, W1 and W2 wires, check wifithermostat.com for help.
6. This is the system monitor. If the monitor finds a problem, you will see a red light in the upper right corner of the thermostat (shines through the cover).
7. If old thermostat has separate wires on AUX and E, place both wires into the E/AUX terminal. If old thermostat has wire on AUX with a jumper to E, place wire on E/AUX terminal. No jumper is required.
Do not use K terminal. - Install battery.
Insert the coin cell battery (included), observing the correct polarity.
- Attach thermostat to wallplate.
Align the thermostat to the wallplate and then snap into place.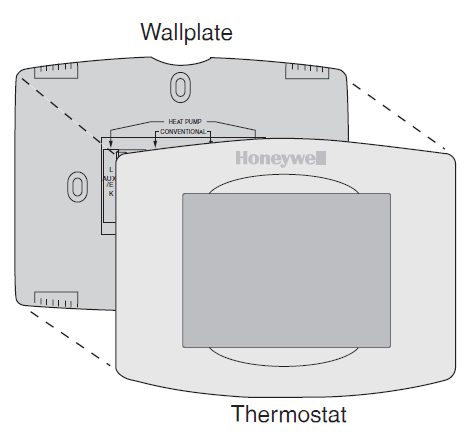
- Switch heating/cooling system ON
Switch power back to ON for your heating/cooling system at the breaker box or the system switch.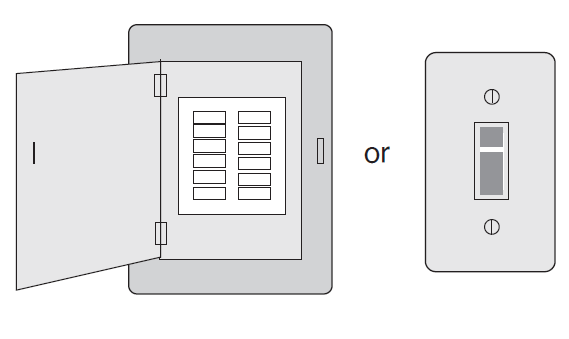
- Set date and time.
Touch s or t buttons to change displayed time and date.
Press and hold a button to quickly change a setting.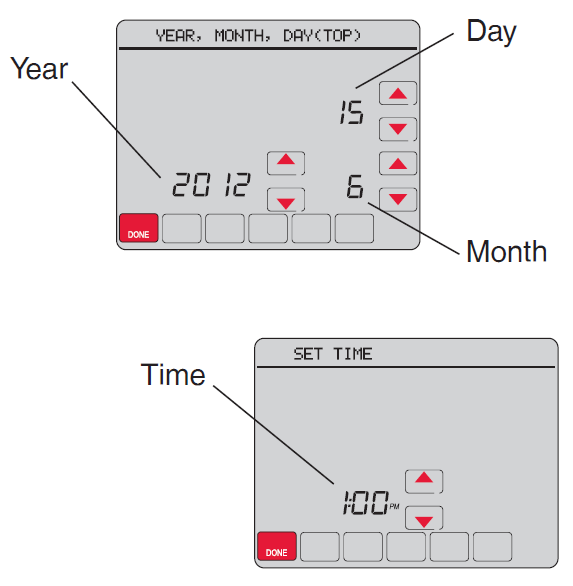
- Determine your heating/cooling system type.If your system type is conventional single stage, continue to “Connecting to your Wi-Fi network” on page 27.
If your system is:• Conventional multistage heat and cool
• Heat pump without backup heat
• Heat pump with backup heat
• Heat only
• Cool onlySee page 51 to match your thermostat to your system type, then continue to “Connecting to your Wi-Fi network” on page 27.
If you are not sure of your heating/cooling system type or have other questions, go to wifithermostat.com


To complete this process, you must have a wireless device connected to your home wireless network. Any of these device types will work:
- Laptop (recommended)
- Tablet (recommended)
- Smartphone
If you get stuck… at any point in this procedure, restart the thermostat by removing the thermostat from the wallplate, wait for 5 seconds, and snap it back onto the wallplate. Return to Step 1 in this procedure, which starts on the next page.


