ILIFE V3s Pro Robotic Vacuum Cleaner
Thank you for choosing the ILIFE V3s Pro robot vacuum cleaner! You’ve joined millions of people to get the cleaning done robotically. This user manual helps you to keep your robot performing at its best. Please take a few moments to read through it. You may also connect with us on Facebook and Twitter to enjoy exclusive benefits:
- Get model-specific customer support, including Q&A, maintenance tips, demo videos, live chat and more;
- Get first-hand product updates including new product launch, exclusive discounts and special promotions.
You may find us on:
Facebook: https://www.facebook.com/iliferobotics
Twitter: twitter.com/lLIFEROBOTICS
If you have any questions, please contact our customer service for assistance or visit www.iliferobot.com for more information.
Enjoy automated home cleaning performed by ILIFE V3s Pro. ILIFE Innovation
Important Tips
How to use 
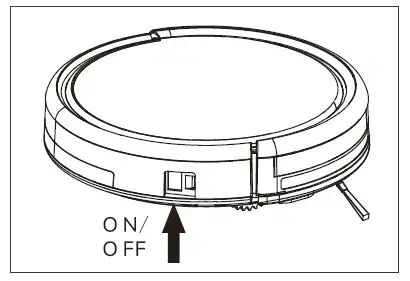
- Before using the robot, please ensure the power switch is on. Take a few moments to survey the area to be cleaned and remove any obstacles.
- The robot will pass over the same area of the floor multiple times to ensure thoroughly clean.
- The spinning brushes may flick small granule(dog food, cat litter) here and there, but finally the robot will vacuum them all in.
- Before replacing side brushes, check and match the “L” “R” mark on both the side brush and the bottom of the robot.
- When you set the clock time or schedule, the final operation will be confirmed by a beep from the robot. If no tone received, your setting is unsuccessful.
- Empty the dustbin. You could notice the robot vacuum less, even spits out. when the dustbin is full, though there is no warning beep sound.
For Best Performance
- Empty V3s Pro’s dustbin and clean its filter after every use.
- The filter could not be washed with water.
- Replace the new Filter when you notice the V3s Pro vacuum gets weaker and picks up less than before.
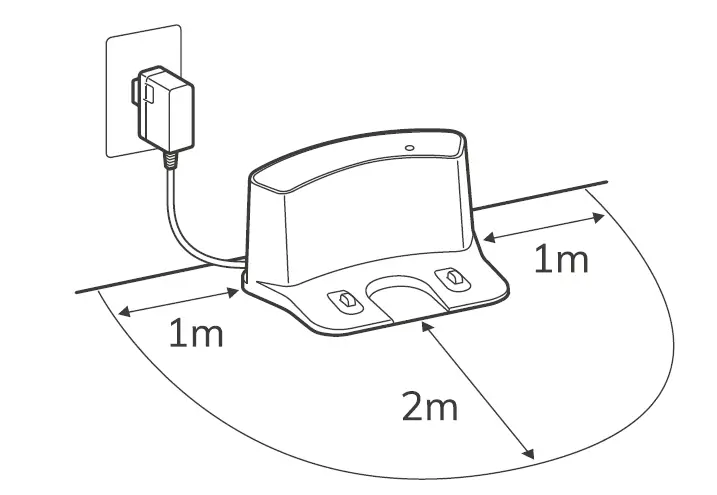
- Put the charging dock against the wall and remove obstacles about 1 meter at two sides and about 2 meters forward.
- Fully charge the robot’s battery before each cleaning cycle.
Battery Life
To extend V3s Pro’s battery life and keep its cleaning at peak performance:
- Charge the robot overnight before first-time use.
- If the robot is not used for a long time, please turn off the power switch.
- Recharge the robot as soon as possible. Waiting several days to recharge may damage the battery.
- Use the robot frequently.
Warning: The product contains electronic parts. DO NOT submerge V3s Pro or spray it with water, clean with a dry cloth only.
Safety Instructions
Before using this product, please read the following safety instructions and follow all normal safety precautions.
- Read this user manual thoroughly and carefully before using this product.
- Keep this user manual.
- Any operation or use of this product in any way other than that described in this manual may lead to serious injury or product damage.
WARNING
- Only certified technicians may disassemble the product. Users are not allowed to disassemble or repair the product.
- Only use the AC adapter provided by the factory. Using other AC adapters may cause electric shock, fire, or product damage.
- Do not touch the power cord, plug, or adapter when your hands are wet.
- Keep loose clothing and fingers away from being drawn into the product’s wheels.
- Keep the robot vacuum away from all flammables.
- Never clean the robot while it is on the charging dock or plugged indirectly. Unplug the robot and turn off the power switch when cleaning.
- Keep the AC power cord tucked away from becoming damaged in any way.
- This product is to be used only indoors. Not intended for outdoor use.
- Do not sit on top of the product or attach an object to the top of it.
- Do not use this product in wet or moist environments.
- Before use, remove all the objects that could get caught in the brushes or suction passage.
- Do not place this product on furniture or platforms where it can fall and be damaged.
- Turn the power switch off when not in use for a long period of time or when transporting the unit.
- To avoid battery damage please check whether the adapter and outlet are properly connected.
- To avoid any tripping hazards or injuries please inform all the people in the house when this product is in use.
- Do not use this product when the dustbin is full.
- Normal operating temperatures are -10 to 40 (centigrade).
- Do not operate this product in high-temperature environments.
- The battery must be removed from the product before it is scrapped.
- Unplug the vacuum from the power source when removing the battery.
- The battery is to be disposed of safely.
- Use factory authorized battery only. Do not use an unmatched battery.
Note: This product is not a toy and should not be used by children or people with a lack of related experience or knowledge.
For more details, please visit www.iliferobot.com
Product Composition
List of Accessories
| Serial Number | Description | Q’ty |
| 1 | Main Body (battery included) | 1 |
| 2 | Charging Dock | 1 |
| 3 | Remote Control (battery not included) | 1 |
| 4 | Power Adapter | 1 |
| 5 | Cleaning Tool | 1 |
| 6 | User Manual | 1 |
| 7 | Extra Side Brushes | 2 |
| 8 | High Performance Filter | 2 |
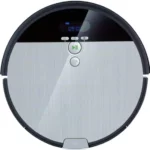
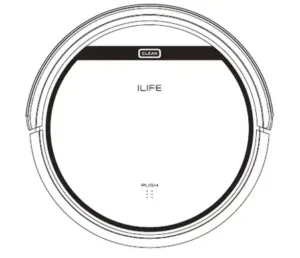
Robot Anatomy 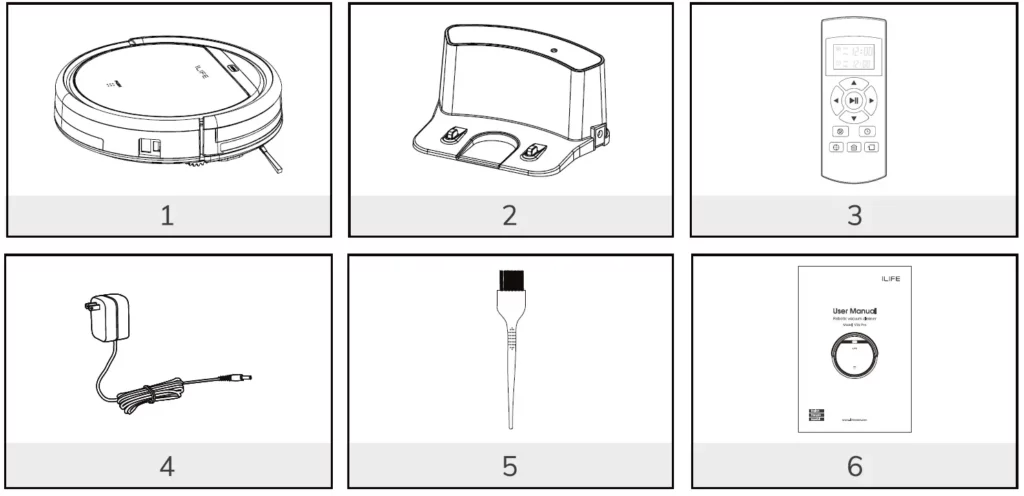

Dustbin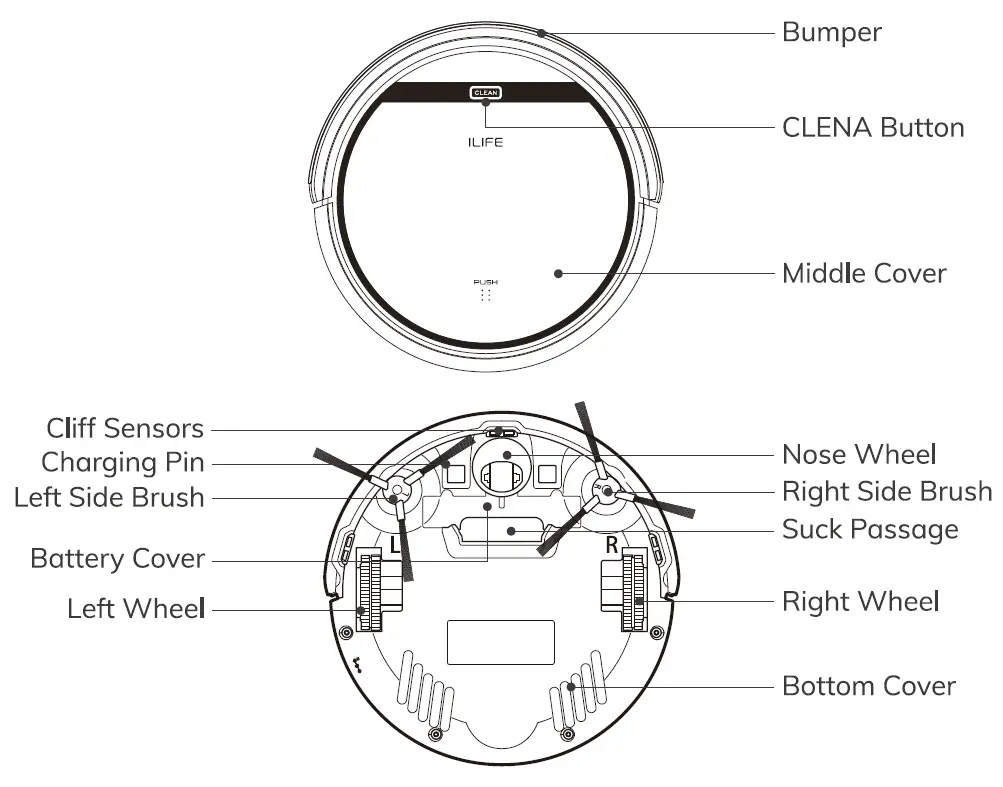
Charging Dock 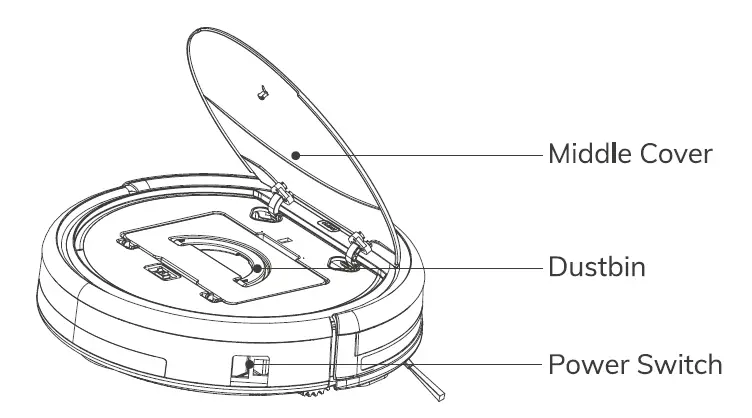
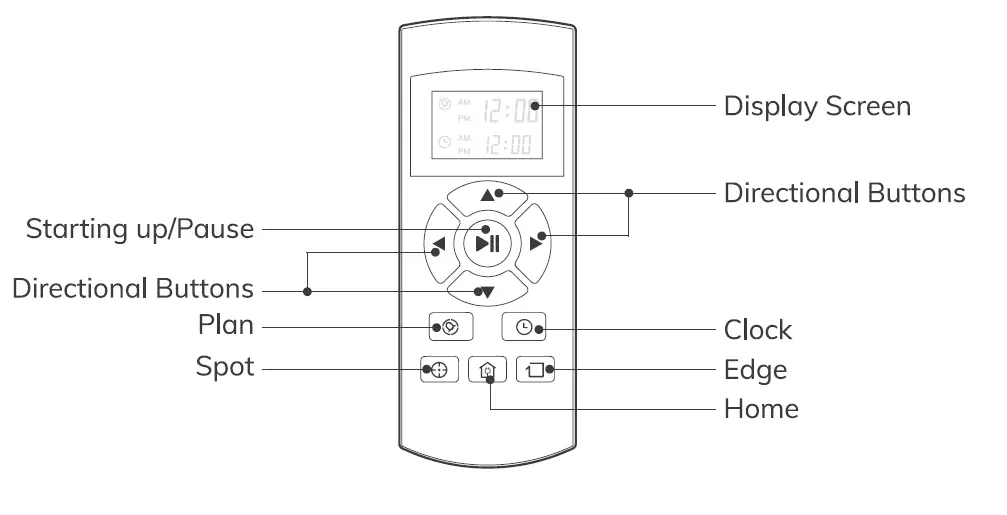
Remote Control 
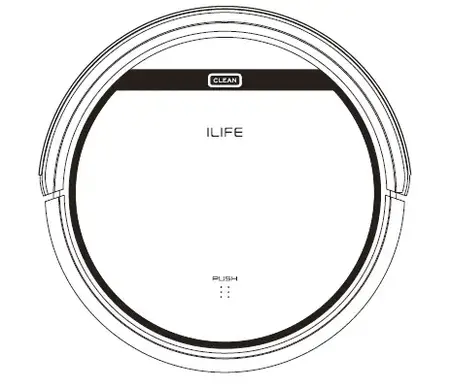
CLEAN Button Status 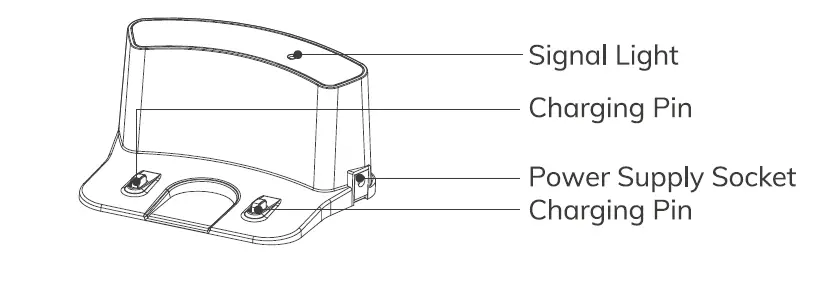
Remote Control Operating
- “
 ” Starting up/Pause
- Press this button to start cleaning in the selected mode.
- Press this button to make the robot stop when it’s cleaning.
- Press this button to exchange from sleeping mode to selected mode.
- Directional Buttons
A. ”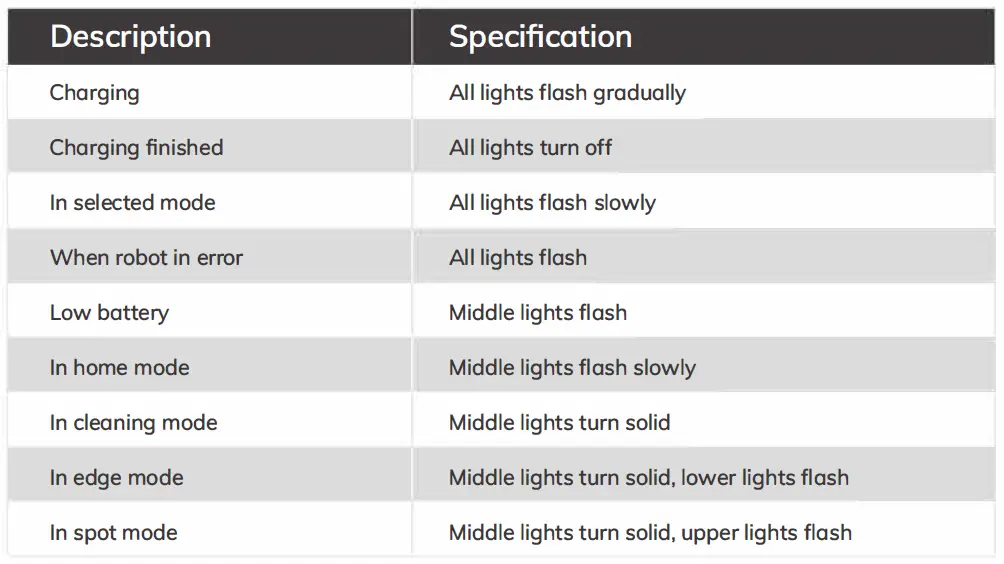 ” button:
- Press this button to increase the number in scheduling or clock mode;
- Press this button to make the robot move forward in the selected mode and the robot will stop when it hits any objects.
B. ” ” button:
 - Press this button to decrease the number in scheduling or clock mode.
- Press to make the robot move backward for a little step in the selected mode.
C. ” ◄ ” button: - Press this button to exchange from minute to hour in scheduling or clock mode.
- Press this button to make the robot turn left.
D. ” ► ” button: - Press this button to exchange from hour to minute in scheduling or clock mode.
- Press this button to make the robot turn right.
- “
 ” Plan
• Press this button to enter scheduling mode when in selected mode or charging mode.
• Press this button to confirm scheduling in scheduling mode. - “
 ” Clock
• Press this button to enter clock mode when in selected mode or charging mode.
• Press this button to confirm the clock setting in clock mode. - “
 ” Home
When the robot is in selected mode or cleaning mode, press this button to return the robot to the charging dock.
6. “ ” Edge
Press this button to make the robot clean along the wall.
7 “ ” Spot
Press this button to make the robot start spot cleaning.
8. Shows the scheduling time.
9. Shows the clock time.
Note:
- Install two AAA-type batteries into the remote control.
- Take out the batteries if the remote control is not used for a long time.
Notice for Use
How to Get Started
- Place charging dock, plug-in the adapter, the signal light on charging dock will turn solid.

Note: put the charging dock against the wall and remove obstacles about 1 meter at two sides and about 2 meters forward. - Turn on the power switch around the power socket, then the display panel will flash.
(If no command received, the robot will turn to sleep mode after 15 seconds.)
Note:
A. Please always keep the power switch turning on. If not, it is unable to make the robot work.
B. If the power switch is turned off, all the scheduling will be lost.
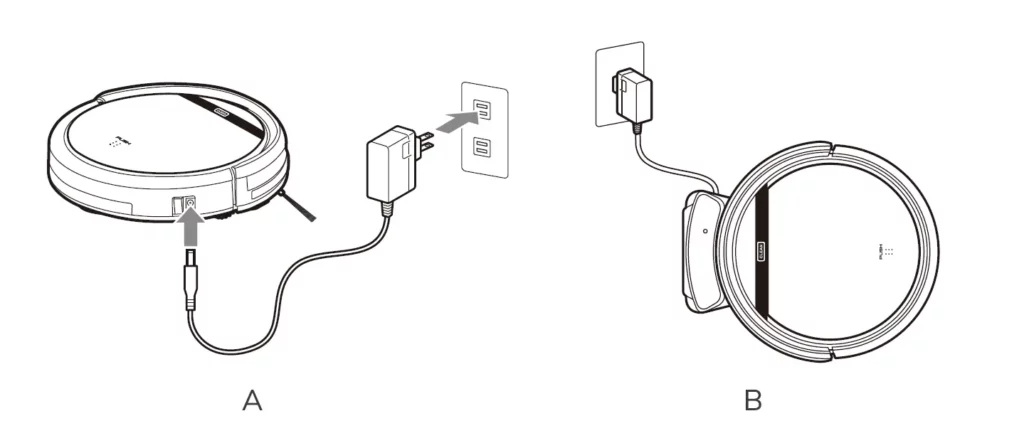
Caution: Before charging the robot, please make sure the power switch is turned on, or else the robot can not be charged. - Charge the robot in either way as shown below:
A. Plug into an outlet.
B. Press to make the robot return to the charging dock for charging itself.
For better extending battery life:
A. Before first use, charge the robot overnight. When charging is finished, the display panel will turn off.
B. In normal use, always store the robot on a charging dock with the base plugged in.
C. If the robot is not used for a long time, turn the power switch off, fully charge the robot and store it in a cool, dry place. - Auto charging
The robot will automatically return to the charging dock when the battery is low.
Starting Up/Pause/Sleeping
Sleeping mode: the robot is not working, lights around the CLEAN button are off and the power switch is on.
Selected model: the robot is not working, lights around CLEAN button flash.
Cleaning mode: the robot is working, lights around the CLEAN button are on.
Please refer to the form on page 9.- Starting up
A. Make sure the power switch is on.
B. Press the CLEAN button on main body or on remote control to start cleaning. I’
Note: If robot is in sleeping mode, press CLEAN button to wake the J.,.L robot up from sleeping mode. Then press CLEAN for a second time, the robot starts cleaning automatically. - Pause
Press CLEAN button on main body or on remote control to exchange robot from cleaning mode to selected mode.
Note: When robot is paused, press CLEAN to make robot to restart cleaning. - Sleeping
To turn robot into sleeping mode from selected mode:
A. Keep pressing CLEAN on main body for 3 seconds.
B. Robot will automatically enter sleeping mode if no command received for 15 seconds.
- Starting up
Scheduling
You can schedule to let the robot start cleaning from a certain time.
Note: Remember to set the clock time and schedule once replace the remote control battery. Once the clock time is set, any scheduling you have set will make robot work on the scheduled time.
Setting the clock time
- Point the remote control towards the robot (ensure the power switch is on).
- Press
 and then use directional buttons to set the correct time.
 - Press
 to save the setting. To cancel the schedule, please turn off the robot.
Setting a schedule
The robot will always work at the scheduled time unless power switch of the robot is turned off.
- Point the remote towards the robot.
- Press
 and then use directional buttons to set the schedule.
 - Press
 to save the setting. To cancel the schedule, please turn off the robot.
Note: When you set the clock time or schedule, the final operation will be confirmed by beep from robot; If no tone received, your setting is unsuccessful.
Cleaning Mode
- Auto cleaning
The robot will clean a room automatically and adjust its cleaning according to the situation.
Note:Press CLEAN button on robot or on remote control to start auto cleaning. - Spot cleaning
- Press spot on the remote toward the robot when the robot is working. The robot will circle around and turn into auto clean mode after spot clean is finished.
- Press spot on the romote towrad the robot when the robot is in selected mode and the robot will begin to circle around. The robot will turn into selected mode after spot clean is finished.
- Edge cleaning
Put the robot near the edge (wall) and press a on remote control to start edge cleaning.
Maintenance
Cleaning Side Brushes
Clean the side brushes when it gets dirty and replace them if it’s been damaged.
Note: Before replacing side brushes, check and match “L” and “R” marks on both and bottom of robot.
Cleaning Dustbin and Filter
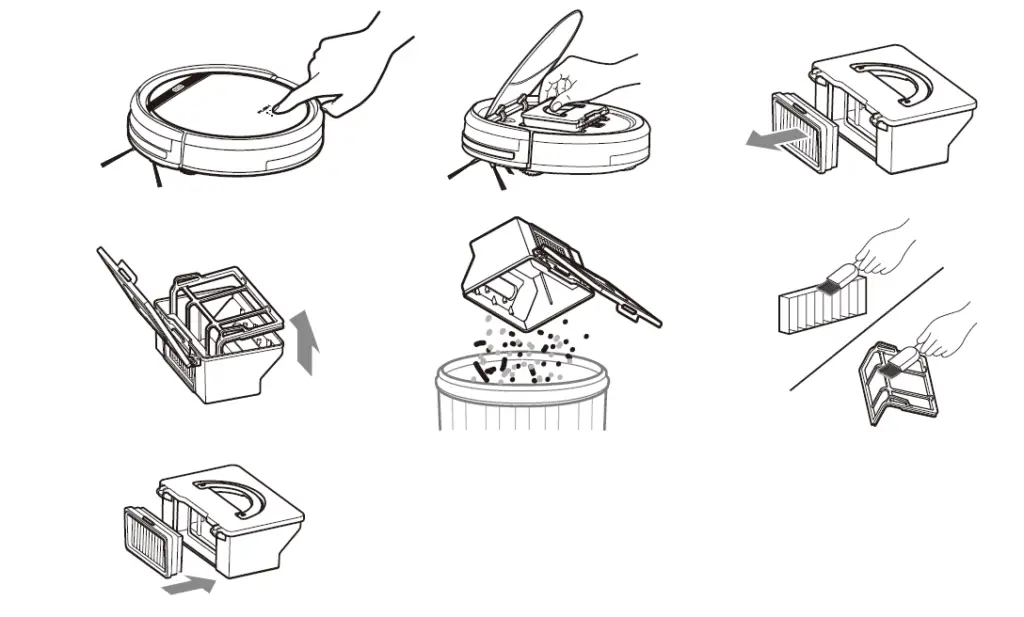
Clean and empty dustbin after each use, steps are as shown in below figures.
- After taking dustbin, check whether there is foreign matter stuck in suck passage and clean it.
- Clean Filter after 15-30 days’use. And replace it after use for 6 months at maximum.
- Install both Filter and primary filters when they are dry.
- Filter and primary filter could be replaced if needed.

Cleaning Cliff Sensors and Auto Charging Pins
Slightly clean the sensor window and onto charging pins with a soft dry cloth
Note: Charging pins on charging dock need to clean if dirty.
Nose Wheel Clean Up
When there is foreign matter in nose wheel, it will affect the cleaning performance, please clean it follow the way below:
- Pull the wheel up vertically and clean it. Please note whether the gasket is off.
- It should be noted that whether the gasket is installed well after clean the nose wheel.
Trouble Shooting
Error Code Sheet
When the robot meets with some routine troubles, it will remind you by beep.
Short tone
| 01 | • | Wheels or side brushes no work | Check wheels or side brushes |
| 02 | • • | Cliff sensor or bumper sensor failure | Clean cliff sensor and shake bumper slightly , check
whether there is foreign matter |
| 03 | • • • | Main body gets stuck | Move main body and start again |
Error Appearance
| Circle around a small area | Side wheels are jammed | – Remove hair and debris from side wheels.
– While reinstalling, push the wheels in and out to make sure they can rotate freely. – Restart robot in another spot. |
| Keep moving Cliff sensor is dirty Check the cliff sensor lens. backward or broken Clean or replace it if needed. | ||
| Bump into obstacles repeatedly | The bumper is stuck | – Tap the bumper 10-20 times to remove debris lodged in it.
– Loosen the screw of the bumper. |
| Working time shortened | – Battery capacity dropped
– Robot is not fully charged |
– Replace battery
– Recharge robot |
| CLEAN button light is off while charging | – Hair or small debris stuck in charging pins.
– Robot is not properly connected to charging pins. |
– Clean charging pins
– Check if robot is connected to charging pins |
| Pick up less dirt and debris | Filter is dirty or wet | Clean or replace filter |
| Spit out litter | Dustbin is full | Empty the dustbin |
| Robot doesn’t start at scheduled time | – Schedule was not saved successfully
– Schedule was cancelled after you restarted robot – Power Switch is off – Battery is low – Debris jammed in components |
– Reset schedule. Wait for a beep to confirm completion of scheduling.
– Turn on power switch on robot – Keep the robot’s power switch on and put it on charging dock to make sure robot is fully charged for the next job – Turn off the power switch on robot and empty the dustbin – Clean side brushes and main brushes |
| Diameter | 300mm | |
| Mechanical
Specifications |
Height | 81mm |
| Weight | 2.2kg | |
|
Electrical |
Power | 22W |
| Specifications | Battery type | Li-ion |
| Dustbin capacity | 0.3L | |
| Charging type | Auto Charging/ Manual Charging | |
| Cleaning
Specifications |
Cleaning mode | Auto, Spot, Edge, DailySchedule |
| Charging time | < 300 mins | |
| Cleaning time | > 90 mins | |
| Main Body Button Type | Touch button | |
