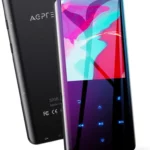
AGPTek Longevity Music Player
A18 User Manual

Please contact us via [email protected], when anything comes to your mind, we urge to turn this little thing into the best music player in the world and in your hand.
Quick Guide
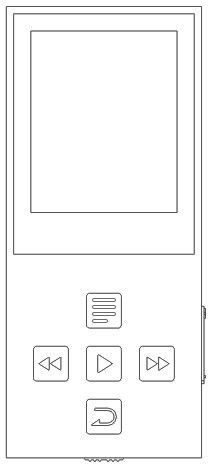
Plug earphones into the jack on the bottom right of your device then slide the power switch to the right to turn the player on.
Each time you tap the button
and EBook.

When it’s on music/FM radio/recording playing interface, tap the button to back 
Power On and Off
Turn the slider switch (Main Power) at the bottom of the player to to right.
- Standby mode. While the slider switches in ON position, pressing the central button for about 3 seconds to turn off your player. Please kindly note, the device is not really powered off but fallen into standby mode, and the battery will be consumed still. To turn off your player totally, please turn the slider switch(Main Power) at the bottom of the player to to the left.
- If you have been fallen into standby mode with the slider switch in ON position, you can wake up the unit by pressing the center button for three seconds.
Note: If you cannot switch the player on, please make sure the slider switch is in ON position (right side).
Charging the Battery
- Plug one end of the provided micro USB cable into the USB port of a computer, plug the other end into the micro USB port on your device. It will start charging automatically.
- You can also charge the device via chargers. Please kindly note that the chargers should meet standards: input: AC110-240V 50/60Hz Max: 100mA; output: DC5.0-5.5V 500mA-800mA.
Transfer Files to Your Player
- Connect your device to the computer with the enclosed micro USB cable the mp3 player will show up as a removable disk as soon as the computer recognize it and then just drag files into the mp3 player. If your computer cannot recognize the player, the enclosed Micro USB lead may have a problem please use another Micro USB lead to connect it to your PC.
- When your device is shown as a removable disk, you can put the files saved on your computer to your player. When the slider is “off” the unit will power up when connected to a USB port, and then go dead when disconnected. Slide the switch of the opposite position it will power up OK.
Play Your Music
Selecting the Music icon on the main screen with a central button, and then a related list will show as “All songs”, “Artist”, “Albums”, and “Genres” etc. Choose and adjust according to your need.

- Return to the main screen
When the player is on the music playing screen, there are two ways for you to return:
• Press the menu button, a related list will show with the item “Back to Home”, choose it and then you will return to the main screen
• Press the back button to return to the last grade, then tap the button
- Rewind/Forward
– Hold button
– Hold the button
– Tap the central button to play or pause. - Volume Adjustment
Press and hold the button +/- to adjust the volume. - Resume Playback
• Resume/Now playing option
- When you have back to the main screen and start another application, the next time you enter “Music”, you will find the item “Resume” or “Now playing”, choose them and then tart playing from where you left off.
• Resume with power on/off
Press the back button to exist from the main playing screen and hold the central button for three seconds to turn the player into sleep mode, the next time you wake up the player it will start playing from where you left off last time. - Submenu
• Shuffle and Repeat
When you are on the music playing interface, tap the menu button to access to its submenu, and then choose the item “Shuffle” or “Repeat” according to your need.


Note: if you play the song through “Music”, it will only shuffle/repeat the songs in the folder in which your music is included. If you play the song through “Folder”, it will shuffle songs by folder and repeat as you set.
- Add Bookmarks
When access to the submenu, choose “Bookmarks” with the option “Add bookmark” from the list that appears.
1) Bookmarks are marked by the stopping time as “hh:mm: ss”.
2) Maximum number of bookmarks supported by each audio file is 10. Addition bookmarks will override the ones set previously.
3) To find saved bookmarks, select “go to bookmark”, found under item “Bookmarks”.
Select “Delete bookmark” to delete it. - Language learning
- Choose “Repeat mode” to access to its function, and the icon for A-B indication will appear on the playing screen.
- Starting time for the replay is confirmed while tapping the button
- Tap the button
- Tap the button again to back to normal playing.
•The player will fall into sleep mode as you set in “Sleep timer”
•Choose “Rock”, “Funk”, “Classical” etc. in “Equalizer”, and you can also custom the effect according to your need.
•The player will start playing indifferent speed according to your settings in “Speed”.
•Add the music file to the playlist in “Add to playlist”.
Play by Bluetooth
Please kindly note turn your BT device on pairing mode before connecting.
Select the “Bluetooth” icon on main screen with central button to enter its function. Make sure that the BT device is on pairing mode. (Please kindly note that for some Bluetooth speakers and lots of Bluetooth headphones, only when the LED flash red and blue at the same time, it is under pairing mode)
- The screen will display as “please wait” > “Searching” > “Bluetooth Connected”. Then play the music files as you want.
Note: the playlist is not supported under BT mode. - Please kindly note you can’t rewind or forward under BT mode, and there is a BT icon on top left corner of the screen.
- If your BT device can’t be connected with the player, please kindly check under the “Bluetooth device list”, find and choose your BT device, and then start connecting.
- If the Bluetooth feature does not work on your player please contact us for help:
FM Radio
Select the “FM radio” icon on the main screen with a central button to enter its function.
- Manual tune and Autotune
When choosing “Manual tune”,tap the button
When choosing “Autotune”, it will start searching automatically, and the searched stations will be saved under “Stations”. - Set via submenu
While on the radio playing screen, press the menu button to access to its submenu. Then a related list will show as “Bluetooth link”, “Save to preset”, “Tuner region” etc. Adjust according to your need.
Please kindly that you need to turn your BT device on pairing mode if you choose “Bluetooth link”. Choose “Search” and find your BT name, then tap and connect it with your player. When it’s connected, you can enjoy listening radio via the BT device. - Start FM recording
Choose the item “Start FM recording”, and then tap the back button to with the option “Yes” to save it.
Tap the item “FM recording” to play the saved recordings you saved.
Recordings
Select the “Recordings” icon on the main screen with a central button to enter its function.
The following functions are displayed: “Start Voice Recording”, “Recordings library”,
“Recording Format” and “Record Settings”.
– Select a format from MP3 and WAV
– Select the bitrate according to your need under “Record Settings”
– Select “Track AVR mode” under “Record Settings” and then it will start recording automatically once it’s waked up by the sound
– Scroll to “Start Voice Recording” to start your recording
– To pause or stop recording, press the central button
– To save, press the back button and then select an answer, yes to save
– To play, go to “Recordings Library” and play as music
Folder View
Select the “Folder View” icon on the main screen with a central button to enter its function.
Tap the button
Tools
Select the “Tools” icon on the main screen with a central button to enter its function. Then a related list will show as follows “Video”, “Calendar”, “Stopwatch” and “Alarm”.
- Video
– Tap the central key for Playing/Pause
– Hold button
– Hold the button
– Back to the menu: while in the video playing screen, tap the back button and then tap the button
– Tap the menu button to enter into its submenu, and then a related list will show as
“Brightness” and “Repeat” etc. Adjust according to your need.
Note: The product only supports 160*128 videos, you may convert video files to this format by the tools included in the device.
![]()
- To use the “am transform” included in the device Install the program on your computer first, and then press the icon
 to choose the file you want to convert on your computer, and choose the icon


- Calendar
Tap the central button to enter its function. And then tap the button to choose among year/month/day, tap the menu/ back button to choose different values. - Stopwatch
Tap the central button to enter its function. There are 5 preset options for you. Tap the central button to enter it.
– Tap the button

– Tap the button
Alarm
Tap the central button to enter its function. And set the alarm time/cycle/music and volume according to your need.


Pictures
Select the “Pictures” icon on the main screen with a central button to enter its function. Tap the button
When it’s on the picture playing interface, tap the menu button to access its function, and then adjust according to your need.
E-Book
Please note: Only the “txt” format is supported for eBooks.
Select the “E-Book” icon on the main screen with a central button to enter its function.
Tap the button
Tap the button 
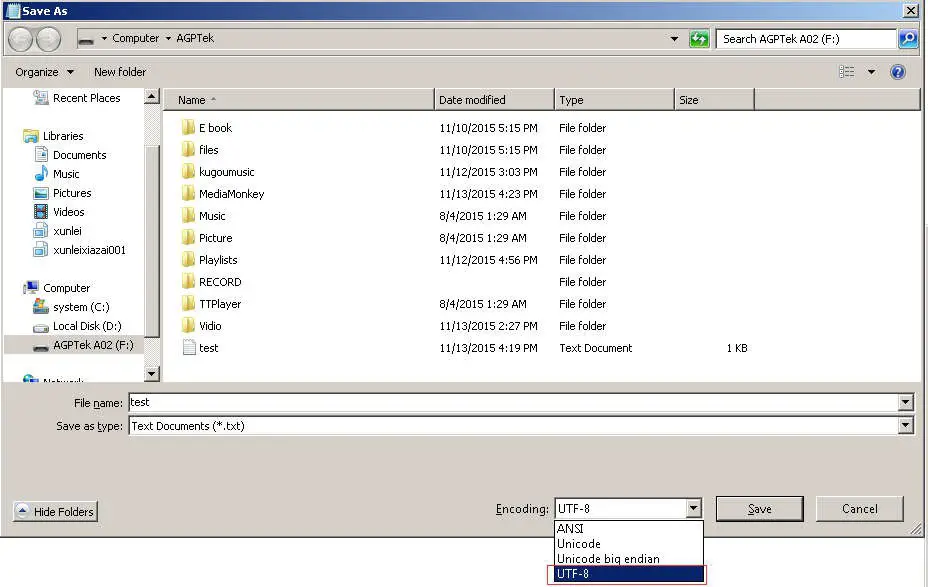
Please note: if you can’t read your text document through Ebook, connect your player to the computer, and then choose the file for the item “save as”, select the code as “UTF- 8” and save. Copy the text file to the E-Book folder and it will back to normal condition for your reading.
Please note: if you can’t read your txt document through Ebook, connect your player to the computer, and then choose the file for the item “save as”, select the code as “UTF- ” and save. Copy the txt file to the E-Book folder and it will back to normal condition for your reading.
Support and Troubleshooting
1. How to use the playlist
- To use the preset playlist.
Press the button and then choose the option “Add to playlist” for the song you want to operate. There are 3 items prepared for you, including “Playlist on the go [1]”, “Playlist on the go [2]” and “Playlist on the go [3]”, you can add the song to any one of these three as you like. - To create the playlist by yourself
Editing Playlist by media player could be painful, no matter by iPod or others. There is a free program called Media Go. It’s the easiest program to use for transferring playlists to AGPTek. Just create your playlists in Media Go and then right-click its name and select ‘Add playlist to X 🙁 Which is your MP3 player’s disk) ‘. (You can download it at http://mediago.sony.com/enu/)
After sending your playlist and music to the player, you may find it in “Music”.

2. If the device is frozen, turn it off and then restart
3. If the device doesn’t turn on
- Turn the slider power switch to off (left).
- Connect the player to your computer.
If the player still can’t be used after charging, please contact our customer service.
4. Serious Noise
- Dirt will cause noise. Inspect the headset and clean if necessary.
- A damaged music file may cause serious noise. Try another song to test.
5. No sound was heard from the headset
- Please check whether the voice volume is setting up at 0.
- Please check if there is any problem with the headset connecting.
Specifications
| Weight | 39.5g |
| Material | Plastic |
| Capacity | 8 GB (supports up to 64GB) |
| E book | TXT |
| Video format | WMA (160*128) |
| Picture format | BMP/JPG |
| Music format | MP3、WMA、APE、FLAC、OGG |
| Recording format | WAV, MP3 |
| Dimension | 92mm×40mm×11mm |
| Battery | 700 mah lithium-ion rechargeable battery |