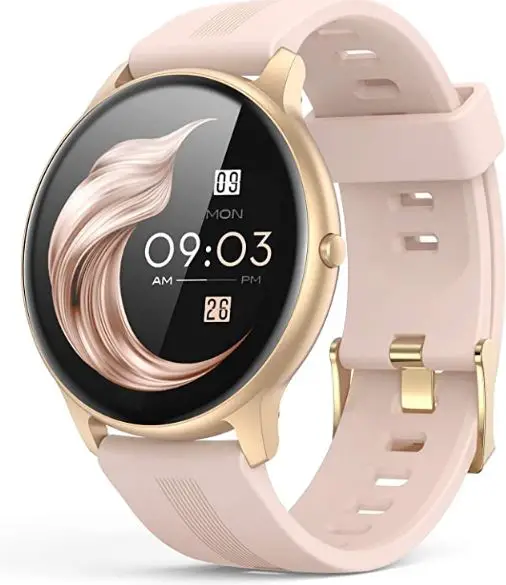
AGPTEK LW11 Smartwatch

AGPTEK LW11 Smartwatch
Thanks for choosing this product. Please read this [user manual] carefully before use and keep it for future reference. Any problem about this product, please contact us at [email protected].
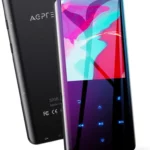
PRODUCT OVERVIEW

| 1. Touch Screen | 4. Optical Sensor |
| 2. Power Button | 5. Charging Point |
| 3. TPU Straps | 6. Strap Slot |
Note: Long press the power button to turn on/off the watch.
INSTALL WATCH

- One side of the spring bar should be inserted into the hole of your watch at first.
- Simply slide the pin with your finger.
- Point to the other side of the spring bar at the other hole of your watch.
- Release the pin and attach the strap.
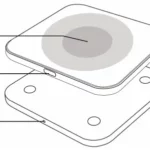
CHARGING WATCH
Attach the supplied magnetic charger to the charging contact on the back of the watch, and insert the other end of the charger into the USB wall charger or USB interface of a computer.
Note:
- Install your watch first, and fully charge your watch before use.
- To ensure smooth charging, please put the watch face down during charging. Charging time: about 2 hrs.
DOWNLOAD APP

- Scan the left QR code.
- Find [Settings] > [QR Code] in Watch. Then, tap it & scan the QR Code with the phone.
- Download “FitCloudPro” from “Apple store” or “Google play store” (Android App store).
http://fitcloud.hetangsmart.com/qrcode/
Note: Mobile phone must support Android 5.0 or above, iOS 9.0 or above, and Bluetooth 4.0+.
BINDING
⦁ FIRST CONNECTION
- For first use, open App “FitCloudPro”, register and log in.
- Follow the instruction of App to start binding the watch. Click [Search Now], and the smartphone will start searching for devices for about 10s that can be connected.
- After a successful search, select and click “LW11-xxx” to complete the connection. There are two situations:
1) iOS: A pairing request will appear, just click “Pair” to connect.
2) Android: No pairing request, directly connect.
⦁ SECOND CONNECTION
Open App, go to [Device] > [+ Add Peripheral Now] > [Search Now]. Follow the above [FIRST CONNECTION] steps 3 to complete the connection.
BASIC OPERATION

MAIN MENU
⦁ SPORT DATA
Record your steps, walking distance & burned calories on that day. They also can be viewed after syncing to the App.

⦁ SPORTS
Swipe up/down to cycle through 8 different sports (Running/Hiking/Swimming, etc.), and select one of your favorite sport and tap it to start. Find the sports data on the [Sports Record].

⦁ HEART RATE
On the heart rate interface, it will enter into real-time monitoring. Swipe up to get the analysis chart of your heart rate. And it can also be viewed in App after syncing.

⦁ SLEEP
Record your sleep from 21:00 pm to 12:00 am. Sync and update the data to “Sleep” in App by manually pulling down the “Home” page of App.

On the blood pressure (BP) or blood oxygen (BO) interface, it will automatically detect your blood pressure or blood oxygen until the vibration is felt, which indicates completing the measurement.

⦁ MUSIC
After connecting the watch and App, tap Music in the main menu to access its functionality. Tap pause, play, forwards, or backward icons to control the songs on your phone. Swipe right on the screen to exit.
Note: The music interface will not switch during operation, but the watch will vibrate to remind you after you have operated.

⦁ WEATHER
Display the current weather. Only the watch connects successfully to the App, the weather information will be shown or updated on the watch. Note: The App should be allowed to access into GPS & Internet of your phone

⦁ STOPWATCH
On the main menu, Tap it to access its function, and a new interface displays. Tap![]()
![]()
![]() to resume. Exit the stopwatch by swiping right on the screen.
to resume. Exit the stopwatch by swiping right on the screen.

⦁ TIMER
With 8 timers + a customized timer. 8 Timers are 1M, 3M, 5M, 10M, 20M, 30M, 1H, 2H. Tap one of the timers you want to start. Then, follow the peration of the stopwatch to use the timer.

⦁ MESSAGE
Find a message on the main menu or swipe up the main interface to quickly access to Message. All notifications of your phone will be automatically synchronized to the watch after a successful connection between watch and App (Ensure enabling all message reminding in App). Swipe up or down to switch messages. Tap the message you want to check to view the whole content of the message.

⦁ FIND PHONE
Tap Find Phone in the main menu or find its icon by swiping down the main interface to start searching for your phone. When searching successfully, your phone will vibrate or give a ringtone (According to your settings).

⦁ SETTINGS
Tap Settings in the main menu or find its icon by swiping down the main interface, to access its functionality. A relative list will show Display, Vibration Intensity, Language, QR Code, System.

– Display. Set Dial Switch, Brightness, Screen Time, Turn Wrist Wake.
1. Dial Switch.
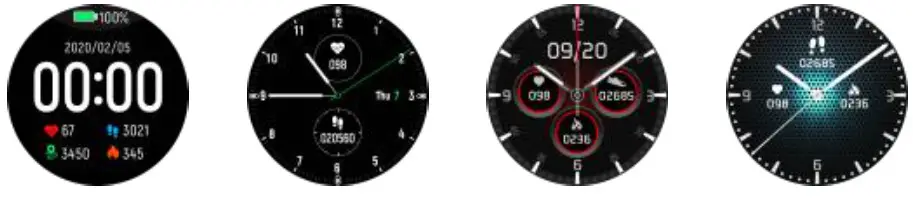
- Watch 4 Built-in Dials. Tap Dial Switch in the main menu or long press the screen on the main interface to enter. Swipe left/right to switch and tap one of your favorite dials to confirm.
- App: Find [Device] > [Watchface] > [Watchface Store], and click the first one dial to start editing. Then, select your favorite picture as the background of the main interface and customize it according to your preference. Your set watch face can be found in [My Watchface] quickly.
- Brightness. Tap Brightness in the main menu or find its icon by swiping down the main interface to access its functionality. Tap + to increase the the brightness of display; Tap – to decrease it.
- Screen Time. Automatically turn off the screen display when reaching the set time (5-9s). Swipe up or down to switch the time, and tap ✔ to confirm your settings.
- Turn Wrist Wake. Set the time(2-6s) of the screen display when you lift your wrist. Swipe up or down to switch the time, and tap ✔ to confirm your settings. Besides, App can set its beginning time and end time.
– Vibration Intensity. Set the intensity of vibration reminder (0-3), and tap ✔ to confirm your settings.
– Language. After a successful connection, the watch will automatically recognize and sync the language of App. If want to make your watch language differ from App, just find Setting > Language in the watch, to set the language of watching alone.
– QR Code. Tap it and scan the QR Code with your phone to download “FitCloudPro”.
– System. Includes: About, Shutdown, Reset.
Display
- About. Display the basic information: Bluetooth Name, Mac Address, Software Version, UI Version.
- Shutdown. Turn off the watch.
- Reset. Reset your watch.
ATTENTIONS
- DON’T use over 5V/2A power adapter to charge it.
- This device is an electronic product, not for medical reference, so the detected data (Especially for blood pressure and blood oxygen) is for reference only.
- Blood pressure monitoring method: Quiet rest for over 5 minutes before monitoring. Do not eat, smoke, take medicine, and drink coffee for 2 hours before monitoring.
- Monitoring process: Take a comfortable, restful sitting position and keep your mind easeful. Forbidden to speak. Place the watch is at the same height as your heart (as shown on the left).

- With IP68 waterproof, sweatproof, and rainproof, it can be used directly in daily washing, shower (cold water), and other daily environments.
- Do not use in the bath, sauna, hot spring, or other environments with corrosive liquid and hot steam, which will lead to product failure.
- Don’t operate the watch underwater.
- Do not wear the watch to deep dive.

FAQ
⦁ Why the measurement of blood pressure is inaccurate?
Affected by the external environment and the skin color of the individual, so it is only used to monitor changes in blood pressure, which can not really monitor the blood pressure of patients with hypertension.
⦁ Why can’t I receive the notification?
- Android: When you turn on the QQ/ Wechat reminder for the first time, the App will get the corresponding permissions automatically.
- iOS: (Call, SMS, SNS) When the reminders in the App are turned on, your phone will automatically pop up the accessing request, you just need to select OK.
SPECIFICATIONS
| Waterproof level | IP68 |
| Sensor | 3 Axis G-sensor |
| Sync method | Bluetooth |
| Resolution | 240*240 |
| Display | 1.28” TFT Full Touch Color Screen |
| Working time | About 8-10 days |
| Working Temperature | -10℃~50℃ |
| Compatible Systems | IOS 9.0 or above; Android 5.0 or above |
FAQ’S
How to connect with my phone?
You can search “FitCloudPro” in the app store. Install it on your phone. Then, follow the instruction to connect.
How to reset the watch?
Long press the power button for 3 seconds to reset the watch.
How to change the language?
Long press the power button for 3 seconds, then choose [Language] and select your language.
How to sync data?
Open FitCloudPro app on your phone. Choose [Sync] in [Main Menu]. Then, connect your watch and phone with Bluetooth. Wait for a while, then sync data will be completed.
How to use heart rate monitor?
You need to install an App named “Heart Rate Monitor” on your phone firstly. Then you can use this function by wearing the heart rate monitor band and watch together. Note that this function is only available when you are doing exercise or sports activities. It will not work if you are just sitting still or walking slowly. If you want to use this function, please check whether your heart rate monitor band is connected with your watch properly before using it. If it is not connected, please check whether both of them are charged enough and restart them again after charging them fully. If they are still not connected, please contact our customer service center for help ([email protected]).
What should I do if my smart watch doesn’t work when I charge it?
Please make sure that the smart watch is charged enough before using it for first time, and fully charge it before next use. If it still doesn’t work properly after charging fully, please contact our customer service center ([email protected]) for help as soon as possible so that we can offer you a good solution as soon as possible.
How do I connect my LW11 smartwatch?
BINDING
For first use, open App “FitCloudPro”, register and log in.
Follow the instruction of App to start binding the watch. Click [Search Now], and the smartphone will start searching for devices for about 10s that can be connected.
After a successful search, select and click “LW11-xxx” to complete the connection.
How do I connect my Agptek smart watch to my phone?
Scan the QR code(Shown on the left). Find [Settings] > [QR Code] in Watch. Then, tap it & scan the QR Code with phone. Download “OnWear” from “Apple store” or “Google play store” (Android App store)
How do I turn on Bluetooth on my Agptek smartwatch?
Connect the bracelet to the app on your phone
Power on Charge or long-press the touch key for 3 seconds, and the bracelet will be powered on and a pairing code will be displayed on the screen to identify the bracelet.
How do I setup my smart Watch?
First, you’ll need to download the Android Wear app(Opens in a new window) on your smartphone and turn on your smartwatch. If your watch doesn’t have a physical button, like the LG G Watch, place it in the charging cradle while power is connected. You’ll also want Bluetooth enabled on your smartphone.
Why is my smartwatch not working?
Your smartwatch may not work due to a lack of battery life, physical damage to the watch or charger, or unclean charging ports. These are the three most common reasons your smartwatch won’t work. It is essential to identify the root cause of the problem.
Can I use a smartwatch without a SIM card?
Most smart watches will still function without a SIM card if the operations don’t require connectivity such as tracking or monitoring activities, telling time, or other similar actions.
AGPTEK LW11 Smartwatch
www://agptek.com/index.php/product/