AKASO Wire-Free Security Camera CS300 User Manual
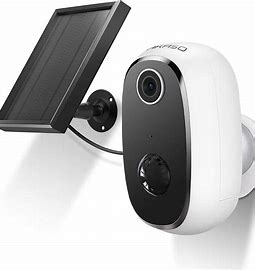
WHAT’S IN THE BOX
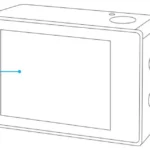
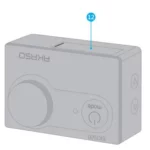
CAMERA INTRODUCTION

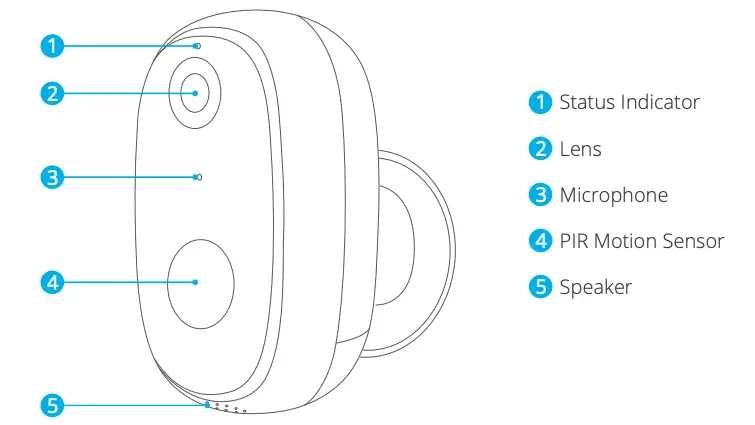
Note: (7) (8) (9) (10) are under the rubber plug and the rubber is for waterproof.

INSTALLATION
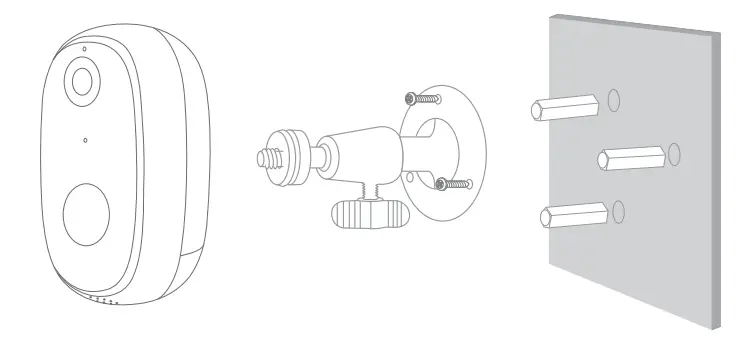
- Bracket Installation
Drill three holes on the wall or ceiling, insert bolt into the hole and tighten to fix the device. Put the camera on it and adjust the direction.

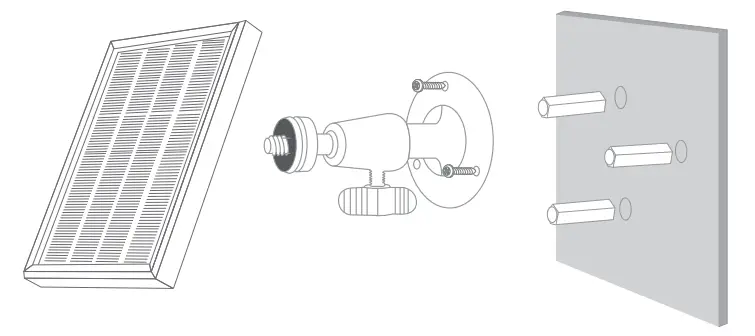
- Solar Panel Installation
Drill two holes and insert screws. Align the hole on the back of solar panel. The solar panel also can be placed on horizontal plane with two feet. Put the camera on it and adjust the direction.
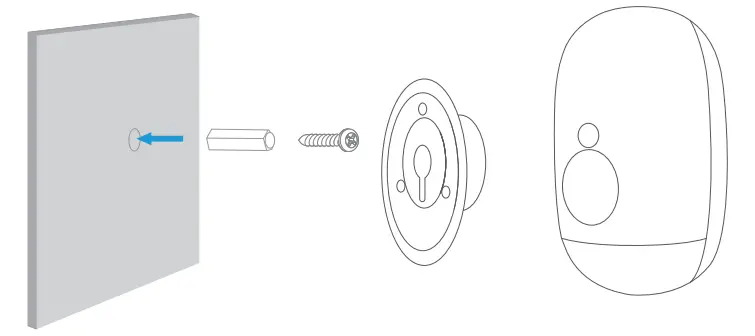
- Magnetitic Bracket Installation
Drill one hole and insert screw. Align the hole on the back of magnetitic bracket. Put the camera on it and adjust the direction.
Note: Camera can be charged through both USB cable and polar panel.
SET-UP
- Install Phone App
Search for “Smart Life” app in App Store/Google play, or scan the QR code below to download.
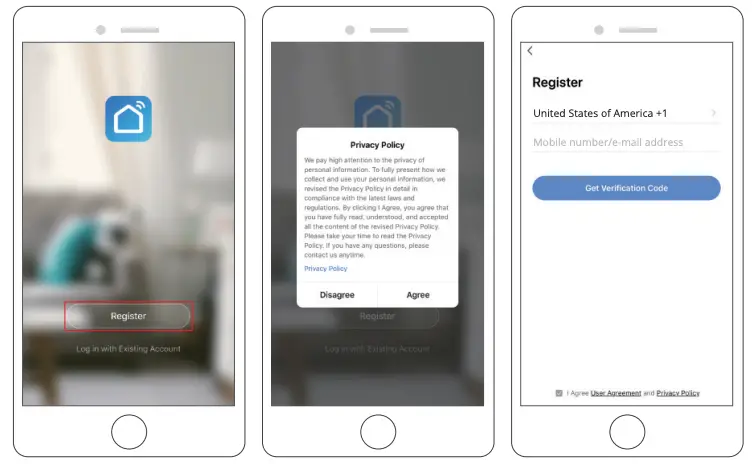
- Get a New Account
If you already have an account for Smart Life, please log in your account and skip to step 4.- Open “Smart Life” app to click “Register → Agree”. Choose country/region, fill in the mobile number or Email.
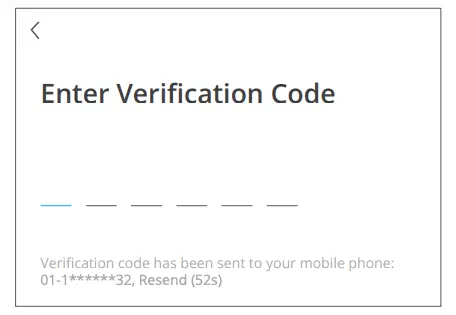
- Fill in email address or phone number, a verification code will be sent, please get it and fill it in.

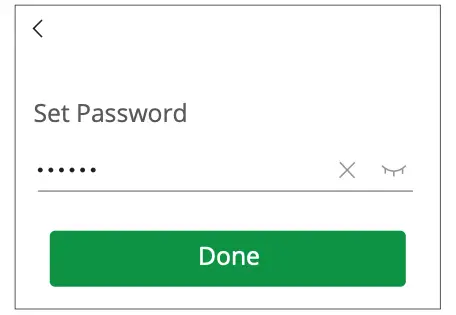
- Then set password, click “Done”.
- After registering the account, you need to add home information, click
 “(at the left bottom)”, enter the “Home Management”, click “Add Home” and fill in Home name, location, add rooms, then click “Save” to add successfully.
Note:- E-mail address or mobile phone number should be valid.
- The length of password must be within 6-20 characters, no special characters included.
- Please choose the same country in register and login.
- If you forgot the password, click “Forget Password” to reset it.
- Open “Smart Life” app to click “Register → Agree”. Choose country/region, fill in the mobile number or Email.
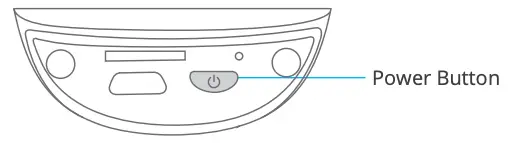
- Power on Camera
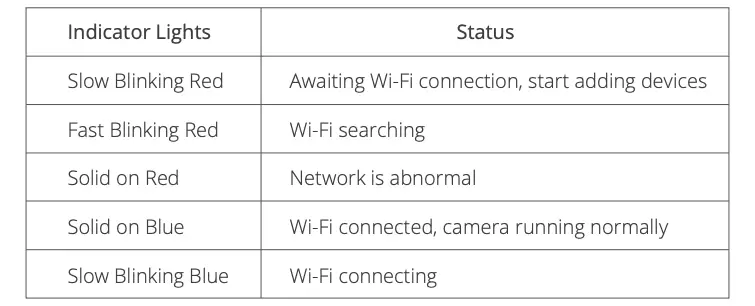
Press and hold the power button for 5 seconds to turn on camera. (If it cannot be power on, plug in DC5V 1A/2A power adapter to charge the camera for 15 mins first.) The camera is started successfully when the indicator light blinking slowly.
Note: DC5V 1A/2A power adapter is not included in packing list. - Add Your Camera
- Bring the camera and your phone to the router within 1 to 3 feet (30 to 100 cm) and connect Wi-Fi.

- Follow the instructions to ensure that the camera is activated. (The indicator light is turning red and flashing slowly.)
- Choose Room, click “Add Device → Video Surveillance → Smart Camera → next step → Enter Wi-Fi Password → Confirm → Continue”.

- A QR code will be shown, just face the phone to the camera, after hearing the beep, then click “I heard a Prompt”, see below picture.
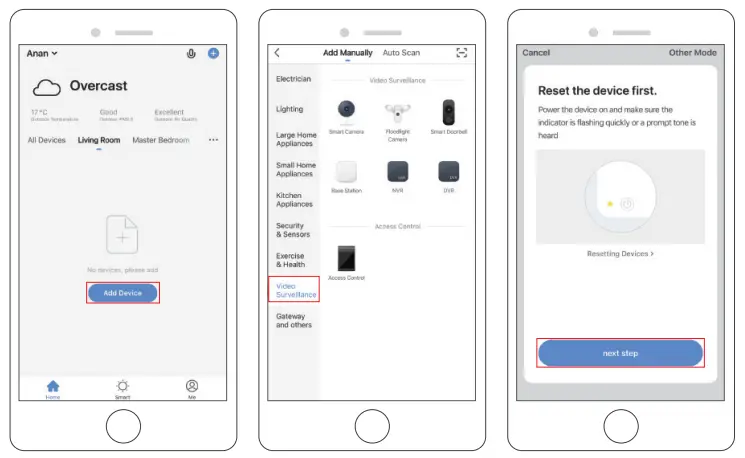
- Wait for the connection for about 30s, the device will be added successfully. Name your camera and click the room where it is, click “Done”.

- Click camera icon to preview camera live video.

- Bring the camera and your phone to the router within 1 to 3 feet (30 to 100 cm) and connect Wi-Fi.
USE THIRD PARTY DEVICES TO CONTROL
Note: If you have downloaded “Akaso Smart” to link your cameras, please remove cameras linked to Akaso Smart account and download “Smart Life” to link your cameras again. (More details, please refer to the procedure “SET-UP”.)
1. Use Amazon Echo To Control
a. Configure the Amazon Echo device
(If you have already configured Amazon Echo, you can skip this step. The following instructions are based on the iOS client.)
① Make sure your Amazon Echo device is powered on and connected to a Wi-Fi network.
② Open the Alexa app on your phone. After successful login, tap on the menu in the upper left corner of the Home page, select “Settings” and tap “Set Up A New Device” to set up the Amazon Echo.
③ Choose your Amazon Echo device type and language for connecting. Press and hold the small dot on the device until the light turns yellow. Then tap “Continue” to connect to the hotspot.
④ After connecting to the Amazon Echo hotspot, return to the page. At this point, the connection is successful. Tap “Continue” to proceed to the next step. Choose a Wi-Fi network to connect to. Amazon Echo will take a few minutes to try to connect to the network.
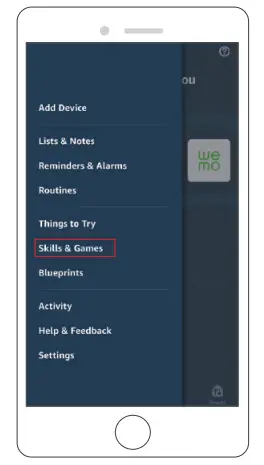
b. Key step – link Skill
① Tap on “Skills” in the Alexa app menu.

② Then search for “Smart Life”. Tap “Enable to use” to enable the Skill.

③ Enter the Smart Life APP account and password, then tap “Link Now” to link your Smart Life account to enable the Skill. Continue and tap “Discover the device” to add your camera into the list. Then you can start your smart home journey.
2. Use Google Assistant To Control
a. Configure Google Home device
(If you have already configured Google Home, you can skip this step. The following instructions are based on the iOS client)
① Make sure your Google Home device is powered on and connected to a Wi-Fi network.
② Open the Google Home app on your phone. After successful login, tap on the menu in the upper left corner and select “SET UP” to set up Google Home.
③ It will notify you with a sound to ensure that you are connected to the correct device. After you hear the sound, tap “YES” to proceed to the next step.
④ You can choose to differentiate the room where Google Home is located from other Google devices. Then, select the Wi-Fi network and language, wait for the system to complete the configuration, and tap “next”.
⑤ According to the page prompts, choose whether to agree to the corresponding operation. When the page displays “Google Home is ready”, select “continue” to continue to the next step.
⑥ Next is the voice control guide tutorial. Once you’re done listening, tap “FINISH SET UP.” At this point, Google Home setup is comple.
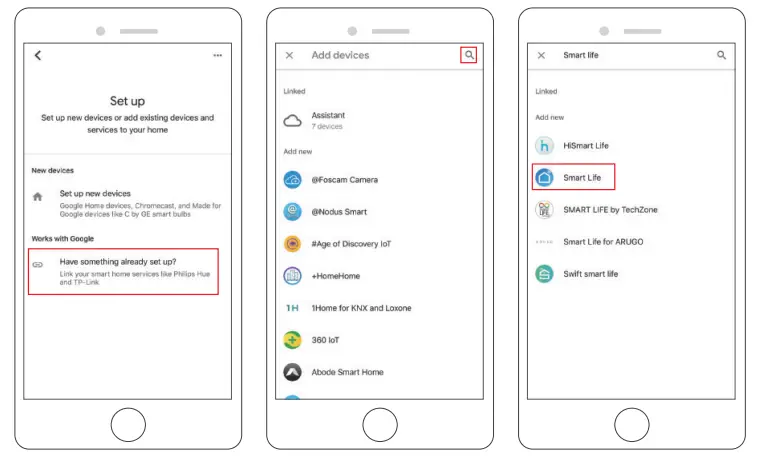
b. Key step – link Action
① On the main page of the Google Home app, tap the sidebar menu in the top left corner and select “Set up device”.

② Then tap the bottom “Have something already set up?” and search for “Smart Life”.

③ Find Smart Life on the list and open it, select the country where your Smart Life app account is located, enter your Smart Life app account and password, and tap “Link Now”.

④ Enter the Smart Life app account and password, then tap “Link Now” to link your Smart Life account. Choose the room where your device is located, and then the skill will appear on the Home Control Devices list. Now you can begin your smart home journey.
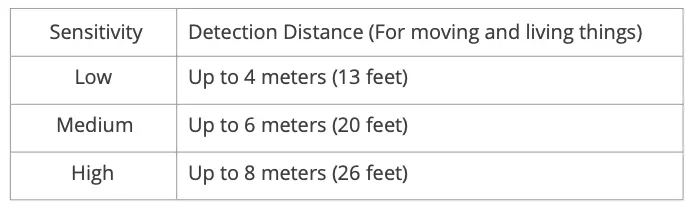
ADJUST PIR DETECTION DISTANCE
PIR “Body Detection” is on by default and the default sensitivity is “Mid”, but it is adjustable. “My Device” – The detecting distance is 6 meters (20 feet).

Note: Higher sensitivity offers longer detecting distance, but it would lead to more false alarms. You are advised to set up the sensitivity level to “Low” or “Medium” when you install the camera outdoors.
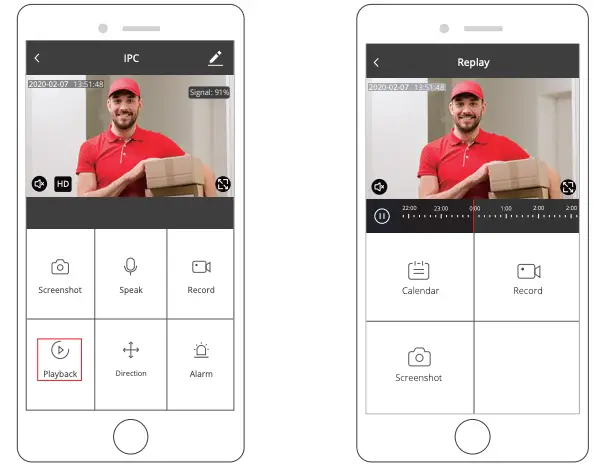
ALARM PUSH NOTIFICATION AND PLAYBACK
Battery camera with PIR sensor is not designed for 7*24 all day recording, but aims at pushing alarm message notification to app and record video to microSD card when PIR sensor detected human body motion events, then you can playback the motion videos wherever you are via Smart Life.
When PIR triggered, camera and system actions:
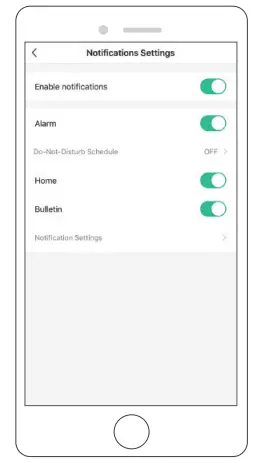
- Alarm Sound in App (please open permission for Smart Life notification in mobile setting and turn mobile volume on).
- Alarm Message Notification (Please enable Smart Life notification in mobile setting).

- Alarm snapshot and video will be recorded on microSD card (please insert microSD card) or Cloud storage.
BATTERY MANAGEMENT
- If the battery capacity is less than 20%, the app will send an alarm message to remind you to charge in time.
- You can charge the camera with DC 5V/1A power adapter
- If your battery is consumed too quickly, the possible cause is that the camera is woken up too frequently. It is recommended to lower down the “Body Detection” sensitivity or turn it off occasionally.
IMPORTANT NOTES FOR REDUCING FALSE ALARMS
- Do not install the camera in a position facing any objects with bright lights, including sunshine, bright lamp lights, etc.
- Do not place the camera too close to a place where there are frequently moving vehicles. Based on numerous tests, the recommended distance between the camera and vehicle is 15 meters (55 feet.).
- Stay away from the outlets, including air conditioner vents, humidifier outlets, the heat transfer vents of the projects, etc.
- Do not let the camera facing the mirror.
- Keep the camera at least 1 meter away from any wireless devices in order to avoid wireless interference, including Wi-Fi router and phones.
- When installing the camera, it’s not suggested to make the PIR sensor vertically face the moving objects, otherwise it may not detect the motion event. It is suggested to make the angular between PIR sensor and detected object larger than 10 degree.
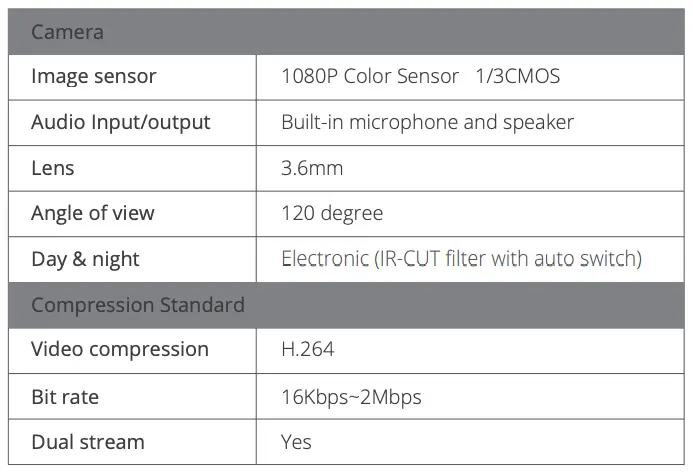
SPEC DATA
TROUBLESHOOTING SHEET
CONTACT US
For any inquiries with AKASO products, please feel free to contact us, we will respond within 24 hours.
E-mail: [email protected]
Tel: (888) 466-9222 (US) Mon-Fri (except holiday) 9am-5pm (EST)
Official website: www.akasotech.com