![]()
Quick Start Guide
Safety Information
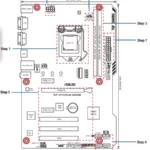
- Before installing the device on a motherboard, carefully read all the manuals that came with the package.
- To prevent electrical shock hazard or short circuits, switch off the power supply before installing the device on a motherboard or connecting any singal cables to the device.
- If the device is broken, do not try to fix it by yourself. Contact a qualified service technician or your retailer.
- Before using the product, make sure all cables are correctly connected. If you detect any damage, contact your dealer immediately.
- To avoid short circuits, keep paper clips, screws, and staples away from connectors, sockets and circuitry.
- Avoid dust, humidity, and temperature extremes. Do not place the product in any area where it may become wet.
- Place the product on a stable surface.
- If you encounter technical problems with the product, contact a qualified service technician or your retailer.
This symbol of the crossed out wheeled bin indicates that the product (electrical and electronic equipment) should not be placed in municipal waste. Check local regulations for disposal of electronic products.
Package Contents
This package should contain the following:
• ASUS Xonar SE PCIE audio card • Low Profile Bracket x1
• Support CD x1 • Quick Start Guide x1
System Requirements
To ensure a successful installation of the the Xonar SE audio card, your computer must meet the following requirements:
- One PCIE 1.0 (or higher) compatible slot for the audio card
- Microsoft® Windows® 10/ 8.1 /7 SP1(32/64bit)
- Intel® Pentium® 4 1.4 GHz or AMD® Athlon 1400 CPU or faster CPU
- 1GB (or above) DRAM system memory
- 300 MB available HDD space for driver installation package
- CD-ROM drive (or DVD-ROM drive ) for software installation
- High-quality headphones or powered analog speakers to enjoy the ultra-high fidelity sound of the card
Driver Installation
After installing the Xonar SE audio card into your computer, you need to install the device driver that enables the Xonar SE audio card to work with Windows operating system.
IMPORTANT: Ensure that you have installed the audio card driver before installing the Xonar SE driver. Otherwise, driver installation error may occur.
To install the device driver:
- After you have installed the Xonar SE card, turn on your computer. Windows® automatically detects the audio card and searches for device drivers. When prompted for the drivers, click Cancel.
- Insert the support CD into the optical drive. If Autorun is enabled in your system, the setup starts automatically. If not, run setup.exe from your support CD.
- Follow the onscreen instructions to finish the installation.
NOTE: Driver version and the contents of the support CD are subject to change without notice.
Functionality
5.1 channel speakers

Digital speakers S/PDIF Out Microphone / headphone
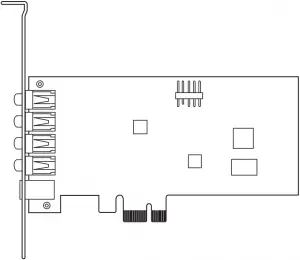
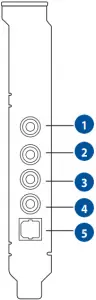
Hardware Features
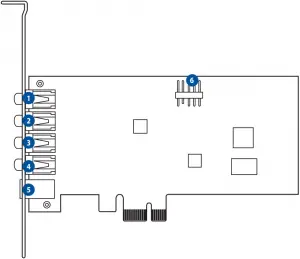
Top view Side view
Audio ports
| No. | Item | No. | Item |
| 1 | Microphone In port | 4 | Center/Subwoofer Out port |
| Line In port | |||
| 2 | Headphone/Front Out port | 5 | S/PDIF Out port |
| 3 | Side Surround Out port | 6 | Front panel audio header |
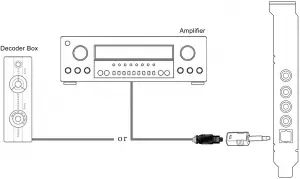
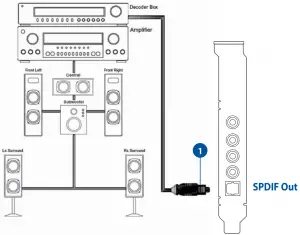
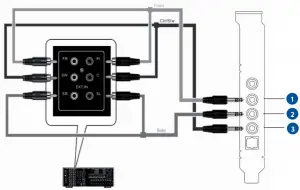
Connecting digital speaker systems (Home Theater)
| No. | Item | Description |
| 1 | Optical cable | Plug your decoder’s TOSLINK optical cable into the S/ PDIF-Out connector. |
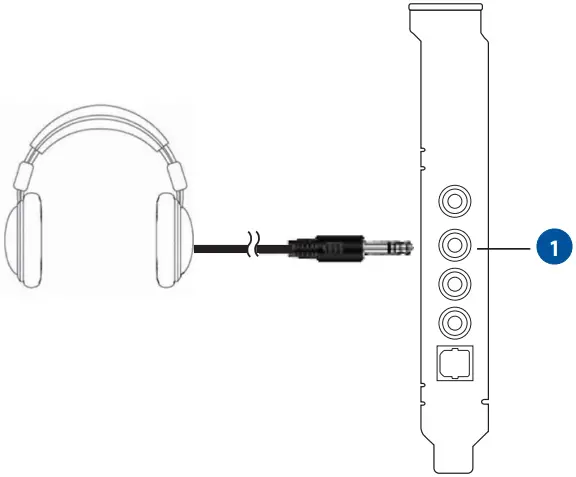
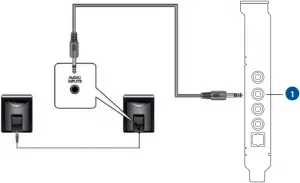
Connecting stereo headphones
| No. | Item | Description |
| 1 | Front Out/Headphone Jack | The Front Out jack has a built-in high-quality amplifier to drive headphones. Connect your stereo headphones directly to this jack. |
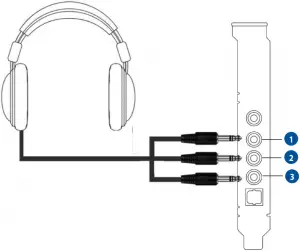
Connecting 5.1 channel headphones
| No. | Item | Description |
| 1 | Front Out port | Connect the front-channel 3.5mm plug of your 5.1 channel headphone into this jack. |
| 2 | Side Surround Out port | Connect the surround-channel 3.5mm plug of your 5.1 headphone into this jack. |
| 3 | Center/Subwoofer Out port | Connect the Center/Bass-channel 3.5mm plug of your 5.1 headphone into this jack. |
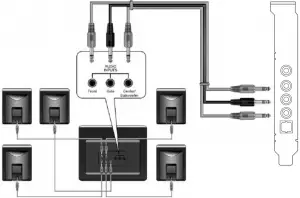
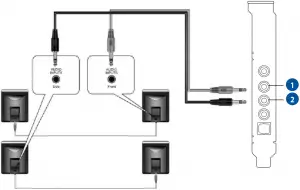
Connecting analog power amplifier
| No. | Item | Description |
| 1 | Front Out port | Connects to the “left front” and “right front” input ports of the analog amplifier with the mini-jack to RCA cable. |
| 2 | Side Surround Out port | Connects to the “left surround” and “right surround” input ports of the analog amplifier with the mini-jack to RCA cable. |
| 3 | Center/Subwoofer Out port | Connects to the “Center” and “subwoofer” input ports of the analog amplifier with the mini-jack to RCA cable. |
Connecting 2 channel speakers
| No. | Item | Description |
| 1 | Front Out/Headphone Jack | Connect the 2 speaker set’s 3.5mm plug into this Front Out jack. |
Connecting 4 channel speakers
| No. | Item | Description |
| 1 | Front Out port | Connects to the Front input port of the 4 speakers with the mini-jack cable. |
| 2 | Side Surround Out port | Connects to the Surround input port of the 4 speakers with the mini-jack cable. |
Connectivity Options
Connecting 5.1 channel speakers
| No. | Item | Description |
| 1 | Front Out port | Connects to the Front input port of the 5.1 speakers with the mini-jack cable. |
| 2 | Side Surround Out port | Connects to the Surround input port of the 5.1 speakers with the mini-jack cable. |
| 3 | Center/Subwoofer Out port | Connects to the Center/Subwoofer input port of the 5.1 speakers with the mini-jack cable. |
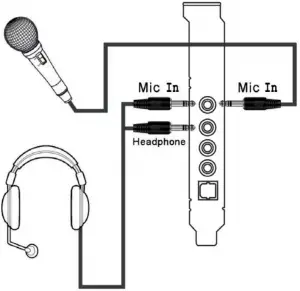
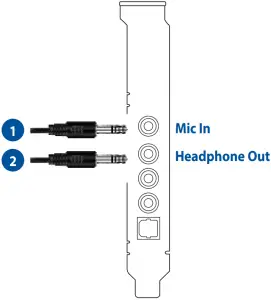
Connecting microphone

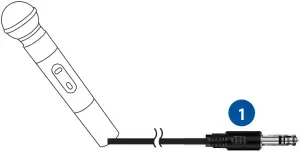
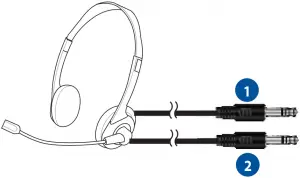
| No. | Item | Description |
| 1 | Microphone Input Jack | Connect the microphone’s 3.5mm plug into this Mic-In jack for voice communication, recording, or karaoke. |
| 2 | Headphone Jack | The Front Out jack has a built-in high-quality amplifier to drive headphones. Connect your stereo headphones directly to this jack. |
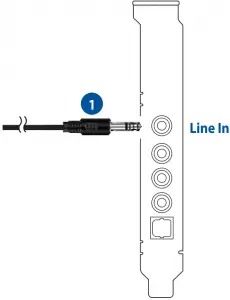
Connecting Line-In audio sources
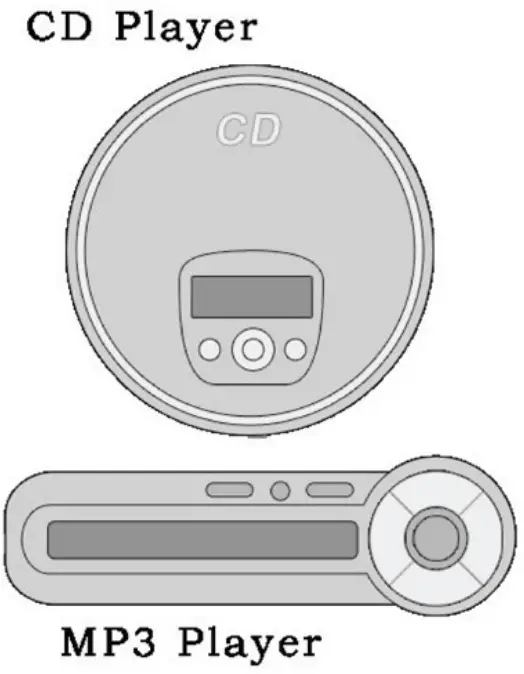
| No. | Item | Description |
| 1 | Line Input Jack | Connect the 3.5mm plug of the CD/MP3 Player or any other Line level analog audio sources into this Line-In jack for sound recording (See the “Mixer” section of the driver guide). |


CAN ICE-3 (B)/NMB-3 (B) D33005 RoHS

MSIP-REM-MSQ-SC30
AEEE
ASUS WARRANTY UPDATE
From 1 January 2012 updated warranties apply to all ASUS products, consistent with the Australian Consumer Law.
For the latest product warranty details please visit: http://support.asus.com
Our goods come with guarantees that cannot be excluded under the Australian Consumer Law. You are entitled to a replacement or refund for a major failure and compensation for any other reasonably foreseeable loss or damage. You are also entitled to have the goods repaired or replaced if the goods fail to be of acceptable quality and the failure does not amount to a major failure.
If you require assistance please call ASUS Customer Service 1300 2787 88 | http://support.asus.com