V-TONE GUITAR DRIVER DI GDI21
Guitar Amp Modeler/Direct Recording Preamp/DI Box
Thank you for showing your confidence in us by purchasing the V-TONE GUITAR GDI21. This high-quality guitar modeling driver is designed for hands-on musicians and no-frills types. We have rebuilt different circuitries and components from famous amps, and packed them into one housing. You can alternate between several different amp re-creations, gain settings and mic placements with a flick of a switch–intuitively and with minimal effort. In addition, the GDI21 functions as standard ultra-transparent direct injection box when used in bypass mode.
A DI (Direct Injection) box allows you to send a signal directly from an unbalanced, high-impedance output (like an electric guitar) and connect it directly to the balanced mic input of a mixing console.
Whether for stage, recording, rehearsal or warm-up, BEHRINGER’s V-TONE GUITAR GDI21 is a natural choice for all players who want an arsenal of different tones.
Control Elements
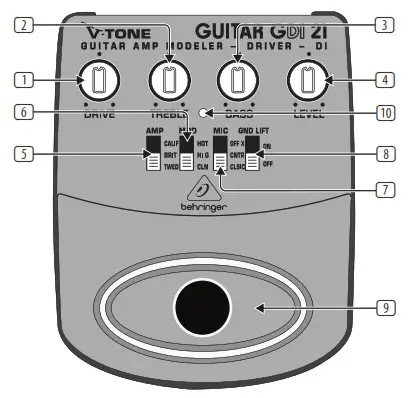
Control elements
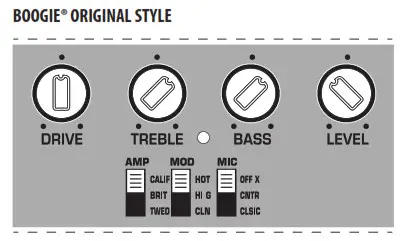
- The DRIVE control adjusts the overall amount of gain and overdrive, similar to pushing the output section of a tube amp.
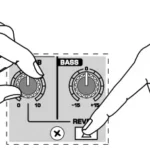
- The TREBLE control governs the high-frequency range of the signal (±12 dB).
- The BASS control allows you to boost/cut the low-frequency range (±12 dB).
- The LEVEL control adjusts the output level of the GDI21.
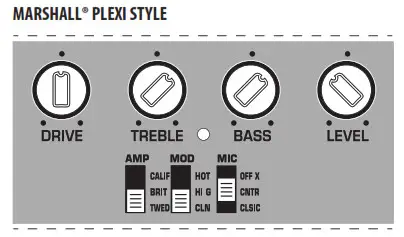
- Use the AMP switch to select one of three great classic tube amps. You will recognize these classic amp tones as soon as you hear them. For crystal-clear, transparent sounds with dynamic bass select TWE(E)D. For aggressive mids and incredible sustain select BRIT(ISH). Rounder and more evened-out (yet still sophisticated) sounds can be dialed up if you select CALIF(ORNIAN); it’s perfect for leads.
- Use the MODE switch to dial up one of three gain settings (HOT, HI G(AIN), CL(EA)N) that you want to combine with the amp setting.
- The MIC switch simulates the microphone placement (orientation and distance) in relation to the cabinet. Select CL(AS)SIC (distant mic placement without ambience) to achieve high mid-range content and a greater definition of notes like with classic early tube amps. In C(E)NT(E)R (close miking at the center of a cone) you get greater high mid-range content and increased low-end for mega crunchy results. OFF (A)X(IS) (close miking at the edge of a cone) is very similar to CENTER, but produces a smoother, softer sound with less upper mid-range content; perfect in combination with MODE position HOT.
- When activated, the GND LIFT disconnects the ground connection between input and output. Depending on the grounding of the connected equipment, this can eliminate hum or ground loops.
- Use the footswitch to activate/deactivate all the tone functions (EQ, DRIVE, modeling). When deactivated, the GDI21 functions solely as a standard transparent DI box.
- This LED illuminates when the effect is activated (see 8).
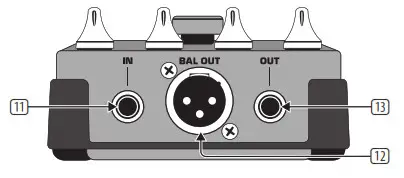
- Use this ¼” TS INPUT connector to plug in the instrument cable of your guitar or other instruments.
- BAL OUT is the GDI21’s balanced mic level output. Use a high-quality, balanced XLR (microphone) cable to connect the driver to a mixing console.
- The unbalanced ¼” TS OUT connector sends the signal to your guitar amp.
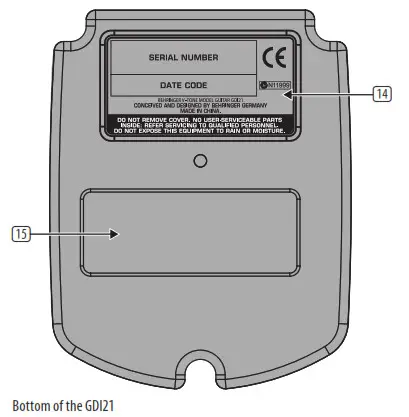
- SERIAL NUMBER. The serial number of the GDI21 is located at the bottom.
- BATTERY COMPARTMENT. Open the lid to install or replace the 9 V battery.
 The GDI21 is powered as soon you insert a plug into the INPUT. The battery is “disconnected” when the plug is removed. For this reason, the GDI21 has no on/off switch. To prolong battery life, always disconnect the input when the driver is not in use.
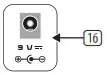
Power supply connector - Use the DC IN connection to plug in a 9 V power supply (not included).
Safety Instructions
Do not use near water, or install near heat sources. Use only authorized attachments/accessories. Do not service product yourself. Contact our qualified servicing personnel for servicing or repairs, especially when power supply cord or plug is damaged.
Warranty
Please register your new BEHRINGER equipment right after your purchase by visiting http://behringer.com and read the terms and conditions of our warranty carefully.
Specifications
| Input | |
| Connector | ¼” TS |
| Impedance | 1 MΩ |
| Output | |
| Connector | ¼” TS |
| Impedance | 1 kΩ |
| Balanced Output | |
| Connector Impedance | XLR |
| Power supply | 200 Ω |
| Power connector | 9 V, >50 mA DC regulated |
| Battery | 2 mm DC jack, negative center |
| Power consumption | 9 V type 6LR61 |
| Connector Impedance | 25 mA |
| Dimensions/Weight | |
| Dimensions (H x W x D) | approx. 5 x 3 9/10 x 2″
approx. 127 x 100 x 50 mm |
| Weight | approx. 1.01 lbs / 0.46 kg |
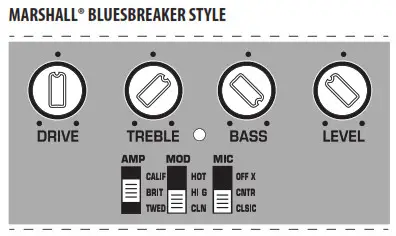
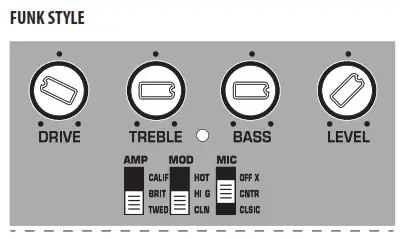
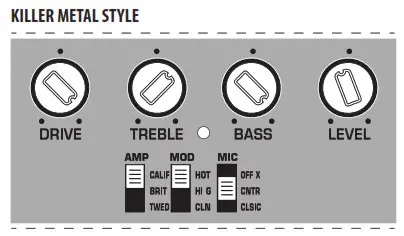
Sample Settings

 MUSIC Tribe accepts no liability for any loss which may be suffered by any person who relies either wholly or in part upon any description, photograph, or statement contained herein. Technical specifications, appearances and other information are subject to change without notice. All trademarks are the property of their respective owners. MIDAS, KLARK TEKNIK, LAB GRUPPEN, LAKE, TANNOY, TURBOSOUND, TC ELECTRONIC, TC HELICON, BEHRINGER, BUGERA and COOLAUDIO are trademarks or registered trademarks of MUSIC Tribe Global Brands Ltd. © MUSIC Tribe Global Brands Ltd. 2018 All rights reserved.
![]()