Bella Pro Series Air Fryer
Bella Pro Series Air Fryer
Thank You for your purchase
Register & sign up for special announcements and trendy recipes!
Tell us what you think!
Rate, review or ask us a question.
@bellahousewares.com
#getinspired
IMPORTANT SAFEGUARDS
When using electrical appliances, basic safety precautions should always be followed, including the following:
- READ ALL INSTRUCTIONS.
- Do not touch hot surfaces. Use handles or knobs.
Use oven mitts or potholders. - To protect against electric shock do not immerse cord, plugs, or appliance in water or other liquid.
- This appliance is not intended for use by persons (including children) with reduced physical, sensory or mental capabilities, or lack of experience and knowledge, unless they have been given supervision or instruction concerning use of the appliance by a person responsible for their safety.
- Children should be supervised to ensure that they do not play with the appliance.
- Unplug from outlet when not in use and before cleaning. Allow to cool before putting on or taking off parts, and before cleaning the appliance.
- Do not operate any appliance with a damaged cord or plug or after the appliance malfunctions, or has been damaged in any manner. Bring it to a qualified technician for examination, repair or electrical or mechanical adjustment.
- The use of accessory attachments not recommended by the appliance manufacturer may cause injuries.
- Do not use outdoors.
- Do not let cord hang over edge of table or counter, or touch hot surfaces.
- Do not place on or near a hot gas or electric burner, or in a heated oven.
- Extreme caution must be used when moving an appliance containing hot oil or other hot liquids.
- Always attach plug to appliance first, then plug cord into the wall outlet. To disconnect, turn any control to “off”, then remove plug from wall outlet.
- Do not use appliance for other than intended use.
- Make sure the crisping tray is in place before adding food to be air fried.
- Make sure the frying basket is locked securely into the front of the Air Fryer, while the Air Fryer is in operation.
WARNING: The Air Fryer will not operate unless frying basket is fully closed.
CAUTION: After hot air frying, extreme caution must be used when handling the hot frying basket, crisping tray, and cooked foods.
SAVE THESE INSTRUCTIONS FOR HOUSEHOLD USE ONLY
ADDITIONAL IMPORTANT SAFEGUARDS
CAUTION HOT SURFACES: This appliance generates heat and escaping steam during use. Proper precautions must be taken to prevent the risk of burns, fires, or other injury to persons or damage to property.
CAUTION: This appliance is hot during operation and retains heat for some time after turning OFF. Always use oven mitts when handling hot materials and allow metal parts to cool before cleaning. Do not place anything on top of the appliance while it is operating or while it is hot.
- All users of this appliance must read and understand this instruction manual before operating or cleaning this appliance.
- The cord to this appliance should be plugged into a 120V AC electrical outlet only.
- If this appliance begins to malfunction during use, pull the frying basket drawer out of the body. Then remove plug from wall outlet. Do not use or attempt to repair the malfunctioning appliance.
- Do not leave this appliance unattended during use.
- Do not immerse power cord in any liquid. If the power cord to this appliance is damaged, it must be replaced by contacting Consumer Service.
- Keep the cord out of reach from children and infants to avoid the risk of electric shock and choking.
- Place the Air Fryer on a flat, heat-resistant work area.
- Do not obstruct the air outlet or air inlets on the back and sides of the Air Fryer, with any objects. Avoid escaping steam from the air outlet during air frying.
- Keep appliance at least 4 inches away from walls or other objects during operation.
- Always use the frying basket handle to open frying basket drawer.
- WARNING: After air frying, make sure to place the frying basket drawer on a flat, heat-resistant surface.
WARNING: Over-filling the frying basket may damage the Air Fryer and could result in serious personal injury. - Never move a hot Air Fryer or an Air Fryer containing hot food. Allow to cool before moving.
- Do not clean with metal scouring pads. Pieces can break off the pad and touch electrical parts, creating a risk of electric shock.
NOTES ON THE PLUG
This appliance has a polarized plug (one blade is wider than the other). To reduce the risk of electric shock, this plug will fit in a polarized outlet only one way. If the plug does not fit fully into the outlet, reverse the plug. If it still does not fit, contact a qualified electrician. Do not modify the plug in any way.
NOTES ON THE CORD
A. A short power-supply cord (or detachable power-supply cord) is to be provided to reduce the risk resulting from becoming entangled in or tripping over a longer cord.
B. Longer detachable power-supply cords or extension cords are available and may be used if care is exercised in their use.
C. If a long detachable power-supply cord or extension cord is used :
- The marked electrical rating of the cord or extension cord should be at least as great as the electrical rating of the appliance;
- If the appliance is of the grounded type, the extension cord should be a grounding-type3-wire cord.
- The longer cord should be arranged so that it does not drape over the countertop or table top where it can be pulled on by children or tripped over unintentionally.
PLASTICIZER WARNING
CAUTION: To prevent Plasticizers from migrating to the finish of the counter top or table top or other furniture, place NON-PLASTIC coasters or place mats between the appliance and the finish of the counter top or table top. Failure to do so may cause the finish to darken; permanent blemishes may occur or stains can appear.
ELECTRIC POWER
If the electrical circuit is overloaded with other appliances, your appliance may not operate properly. It should be operated on a separate electrical circuit from other appliances.
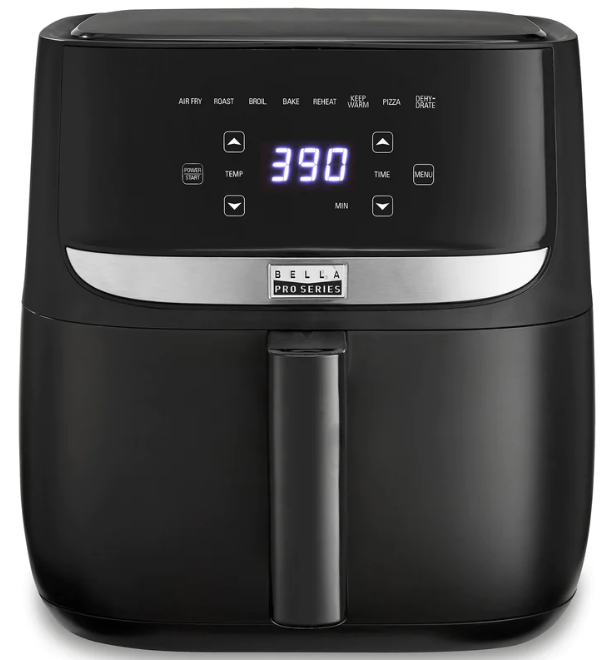
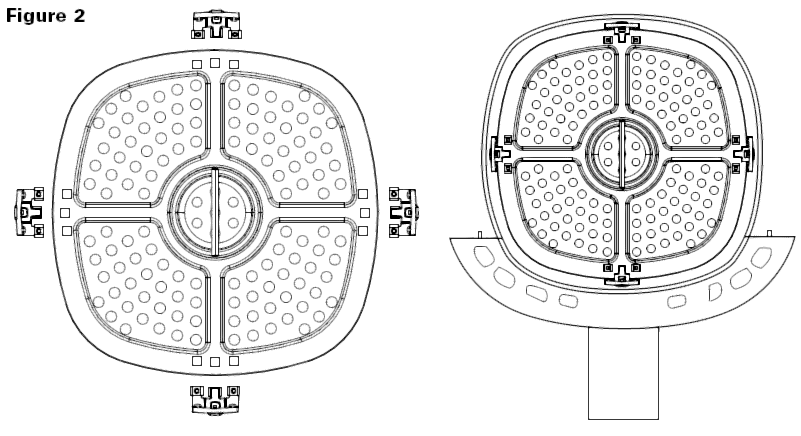
Getting to Know Your 6 QT Air Fryer
Product may vary slightly from illustration
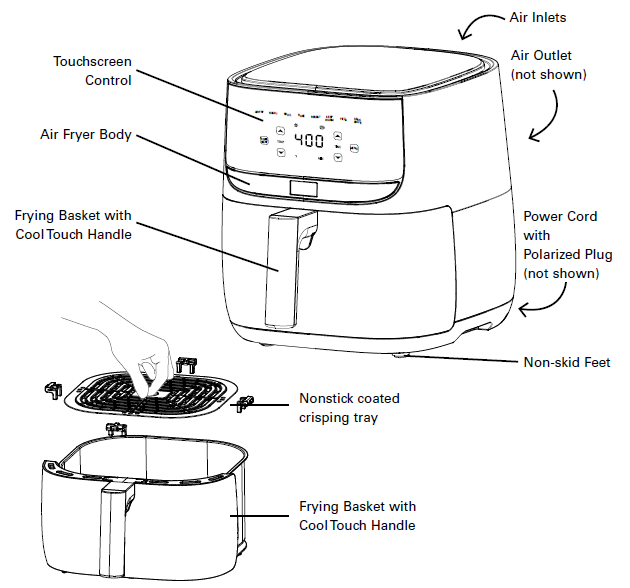
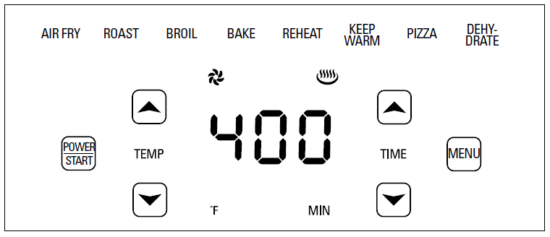
Touchscreen Control
- There are 8 menus options, each with a preset time and temperature.
- Press MENU once. The AIR FRY icon will flash. Press MENU to advance to the next menu option.
Before Using for the First Time
- Remove all packing material and labels from the inside and outside of the air fryer. Check that there is no packaging underneath and around the frying basket.
- Your air fryer is shipped with the frying basket locked inside the air fryer body. Firmly grasp the frying basket handle to open frying basket and place on a flat, clean work area.
- Wash frying basket and crisping tray in hot, soapy water.
- DO NOT IMMERSE THE AIR FRYER BODY IN WATER. Wipe the air fryer body with a damp cloth.
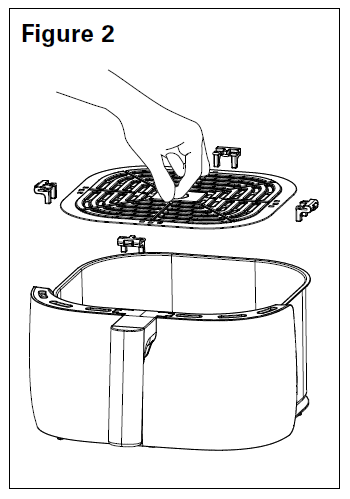
Dry all parts thoroughly. - To ensure the crisping tray fits snugly into the frying basket drawer, there are 4 rubber tips attached to the sides of the tray. Before using, check to make sure all
- rubber tips are in place. If they become separated from the tray, simply slide onto the tabs as shown. (See fig 2.)
Operating Instructions
WARNING! This air fryer should not be used to boil water.
NOTE: During first use, the air fryer may emit a slight odor. This is normal.
- Place the Air Fryer on a flat, heat-resistant work area, close to an electrical outlet.
- Firmly grasp the frying basket handle to open frying basket; then remove from the machine and place on a flat, clean surface.
- Place the crisping tray into the base of the frying basket.
- Arrange food on top of the crisping tray. Do not overfill frying basket with food.
To ensure proper cooking and air circulation, NEVER fill any frying basket more than 2/3 full. When air frying fresh vegetables, we do not recommend adding more than 1-1/2 cups of food to the frying basket. - Fully insert the frying basket into the front of the Air Fryer.
- Plug cord in the wall outlet. A lone red POWER/START background.
- To begin, press the red POWER/START
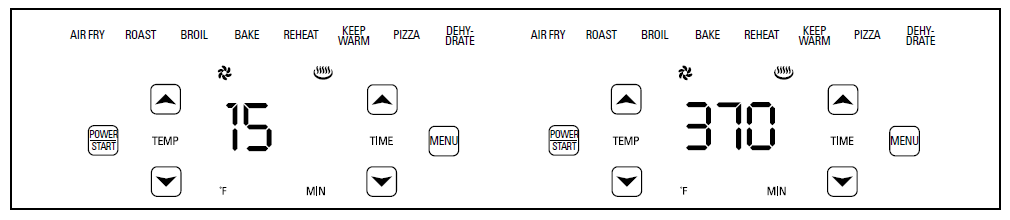
8. The control panel will appear
9. The default TIME AND TEMERATURE : 15 minutes and 370 °F will alternate on the display
Manual Operation
10. To adjust the air frying TIME, press  and then the button
  or
or  on the right side of the control panel to advance or decrease time in 1 minute increments, from 1 to 60 minutes.
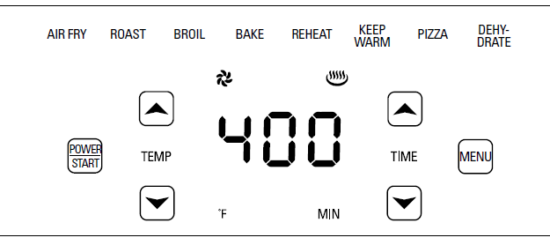
11. To adjust the air frying TEMPERATURE, press  and then the button or on the right side of the control panel to adjust the temperature range from 90 °F to 400 °F in 10 degree increments.
12. When the desired TIME and TEMPERATURE appear on the display, press the white  to turn the air fryer ON. The white convection fan
  will blink/and or the heating
  icon indicating the air fryer is in operation.
The preset temperature and time will alternate on the display until the time has expired.
IMPORTANT: The air fryer will not heat until the white POWER/START is pressed.
If no buttons are pressed, the air fryer will automatically turn OFF within 1minute.
13. To turn the air fryer OFF at any time, simply press & hold the white POWER/START for 2 seconds. The white convection fan flash for 15 seconds then stops. In the display END will appear for 15 seconds, 3 beeps will sound. The POWER/START turns red.
Preset Menu (AIR FRY/ROAST/BROIL/BAKE/REHEAT/KEEP
WARM/PIZZA/DEHYDRATE)
14. To use the preset menu option, simply press MENU  Each time MENU is pressed, the next menu option will start blinking.
15. When the desired menu option is blinking, press the white POWER/START to turn the air fryer ON.
16. The white convection fan will flash when the air fryer is in operation. The preset temperature and time will alternate on the display until the air fry time has expired.
17. The quantity, density, weight of food will alter the total cooking time necessary.
Remember, frying smaller batches will result in shorter cooking times and higher food quality.
IMPORTANT: Always check food halfway though cooking time to determine final cook time and temperature.
18. To adjust the air frying TIME, press and then the button or on the right side of the control panel to advance or decrease time in 1 minute increments, from 1 to 60 minutes.
19. To adjust the air frying TEMPERATURE, press and then the button or on the right side of the control panel to adjust the temperature range from 90 °F to 400 °F in 10 degree increments.
WARNING! ALWAYS USE A MEAT THERMOMETER TO ENSURE THAT MEAT
AND FISH ARE COOKED THOROUGHLY BEFORE EATING.
Air Frying Technique
- Please consult the Air Frying Chart and/or follow package instructions for suggested TIME and TEMPERATURE.
- To assure even cooking/browning, ALWAYS open the frying basket halfway through the cooking time and check, turn or shake foods in the frying basket.
Adjust TIME or TEMPERATURE if needed.
WARNING: Extreme caution must be used when handling the hot frying basket and crisping tray. Avoid escaping steam from the frying basket and the food.
CAUTION: Always use oven mitts when handling the hot air fryer basket.
CAUTION: Hot oil can collect at the base of the drawer. To avoid risk of burns or personal injury, or to avoid oil from contaminating air fried foods, always unlock and remove the frying basket from the drawer before emptying. NEVER turn the drawer upside down with the frying basket attached. - If additional air frying is needed, adjust TEMPERATURE if desired, and set TIME for 2 to 5 minute intervals until fully cooked.
- When the air frying TIME expires, the white convection fan will continue to flash for 15 seconds then stops. In the display END will appear for 15 seconds, 3 beeps will sound. The POWER/START turns red.
- To turn the air fryer OFF at any time, simply press & hold the white POWER/START
for 2 seconds.
The white convection fanwill continue to flash for 15 seconds then stops. In the display END will appear for 15 seconds, 3 beeps will sound. The POWER/START turns red.
WARNING! ALWAYS USE A MEAT THERMOMETER TO ENSURE THAT MEAT,
POULTRY AND FISH ARE COOKED THOROUGHLY BEFORE EATING. - If recipe instructions instruct, allow cooked foods to rest for 5 to 10 minutes.
Remove the frying basket from the machine and place on a flat, heat resistant surface. - Use tongs or a long fork to remove air fried foods onto a serving plate.
Promptly replace the frying basket into the front of the air Fryer.
Continue with subsequent batches, if any. - Unplug the Air fryer when not in use.
Turn Food Function ( AIR FRY, ROAST, BROIL & BAKE)
Half way through cooking, the display changes to trn and beeps for 5 seconds to remind you to flip or shake your food items. Remove the air fryer basket to pause the program. Turn or shake food as desired, then insert the air fryer basket back into the cooking chamber. Once fully inserted, cooking will resume automatically
- To adjust the air frying TIME, press and then the button or on the right side of the control panel to advance or decrease time in 1 minute increments, from 1 to 60 minutes.
- To adjust the air frying TEMPERATURE, press and then the button or on the right side of the control panel to adjust the temperature range from 90 °F to 170 °F in 10 degree increments.
DEHYDRATE (TIME & TEMPERATURE)
- To adjust the air frying TIME for DEHYDRATE, press and then the button or on the right side of the control panel to advance or decrease time in 30 minute increments.
For dehydrate times longer than 10 hrs, time is increased or decreased by 1 hr increments. - To adjust the air frying TEMPERATURE for DEHYDRATE, press and then the button or on the right side of the control panel to adjust the temperature range from 90 °F to 170 °F in 10 degree increments.
A Note on Air Frying Pre-Packaged Frozen Foods
- The air fryer is powered with 1700W high performance technology that circulates heat for fast air fry and recovery.
- As a general rule, reduce the package cooking time by 30% to 50% depending on the food and amount to be cooked.
- Always check food halfway though cooking time to determine final cook time and temperature.
- Always check cooking progress after TIME has expired. If more time is needed, cook at short time intervals until food tests done.
For Best Results
- Use your air fryer to cook pre-packaged foods with a fraction of the oil, in a fraction of the time!
- Always check food halfway though cooking time to determine final cook time and temperature.
- Always pat food dry before cooking to encourage browning and avoid excess smoke.
- To avoid excess smoke, when cooking naturally high fat foods, such as chicken wings or sausages, it may be necessary to empty fat from the frying basket drawer between batches.
- For crispier results, air fry small batches of freshly breaded foods. Create more surface area by cutting food into smaller pieces. Press breading onto food to help it adhere.
Refrigerate breaded foods for at least 30 minutes before frying. - Arrange breaded food in frying basket so that food is not touching to allow air flow on all surfaces.
- Spray olive oil or vegetable oil work best as oil is distributed evenly and less oil is needed.
- Do not overfill frying basket with food. NEVER fill any frying basket more than 2/3 full. When air frying fresh vegetables, we do not recommend adding more than 3 cups of food to the frying basket.
- Some foods need to be shaken vigorously or turned over during the air fry time. Consult the Air Frying Chart for a general guide.
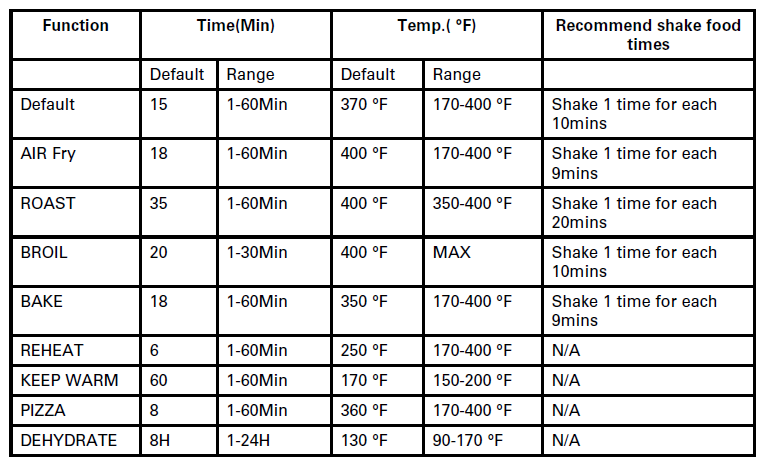
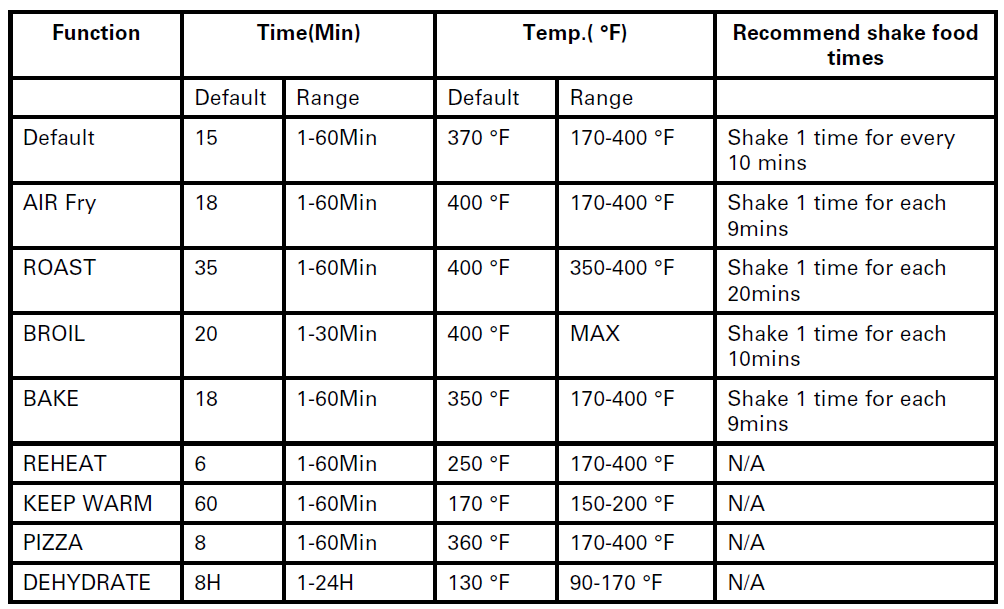
Air Frying Chart (Includes Preset Menu Items)
WARNING! ALWAYS USE A MEAT THERMOMETER TO ENSURE THAT MEAT,
POULTRY AND FISH ARE COOKED THOROUGHLY BEFORE EATING.
IMPORTANT! For your convenience, your air fryer has 8 built in smart cooking options: Air Fry, Roast, Broil, Bake, Reheat, Keep Warm, Pizza and Dehydrate.
The following chart is intended as a general guide only. The quantity of food air fried at one time, the thickness or density of the food, and whether the food is fresh, thawed, or frozen will alter the total cooking time necessary.
- To assure even cooking/browning, open the frying basket drawer halfway through the cooking time. Check, turn or vigorously shake foods in the frying basket. This chart lists cooking temperature, average total air frying time, and what action is to be taken for best results.
- Frying smaller batches will result in shorter cooking times and higher food quality.
Adjust air frying temperatures and times as necessary to suit your taste.
IMPORTANT NOTE: Unless food is pre-packaged and pre-oiled, for browned and crispy results, all foods should be lightly oiled before air frying.
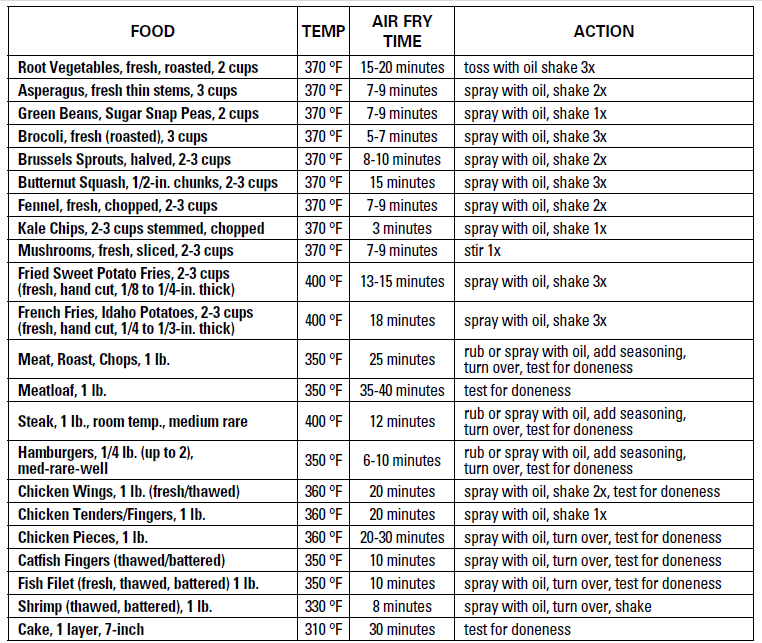
PLEASE NOTE: The USDA recommends that meats such as beef and lamb, etc. should be cooked to an internal temperature of 145°F/63°C. Pork should be cooked to an internal temperature of 160 °F/71 °C and poultry products should be cooked to an internal temperature of 170 °F/77 °C – 180 °F/82 °C to be sure any harmful bacteria has been killed. When reheating meat/poultry products, they should also be cooked to an internal temperature of 165°F/74°C.
User Maintenance Instructions
This appliance requires little maintenance. It contains no user-serviceable parts. Any servicing requiring disassembly other than cleaning must be performed by a qualified appliance repair technician.
Care & Cleaning Instructions
WARNING! Allow the Air fryer to cool fully before cleaning.
- Unplug the Air Fryer. Remove frying basket. Make sure the frying basket and crisping tray have cooled completely before cleaning. Use the center hole of the crisping tray to lift crisping tray up and out of the frying basket.
- Wash the frying basket and crisping tray in hot soapy water. Do not use metal kitchen utensils or abrasive cleansers or cleaning products as this may damage the nonstick coating.
- The frying basket and crisping tray are dishwasher-safe. For best results, place in the top rack of your dishwasher to clean.
- Wipe the air fryer body with a soft, non-abrasive damp cloth to clean.
Storing Instructions
- Make sure the air fryer is unplugged and all parts are clean and dry before storing.
- Never store the air fryer while it is hot or wet.
- Store the air fryer in its box or in a clean, dry place.
Recipes
Seasoned Kale Chips
- 6 cups raw kale, dry, cleaned, stemmed, cut into 1 to 2-inch ribbons, spray with olive oil
- 1 teaspoon garlic powder
- 3/4 teaspoon chili powder
- 1/2 teaspoon onion powder
- 1/2 teaspoon smoked paprika
- 1/4 teaspoon fine grain sea salt or pink Himalayan sea salt
- 1/8 teaspoon cayenne pepper (optional)
- Combine seasoning ingredients in a small bowl.
Stir to combine. - Add 3 cups raw kale to the air frying basket. Spray with olive oil. Add half of the seasoning mixture to the oiled kale. Toss to coat.
- To begin, press red POWER/START .
- The control panel will appear, POWER/START turns white.
- Air Fry at 370 °F for 3 minutes. Shake at 2 minutes.
- Empty first batch into a large serving bowl.
Oil, season and air fry the second batch and add to the bowl to serve.
Recipes
Spicy Adobo Drumsticks 2 Ways: Roasted / Air Fried
Makes: 4-5 chicken drumsticks
Serves 4 to 6
Brine
- 6 cups water
- 1/4 cup sugar
- 1/2 cup Kosher salt
Breading
- 4 eggs
- 2 cup panko breadcrumbs
- 3-4 green onions, chopped
- 1 1/2 tablespoon Adobo seasoning
- spray with olive oil
- Brine chicken for 3 hours to overnight
- Remove chicken from brine and dry thoroughly.
- Combine rub ingredients on a plate, mix well, roll, then pat chicken legs with rub.
- Cover and refrigerate for 3 to 4 hours.
Roasted drumsticks
- Add rubbed drumsticks to the air frying basket. Spray with olive oil. (optional)
- To begin, press red POWER/START .
- The control panel will appear, POWER/START turns white.
- Press MENU until AIR FRY appears on the display.
Press the white POWER/STARTto begin operation. - Check the cooking progress when time expires.
If more time is needed, cook at 3 minute intervals until drumsticks test done.
Air Fried drumsticks
- Beat eggs in a medium mixing bowl. Add legs to the bowl.
- Combine panko, green onions, and Adobo on a plate, mix well.
- Remove legs from the egg mixture. Press breadcrumbs onto the legs.
Arrange breaded legs on a plate. Spray lightly with olive oil, cover and refrigerate for 1 hour. - Add breaded drumsticks to the air frying basket. Spray with olive oil. (optional)
- To begin, press red POWER/START .
- The control panel will appear, POWER/START turns white.
- Press MENU until AIR FRY appears on the display.
Press the white POWER/START to begin operation. - Check the cooking progress when time expires.
If more time is needed, cook at 3 minute intervals until drumsticks test done
Fried Shrimp with Homemade Cocktail Sauce
Serves 4 to 8
- 2 lb. raw shrimp, shelled and deveined
- 4 eggs, lightly beaten
- 2 cup panko breadcrumbs
- 1 1/2 tablespoon Old Bay® seasoned salt
- spray with olive oil
Cocktail Sauce
- 1/2 cup ketchup
- 1/2 cup chili sauce
- 4 tablespoons horseradish, plus more to taste
- 1 teaspoon lemon juice
- 1 teaspoon Worcestershire sauce
- 1/2 teaspoon hot sauce, plus more to taste
- Pat shrimp dry before air frying.
- Beat eggs in a medium mixing bowl. Add shrimp to the bowl.
- Add panko breadcrumbs and Old Bay® seasoned salt to a gallon size zipper bag.
Add drained shrimp to the bag. - Toss to coat and press breadcrumbs into the shrimp. Arrange breaded shrimp on a plate. Spray lightly with olive oil, cover and refrigerate for 1 hour.
- Add breaded shrimp to frying basket. Spray with olive oil. (optional)
- To begin, press red POWER/START .
- The control panel will appear, POWER/START turns white.
- Press MENU until AIR FRY appears on the display.
Press the white POWER/START to begin operation. - While shrimp are cooking, prepare cocktail sauce. Add all ingredients into a small bowl and mix well.
- Check the cooking progress when time expires.
If more time is needed, cook at 2 minute intervals until shrimp are crispy and golden. - Serve with plenty of fresh cocktail sauce.
Fresh Salmon with Sweet Chili Sauce
Serves 2 to 3
- 2 lb fresh salmon, filet, trimmed into 3 pieces
- 1/2 cup panko breadcrumbs
- 1/2 cup sesame seeds
- 2 teaspoon salt
- spray with olive oil
Sweet Chili Sauce
- 7 tablespoons Asian sweet chili sauce
- 2 teaspoon Ponzu sauce
- 2 teaspoons fresh lime juice (or lemon juice)
- 2 teaspoon sesame seeds
- 4 tablespoons chopped cilantro
- 1/4 teaspoon hot sauce, (optional) plus more to taste
- Add panko breadcrumbs, sesame seeds and salt to a gallon size zipper bag. Add salmon pieces to the bag.
- Carefully press breadcrumbs into the salmon.
Remove to a plate. Spray lightly with olive oil, cover and refrigerate for 1 hour. - Add coated salmon to frying basket.
Allow air circulation on all sides of each salmon piece for best browning. - Spray with olive oil. (optional)
- To begin, press red POWER/START .
- The control panel will appear, POWER/START turns white.
- Press MENU until AIR FRY appears on the display.
Press the white POWER/START to begin operation. - Check the cooking progress when time expires.
If more time is needed, cook at 2 minute intervals until fish is flaky.
Roasted Sugar Snap Peas with Sesame Seed
Serves 2 to 3
- 1 lb. fresh sugar snap peas (2 cups)
- 2 teaspoon cornstarch
- 1 Teaspoon sesame oil
- 2 teaspoon olive oil
- 2 tablespoon sesame seeds
- Combine all ingredients in a medium bowl. Toss snap peas well to coat.
- Add to the air frying basket.
- To begin, press red POWER/START
- The control panel will appear, POWER/START
- Air Fry at 370 °F for 6 minutes. Shake at 3 minutes.
Apple Stuffed Pork Chops
Serves 4-6
- 4 pork chops, 1/2 – 3/4-inch thick
- 1/2 cup flour
- 2 tablespoon cajun seasoning
- 4 eggs
- 2 cup seasoned panko breadcrumbs
- spray with olive oil
- toothpicks or metal skewers to seal
Stuffing
- 4 small apples, peeled, cored and chopped into small pieces
- 3/4 teaspoon allspice
- 3/4 teaspoon salt (to taste)
- Slit each pork chop through the center, from the fatty side to the bone to create a pocket. Place the chopped apples into a small bowl. Add allspice and salt and toss to coat apples well. Stuff chops with apple mixture. Use toothpicks or skewers to secure.
- Hold each chop tightly closed and dredge each side of the chop in flour.
Pat the outside gently with your hands to remove any excess. - Dip both sides into egg; use a fork to press and coat both sides with panko breadcrumbs.
- Add breaded pork chops to the air frying basket. Spray with olive oil. (optional)
- To begin, press red POWER/START .
- The control panel will appear, POWER/START turns white.
- Press MENU until AIR FRY appears on the display.
Press the white POWER/START to begin operation.
NOTE: Depending on the thickness of the chops and the amount of apple stuffing, it may be necessary to use a meat thermometer to check cooking progress halfway through cooking time to determine final cook time and temperature. If more time is needed, cook at 5 minute intervals until pork tests 160 °F.
Cauliflower-Tots
Makes: 22 – 24 tots
- 2 cups cauliflower florets
- 1/2 cup breadcrumbs, seasoned
- 1/2 cup Parmesan cheese, grated
- 4 tablespoons chopped parsley
- salt
- 2 eggs, lightly beaten
- Steam cauliflower for 3 minutes.
- Use food processor to chop cauliflower to the size of large breadcrumbs.
- Line a colander with a clean kitchen towel and add the cauliflower.
Fold the towel over the top and gently press to remove as much liquid as possible. - Transfer the dried cauliflower to a large mixing bowl.
Add breadcrumbs, Parmesan, parsley, salt and mix well. - In a small bowl, mix the eggs, then add to the cauliflower.
Mix by hand and form into 1-inch round or slightly oblong tots.
Place formed tots onto a plate, then into the refrigerator to cool for 1 hour to overnight. - Add breaded tots to the air frying basket. Spray with olive oil. (optional)
- To begin, press red POWER/START
- The control panel will appear, POWER/START turns white.
- Air Fry at 370 °F for 16 minutes. Shake at 8 minutes.
Mango Blueberry Ginger Crumble
Serves 4 to 6
- 2 cups fresh mango
- 1/2 cup fresh blueberries
- 3/4 teaspoons fresh grated ginger
- 1/4 teaspoons ground ginger
- 2 tablespoons sugar
Crumble Topping
- 7/8 cup flour
- 4 tablespoons cold butter, chopped
- 1/4 cup brown sugar
- 1 tablespoon lemon juice
- 1/2 cup chopped pecans
- salt
- 7-inch round oven or aluminum foil pan
- Cut mango into chunks and place into a bowl.
- Add the blueberries, grated ginger, ground ginger, 2 tablespoons sugar and mix well.
- Scoop the fruit mixture into the aluminum foil pan. Spread evenly.
- In a bowl, mix the flour with a pinch of salt and the remaining sugar.
- Add the butter and lemon juice. Rub flour and butter together with your fingertips until a crumbly mixture is achieved. Add chopped nuts.
- Distribute the crumble mixture evenly over the fruit and lightly press down.
- Press MENU until BAKE appears on the display.
- Press the white POWER/START to begin operation.
- Check the baking progress of the crumble at 3 minutes before time expires.
- If there is too much liquid, turn TEMPERATURE up to 390 °F and continue to cook until top is brown.
Limited Two-Year Warranty
SENSIO Inc. hereby warrants that for a period of TWO YEARS from the date of purchase, this product will be free from mechanical defects in material and workmanship, and for 90 days in respect to non-mechanical parts. At its sole discretion, SENSIO Inc. will either repair or replace the product found to be defective, or issue a refund on the product during the warranty period.
Exclusions:
The warranty does not cover normal wear of parts or damage resulting from any of the following: negligent use of the product, use of improper voltage or current, improper routine maintenance, use contrary to the operating instructions, disassembly, repair, or alteration by anyone other than qualified SENSIO Inc. personnel. Also, the warranty does not cover
Acts of God such as fire, floods, hurricanes, or tornadoes.
SENSIO Inc. shall not be liable for any incidental or consequential damages caused by the breach of any express or implied warranty. Apart from the extent prohibited by applicable law, any implied warranty of merchantability or The warranty is only valid for the original retail purchaser from the date of initial retail purchase and is not transferable. Keep the original sales receipt, as proof of purchase is required to obtain warranty validation. Retail stores selling this product do not have the right to alter, modify, or in any way revise the terms and conditions of the warranty.
Fitness for a particular purpose is limited in time to the duration of the warranty. Some states, provinces or jurisdictions do not allow the exclusion or limitation of incidental or consequential damages, or limitations on how long an implied warranty lasts, and therefore, the above exclusions or limitations may not apply to you. The warranty covers specific legal rights which may vary by state, province and/or jurisdiction.
How To Obtain Warranty Service
You must contact Customer Service at our toll-free number: 1-866-832-4843.
A Customer Service Representative will attempt to resolve warranty issues over the phone. If the Customer Service Representative is unable to resolve the problem, you will be provided with a case number and asked to return the product to SENSIO Inc. Attach a tag to the product that includes: your name, address, daytime contact telephone number, case number, and description of the problem.
Also, include a copy of the original sales receipt. Carefully package the tagged product with the sales receipt, and send it (with shipping and insurance prepaid) to SENSIO Inc.’s address.
SENSIO Inc. shall bear no responsibility or liability for the returned product while in transit to SENSIO Inc.’s Customer Service Center.
For customer service questions or comments 1-866-832-4843
bellahousewares.com
Sensio Inc.
New York, NY 10016/USA
Downloads
- Bella Pro Series Air Fryer Instruction Manual [ Download PDF ]
FAQ’S
What is the difference between the Bella Pro Series Air Fryer and the Bella Air Fryer?
The Bella Pro Series Air Fryer has a digital timer, a larger capacity, and a stainless steel basket. The Bella Air Fryer has a non-stick basket, a smaller capacity, and no timer.
Can I use metal utensils in my air fryer?
No, metal utensils can scratch the non-stick coating on your air fryer. Use plastic or wood utensils only.
How long does it take to cook food in an air fryer?
It will depend on what you are cooking. Frozen foods will take longer to cook than fresh foods. It also depends on the temperature you have your air fryer set at. You can always check to see if food is done by using an instant-read thermometer. If you don’t have one, cut into the food to see if it is done to your liking.
Can I use frozen foods in my air fryer?
Yes, you can use frozen foods in your air fryer. However, frozen foods will take longer to cook than fresh foods. Frozen french fries may take as long as 40 minutes to cook in an air fryer. Make sure you preheat your air fryer for at least 10 minutes before putting frozen foods inside of it. Also make sure that you do not overload your basket with too many frozen foods at one time. Overloading the basket may cause some of the food to not get enough heat and will not cook properly. Cook frozen foods in small batches so that they all get enough heat from the circulating hot air inside of your air fryer.
Can I use oil in my air fryer?
Yes, you can use oil in your air fryer but we recommend using spray oil instead of pouring oil into the basket or tray of your air fryer because it is much easier to clean up afterwards and there is less chance of spilling oil all over your countertop or floor when using spray oil versus pouring oil into the basket or tray of your air fryer. You should never fill your air fryers basket or tray more than half full with oil because it will spill out over the top while cooking and make a huge mess on your countertop or floor when cooking with too much oil inside of it at one time. You should only fill your baskets or trays half full with food and then fill them with spray oil after they are already inside of the air fryer so that you don’t spill any oil onto your countertop or floor while cooking with them inside of it at one time. The maximum amount of spray oil that should be used for cooking at one time is 1/4 cup for every 1 pound of food being cooked in an 8
What can you cook with Bella Pro Series air fryer?
Air Fry, Dehydrate, Rotisserie, Grill, Roast, Bake, Broil, and Reheat your favorite meals with consistent results every time. The extra-large capacity fits a 10” pizza, 2.2 lbs. of french fries, 4 slices of bread, and a 4 lb. chicken.
Do you have to preheat a Bella Pro Series air fryer?
BELLA 2.9QT Touchscreen Air Fryer, No Pre-Heat Needed, No-Oil Frying, Fast Healthy Evenly Cooked Meal Every Time, Dishwasher Safe Non Stick Pan and Crisping Tray for Easy Clean Up, Matte Red.
What can you not cook in an air fryer?
8 Things You Probably Shouldn’t Cook in an Air Fryer
Battered foods. Avoid placing wet batter in the air fryer.
Fresh greens. Leafy greens like spinach will cook unevenly because the machine uses high-speed air.
Whole roasts.
Cheese.
Raw grains.
Hamburgers.
Toast.
Popcorn.
Do you have to clean air fryer after every use?
And every time you use the fryer, those bits of food will keep cooking and eventually burn. That’s why you should clean your air fryer after every use.
Can you use coffee filters in air fryer?
A PSA, I know a lot of you are reading about using coffee filters for your air fryer, please do not use them, these are made just for the air fryer.
Can you use Airfryer as a toaster?
Air Fryer Toast is the easiest way to make toast! It turns out perfectly golden and crispy, in just a few minutes. All you need is your favorite slices of bread, and your air fryer. Golden toast is often a favorite breakfast.
Can you heat a cup of coffee in an air fryer?
Air fryers are not suitable for reheating any liquid -including coffee or tea. These appliances heat foods by circulating hot air around the food, cooking from the outside in.
]]>BELLA 17160 2 QT Air Fryer
IMPORTANT SAFEGUARDS
When using electrical appliances, basic safety precautions should always be followed, including the following:
- READ ALL INSTRUCTIONS.
- Do not touch hot surfaces. Use handles or knobs. Use oven mitts or potholders.
- To protect against electric shock do not immerse cord, plugs, or appliance in water or other liquid.
- This appliance is not intended for use by persons (including children) with reduced physical, sensory or mental capabilities, or lack of experience and knowledge, unless they have been given supervision or instruction concerning use of the appliance by a person responsible for their safety.
- Children should be supervised to ensure that they do not play with the appliance.
- Unplug from outlet when not in use and before cleaning. Allow to cool before putting on or taking off parts, and before cleaning the appliance.
- Do not operate any appliance with a damaged cord or plug or after the appliance malfunctions or has been damaged in any manner. Bring it to a qualified technician for examination, repair or electrical or mechanical adjustment.
- The use of accessory attachments not recommended by the appliance manufacturer may cause injuries.
- Do not use outdoors.
- Do not let cord hang over edge of table or counter or touch hot surfaces.
- Do not place on or near a hot gas or electric burner, or in a heated oven.
- Extreme caution must be used when moving an appliance containing hot oil or other hot liquids.
- To disconnect, turn the timer dial to OFF. Then remove plug from wall outlet.
- Do not use appliance for other than intended use.
- Make sure the crisping tray is in place before adding food to be air fried.
- Make sure the frying basket is locked securely into the front of the Air Fryer, while the Air Fryer is in operation.
WARNING: The Air Fryer will not operate unless frying basket is fully closed. CAUTION: After hot air frying, extreme caution must be used when handling the hot frying basket, crisping tray, and cooked foods.
ADDITIONAL IMPORTANT SAFEGUARDS
CAUTION HOT SURFACES: This appliance generates heat and escaping steam during use. Proper precautions must be taken to prevent the risk of burns, fires, or other injury to persons or damage to property.
CAUTION: This appliance is hot during operation and retains heat for some time after turning OFF. Always use oven mitts when handling hot materials and allow metal parts to cool before cleaning. Do not place anything on top of the appliance while it is operating or while it is hot.
- All users of this appliance must read and understand this instruction manual before operating or cleaning this appliance.
- The cord to this appliance should be plugged into a 120V AC electrical outlet only.
- If this appliance begins to malfunction during use, immediately unplug the cord. Do not use or attempt to repair the malfunctioning appliance.
- Do not leave this appliance unattended during use.
- Do not immerse power cord in any liquid. If the power cord to this appliance is damaged, it must be replaced by contacting Consumer Service.
- Keep the cord out of reach from children and infants to avoid the risk of electric shock and choking.
- Place the Air Fryer on a flat, heat-resistant work area.
- Do not obstruct the air outlet or air inlets on the back and sides of the Air Fryer, with any objects. Avoid escaping steam from the air outlet during air frying.
- Keep appliance at least 4 inches away from walls or other objects during operation.
- Always use the frying basket handle to open the frying basket.
- WARNING: After air frying, make sure to place the frying basket on a flat, heat-resistant surface.
WARNING: Under or over-filling the frying basket may damage the Air Fryer and could result in serious personal injury. - Never move a hot Air Fryer or an Air Fryer containing hot food. Allow to cool before moving.
NOTES ON THE PLUG
This appliance has a polarized plug (one blade is wider than the other). To reduce the risk of electric shock, this plug will fit in a polarized outlet only one way. If the plug does not fit fully into the outlet, reverse the plug. If it still does not fit, contact a qualified electrician. Do not modify the plug in any way.
NOTES ON THE CORD
- A. A short power-supply cord (or detachable power-supply cord) is to be provided to reduce the risk resulting from becoming entangled in or tripping over a longer cord.
- B. Longer detachable power-supply cords or extension cords are available and may be used if care is exercised in their use.
- C. If a long detachable power-supply cord or extension cord is used :
- The marked electrical rating of the cord or extension cord should be at least as great as the electrical rating of the appliance;
- If the appliance is of the grounded type, the extension cord should be a grounding-type3-wire cord; and
- The longer cord should be arranged so that it does not drape over the countertop or table top where it can be pulled on by children or tripped over unintentionally.
PLASTICIZER WARNING
CAUTION: To prevent Plasticizers from migrating to the finish of the counter top or table top or other furniture, place NON-PLASTIC coasters or place mats between the appliance and the finish of the counter top or table top. Failure to do so may cause the finish to darken; permanent blemishes may occur, or stains can appear.
ELECTRIC POWER
If the electrical circuit is overloaded with other appliances, your appliance may not operate properly. It should be operated on a separate electrical circuit from other appliances.
Getting to Know Your 2QT Air Fryer
Product may vary slightly from illustration
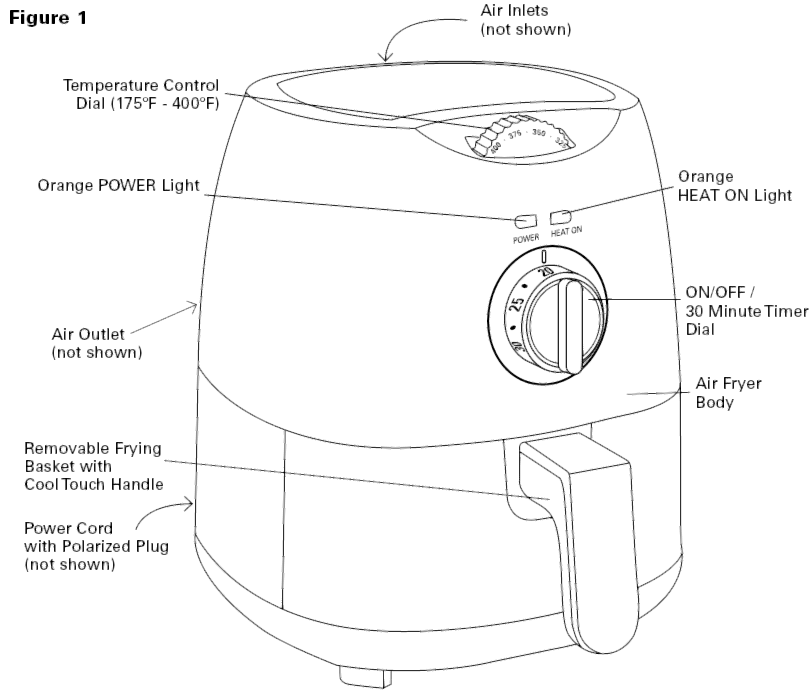
Control Dials
Temperature Control Dial
- Select air frying temperature from 175°F to 400°F. Temperatures can be adjusted at any time.
- The orange HEAT ON light will turn off when set temperature is reached.
- The orange HEAT ON light and heating element cycle on and off to maintain the selected temperature.
30 Minute Countdown Timer Dial
- Once the timer dial is set, the orange HEAT ON light will illuminate to show the Air Fryer is heating.
- To assure even cooking/browning, open the frying basket halfway through the cooking time. Check, turn or vigorously shake foods in the frying basket.
IMPORTANT: When you pull the basket out from the Air Fryer body, the orange HEAT ON light
and the Air Fryer will turn OFF. The timer will continue to count down when the basket is opened. Allow for additional cook time as necessary. - Heating will resume when the basket is replaced.
- One beep will sound when the set air frying time has reached 0. The Air Fryer will turn OFF automatically. The orange HEAT ON light will turn off.
IMPORTANT: When all air frying is finished, turn the timer dial to 0 (OFF). Unplug the Air Fryer when not in use.
Before Using for the First Time
- Your Air Fryer is shipped with the frying basket locked into the front of the Air Fryer body. Firmly grasp the handle to open frying basket; then remove the basket from the machine and place on a flat, clean work area.
- Remove all packing material and labels from the inside and outside of the Air Fryer. Check that there is no packaging underneath and around the frying basket.
- Wash the frying basket and crisping tray in hot, soapy water.
- DO NOT IMMERSE THE AIR FRYER BODY IN WATER. Wipe Air Fryer body with a damp cloth. Dry all parts thoroughly.
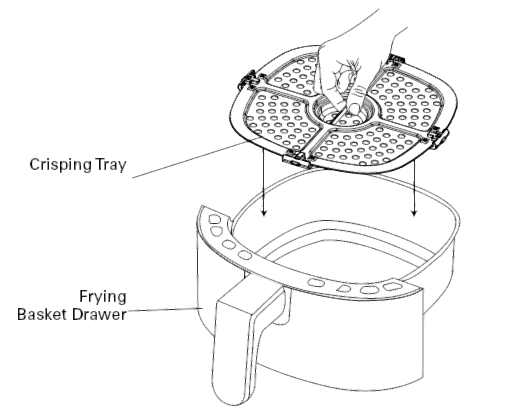
- To ensure the crisping tray fits snugly into the frying basket drawer, there are 4 rubber tips attached to the sides of the tray. Before using, check to make sure all 4 rubber tips are in place. If they become separated from the tray, simply slide onto the tabs as shown.
Operating Instructions
WARNING! This unit should never be used to boil water or heat oil.
NOTE: During first use, the Air Fryer may emit a slight odor. This is normal and will not affect food cooked.
- Place the Air Fryer on a flat, heat-resistant work area, close to an electrical outlet.
- Firmly grasp the frying basket handle to open frying basket; then remove from the machine and place on a flat, clean surface.
- Place the crisping tray into the base of the frying basket.
- Arrange food on top of the crisping tray. Do not overfill frying basket with food. To ensure proper cooking and air circulation, NEVER fill any frying basket more than 2/3 full. When air frying fresh vegetables, we do not recommend adding more than 1-1/2 cups of food to the frying basket.
- Fully insert the frying basket into the front of the Air Fryer.
- Plug cord in the wall outlet.
- Select air frying temperature from 175°F to 400°F.
- Turn timer dial to the desired air frying time plus 3 minutes for preheat if the Air Fryer is cold. The orange HEAT ON light will illuminate; the Air Fryer will begin heating.
IMPORTANT: The Air Fryer will not heat if the timer dial has not been set or if the frying basket is not fully closed - The orange HEAT ON light will turn off when set temperature is reached.
NOTE: During air frying, the orange HEAT ON light will cycle on and off as proper air frying temperature is maintained. - To assure even cooking/browning, open the basket halfway through the frying time and check, turn or shake foods in the frying basket. Adjust temperature if needed. The timer will continue to count down when the basket is opened,
but the Air Fryer will stop heating until the basket is replaced.
WARNING: Extreme caution must be used when handling the hot frying basket and crisping tray. Avoid escaping steam from the frying basket and hot food.
CAUTION: Always use oven mitts when handling the hot air frying basket.
CAUTION: Hot oil can collect at the base of the drawer. To avoid risk of burns or personal injury, or to avoid oil from contaminating air fried foods, always use a pair of tongs or a long wooden spoon to remove the foods from the frying basket. NEVER turn the basket upside down containing air fried foods.
NOTE: The Air Fryer can be turned OFF at any time by turning the timer dial to 0. - One beep will sound when the set air frying time has expired. The Air Fryer will turn OFF automatically. The orange HEAT ON light will turn off automatically. Both the orange POWER light and the orange HEAT ON light will turn off.
- Shake the frying basket vigorously and check food for browning and doneness. If additional
air frying is needed, adjust temperature if desired, and set timer for 3-minute intervals until fully cooked. - Allow cooked food to rest for 5 to 10 seconds before removing basket from Air Fryer or food from frying basket.
- When air frying is finished, remove the basket from the machine and place on a flat, heat resistant surface.
- Use tongs or a long fork to remove air fried foods onto a serving plate. Promptly replace the frying basket into the front of the Air Fryer. Continue with subsequent batches, if any.
- When all air frying is completed, turn the timer dial to OFF. The orange HEAT ON light will turn off.
- Unplug the Air Fryer when not in use.
Helpful Hints
- Spray olive oil or vegetable oil works well for air frying.
- Use your Air Fryer to cook pre-packaged foods with a fraction of the oil, in a fraction of the time!As a general rule, lower the recipe baking temperature by 20ºF, up to 50ºF and reduce the cooking time by 30% to 50% depending on the food and amount.
- Do not overfill frying basket with food. NEVER fill any frying basket more than 2/3 full. When air frying fresh vegetables, we do not recommend adding more than 1-11/2 cup of food to the frying basket.
- For best results, some foods need to be shaken vigorously or turned over during the air fry time. Consult the Air Frying Chart as a general guide.
- To avoid excess smoke, when cooking naturally high fat foods, such as chicken wings or sausages, it may be necessary to empty fat from the frying basket between batches.
- Always pat food dry before cooking to encourage browning and avoid excess smoke.
- Air fry small batches of freshly breaded foods. Press breading onto food, place on a cooling rack and refrigerate to help breading adhere. Arrange in frying basket so that food is not touching to allow air flow on all surfaces.
- The Air Fryer is perfect for reheating food. Set the temperature to 300ºF for up to 10 minutes.
Air Frying Chart
WARNING! ALWAYS USE A MEAT THERMOMETER TO ENSURE THAT MEAT, POULTRY AND FISH ARE COOKED THOROUGHLY BEFORE EATING. The following chart is intended as a guide only. The quantity of food air fried at one time, the thickness or density of the food, and whether the food is fresh, thawed, or frozen may alter the total cooking time necessary.
- To assure even cooking/browning, open the frying basket halfway through the cooking time. Check, turn or vigorously shake foods in the frying basket. This chart lists average total air frying time, the time at which some action is required, and what action is to be taken for best results.
- Remember, frying smaller batches will result in shorter cooking times and higher food quality. Adjust air frying temperatures and times as necessary to suit your taste.
IMPORTANT NOTE: Unless food is pre-packaged and pre-oiled, for browned and crispy results, all foods should be lightly oiled before air frying.
- Oil may be sprayed or brushed onto foods.
- Spray oils work well as oil is evenly distributed and smaller quantities of oil are needed.
- To ensure crispy results, make sure foods are dried before adding oil.
- Cut pieces smaller to create more surface area for crispier results.
- Blanching is a term that refers to pre-cooking foods at a lower temperature before the final air fry.
- Add 3 minutes to the AIR FRY TIME to allow the cold Air Fryer to preheat.
| FOOD | TEMP | AIR FRY TIME* | TIME | ACTION |
| Mixed Vegetables (roasted) | 400ºF | 15 – 20 minutes | 8 minutes | shake |
| Broccoli (roasted) | 400ºF | 15 – 20 minutes | 8 minutes | shake |
| Onion Rings (frozen) | 400ºF | 12 – 18 minutes | 8 minutes | shake |
| Cheese Sticks (frozen) | 350ºF | 8 – 12 minutes | — | — |
| Fried Sweet Potato Chips (fresh, hand cut, 1/8 to 1/16-in. thick) | ||||
| Blanch (Step 1) | 325ºF | 15 minutes | 8 minutes | shake |
| Air Fry (Step 2) | 350ºF | 5 minutes | 3 minutes | shake |
| French Fries, (fresh, hand cut, 1/4 to 1/3-in. thick) | ||||
| Blanch (Step 1) | 325ºF | 15 minutes | 8 minutes | shake |
| Air Fry (Step 2) | 350ºF | 10 – 15 minutes | 5 minutes | shake |
| French Fries, thin (frozen 1.5 cups) | 400ºF | 12 – 16 minutes | 8 minutes | — |
| French Fries, thick (frozen 1.5 cups) | 400ºF | 17 – 21 minutes | 10 minutes | shake |
| Meatloaf, 1 lb. | 350ºF | 35 – 40 minutes | — | — |
| Hamburgers, 1/4 lb. (up to 2) | 350ºF | 10 – 14 minutes | (rare to well done) | |
| Hot Dogs /Sausages | 350ºF | 10 – 15 minutes | 6 minutes | turn over |
| Chicken Wings (fresh/thawed) | ||||
| Blanch (Step 1) | 325ºF | 15 minutes | 8 minutes | shake |
| Air Fry (Step 2) | 350ºF | 9 – 12 minutes | 5 minutes | shake |
| Chicken Tenders/Fingers | ||||
| Blanch (Step 1) | 360ºF | 10 minutes | 5 minutes | turn over |
| Air Fry (Step 2) | 400ºF | 5 minutes | 3 minutes | shake |
| Chicken Pieces | 350ºF | 20 – 30 minutes | 10 minutes | turn over |
| Chicken Nuggets (frozen) | 350ºF | 10 – 15 minutes | 5 minutes | shake |
| Catfish Fingers (thawed, battered) | 400ºF | 7 – 8 minutes | 3 minutes | turn over |
| Fish Sticks (frozen) | 400ºF | 10 – 15 minutes | 5 minutes | turn over |
| Apple Turnovers | 400ºF | 5 minutes | — | — |
| Donuts | 350ºF | 5 minutes | 3 minutes | turn over |
| Fried Cookies | 350ºF | 8 minutes | 4 minutes | turn over |
*Add 3 minutes to the AIR FRY TIME to allow the Air Fryer to preheat.
PLEASE NOTE:
The USDA recommends that meats such as beef and lamb, etc. should be cooked to an internal temperature of 145ºF/63ºC. Pork should be cooked to an internal temperature of 160ºF/71ºC and poultry products should be cooked to an internal temperature of 170ºF/77ºC – 175ºF/82ºC to be sure any harmful bacteria has been killed. When reheating meat/poultry products, they should also be cooked to an internal temperature of 165ºF/74ºC.
User Maintenance Instructions
This appliance requires little maintenance. It contains no user-serviceable parts. Any servicing requiring disassembly other than cleaning must be performed by a qualified appliance repair technician.
Care & Cleaning Instructions
WARNING! Allow the Air Fryer to cool fully before cleaning.
- Unplug the Air Fryer. Remove frying basket. Make sure the frying basket and crisping tray have cooled completely before cleaning. Use the center hole of the crisping tray to lift crisping tray up and out of the frying basket.
- Wash the frying basket and crisping tray in hot soapy water. Do not use metal kitchen utensils or abrasive cleansers or cleaning products as this may damage the non-stick coating.
IMPORTANT: After cleaning, always check to make sure all 4 rubber tips are securely fastened to the 4 tabs on the crisping tray. - The frying basket and crisping tray are dishwasher-safe. For best results, place in the top rack of your dishwasher to clean.
Storing Instructions
- Make sure the Air Fryer is unplugged and all parts are clean and dry before storing.
- Never store the Air Fryer while it is hot or wet.
- Store Air Fryer in its box or in a clean, dry place.
Recipes
Air Fried Sweet Potato Chips
Serves 1 to 2:
- 1 large sweet potato (2 cups)
- 2 teaspoons vegetable oil
- Cinnamon sugar or brown sugar, optional
- Wash the sweet potato and peel if desired.
- If available, use a mandolin to cut thin and even potato chips.
- To cut by hand, first cut potato in half, and with the flat side on the cutting board, hand cut into very thin chips.
- Place vegetable oil into a large bowl. Add raw potatoes and use your hands to mix well, making sure every chip is oiled on all sides. NOTE: Spray oils may be substituted.
- Transfer oiled chips to the frying basket
- Set Air Fryer to 325ºF and air fry for 15 minutes. Shake the frying basket vigorously halfway through air fry time.
- Increase heat to 350ºF and air fry for 5 minutes. Shake the frying basket vigorously halfway through air fry time.
- Remove from Air Fryer. Sprinkle hot potatoes with cinnamon sugar or brown sugar for a special sweet treat.
Hard Cooked Eggs
6 eggs
Place in the Air Fryer @ 260°F for 13 minutes.
When eggs are cool enough to handle, they will be perfectly cooked!
Stuffed Rainbow Baby Bells
- 1 poblano pepper, may substitute 1-2 jalapenos, or 1 Cubanelle
- 8 baby bell peppers
- 1/4 cup vegetable cream cheese
- 1/4 cup grated or shredded fresh Parmesan cheese
- 2 tablespoons milk
- 1 handful mixed greens
- 1 teaspoon zaatar seasoning
- 1 teaspoon Kosher salt
- Roast poblano pepper, or any fresh pepper(s) of your choice. Lightly spray with oil. Place in the Air Fryer and cook @ 370°F for 13 minutes. Turn pepper(s) halfway through cooking.
- When cooled, remove top(s), skin, slice open to scrape out seeds. Chop cooked pepper(s) into small pieces.
- Prepare baby bells by removing the tops, scoop out the insides by removing the seeds, and veins. Set aside.
- Place all filling ingredients into a large bowl. Mix well.
- Stuff each pepper with this mixture. Arrange in the frying basket.
- Spray with olive oil, optional.
- Set Air Fryer to 370°F and cook for 8 to 10 minutes. Turn stuffed peppers halfway through cooking.
- Serve at room temperature.
Air Fried Hassle-Free Hasselback Potatoes
- 1 or 2 medium potatoes, red or white
- olive oil, as needed
- Kosher salt or sea salt
- shredded cheese, your choice, optional
- bacon bits, optional
- Wash potatoes well. Depending on your preference, these Hassle-Free potatoes are delicious either with the skin on or peeled.
- Prepare Hasselbacks. Cut slits 1/4-inch apart and 1/4-inch from the bottom of the potatoes.
- Brush potatoes with olive oil.
- Set Air Fryer to 370°F and cook for 30 minutes.
- Halfway through cook time, brush potatoes with olive oil. Continue to cook until potatoes are fully cooked.
- Delicious plain or topped! Try shredded cheese and bacon bits, plain melted salted butter, sour cream, chives, pesto, salsa, or olive tapenade.
Family Cornbread
- 1 (8 oz.) box corn muffin/corn bread mix
- 1/2 (8 oz.) can creamed corn
- 1/2 cup shredded pepper jack or cheddar cheese
- 1 egg
- 1 tablespoon salted butter, melted
- 2 tablespoons sour cream
- IMPORTANT! Remove the crisping tray from the frying basket drawer.
- Whisk an egg in a medium mixing bowl. Add corn muffin mix and the remaining ingredients to the bowl and mix well.
- Bake 400ºF for 18 to 20 minutes or until golden brown and a toothpick comes out clean.
Fish & Chips
Makes 12 nuggets
Serves 3 to 4
Treat your family to a delicious Fish & Chips dinner. These sweet and juicy catfish nuggets are crunchy good and pair fabulously with fresh hand cut French fries (recipe follows). Serve with fresh slaw and the meal is complete!
- 1 small catfish filet, or a 1/3 to 1/2 lb. hunk of filet
- 1/8 cup flour
- 1 tablespoon Old Bay® seasoning
- 1 egg + 1 egg white
- 3/4 cup seasoned panko bread crumbs
- olive oil spray
- Cut the catfish into 10 to 12 nuggets approximately 1-inch by 2-inches in length.
- Season each piece of fish, top and bottom, with Old Bay® seasoning.
- Set up 3-bowl breading station:
• Flour
• Whisk egg and egg white until well blended
• Panko bread crumbs - Place each piece of catfish into the flour. Pat gently with your hands to remove any excess.
- Dip both sides into egg.
- Dip and press and coat both sides with panko bread crumbs.
- Add 4 to 5 catfish nuggets to air frying basket. Allow air circulation on all sides of each fish piece for best browning.
- Spray with olive oil. (optional)
- Set Air Fryer to 400ºF and air fry for 7 to 8 minutes. Turn fish at 3 minutes.
- Repeat with remaining fish nuggets.
Chips (Fresh Hand Cut French Fries)
Serves 1 to 2
- 1 russet potato
- 2 teaspoons vegetable oil
- Kosher salt, to taste
- 6-8 cups water
- 4 tablespoons salt
- Cut potatoes into 1/4” x 1/4” French fries. One medium potatoes will yield 2 cups raw cut potatoes. It is best to fry in 2 batches.
- Soak potatoes in brine for 1 hour to overnight.
- Dry on clean kitchen towel.
- Place 2 teaspoons of vegetable oil into a large bowl. Add raw potatoes and use your hands to mix well, making sure every potato is oiled on all sides.
- Transfer oiled potatoes to the frying basket.
- Set Air Fryer to 325ºF and air fry for 15 minutes Shake the frying basket vigorously halfway through air fry time.
- Increase heat to 350ºF and air fry for 10 minutes. Shake the frying basket vigorously halfway through air fry time.
- Remove from Air Fryer and add Kosher salt, or your choice of seasonings, to taste.
- Repeat with remaining potatoes.
Nutrition Facts:
- Per 1/2 recipe
- Calories 170
- Fat 2.5g
- Cholesterol 0mg
- Sodium 470mg
- Carbohydrate 32g
- Fiber 3g
- Sugars 2g
- Protein 4g
Nutrition Comparisons:
- These fries contain 88% less fat than typical fast food French fries (based on averaged data from 4 restaurants).
- These fries contain 65% fewer calories than typical fast food French fries (based on averaged data from 4 restaurants).
Nutrition Notes:
The sodium value is an estimate only. It will vary depending on how long the potatoes stay in the brine and the amount of brine absorbed into the potatoes. This analysis estimates a brine absorption of 10% of the raw weight of the potatoes
Crisp & Juicy Chicken Tenders
- 2 egg whites
- 1/4 cup water
- 3/4 cup seasoned panko bread crumbs
- 4 chicken tenders (1 1/4 lb)
- Spray olive oil (optional)
- In small bowl, lightly beat together egg whites and water. Place bread crumbs on plate. Dip 1 chicken tender into egg whites; dredge in bread crumbs, pressing to coat on both sides. Repeat with remaining chicken tenders.
- Add breaded chicken tenders to fry basket, leaving space in between to allow air circulation for browning. Spray with olive oil (if using).
- Set Air Fryer to 350°F; air fry for 12 minutes, turning chicken tenders halfway through air fry time. Increase heat to 400°F; air fry for 6 minutes, turning chicken tenders halfway through air fry time. Repeat with remaining chicken tenders.
Tip: Use chicken tenders whole or cut into pieces if desired.
Nutrition Facts
- (2 tenders)
- Calories 200
- Fat 3g
- Cholesterol 80mg
- Sodium 100mg
- Carbohydrate 8g
- Fiber 0g
- Sugars 0g
- Protein 34g
Nutrition Comparisons:
- These chicken tenders contain 89% less fat than typical fast food chicken tenders (based on averaged data from 2 restaurants).
- These chicken tenders contain 57% fewer calories than typical fast food chicken tenders (based on averaged data from 2 restaurants).
Apple Turnovers with Vanilla Drizzle
Makes: 8 bitsy turnovers
- 2 (5-in. x 5-in.) frozen, prepared puff pastry sheets, thawed
- 1/2 cup apple pie filling
- 3 teaspoons golden raisins (optional)
Vanilla* Drizzle
- 1/2 cup confectioner’s sugar
- 1 tablespoon milk
- 1/4 teaspoon vanilla* extract
Chocolate Drizzle
- 1/2 cup confectioner’s sugar
- 2 tablespoons cocoa powder (unsweetened)
- 1 tablespoon milk
- 1/4 teaspoon vanilla* extract
- Prepare icings to drizzle over turnovers. Combine ingredients in a small bowl and mix well.
* May substitute caramel, maple, almond, lemon, or orange extract. - Unfold thawed puff pastry sheet onto a clean, lightly floured surface.
- Spoon 1 tablespoon pie filling into the center of each square.
- Fold pastry over the pie filling to form a triangle. Crimp edges with a fork to seal.
- Add 4 bitsy turnovers to the frying basket.
- Set Air Fryer to 400º and air fry for 5 minutes.
- Remove bitsy turnovers from frying basket. Allow to cool.
- Repeat with 4 remaining turnovers.
- Use a small spoon to drizzle vanilla in a zig zag pattern over the top.
* May substitute any flavor prepared canned pie filling.
Variation: Cherry Turnovers with Chocolate Drizzle
1. Follow the turnover recipe above. Use cherry pie filling.
2. Drizzle with chocolate icing.
3. Serve warm turnovers topped with your favorite ice cream.
Limited TWO-YEAR Warranty
SENSIO Inc. hereby warrants that for a period of TWO YEARS from the date of purchase, this product will be free from mechanical defects in material and workmanship, and for 90 days in respect to non-mechanical parts. At its sole discretion, SENSIO Inc. will either repair or replace the product found to be defective, or issue a refund on the product during the warranty period.
The warranty is only valid for the original retail purchaser from the date of initial retail purchase and is not transferable. Keep the original sales receipt, as proof of purchase is required to obtain warranty validation. Retail stores selling this product do not have the right to alter, modify, or in any way revise the terms and conditions of the warranty.
EXCLUSIONS:
The warranty does not cover normal wear of parts or damage resulting from any of the following: negligent use of the product, use of improper voltage or current, improper routine maintenance, use contrary to the operating instructions, disassembly, repair, or alteration by anyone other than qualified SENSIO Inc. personnel. Also, the warranty does not cover Acts of God such as fire, floods, hurricanes, or tornadoes.
SENSIO Inc. shall not be liable for any incidental or consequential damages caused by the breach of any express or implied warranty. Apart from the extent prohibited by applicable law, any implied warranty of merchantability or fitness for a particular purpose is limited in time to the duration of the warranty. Some states, provinces or jurisdictions do not allow the exclusion or limitation of incidental or consequential damages, or limitations on how long an implied warranty lasts, and therefore, the above exclusions or limitations may not apply to you. The warranty covers specific legal rights which may vary by state, province and/or jurisdiction.
HOW TO OBTAIN WARRANTY SERVICE:
You must contact Customer Service at our toll-free number: 1-866-832-4843.
A Customer Service Representative will attempt to resolve warranty issues over the phone. If the Customer Service Representative is unable to resolve the problem, you will be provided with a case number and asked to return the product to SENSIO Inc. Attach a tag to the product that includes: your name, address, daytime contact telephone number, case number, and description of the problem. Also, include a copy of the original sales receipt. Carefully package the tagged product with the sales receipt, and send it (with shipping and insurance prepaid) to SENSIO Inc.’s address. SENSIO Inc. shall bear no responsibility or liability for the returned product while in transit to SENSIO Inc.’s Customer Service Center.
![]()
![]()
1.5 QUART
SLOW COOKER
Instruction Manual and Recipe Guide
WWW.BELLAHOUSEWARES.COM
Register your product and get support · Registrary obtene
IMPORTANT SAFEGUARDS
When using electrical appliances especially when children are present, basic safety precautions should always be followed to reduce the risk of fire, electric shock, and/or injury to persons, including the following:
- READ ALL INSTRUCTIONS.
- Do not touch hot surfaces, as it will cause burns to hands and limbs.
Use handles or knobs.
Use potholders when removing cover or handling hot containers. - To protect against electrical shock, do not place a cord, plug, or appliance in water or other liquid.
- Close supervision is necessary when any appliance is used by or near children, as it is an electrical appliance that may cause electric shock when not in proper use.
- Unplug from outlet when not in use and before cleaning. Allow cooling before cleaning, putting on, or taking off parts.
- Do not operate any appliance with a damaged cord or plug, or after the appliance malfunctions or has been damaged in any manner. If there is a problem, return the appliance to the nearest authorized service facility for examination, repair, or adjustment.
- The use of accessory attachments not recommended by the appliance manufacturer may cause injury.
- Do not use outdoors, as it is not designed for such use and can cause electric shock.
- Do not let the cord hang over the edge of the table or counter, as you may trip and fall or cause the hot contents of the slow cooker to spill and possibly cause burns or injuries.
- Do not place on or near a hot gas, electrical burner, or in a heated oven as these actions could cause this appliance to melt.
- Do not let the cord touch hot surfaces as it will melt.
- Extreme caution must be used when moving an appliance containing hot food, water, or other hot liquids to reduce the risk of burns or injury to hands and limbs.
- Lift and open the cover carefully to avoid scalding and to allow hot condensation to drip back into the unit.
- To disconnect, turn control to OFF, then remove the plug from the wall outlet.
- Stoneware pots are designed for use with this appliance only. They must never be used on a range top, as it will crack and can cause burns if there are hot liquids or food inside. Do not set a hot stoneware pot on a wet or cold surface, as it will crack. Do not use a cracked container.
- This appliance is for HOUSEHOLD USE ONLY. It may be plugged into an AC electrical outlet (ordinary household current). Do not use any other electrical outlet, as it will cause an electric shock.
- Do not use appliances other than intended use.
- Avoid sudden temperature changes, such as adding refrigerated foods into a heated pot, as the pot will crack.
- To reduce the risk of electrical shock, cook only in a removable stoneware pot provided.
SAVE THESE INSTRUCTIONS FOR HOUSEHOLD USE ONLY
ADDITIONAL IMPORTANT SAFEGUARDS
CAUTION, HOT SURFACES: This appliance generates heat and escaping steam during use. Proper precautions must be taken to prevent the risk of burns, fires, or another injury to persons or damage to property.
- A person who has not read and understood all operating and safety instructions is not qualified to operate this appliance. All users of this appliance must read and understand this instruction manual before operating or cleaning this appliance.
- If this appliance falls or accidentally becomes immersed in water, unplug it from the wall outlet immediately. Do not reach into the water! It will cause an electric shock.
- When using this appliance, provide adequate air space above and on all sides for air circulation. Do not operate this appliance while it is touching or near curtains, wall coverings, clothing, dish towels, or other flammable materials.
- Do not leave this appliance unattended during use.
- If this appliance begins to malfunction during use, immediately unplug the cord. Do not use or attempt to repair a malfunctioning appliance!
- The cord to this appliance should be plugged into a 120V AC electrical wall outlet.
- Do not use this appliance in an unstable position. The unit may tilt and cause the food to fall and burn the hands and limbs of the user.
- Never use the stoneware pot on a gas or electric cook top or on an open flame, as the stoneware pot, will crack.
- Liftoff the lid carefully to avoid scalding, and allow water to drip into the stoneware pot.
- CAUTION: To protect against damage or electric shock, do not cook in the base unit. Cook only in the stoneware liner provided.
NOTES ON THE PLUG
This appliance has a polarized plug (one blade is wider than the other). To reduce the risk of electric shock, this plug will fit in a polarized outlet only one way.
If the plug does not fit fully into the outlet, reverse the plug. If it still does not fit, contact a qualified electrician. Do not modify the plugin any way.
NOTES ON THE CORD
The provided short power-supply cord (or detachable power-supply cord) should be used to reduce the risk resulting from becoming entangled in or tripping over a longer cord. Do not use an extension cord with this product.
PLASTICIZER WARNING
CAUTION: To prevent Plasticizers from migrating from the finish of the countertop or tabletop or other furniture, place NON-PLASTIC coasters or placemats
between the appliance and the finish of the countertop or tabletop. Failure to do so may cause the finish to darken; permanent blemishes may occur or stains can appear.
ELECTRIC POWER
If the electrical circuit is overloaded with other appliances, your appliance may not operate properly. It should be operated on a separate electrical circuit from
other appliances.
GETTING TO KNOW YOUR SLOW COOKER
Product may vary slightly from illustration
 INTRODUCTION TO SLOW COOKING
Slow cooking occurs at temperatures just around boiling. The Slow Cooker can operate at LOW all day or night if required. Cooking on HIGH is very much like cooking in a covered pot on the stovetop. Foods will cook on HIGH in about half the time required for LOW cooking. Additional liquid may be required as foods do boil on HIGH. When cooking is complete, food can be kept on WARM for short periods of time. To turn the Slow Cooker OFF, turn the control dial to the OFF position. Always unplug from the electrical outlet when not in use.
BEFORE USING IT FOR THE FIRST TIME
- Carefully unpack the slow cooker.
- Wash the cooking pot and glass lid in warm, soapy water. Rinse well and dry thoroughly.
- Wipe interior and exterior surfaces of the base with a soft, moist cloth to remove dust particles collected during packing and handling. NEVER IMMERSE THE BASE, ITS CORD, OR PLUG IN WATER OR ANY OTHER LIQUID, IT WILL CAUSE BURNS TO HANDS AND LIMBS.
- The slow cooker should be operated before initial use. After cleaning the unit, place the cooking pot inside the base. Pour 2 cups of water into the cooking pot and cover with a lid. Plug the slow cooker into an electrical wall outlet and turn to HIGH setting. Allow operating for approximately 30 minutes.
- After 30 minutes, switch OFF and unplug. Allow unit to cool. Remove the cooking pot, and discard water. Rinse the cooking pot, dry thoroughly, and replace it in the base.
LINE CORD SAFETY TIPS
1. Never pull or yank on a cord or the appliance.
2. To insert the plug, grasp it firmly and guide it into an outlet.
3. To disconnect the appliance, grasp the plug and remove it from the outlet.
4. Before each use, inspect the line cord for cuts and/or abrasion marks. If any are found, this indicates that the appliance should be serviced and the line cord replaced.
5. Never wrap the cord tightly around the appliance, as this could place undue stress on the cord where it enters the appliance and causes it to fray and break.
An extension cord is not recommended for use with this appliance.
DO NOT OPERATE THE APPLIANCE IF THE LINE CORD SHOWS ANY DAMAGE, OR IF THE APPLIANCE WORKS
INTERMITTENTLY OR STOPS WORKING ENTIRELY.
IMPORTANT
During the first few minutes of initial use, you may notice smoke and/or a slight odor. This is normal and
should quickly disappear. It will not recur after the appliance has been used a few more times.
STONEWARE POT CARE
Like any ceramic, the stoneware pot may crack or break if not properly handled.
To prevent damage, handle with care!
WARNING: Failure to follow these instructions can cause breakage resulting in injury or property damage.
- ALWAYS USE POTHOLDERS OR OVEN MITTS WHEN HANDLING HOT STONEWARE, AS IT WILL CAUSE BURNS TO HANDS AND LIMBS.
- DO NOT place hot stoneware pot on the countertop, as it will stain or burn the countertop. Use a protective trivet.
- DO NOT place stoneware pot on any range top burner, under a broiler, microwave browning element, or in a toaster oven; as it will crack the stoneware pot.
- DO NOT strike utensils against the rim of the stoneware pot to dislodge the food, as it will scratch the stoneware.
- DO NOT use stoneware pot to popcorn, caramelize sugar, or make candy.
- DO NOT use abrasive cleaners, scouring pads, or any object that will scratch the cookware or accessories.
- DO NOT use or repair any pot or lid that is chipped, cracked, or broken.
- DO NOT use stoneware pot for reheating foods or for general food storage.
- Always place foods into the stoneware pot at room temperature; then place the pot into the base unit before turning the unit ON.
NEVER heat the stoneware pot when it is empty, as it will crack the pot.
GLASSWARE CARE
WARNING: To prevent cracking or breaking of the glass cover, which may cause personal injury, the cover should be treated with special care.
CAUTIONS: Glass cover may shatter if it is exposed to direct heat or subjected to severe temperature changes. Chips, cracks or deep scratches may also weaken the cover.
- KEEP COVER AWAY FROM broiler, microwave oven, hot stovetop burners, oven heat vents. If cover
has been utilized in any of these locations, do not use it again, even if there are no signs of damage. - IF THE COVER BECOMES CHIPPED, CRACKED, OR SCRATCHED, DO NOT USE IT. Discard it.
- ALWAYS LET COVER COOL on a dry, heat-resistant surface before handling. Do not place it on cold or wet surfaces, as this may cause it to crack or shatter.
- ALWAYS USE POTHOLDERS OR OVEN MITTS when removing the hot cover. To avoid burns from escaping steam, always tilt the cover away from hands and face.
OPERATING INSTRUCTIONS
Using a slow cooker is easy but different from conventional cooking. To help you, this manual contains many helpful hints for successful slow cooking. Many more slow cooker recipes books are available in libraries and bookstores. Keep these materials handy whether preparing favorite recipes or trying something new. This slow cooker has three heat settings: LOW, HIGH, and WARM. Use the recommended guidelines offered in the recipe being used to determine the cooking time and heating position. Dishes can be prepared well in advance of mealtime and cooking time regulated so that food is ready to serve at a convenient time. A general rule of thumb for most slow cooker meat-and-vegetable combos is:
| COOKING TIME | RECOMMENDED TEMPERATURE SETTING |
| 8-10 hours 4-6 hours |
LOW HIGH |
- Prepare recipe according to instructions.
- Place food in a cooking pot and cover.
- Plug the slow cooker into a wall outlet and select LOW, HIGH, or WARM.
- Cook according to recipe instructions.
- Serving. Turn the slow cooker to the WARM setting for a short period of time prior to serving or turn to the OFF position to unplug the appliance.
- Using pot holders, remove the cover.
CAUTION: When removing the cover, grasp the designated area on the lid and lift to allow steam to escape before setting cover aside.
To avoid burns, always hold cover so that escaping steam flows away from hands and face. - Grasp the cooking pot by the handles and remove it from the base.
- Tableside serving. If serving directly from the cooking pot, always place a trivet or protective padding under the pot before placing it on a table or countertop.
CAUTION: The pot will be hot and can cause burns.
HINTS FOR SLOW COOKING
- Meats will not brown during the cooking process. If you desire to brown, heat a small amount of oil in a skillet and brown meats prior to placing into the stoneware liner.
- Whole herbs and spices flavor better in slow cooking than crushed or ground.
- When cooking in a Slow Cooker, remember that liquids do not boil away like they do in conventional cooking. Reduce the amount of liquid in any recipe that is not designed for a Slow Cooker. The exceptions to this rule would be rice and soups. Remember, liquids can always be added at a later time if necessary. If a recipe results in too much liquid at the end of the cooking time, remove the glass lid and turn the control dial to HIGH. After about 30-45 minutes the amount of liquid will be reduced.
- Most recipes that call for uncooked meat and vegetables require about 6-8 hours at LOW temperature.
- High-fat meats can result in dishes with less flavor. Pre-cooking or browning will help reduce the amount of fat and help to preserve the color. The higher the fat content, the less liquid is needed. If cooking meat with high-fat content, use thick onion slices under it so that the meat will not sit and cook in the fat. If necessary, use a slice of bread, a spoon, or a straining spoon to skim off excess fat from the top of the foods before serving.
- Foods cut into uniform pieces will cook faster and more evenly than foods left whole such as roast or poultry.
- Use the WARM setting to keep cooked food at the perfect serving temperature.
DO NOT cook foods in the WARM setting.
NOTE: Do not keep foods on the WARM setting for more than 4 hours.
CONVERTING STANDARD RECIPES TO SLOW COOKING
- Vegetables such as carrots, potatoes, turnips, and beets require a longer cooking time than many types of meat. Be sure to place them on the bottom of the Slow Cooker and cover them with liquid.
- If adding fresh milk or yogurt, this should be done during the last 2 hours. Evaporated milk may be added at the start of cooking.
- Rice, noodles, and pasta are not recommended for long cooking periods. Cook them separately and then add to the Slow Cooker during the last 30 minutes.
USER MAINTENANCE INSTRUCTIONS
This appliance requires little maintenance. It contains no user-serviceable parts. Do not try to repair it yourself. Any servicing requiring disassembly other than cleaning must be performed by a qualified appliance repair technician.
- Avoid sudden, extreme temperature changes. For example, do not place a hot glass lid or stoneware liner into cold water or onto a wet surface.
- Do not use the stoneware liner to store food in the refrigerator, and then reheat it in the base unit. The sudden temperature change may crack the liner.
- Avoid hitting the stoneware liner and glass lid against the faucet or other hard surfaces.
- Do not use stoneware liner or glass lid if chipped, cracked, or severely scratched.
CAUTION: NEVER IMMERSE THE BASE UNIT OR CORD IN WATER OR OTHER LIQUID. - Always unplug and allow to cool completely before cleaning.
- Both the liner and the glass lid may be cleaned in the dishwasher. To clean by hand, wash the stoneware liner and glass lid in warm, soapy water.
- If food sticks to the stoneware liner, fill with warm soapy water and allow to soak before cleaning with a plastic scouring pad. Rinse and dry thoroughly.
- Wipe the interior and exterior of the base unit with a soft, slightly damp cloth or sponge. Never use abrasive cleaners or scouring pads to clean the base unit, as they may damage the surfaces.
TO CLEAN
This appliance should be cleaned after every use. After the unit has been allowed to cool, wash the cooking pot and cover in warm, soapy water. Rinse well and dry. If food sticks to the surface of the cooking pot, fill the pot with warm, soapy water and allow it to sit for a few hours before cleaning. Wipe interior and exterior surfaces of the base with a soft, slightly damp cloth or sponge. Never immerse the base in water. Never use abrasive cleaners or scouring pads to clean the cooking pot or base, as these can damage the surfaces.
NEVER IMMERSE THE BASE IN WATER. NEVER USE ABRASIVE CLEANERS OR SCOURING PADS TO CLEAN THE COOKING POT OR BASE, AS THESE CAN DAMAGE THE SURFACES.
DISHWASHER CLEANING
Stoneware cooking pot may be cleaned in a dishwasher. To prevent damage, position it in the rack so that it will not hit other items during cleaning.
SPECIAL CLEANING
If the cooking pot becomes stained, clean with a non-abrasive cleanser or applies a paste of baking soda with a soft cloth. To remove water spots or mineral deposits, wipe with distilled white vinegar, or pour a small amount into the pot and let it soak. After cleaning, wash the pot in warm, soapy water, rinse and dry.
STORING INSTRUCTIONS
- Be sure all parts are clean and dry before storing.
- Store appliances in their box or in a clean, dry place.
- Never store Slow Cooker while it is hot or wet.
- To store, place stoneware liner inside the base unit and the glass lid over the stoneware liner; to protect the glass lid, wrap with a soft cloth and place upside down over the liner.
- Never wrap the cord tightly around the appliance; keep it loosely coiled.
Recipes
Mexican Cheese Dip
Serves 4 to 5
- 2 Italian turkey sausages, hot or mild (may substitute your favorite pork sausage)
- 1 tablespoons vegetable oil
- 2 tablespoons chili powder
- 1 tablespoon ground cumin
- 4 tablespoons taco seasoning
- 1 (2.25 oz.) can sliced black olives
- 1/4 cup jalapenos, canned, sliced (optional)
- 2 cups processed cheese, such as Velveeta®, cubed
- tortilla chips, for serving
- Preheat a skillet, over medium-high heat. Use a knife to lightly cut through sausage casing.
Pull away casing to remove sausage. When the skillet is hot, add oil and brown turkey sausage, 10 to 15 minutes. - Transfer browned turkey to the Slow Cooker.
- Add the remaining ingredients.
- Cover and cook on HIGH until cheese is bubbly and melted, about 1 hour.
- Turn heat down to WARM and serve with tortilla chips.
Maple Baked Red Beans
Serves 4 to 6
- 2 (15 oz.) cans of red beans
- 1 can (14.5 oz.) stewed tomatoes
- 1 cup onions, chopped
- 1 red pepper, seeded, chopped
- 1 cup beef or chicken broth
- 3 tablespoons ancho chili powder
- 1 cup pure maple syrup
- Add drained, rinsed beans and the remaining ingredients to the Slow Cooker. Mix well.
- Cover and cook on LOW for 6 to 8 hours or HIGH for 3 to 4 hours.
- For a thicker, creamier texture, after cooking is complete, remove a portion of the beans from the Slow Cooker in a small bowl. Mash with a potato masher and return to the beans.
Mix well.
NOTE: These beans will thicken in time. Add more broth if needed.
Recipes
Sweet & Spicy Pineapple Chicken
Serves 2 to 3
- 4 skinless, boneless chicken breasts
- 2 – 3 garlic cloves, minced
- 2 tablespoons fresh ginger, minced
- 1/2 teaspoon crushed red pepper flakes
- 1 jalapeno pepper, seeded and deveined, finely chopped (optional)
- 1 tablespoon chipotle pepper in adobo sauce, chopped finely (optional)
- 1/2 cup canned pineapple chunks, drained
- 1 green bell pepper, seeded, chopped
- 1/4 cup chicken broth
- 1/4 cup dark brown sugar
- 1/4 cup apple cider vinegar
- 2 tablespoons soy sauce
- 1 tablespoon hoisin sauce
- 2 cups white or brown rice to serve
- 4 green onions, sliced thinly
- Add all ingredients to Slow Cooker.
- Cover and cook on LOW for 5-6 hours.
- Serve over rice. Sprinkle fresh green onions over the top before serving.
Limited TWO-YEAR Warranty
SENSIO Inc. hereby warrants that for a period of TWO YEARS from the date of purchase, this product will be free from mechanical defects in material and workmanship, and for 90 days in respect to non-mechanical parts. At its sole discretion, SENSIO Inc. will either repair or replace the product found to be defective, or issue a refund on the product during the warranty period. The warranty is only valid for the original retail purchaser from the date of initial retail purchase and is not transferable. Keep the original sales receipt, as proof of purchase, is required to obtain warranty validation. Retail stores selling this product do not have the right to alter, modify, or in any way revise the terms and conditions of the warranty.
EXCLUSIONS:
The warranty does not cover normal wear of parts or damage resulting from any of the following: negligent use of the product, use of improper voltage or current, improper routine maintenance, use contrary to the operating instructions, disassembly, repair, or alteration by anyone other than qualified SENSIO Inc. personnel. Also, the warranty does not cover Acts of God such as fire, floods, hurricanes, or tornadoes.
SENSIO Inc. shall not be liable for any incidental or consequential damages caused by the breach of any express or implied warranty. Apart from the extent prohibited by applicable law, any implied warranty of merchantability or fitness for a particular purpose is limited in time to the duration of the warranty. Some states, provinces, or jurisdictions do not allow the exclusion or limitation of incidental or consequential damages or limitations on how long an implied warranty lasts, and therefore, the above exclusions or limitations may not apply to you. The warranty covers specific legal rights which may vary by state, province, and/or jurisdiction.
HOW TO OBTAIN WARRANTY SERVICE:
You must contact Customer Service at our toll-free number: 1-866-832-4843.
A Customer Service Representative will attempt to resolve warranty issues over the phone. If the Customer Service Representative is unable to resolve the problem, you will be provided with a case number and asked to return the product to SENSIO Inc. Attach a tag to the product that includes: your name, address, daytime contact telephone number, case number, and description of the problem. Also, include a copy of the original sales receipt. Carefully package the tagged product with the sales receipt, and send it (with shipping and insurance prepaid) to SENSIO Inc.’s address. SENSIO Inc. shall bear no responsibility or liability for the returned product while in transit to SENSIO Inc.’s Customer Service Center.
![]()
 THANK YOU
for your purchase

REGISTER AND SIGN UP
for special announcements and trendy recipes!
![]()
TELL US WHAT YOU THINK!
Rate, review or ask us a question.
![]()
GO TO: bellahousewares.com
#myBELLAlife
![]()
For customer service questions or comments Dudas o comentarios contactar el departamento de servicio al cliente
1-866-832-4843 / [email protected]
17170_R0
Sensio Inc. New York, NY 10016/USA
17170_BELLA_1.5QT slow cooker_SS_IM_R0.indd 22
2020-06-05 3:25 PM
]]>IMPORTANT SAFEGUARDS
WARNING: When using electrical appliances, basic safety precautions should always be followed, including the following:
- READ ALL INSTRUCTIONS BEFORE USING APPLIANCE.
- Do not touch hot surfaces. Use handles or knobs. Use potholders when removing lid or handling hot containers.
- To protect against electrical shock do not immerse cord, plugs, or appliance in water or other liquid.
- This appliance is not intended for use by persons (including children) with reduced physical, sensory or mental capabilities, or lack of experience and knowledge, unless they have been given supervision or instruction concerning use of the appliance by a person responsible for their safety.
- Close supervision is necessary when any appliance is used by or near children.
- Unplug from outlet when not in use and before cleaning. Allow to cool before putting on or taking off parts.
- Do not operate any appliance with a damaged cord or plug or after the appliance malfunctions, or has been damaged in any manner. Bring it to a qualified technician for examination, repair or for electrical or mechanical adjustment.
- The use of accessory attachments not recommended by the appliance manufacturer may cause injuries.
- Do not use outdoors.
- Do not let cord hang over edge of table or counter, or touch hot surfaces.
- Do not place on or near a hot gas or electric burner, or in a heated oven.
- Extreme caution must be used when moving an appliance containing hot oil or other hot liquids.
CAUTION: To protect against damage or electric shock, do not cook in the base. Cook fresh, whole eggs only in the boiling racks provided.
NOTE: Never operate Egg Cooker without water in the reservoir, or use a liquid other than water for cooking purposes as this may damage the unit. - To disconnect, press the ON/OFF (I/O) button, then remove plug from outlet.
- Do not use appliance for other than intended use.
WARNING: Escaping steam. Use caution. Do not place face near steam vents.
WARNING: To avoid scalding, lift to open lid carefully and allow water to drip into the water reservoir.
CAUTION: The piercing pin on the underside of the water measuring cup is very sharp. Use extreme caution when handling.
ADDITIONAL IMPORTANT SAFEGUARDS
CAUTION HOT SURFACES: This appliance generates heat and escaping steam during use. Proper precautions must be taken to prevent the risk of burns, fires or other injury to persons or damage to property.
- A person who has not read and understood all operating and safety instructions is not qualified to operate this appliance. All users of this appliance must read and understand this instruction manual before operating or cleaning this appliance.
- If this appliance falls or accidentally becomes immersed in water, unplug it from the wall outlet immediately. Do not reach into the water!
- Do not leave this appliance unattended during use.
- If this appliance begins to malfunction during use, immediately unplug the cord. Do not use or attempt to repair a malfunctioning appliance!
- The cord to this appliance should be plugged into a 120V AC electrical wall outlet.
- Do not use this appliance in an unstable position.
CAUTION: To protect against damage or electric shock, do not cook in the base.
WARNING! FOOD SAFETY HAZARD FDA GUIDELINES SUGGEST:
- Consuming raw or undercooked eggs may increase your risk of foodborne illness.
- Thorough cooking is perhaps the most important step in making sure eggs are safe. Cook eggs until both the yolk and the white are firm. Scrambled eggs should not be runny.
- Foods containing eggs should be cooked to 160°F (72°C). Always use a food thermometer to test.
- For recipes that call for raw or undercooked eggs, use pasteurized or fresh organic eggs.
NOTES ON THE PLUG
This appliance has a polarized plug (one blade is wider than the other). To reduce the risk of electric shock, this plug will fit in a polarized outlet only one way. If the plug does not fit fully into the outlet, reverse the plug. If it still does not fit, contact a qualified electrician. Do not modify the plug in any way.
NOTES ON THE CORD
A. A short power-supply cord (or detachable power-supply cord) is to be provided to reduce the risk resulting from becoming entangled in or tripping over a longer cord.
B. Longer detachable power-supply cords or extension cords are available and may be used if care is exercised in their use.
C. If a long detachable power-supply cord or extension cord is used:
- The marked electrical rating of the cord or extension cord should be at least as great as the electrical rating of the appliance;
- If the appliance is of the grounded type, the extension cord should be a grounding-type3-wire cord; and
- The longer cord should be arranged so that it will not drape over the counter top or table top where it can be pulled on by children or tripped over.
PLASTICIZER WARNING
CAUTION: To prevent Plasticizers from migrating to the finish of the counter top or table top or other furniture, place NON-PLASTIC coasters or place mats between the appliance and the finish of the counter top or table top. Failure to do so may cause the finish to darken; permanent blemishes may occur or stains can appear.
ELECTRIC POWER
If the electrical circuit is overloaded with other appliances, your appliance may not operate properly. It should be operated on a separate electrical circuit from other appliances.
Getting to Know Your Egg Cooker
Product may vary slightly from illustration

Before Using for the First Time
- Carefully unpack all parts of your Egg Cooker. Set the base aside.
- Wash lid, boiling rack, poaching tray, omelet tray and water measuring cup in warm, soapy water. Rinse and dry thoroughly.
CAUTION: The piercing pin on the underside of the water measuring cup is very sharp. Use extreme caution when handling. - Wipe the base’s water reservoir with a damp, non-abrasive cloth.
Operating Instructions
Important!
- ONLY USE COLD EGGS. Eggs may be overcooked if they are not refrigerated until use.
- Store eggs in their carton to assure freshness and to keep the yolks centered.
- This Egg Cooker works best for large sized eggs. It may be necessary to adjust the amount the of water for other sizes.
- Always use cold water, preferably distilled or filtered to reduce mineral deposits.
- Boiled eggs in their shells, may be kept refrigerated for up to 5 days.
Auto Shut-Off Timer
The Egg Cooker is designed with a thermal sensor that detects when water has fully evaporated from the Heating Plate, signaling it to shut off automatically for perfectly cooked eggs and for the beep alert to sound.
NOTE: Avoid unplugging the Egg Cooker in the middle of the cooking cycle. If doing so, the Egg Cooker will not shut off completely and will turn back on when the unit is plugged back in next. However the
thermal sensor will detect no water on the Heating Plate and will automatically shut off within 30 seconds.
When the unit turns off unplug it , otherwise the egg cooker will be in a permanent ON/OFF cycle.
Boiled Eggs
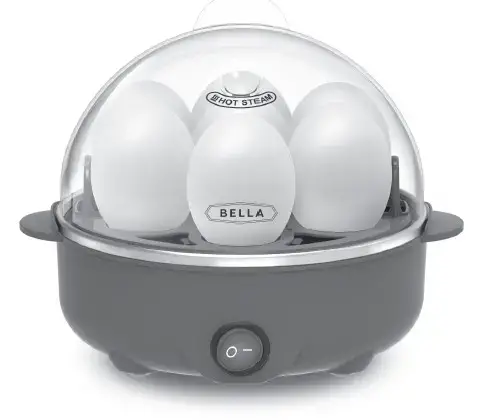
Figure 2
- Place the Egg Cooker on a flat, clean surface.
- Using the water measuring cup, add cold water, preferably distilled or filtered, to the designated SOFT, MEDIUM or HARD boiled mark See Figure 2); then pour into the base’s water reservoir.
NOTE: Always use cold water. - Center the boiling rack on top of the base.
- To avoid broken boiled eggs, wash eggs first, then pierce eggs using the pin on the underside of the water measuring cup.
NOTE: Eggs will cook perfectly with or without piercing. - Place up to 7 eggs in the boiling rack, pierced side up. Add the lid.
- Plug cord into a 120V AC outlet.
- Press the ON/OFF switch to turn the Egg Cooker ON. The water will begin to heat and boil.
IMPORTANT: To ensure proper doneness, eggs must be LARGE sized and COLD out of the refrigerator. - When the eggs are cooked and the water has evaporated, the unit will beep and the egg cooker indicator light will turn off indicating that the cooking process has finished.
- Once cooking is finished, remove the plug from wall outlet.
- Immediately lift lid carefully to avoid scalding, and allow water to drip into the water reservoir.
- Using protective oven mitts or pot holders, use the side handles to carefully lift the boiling rack up and off the base. Rinse boiled eggs with cold water or place in an ice bath to stop cooking. Eggs can be peeled when they are cool enough to handle. CAUTION: The unit and the escaping steam can cause burns or injuries. Precaution must be taken when the unit is in operation or just done cooking
IMPORTANT: Unused shell-on boiled eggs may be refrigerated and used for up to 5 days. - To cook additional eggs repeat step 2 – 11.
- To serve soft or medium-cooked eggs out of their shell, use a knife to break the shell across the top. Use a small teaspoon to enjoy the egg directly from the shell, or use toast strips to dip into the soft yolk.
Poached Eggs & Omelettes
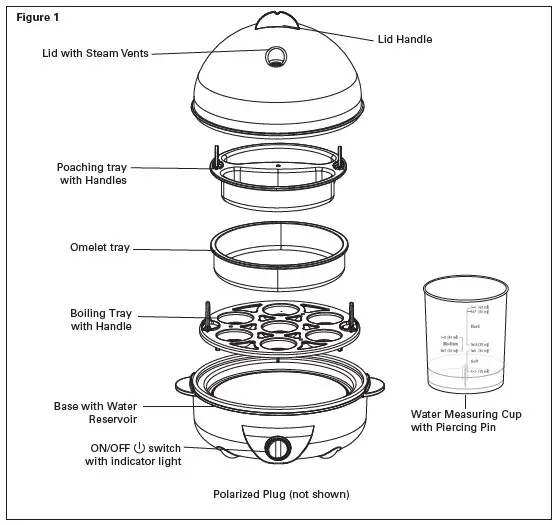
Figure 3
- Using the water measuring cup, add cold water, preferably distilled or filtered, to the POACHED/OMELETTE mark (See Figure 3); then pour into the base’s water reservoir.
NOTE: Always use cold water. - Center boiling rack on top of the base. Rest the poaching tray on top of the boiling rack. (See Figure 1.)
CAUTION: Never place poaching or omelet tray directly onto Heating plate - Poach up to 2 eggs or prepare an omelettes in the trays. For best results you can lightly butter or spray oil on trays.
- Poached Eggs: Crack one egg at a time to add to each poaching section.
- Omelettes: Whisk eggs, one at a time with your favorite add-ins: grated or shredded cheese, small diced tomatoes, sausage crumbles, bacon bits, any small diced cooked vegetables, even leftovers!
Carefully add to each poaching section. DO NOT OVERFILL! - Plug cord into a 120V AC outlet.
- Press the ON/OFF switch to turn the Egg Cooker ON. The water will begin to heat and boil.
- When the eggs are cooked and the water has evaporated, the unit will beep and the egg cooker indicator light will turn off indicating that the cooking process has finished.
- Once cooking is finished, remove the plug from wall outlet.
- Immediately lift lid carefully to avoid scalding, and allow water to drip into the water reservoir.
- Using protective oven mitts or pot holders, use the top handle to carefully lift the poaching tray up and off the base.
- Remove poached eggs/omelettes. Serve immediately.
COOKING EGGS
The cooking times listed below are guidelines on how long to cook eggs for desired doneness. The thermal sensor in the Egg Cooker will automatically shut off when the water has completely evaporated and the eggs are done.
The Time Chart provided is for Medium to Large eggs. Jumbo or XL eggs will require additional water and time for the Egg Cooker to achieve the desired cooking results.
For firmer Medium Eggs, allow the eggs to sit covered in the Egg Cooker for an additional 2-3 minutes before removing them. For extra-firm hard boiled eggs, leave the eggs covered in the Egg Cooker for a few more minutes after the beep alert goes off.
| Doneness | Number of Eggs | Cook Time | Water level (in ml) |
| Soft Boiled | 1-4 eggs | 9 mins | 30 ml |
| 5-7 eggs | 11 mins | 15 ml | |
| Medium Boiled | 1-4 eggs | 11 mins | 40 ml |
| 5-7 eggs | 14 mins | 30 ml | |
| Hard Boiled | 1-4 eggs | 17 mins | 70 ml |
| 5-7 eggs | 20 mins | 60 ml |
User Maintenance Instructions
This appliance requires little maintenance. It contains no user serviceable parts. Do not try to repair it
yourself. Any servicing requiring disassembly other than cleaning, must be performed by a qualified
appliance repair technician. Cleaning Instructions
CAUTION: NEVER IMMERSE BASE UNIT OR CORD IN WATER OR OTHER LIQUID.
- Always unplug and allow to cool completely before cleaning.
- All Egg Cooker parts, with the exception of the base, may be cleaned in the top rack of a dishwasher. To clean by hand, wash in warm, soapy water.
CAUTION: THE BASE UNIT IS EXTREMELY HOT AFTER USE. Allow base to cool completely before cleaning. - To remove mineral deposits, wipe the base’s water reservoir with a paper towel moistened with 1 tablespoon distilled white vinegar. Rinse and dry thoroughly.
- Wipe the exterior of the base with a soft, slightly damp cloth or sponge. Never use abrasive cleansers or scouring pads to clean the base, as they may damage the surfaces.
Storing Instructions
- Never store the Egg Cooker while it is hot or wet. Make sure all parts are clean and dry before storing.
- Store appliance in its box or in a clean, dry place.
- To store, assemble with parts in place with the lid securely fitted on top.
Classic Deviled Eggs
For a simply elegant presentation, fill a pastry bag with the egg yolk mixture (or a zip lock bag with the corner snipped) and pipe about a tablespoon of the mixture into the well of the
egg. Repeat until all the eggs are filled. Experiment with various toppings: salmon roe caviar, scallions, bacon crumbles, chopped olives, sweet pickles, sweet or spicy roasted peppers. Serves 7
- 7 large eggs, hard boiled
- 2 tablespoons capers, chopped
- 1/4 cup mayonnaise
- 1/4 cup sour cream
- 2 teaspoons spicy brown mustard
- 1/4 teaspoon onion powder
- 1/4 teaspoon Tabasco sauce
- smoked Spanish paprika, for garnish
- Crack egg shells and carefully peel under cool running water. Gently dry with paper towels.
- Slice hard boiled eggs in half lengthwise. Remove yolks and place in a medium mixing bowl. Place the whites on a deviled egg serving platter.
- Using a fork, mash egg yolks into a fine crumble. Add the remaining ingredients and mix well.
- Spoon heaping teaspoons or pipe the yolk mixture into the egg white. Sprinkle with paprika before serving.
Chicken Cobb Salad with Creamy Basil Blue Cheese Dressing
My family loves a Cobb salad, and this is a wonderful recipe. It makes plain old, shredded iceberg lettuce shine. Bacon, hard boiled eggs, chicken, tomatoes, blue cheese, avocado, green onion and dressing.
Serves 4
Creamy Basil Blue Cheese Dressing
- 1 cup mayonnaise
- 1/2 cup buttermilk
- 1/2 cup sour cream
- 3 dashes Worcestershire sauce
- 4 oz. blue cheese, crumbled
- 4 tablespoons chives, chopped
- 4 tablespoons fresh basil, chopped
- 1/4 teaspoon salt
- 1/2 teaspoon freshly ground black pepper, to taste
Chicken
- 2 boneless, skinless chicken breasts, sliced into 8 thin strips
- salt and freshly ground black pepper
Salad
- 3 hearts of romaine lettuce, chopped
- 4 large eggs, hard boiled
- 8 slices bacon
- 1 cup artichoke hearts, quartered
- 2 vine ripened tomatoes, seeded, chopped
- 2 ripe avocados, diced
- 1 red onion, chopped
- Prepare the bacon: Cut bacon into 1-inch strips. Fry bacon in a grill pan or heavy skillet over medium-high heat. Remove bacon and all grease, leaving 1 tablespoon bacon grease in the pan or skillet.
- Prepare the chicken: Season the chicken, then grill on medium-high heat in the bacon grease for 2 to 3 minutes per side until done. Remove from the pan and set aside to cool.
- For the blue cheese dressing: In a bowl, whisk together the mayonnaise, buttermilk sour cream and Worcestershire sauce and mix until smooth. Stir in the blue cheese, chives,
basil, salt and pepper. Cover and refrigerate for at least 2 hours before serving to allow the flavors to develop. - For the salad: Arrange the chopped lettuce in a large bowl or on a large platter. Add rows of salad ingredients: chopped grilled chicken, chopped or quartered hard boiled eggs, bacon, artichoke hearts, tomatoes, avocados, and chopped red onion.
- Drizzle the Creamy Basil Blue Cheese Dressing over the salad before serving.
Peppadew & Cheese Deviled Eggs
We’ve spun a southern favorite into an elegant appetizer and kicked it up with peppadew peppers to add a slightly sweet and spicy note. Serves 7
- 7 large eggs, hard boiled
- 1/3 cup mayonnaise
- 1/4 lemon, juiced
- 1/4 cup chopped peppadew peppers
- 2 tablespoons shredded cheddar cheese
- 1-1/2 tablespoon brown spicy mustard
- Kosher salt, to taste
- 1/2 teaspoon cayenne pepper, more to taste
- Crack egg shells and carefully peel under cool running water. Gently dry with paper towels.
- Slice hard boiled eggs in half lengthwise. Remove yolks and place in a medium mixing bowl. Place the whites on a deviled egg serving platter.
- Using a fork, mash egg yolks into a fine crumble. Add the remaining ingredients and mix well.
- Spoon heaping teaspoons or pipe the yolk mixture into the egg white shells. Dust with cayenne before serving.
Loaded Turkey Meatloaf
This old world meatloaf features decorative white and yellow rings running through middle of the slices. This dish was originated in Germany where it has been said that immigrants brought
meatloaf with them to Southern Brazil where it was adapted to include a hardboiled egg stuffed inside. In Hungary, Stefania meatloaf is a favorite where a long meatloaf is baked in a oaf pan with hard boiled eggs in the middle.
Meatloaf
- 1 lb. ground turkey, dark meat preferred
- 1 cup onion, chopped finely
- 1 clove of garlic, minced
- 1 bunch fresh parsley, chopped finely
- 2 tablespoons dried oregano
- 2 eggs
- 1/4 cup Italian seasoned breadcrumbs
- 1/3 cup barbeque sauce, as topping
Stuffing
- 2 tablespoons olive oil
- 2 tablespoons chili oil
- 1 cup fresh mushrooms, chopped
- shisito peppers, chopped
- 1/2 onion, sliced
- 1 cup zucchini, grated
- 4 hard boiled eggs
- Prepare Meatloaf. Place all meatloaf ingredients in a large bowl. Mix by hand until combined.
- Spread plastic wrap onto the working surface. Empty meat onto the center of the plastic wrap.
Use your hands to press into a square, approximately 13-inches wide x14-inches deep. - Prepare stuffing. Sauté all ingredients in a large pan until the onions are soft and browned.
- Add a layer of the stuffing over the meat.
- Arrange a line of 4 eggs down the center of the meat and stuffing.
- Roll the loaf. Use the plastic wrap to lift the front of the meat up and over the eggs. Pull the top of the plastic wrap down. Firmly grasp both corners of the back of the wrap and pull the meat up and over the backside of the eggs to form a loaf. Using a brush or a spoon, spread the barbeque sauce over the top of the loaf.
- Bake at 350°F for 25 minutes. Use a meat thermometer to check for an internal temperature of 170°F – 180°F. Continue cooking for 5 minutes, if needed.
Poached Eggs
- 3 large eggs
- Salt and pepper, for garnish
- Using the water measuring cup add cold water into the base’s water reservoir.
- Center boiling rack on top of the base. Rest the poaching tray on top of the boiling rack.
- Crack one egg at a time to add to each poaching section.
- Add the lid and Press the ON/OFF Button to turn the Egg Cooker ON.
- In 6-8 minutes, when the eggs are cooked and the water has evaporated, the Egg Cooker red READY indicator light will turn off.
- Remove poached eggs/omelettes. Sprinkle with salt and pepper before serving.
Limited TWO-YEAR Warranty
SENSIO Inc. hereby warrants that for a period of TWO YEARS from the date of purchase, this product will be free from mechanical defects in material and workmanship, and for 90 days in respect to non-mechanical parts. At its sole discretion, SENSIO Inc. will either repair or replace the product found to be defective, or issue a refund on the product during the warranty period.
The warranty is only valid for the original retail purchaser from the date of initial retail purchase and is not transferable. Keep the original sales receipt, as proof of purchase is required to obtain warranty validation. Retail stores selling this product do not have the right to alter, modify, or in any way revise the terms and conditions of the warranty.
EXCLUSIONS:
The warranty does not cover normal wear of parts or damage resulting from any of the following: negligent use of the product, use of improper voltage or current, improper routine maintenance, use contrary to the operating instructions, disassembly, repair, or alteration by anyone other than qualified SENSIO Inc. personnel. Also, the warranty does not cover Acts of God such as fire, floods, hurricanes, or tornadoes.
SENSIO Inc. shall not be liable for any incidental or consequential damages caused by the breach of any express or implied warranty. Apart from the extent prohibited by applicable law, any implied warranty of merchantability or fitness for a particular purpose is limited in time to the duration of the warranty. Some states, provinces or jurisdictions do not allow the exclusion or limitation of incidental or consequential damages, or limitations on how long an implied warranty lasts, and therefore, the above exclusions or limitations may not apply to you. The warranty covers specific legal rights which may vary by state, province and/or jurisdiction.
HOW TO OBTAIN WARRANTY SERVICE:
You must contact Customer Service at our toll-free number: 1-866-832-4843.
A Customer Service Representative will attempt to resolve warranty issues over the phone. If the Customer Service Representative is unable to resolve the problem, you will be provided with a case number and asked to return the product to SENSIO Inc. Attach a tag to the product that includes: your name, address, daytime contact telephone number, case number, and description of the problem. Also, include a copy of the original sales receipt. Carefully package the tagged product with the sales receipt, and send it (with shipping and insurance prepaid) to SENSIO Inc.’s address. SENSIO Inc. shall bear no responsibility or liability for the returned product while in transit to SENSIO Inc.’s Customer Service Center.
Bella 6 Litre Pressure Cooker
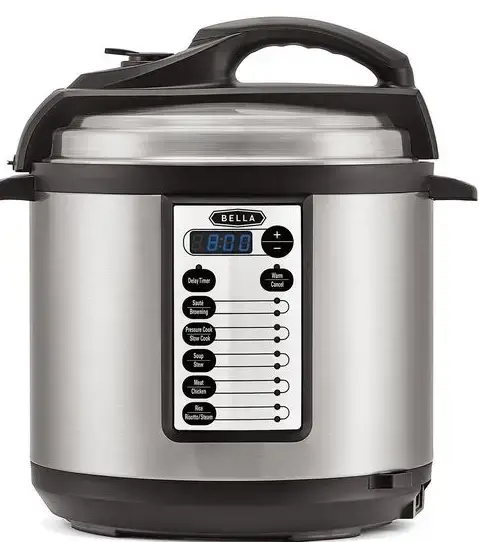
INTRODUCTION
You may already be familiar with using a similar product, but do please take the time to read these instructions – they have been written to ensure you get the very best from your purchase. Safety is Important To ensure your safety and the safety of others, please ensure you read the Product Safety and Electrical Safety information before you operate this product. Please pay particular attention to any warnings and cautions contained within these instructions. Keep these instructions in a safe place for future reference. What can you expect from the Bella Pressure Cooker? This fantastic unit is one pot cooking and it saves time by cooking up to 70% faster than conventional cooking. At the touch of a button you can create delicious meals in a fraction of the time than on the stove top or in a slow cooker. The pre-programmed settings mean that you simply select a function and away you go, you don’t have to worry about pressure levels as the unit does it all for you. Instead of using lots of pots and pans, all the preparation is carried out in one pot, you can brown meat and caramalise vegetables, it’s not only easier but saves on washing up! Due to our policy of continuous improvement, the actual product may differ slightly from the one illustrated in this booklet.
PRODUCT SAFETY
Read this manual thoroughly before first use, even if you are familiar with this type of product. The safety precautions enclosed herein reduce the risk of fire, electric shock and injury when correctly adhered to. Keep the manual in a safe place for future reference. If applicable, pass these instructions on to the next owner of the appliance. Always follow basic safety precautions and accident prevention measures when using an electrical appliance, including the following:
READ ALL INSTRUCTIONS CAREFULLY BEFORE USING YOUR APPLIANCE.
- Ensure the unit is used on a stable, level and heat-resistant surface out of the reach of children. If necessary place a chopping board or heat resistant mat underneath the Pressure Cooker during use.
- Always attach the connector end of the power cord into the appliance before inserting the plug into the wall socket.
- Do not touch the hot surfaces of the Pressure Cooker, use the handles only. Use oven gloves or a cloth when opening the lid or handling the inner cooking pot as steam will escape.
- This appliance can be used by children aged from 8 years and above and persons with reduced physical, sensory or mental capabilities or lack of experience or knowledge if they have been given supervision or instruction concerning use of the appliance in a safe way and understand the hazards involved. Children shall not play with the appliance. Cleaning and user maintenance shall not be made by children without supervision.
- Do not operate the appliance with a damaged cord or plug, or after the appliance malfunctions or has been damaged in any manner. Take it to a qualified service technician for investigation.
- Do not let the cord hang over the edge of the table or counter.
- Do not use this Pressure Cooker on or near a hot plate. Do not position it under hanging kitchen cabinets as steam from the pressure release may cause damage.
- Always check the silicone sealing ring is correctly positioned before use.
- Before placing the removable cooking pot into the unit, ensure the pot base and the internal heating plate are clean and free of any food debris.
- Do not place food or liquid directly into the base of the unit. Only the removable cooking pot is designed to contain food or liquid.
- Never obstruct the pressure release valve.
- Always check the pressure release valve to ensure it is not clogged before use.
- NEVER ATTEMPT TO OPEN THE LID WHEN THE UNIT IS UNDER PRESSURE.
- Do not open the unit until the pressure has been released. If the lid is difficult to rotate do not force it as the unit is still under pressure and it can be hazardous if forced.
- See the instructions on how to remove the lid on page 9.
- Never operate the Pressure Cooker without food or liquid in the removable cooking pot. Do not fill the pot over 4/5 full. When cooking foods that expand or foam such as dried vegetables, legumes, beans and grains do not fill the pot over ½ full. If overfilling occurs it may block the pressure release valve and cause a build-up of pressure.
- This Pressure Cooker cooks under pressure, improper use may result in scalding. Follow the “Using your Pressure Cooker” instructions on page 8 and make sure the lid is closed properly before operating.
- Be aware that certain foods can foam, froth and splutter which can block the pressure release valve, these foods include apple sauce, cranberries, pearl barley oatmeal and other cereals, noodles, pasta and rhubarb. Extra care should be taken when cooking anything containing these.
- Do not touch the pressure release valve when in use. Only turn to release the pressure after the unit has finished cooking.
- Ensure there is sufficient water in the removable cooking pot when steaming; it should reach the minimum 1/5 mark at least.
- Do not use the Pressure Cooker for Deep Frying.
- Do not use metal utensils as they will scratch the premium non-stick coating on the removable cooking pot. Use heat resistant plastic utensils or use a wooden spoon.
- Do not move the appliance when in use.
- Always keep your hands and face away from the pressure release valve, when releasing the pressure.
- Use extreme caution when removing the lid after cooking. Always tilt the lid away from you, so that any steam does not come into contact with your face.
- To protect against electric shock, do not immerse the Pressure Cooker, base unit, power cord or plug into water or any other liquid.
- Unplug from the mains socket using dry hands when not in use and before cleaning. Allow to cool before putting on or taking off parts.
- Do not use the appliance for other than its intended use, this is for HOUSEHOLD USE ONLY.
ELECTRICAL SAFETY
- Read these instructions thoroughly before using this appliance or connecting it to the mains supply.
- A 13 amp BS1362 ASTA approved fuse must be fitted.
- This appliance must be earthed.
- There are no user-serviceable parts inside this appliance.
- Always refer servicing to qualified service personnel.
- The mains lead of this product is not replaceable by the user. If the mains lead is damaged, do not use until the appliance has been inspected and approved by a qualified electrician.
- Do not allow this product to be exposed to rain or moisture during use or storage.
- Before switching on, make sure that the voltage of your electricity supply is the same as that indicated on the product rating plate. Connecting it to any other power source may cause damage.
- This product may be fitted with a non-rewireable plug. If it is necessary to change the fuse in the plug, the fuse cover must be refitted. If the fuse cover becomes lost or damaged, the plug must not be used until a suitable replacement is obtained. If the plug has to be changed because it is not suitable for your socket, or due to damage, it should be cut off and a replacement fitted, following the wiring instructions shown.
- The old plug must be disposed of safely because inserting it into a 13 amp socket could cause an electrical hazard.
ELECTRICAL SAFETY
- The wires in the power cable of this product are coloured in accordance with the following code:
- Blue = Neutral, Brown = Live, Green/Yellow = Earth
- If the markings on the terminals of your plug do not correspond to the colours of the wires in the power cable, proceed as follows:
- The wire which is coloured Blue must be connected to the terminal which is marked N or coloured Black.
- The wire which is coloured Brown must be connected to the terminal which is marked L or coloured Red.
- The wire which is coloured Green/Yellow must be connected to the terminal which is marked with the earth symbol ( ) or coloured Green
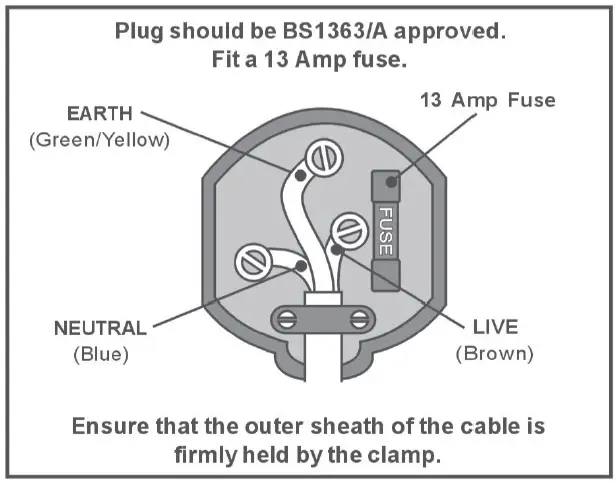
Features
- Lid
- Lid Handle
- Pressure Release Valve
- Floating Safety Valve
- Inner Aluminum Plate with Silicone Washer and Metal Peg
- Clear Silicone Sealing Ring
- Removable Cooking Pot
- Base Handles
- Condensation Collector
- Base Unit
- Control Panel
- Heating Plate (inside)
- Power Cord
- Measuring Cup
- Rice Spoon
- Steaming Rack
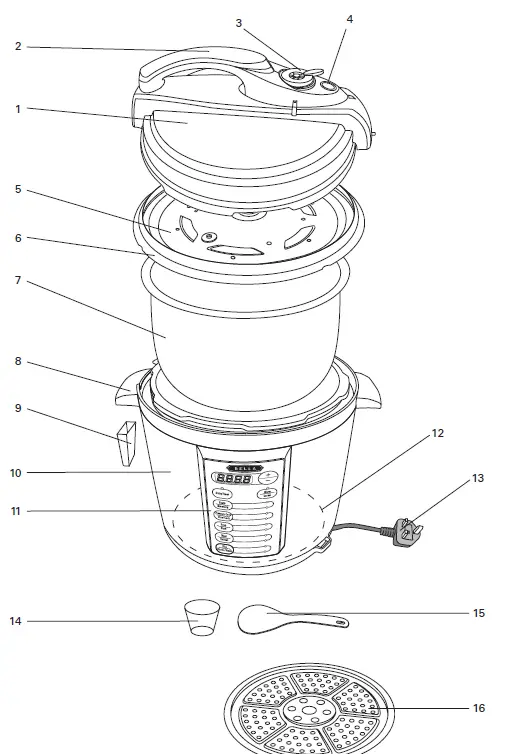
- Floating Valve with Sealing Ring
- Pressure Release Valve Cover
- Centre Post
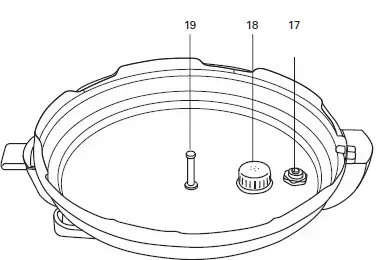
- LED Display
- Increase/Decrease time button
- Delay Timer
- Warm/Cancel
- Sauté/Browning
- Pressure Cook/Slow Cook
- Soup/Stew
- Meat/Chicken
- Rice/Risotto/Steam
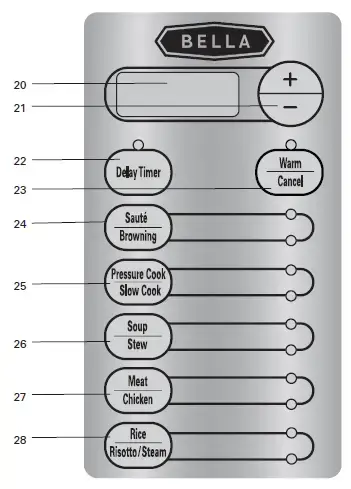
Introduction to Pressure Cooking
Discover the secrets of pressure cooking with this wonderful pressure cooker that will help you cook faster, healthier and tastier meals with unbelievable speed and ease. This pressure cooker offers 11 cooking settings with the touch of a button. Slow cook all day long or whip up a quick delicious meal, this pressure cooker is the perfect sous-chef. No more tough cuts of meat that take hours to cook, only delicious succulent meat with the nutrients and flavours locked in.
Before First Use
- Remove all labels and tags from the product. Carefully unpack your pressure cooker; remove all packaging materials from the parts and accessories.
- Remove the lid by turning the handle clockwise to the UNLOCK position and lifting the lid off the unit.
- Wash the cooking pot and all accessories that will come into contact with food in hot soapy water with a sponge or dishcloth. DO NOT use a scouring pad or any abrasive materials as this could damage the product. Rinse the cooking pot, accessories and lid thoroughly and dry.
- Avoid leaving the lid fully immersed in water as it will take a long time to drain and dry.
- Attach the condensation collector by sliding it into place
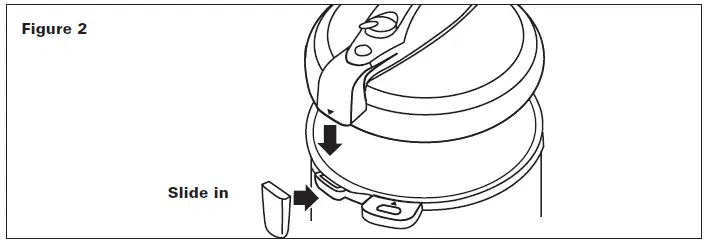
- Ensure that the well dried cooking pot is sitting flat in the base unit with proper contact.
- Never lift the pressure cooker using the lid handle, always use base handles.
NOTE: DO NOT IMMERSE THE MAIN COOKING UNIT IN WATER!
Using Your Pressure Cooker
- Cooking under pressure raises the temperature of the liquid and steam inside to well above boiling point and results in food being cooked up to 70% faster. This method of cooking retains more vitamins and minerals and enhances natural flavours. It also means that less energy is used because cook times are so quick saving you both time and money.
- NOTE: Place the base on a dry, level, heat resistant surface, away from the edge of the work surface.
- Do not use the appliance on the floor or under hanging wall cabinets. Small amounts of steam will escape from the pressure release valve while heating and sometimes during the cooking cycle. This is perfectly normal.
- Place the dry and clean cooking pot into the base unit and ensure that it is seated properly on the heating plate.
- Check that silicone sealing ring is securely placed around the aluminum plate and the aluminum plate is attached to the housing lid with the metal peg facing outwards. If the plate is not correctly fitted the lid will not close properly and the unit will not be able to build up pressure, so ensure it all assembles correctly
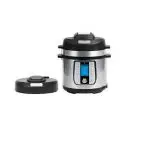
- If you are sautéing or browning food first before cooking, add some oil or butter to the cooking pot and select either option make sure you do this with the lid OFF. When you have finished browning press the cancel option.
- Place the remaining ingredients to be cooked in the cooking pot and add liquid according to your recipe. Make sure that amount of food and liquid combined reaches the minimum mark on the inside of the cooking pot, but never more than the 4/5 mark on the cooking pot as the food needs space to boil and bubble When cooking food that expands such as rice, dried beans, grains and legumes, do not fill more than the 3/5 mark on the cooking pot.
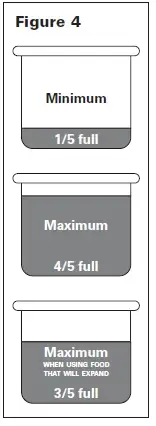
- Secure the lid to the appliance. Place the lid on the appliance in the “UNLOCK” position, then turn the lid anti-clockwise to the “LOCK” position Ensure that the lid fits tightly, you will hear a click once correctly in place.

- Once the lid is closed securely, attach the power cord to the base of the unit then plug the cord into power socket. Use the CONTROL PANEL to choose the appropriate food type and adjust the default cooking time using the +/- button to suit the recipe that you are cooking.
- Set the pressure release valve to the PRESSURE setting as shown
- The pressure cooker will take a few minutes to build up pressure, during this time the LED panel will circle round. Once the required pressure is reached the time will become fixed and begin to countdown. The unit is now cooking under pressure.
- The LED panel may circle around during the cooking time, do not be alarmed the unit is simply maintaining pressure.
- During initial use, you may notice a slight odour due to the burning off of manufacturing residue. This is completely normal, it does not affect the food being cooked and will disappear after a few uses.
NOTE: If the silicone sealing ring is cracked or broken do NOT use it in the pressure cooker. Contact Customer Services and replace with a new sealing ring and assemble on aluminum inner plate
The Delay Function
- Before selecting the cooking function press the DELAY TIMER button to delay the start of the cooking time. The delay timer can be adjusted up to a maximum delay time of 2 hours. Continue to press the button until the desired time delay is reached. The amount of time until the unit begins cooking will be displayed on the screen.
- Once the delay time has been selected use the CONTROL PANEL to choose the desired cooking setting (i.e. rice, soup, chicken etc) and adjust the cooking time using the +/- button. It will flash then automatically switch to the delay time. The delay time will start to count down and cooking will begin once the delay time has elapsed.
- N.B Do not leave perishable foods such as meat, poultry, fish, cheese and dairy products at room temperature for longer than 2 hours.
- Please note that once the cooking time has counted down, the time may not be adjusted. If more or less cooking time is required. The cooking process must be cancelled and the timing must be reset to the required/desired time.
- During set up and while cooking, the WARM/CANCEL button can be pressed to cancel cooking at any time.
Warm/Cancel Functions
Once the cooking process is complete, the Pressure Cooker will beep and move automatically to the WARM function this is shown by a “bb” on the LED display. This function is used to keep cooked food warm up to 24 hours, however for maximum flavour the recommended hold time for food is no longer than 6 hours. This function is also to stop or cancel the current function.
NOTE: It is not recommended to use the WARM function for extended periods when cooking fish or chicken dishes.
To Remove the Lid
When the pressure cooking cycle has finished, the unit automatically switches to WARM. At this point you may choose to release the pressure in two ways. The floating pressure safety valve will not go down until pressure is released and you will not be able to open the lid.
- Natural Pressure Release – This is recommended for anything with large amounts of liquid e.g. soups and stocks it will prevent the liquid inside from boiling over and blocking the pressure release valve. Following pressure cooking, allow the unit to remain on the WARM function. The pressure will begin to drop inside this can take from 12 minutes to 30 minutes depending on the amount of liquid inside. The lid can only be removed with the pressure has gone down.
- Quick Pressure Release – Following pressure cooking, the cooker will beep, this indicates that the cooking time has finished. Press the Cancel Button to stop the WARM function and turn the Pressure Release Valve to the “Pressure Release” position using an oven mitt (see Fig 6). Hot Steam will be released. DO NOT put your hands or face near the unit when turning the valve. The lid will only open once all the pressure has been released. Turn the lid clockwise and unlock. When removing the lid, tilt the lid away from you, this way the steam is directed away from you to avoid being scalded by the escaping steam. Use oven mitts when removing the inner cooking pot. Only use non-stick utensils to serve from the cooking pot as any hard utensils made from stainless steel or similar materials could damage the non-stick surface of the inner cooking pot.
One Touch Digital Functions
For your convenience the pressure cooker has 11 pre-set options with default cook times. Based on your recipe you can choose any one of these settings Sauté, Browning, Pressure Cook, Slow Cook, Soup, Stew, Meat, Chicken, Rice, Risotto/Steam and Warm. Every button has 2 settings and a corresponding pair of lights next to it. To select a setting simply press the button and the corresponding light will indicate the selected setting You can adjust the cook time by pressing the + or – buttons. When the time has been selected the LED will flash until the unit builds up pressure. When the pressure is at the correct level inside the cooking time till start to countdown.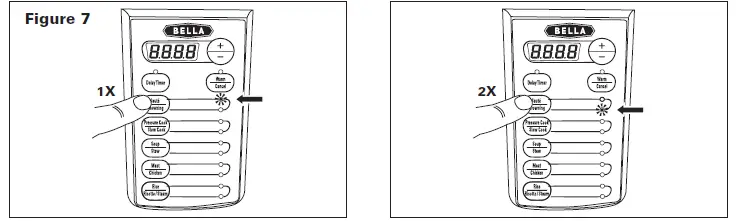
Sauté
This is great for caramelizing vegetables which adds more flavour to your dishes, simply place a little oil or butter in the base of the cooking pot and add your onions, carrots etc. Cooking will soften them and add a delicious flavour, you can also warm spices to release their flavour. This setting is also perfect to reduce and thicken any remaining liquid at the end of cooking time as there is no evaporation during pressure cooking so you need to add less liquid. Sometimes excess liquid may need thickening you can either add a cornflour and water mixture or simply bubble it for 10 minutes to reduce the liquid.
Browning
As meat will not brown during the pressure cooking process it is recommended to brown meat before so that this not only tastes better but the finished dish will look better. By browning meat, such as lamb, it will reduce the amount of fat present in the final meal and will also add a richer flavour. Use this setting for browning meat, chicken or game. Ensure you cut them into even sized pieces so they cook evenly. Add oil or butter to the base of the pot and sear the meat. If you have a lot of meat you may have to brown in batches this will maintain a high heat and ensure the meat is browned rather than stewed.
Pressure Cook
This setting is for general pressure cooking. Anything can be cooked on this setting that isn’t included in one of the one touch digital options. Just adjust the time according to your recipe.
Slow Cook
This is for long slow cooking up to 12 hours. It is NOT cooked under pressure. This is ideal if you need to be out the house all day and want to eat as soon as you come home. Use this setting as you would a slow cooker, so any recipes suitable for a slow cooker would be good for this setting. Remember this is low and slow, so cheap cuts of meat are better. Save your premium cuts for super fast cooking using a pressure setting.
Soup
Ideal for soups and stocks, just ensure that you do not overfill the cooking pot and make sure you use the NATURAL PRESSURE RELEASE when removing the lid for safety following the instructions detailed on page 9.
Stew
This is great for Meat Ragu, Chilli Con Carne, Casseroles and even pie fillings like Steak and Ale.
Meat
This is great for larger pieces of meat, such a lamb shanks, pork shoulder, ribs, brisket, gammon etc. Brown them first using the browning option then simply select this setting and adjust your time to suit your recipe
Chicken
This setting is great for cooking a whole chicken for a delicious pot roast, then pop it under a pre-heated grill to crisp up the skin if you prefer it golden. You can also cook chicken legs, thighs, drumsticks and fillets.
Rice
Cook perfect fluffy rice on this setting. You can add spices or herbs during cooking and add salt if required. Also a drizzle of oil helps to reduce the foam (see Hints and Tips for cooking guidelines).
Risotto/Steam
Make delicious creamy risotto on this setting in a fraction of the time without the need to keep stirring. Simply sauté the grains of rice in some butter or oil until they turn opaque then add the liquid. To steam simply add sufficient water to the cooking pot to come to the 1/5 level on measuring scale inside the cooking pot. Place the steam rack into the pot, it will fit inside the pot on the ridge above the water Add the food to be steamed on top of the rack cutting vegetables into even pieces and place the lid on top of the unit and turn the pressure release value to the pressure setting. Select the steam function and adjust the time accordingly. If you wish to steam larger items such as puddings, you will need to place a trivet in the bottom of the cooker for the pudding bowl to sit on.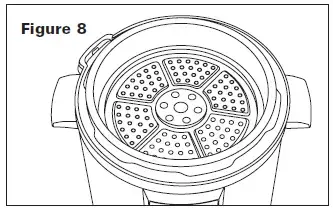
Warm
The unit automatically switches to keep warm as soon as the cooking has finished. This is great if not everybody is eating at the same time. This can be cancelled at any point by pressing the button again to cancel the function. This setting can also be used to keep food warm that has NOT been cooked in the pressure cooker. It can be used as a food warmer to keep already cooked food hot. This is especially good if you are having a party and need to keep a big pot of Chilli Con Carne hot for your guests. Using this function it is not recommended to keep food warm for more than 6 hours as this will affect the taste and texture of the food.
| Function | Default Cooking Time |
| Sauté | Stay ON (30 min.) |
| Browning | Stay ON (30 min.) |
| Pressure Cook | 30 min (Max 99 min.) |
| Slow Cook | 4 h (Max 12 hrs.) |
| Soup | 20 min. |
| Stew | 30 min. |
| Meat | 60 min. |
| Chicken | 45 min. |
| Rice | 10 min. |
| Risotto/Steam | 25 min. |
| Warm | Stay ON |
Cooking Times
Cooking Rice
White rice (Basmati, Long Grain) takes 3 minutes to cook and uses the fully absorption method. The rice will be slightly sticker than rice cooked on the stove top. Use the marking on the pot as a guide i.e 2, 4, 6 cups. Fill the water in the pot FIRST to the level required and then add the corresponding cup of rice.
| Level on cooking pot | Cups of rice | Oil tbsp. quantity | Yield (cups) when cooked |
| 2 | 2 | 1 | 6 |
| 4 | 4 | 1 | 12 |
| 6 | 6 | 2 | 18 |
| 8 | 8 | 2 | 24 |
Set the time to 3 minutes and use the NATURAL PRESSURE RELEASE METHOD. During this time the rice will absorb the steam and will be dry not wet. Cooking wholegrain/brown rice is very different. It needs to be cooked in lots of water and then drained. Only cook a maximum of 2 CUPS grain/brown rice in 6.5 cups of water.
| Rice type | Cooking time |
| Aborio/ Paella | Sauté rice in butter/oil until opaque. Add liquid. Cook for 6-8 minutes. Use the Quick Release. |
| Brown Rice | Cook under pressure for 10 minutes. Use Natural Pressure Release for at least 10 minutes then quick release. |
| Wild Rice | Cook under pressure for 20 minutes. Use Natural Pressure Release for at least 10 minutes then quick release. |
Cooking Vegetables
When steaming vegetables, chop them up into even size pieces so they cook evenly. Remember most vegetables take a few minutes to cook. Add boiling water to the pot this will bring the unit up to pressure much quicker. Always use the quick steam release to avoid overcooking.
Vegetables Cooking Times
| Artichokes 4 medium/large | 7 to 9 minutes |
| Asparagus whole | 1 minutes |
| Beans, Green cut into 2-inch lengths | 1 to 2 minutes |
| Beans, runner cut into 1- inch slices | 2 minutes |
| Beetroot , medium-large | 24 to 26 minutes |
| Broccoli, cut into large florets | 2 to 3 minutes |
| Cauliflower, cut into large florets | 2 to 3 minutes |
| Carrots, cut into 2-inch lengths | 8 minutes |
| Carrots, ½-inch slices | 2 to 3 minutes |
| Corn on the cob, 2 ears | 4 minutes |
| Courgette, cut into ½-inch slices | 1 to 3 minutes |
| Greens, cabbage, kale, cut into 1-inch strips | 1-2 minutes |
| Onions, baby peeled | 2 to 4 minutes |
| Parsnips, peeled, cut into 2-inch pieces | 3 to 4 minutes |
| Parsnips, ½-inch slices | 1 to 2 minutes |
| Potatoes White, medium quartered | 5 to 7 minutes |
| Potatoes Sweet, 2-inch cubes | 5 to 6 minutes |
| Squash Butternut, peeled & sliced | 3 to 4 minutes |
Cooking Meat and Poultry
| Food | Cooking Time (in minutes) |
| Chicken | |
| Whole 1.5kg | 25-30 |
| Breast fillets | 6-8 |
| Thigh and leg bone in | 15 |
| Thigh boneless | 10 |
| Beef | |
| Brisket | 55 |
| Oxtail | 40-45 |
| Shin | 40-50 |
| Stewing | 15 |
| Steak Mince | 10-15 |
| Lamb | |
| Leg | 35-40 |
| Shanks | 60 |
| Shoulder, cubed | 25 |
| Stewing, cubed | 15 |
| Pork | |
| Chops | 10 (brown first) |
| Shoulder | 60-70 |
| Leg, cubed | 30 |
Hints and Tips for Pressure Cooking
- It really is worth sautéing vegetables, browning meat and warming spices before pressure cooking.
- It may take a little longer to prepare but the end result will be worth it. It adds depth of flavour to the finished result.
- The amount of liquid required when pressure cooking is much less than traditional methods as there is no evaporation during cooking. Any excess liquid at the end of cooking can be thickened or reduced using the Sauté function or simply use a cornflour/water mixture to thicken any remaining liquid.
- Hot liquid/food will come to pressure quicker than cold liquid/food.
- Pressure cooking allows less tender cuts of meat to be cooked quickly and achieve a tender juicy result
Beef Lamb Pork Chicken Shin, Chuck and Blade (Braising Steak) Brisket, Silverside and Oxtail. Shanks, Shoulder, Breast, Scrag and Middle neck. Diced leg, Shoulder, Spare ribs and Belly. Drumsticks, Thighs on the bone or Fillets and Legs. - When preparing vegetables they should be cut into even-sized pieces to ensure even cooking.
- Vegetables can be cooked from frozen very easily, they may take slightly longer than if they were thawed, just make sure they are piping hot before eating.
- It is not recommended to cook meat, fish, poultry or game from frozen. It is recommended to thaw it first as thawed food can either be marinated or browned first which will add heaps of flavour. Also frozen meat will release the fat into the cooking liquid which will result in a fatty sauce. Thawed meat that is browned first will release fat which can be poured away before cooking. If meat, fish, poultry or game is cooked from frozen the cooking time will be longer and the use of a thermometer is essential to ensure that the internal temperature of the product has reached AT LEAST 75°C, if it is not, continue to cook until it is reached.
- When pot roasting meat, add sliced vegetables on the base of the pot such as thickly sliced onions, carrots or celery. Sit the meat on top of these and the flavours from the vegetables will enrich any sauce or gravy. Simply strain the liquid through a sieve and thicken and serve with your pot roast.
- When cooking dried beans and peas, soak them for a minimum of 3 hours in boiling water first or overnight, this will ensure that they remain intact and do not split. Or you can use the quick soak method which is to pre-cook them in the pressure cooker before adding to your recipe for further cooking. Simply rinse and pick out any broken or discolored beans, for every 1 cup of beans add 4 cups of water and a teaspoon of salt to the cooking pot, this prevents the beans from splitting. Add a good drizzle of oil and cook for 4 minutes under pressure. Release the pressure carefully as beans foam. Drain and rinse lightly then use in your recipe that calls for pre-soaked beans.
- Remember do not fill more than half full as beans foam.
- To adapt your own recipes, the general rule is that cooking time will be at least 1⁄3 to 1/2 of the traditional cooking time. Reduce your cooking liquid by at least half – it may be trial and error at first with your recipe to get it right. You may wish to add vegetables and canned pulses at the end of cooking to avoid overcooking.
Care and Cleaning
- Unplug and let the unit cool down before cleaning.
- Clean the base unit with a soft damp cloth. DO NOT IMMERSE THE BASE INTO WATER OR ANY OTHER LIQUID.
- Wash the removable cooking pot in hot soapy water, using a sponge or washing up brush. Rinse and dry thoroughly.
- Wipe the heating plate with a soft damp cloth and dry thoroughly.
- Remove the condensation collector from the side of the unit, empty and wash thoroughly and let it dry, and replace it back into the original position on the Pressure Cooker.
- Remove the sealing ring assembly from inside the lid by pulling on the metal peg. Carefully remove the clear silicone sealing ring from the inner aluminum plate and wash and dry thoroughly.
- Remove the Pressure Release Valve by pulling it up and off and rinse with warm water and dry, replace it into position
- Rinse the upper and underside of the lid with warm water and remove the Pressure Release Valve Cover by twisting and pulling off. Dry thoroughly and replace the
- Pressure Release Valve Cover by clipping it back into place
- Replace the sealing ring assembly onto the lid making sure the MAKE SURE THE METAL PEG ON THE THE INNER STEEL PLATE FACES OUT. Push this onto the centre post on the lid
- Replace the cooking pot back into the unit. Store the unit with the lid loosely on top of the pressure cooker to prevent aromas, moulds and odours
Storing instructions
- Be sure all parts are clean and dry before storing.
- Store the pressure cooker with cooking pot inside the base unit; and the lid locked. Store assembled unit in a clean dry place.
- Never store the pressure cooker while it is hot or wet.
- Never wrap cord tightly around the appliance; keep it loosely coiled.
Servicing
This appliance requires little maintenance. It contains no user serviceable parts. Do not try to repair it yourself. Any servicing requiring disassembly other than cleaning, must be performed by a qualified electrician.
GUARANTEE
This product is guaranteed for twelve months from the date of original purchase. Any defect that arises due to faulty materials or workmanship will either be replaced or refunded where possible during this period by the dealer from whom you purchased the unit.
The following conditions apply:
- The guarantee does not cover accidental damage, misuse, cabinet parts, knobs or consumable items.
- The product must be correctly installed and operated in accordance with the instructions contained in this manual.
- It must be used only for domestic purposes.
- The guarantee will be rendered invalid if the product is re-sold or has been damaged by inexpert repair.
- Specifications are subject to change without notice.
- The manufacturer disclaims any liability for the incidental or consequential damages.
- The guarantee is in addition to, and does not diminish your statutory or legal rights.
- Valid in the UK only.
Customer Helpline: 0345 467 6743
DISPOSAL INFORMATION
Waste electrical products should not be disposed of with household waste. Please recycle where facilities exist. Check with your local authority for recycling advice.
For technical queries, please contact:
MPL Home Ltd, IMEX, 575 – 599 Maxted Road, Hemel Hempstead, Herts, HP2 7DX Downloaded from
Recipes
Risotto with Butternut Squash, Sage and Chestnuts
Ingredients
- 60g butter
- 20 cooked chestnuts, chopped
- 16 sage leaves, shredded
- 1 onion
- 500g risotto rice
- 450g butternut squash, chopped
- 1400ml vegetable stock
- 50g Parmesan cheese
Method
- Add the butter to the cooking pot and select SAUTÉ, add all the chopped chestnuts and half the shredded sage, cook until the butter starts to brown slightly. Remove these with a slotted spoon and set aside for now.
- Add the onion to the cooking pot and sauté until softened; add the rice, butternut squash and the remaining sage. Cook for a minute until the grains of rice start to turn opaque and then add the stock. Cancel the Sauté setting.
- Lock the lid into place and select the RISOTTO setting and set the timer for 8 minutes and cook under pressure.
- When the cooking time has finished, leave to rest for 5 minute before releasing the pressure.
- Add most of the reserved cooked chopped chestnuts keeping a few back to garnish, and add a handful of grated parmesan cheese.
- Serve each portion with a few of the reserved chestnuts on top and a sprinkle of parmesan cheese. Moroccan Lamb Shanks with Chickpeas
Ingredients
- 4 lamb shanks
- 2 tbsp. Harissa paste
- Salt and pepper
- 1-2 tbsp. oil
- 1 onion chopped
- 1 cinnamon stick
- 2 tsp. ground ginger
- 2 tsp. ground cumin
- 1/2 tsp. ground allspice
- 1/4 tsp. ground mixed spice
- 1 x 400g can chopped tomatoes
- 200ml chicken stock
- 1 tbsp. honey, plus a little extra
- Half a lemon
- 1 x 400g can chickpeas, drained
Method
- Rub the harissa paste into the lamb shanks and season them with salt and pepper.
- Select the BROWNING option and heat the oil in the cooking pot, brown two lamb shanks at a time on all sides remove when brown all over and set aside and repeat with the other two.
- Remove these and keep them to the side for minute.
- Select SAUTÉ and add the onion to the cooking pot and cook until softened, add the spices and warm until fragrant. Add the tomatoes, stock and honey and add the lamb shanks back to the cooking pot, coat the lamb in the sauce.
- Attach the lid and secure, select MEAT and cook under pressure for 1 hour.
- When the cooking time has finished, remove the lamb shanks and place them on a large serving plate and keep them warm.
- Add a squeeze of lemon juice, a drizzle of honey and add the chickpeas.
- Select the SAUTÉ function and bring the liquid to a boil, simmer down until the sauce has thickened.
- Pour the sauce over the lamb shanks and serve with cous cous.
Asian Style Aromatic Pulled Pork
This is the perfect recipe for the pressure cooker; it produces meltingly tender meat in 70 minutes. Fabulous for a party, simply prepare everything in advance and just let the pressure cooker do all the work. The pork does benefit from marinating in the spice rub overnight.
Ingredients
2.5 kg pork shoulder, remove rind and fat
Sauce
- 1-2 tbsp. vegetable oil
- 1 onion, peeled and sliced into thick rings
- 2 tbsp. light soy sauce
- 3 tbsp. hoisin sauce
- 2 tbsp. rice vinegar or cider vinegar
- 8 tbsp. water
- 1 tbsp. runny honey
Spice rub
- 1 tbsp. sugar
- 1 star anise
- 1 tsp. fennel seeds
- 1 tsp. Szechuan peppercorns
- 1 cinnamon stick
- 1 tsp. coriander seeds
- 1 tsp. ground ginger
- 1 tsp. garlic salt
- 2 cloves
Method
- Remove the rind from the pork and remove as much fat using a sharp knife as you can. Cut the pork into 4 large pieces, set aside for a minute.
- Make the spice rub by blitzing the ingredients in a spice grinder or pounding with a pestle and mortar, until you have a powder. Using your hands rub this into the pieces of pork then place in a bowl and cover with cling film. Marinate this overnight in the fridge if you can, if not as long as possible.
- When ready to cook, sear the pieces of pork in a little oil on the BROWNING function until brown on all sides, remove from the pot for a minute. Cancel the browning function.
- Add the onion in a layer on the bottom of the cooking pot and add the soy sauce, hoisin sauce, rice/cider vinegar and water. Sit the pork on top and turn the meat over to coat it in the sauce.
- Select the MEAT function and increase the time to 70 minutes, cook under pressure. When the pork has finished cooking, release the pressure. Remove the pork from the pot and place on a serving plate and spoon a little of the cooking liquid over it. Leave the meat to rest covered with foil for 10-15 minutes.
- While the meat is resting, bring the cooking liquid to the boil on the SAUTÉ function and add the honey, leave this to reduce down to a thick consistency. Strain through a sieve if desired.
- When ready to serve, shred the meat with two forks.
- Serve the pulled pork piled onto a tortilla wrap with cucumber and spring onion strips and a good drizzle of the sauce, roll up and eat
Celeriac and Stilton Soup
This soup is made using Celeriac which is a very underrated vegetable. The combination of the subtle sweetness from the pear and the creaminess from the Stilton is a real winner.
Ingredients
- Knob of butter
- 1 large onion, peeled and quartered
- 500g celeriac, peeled and chopped into small chunks
- 250g potatoes, peeled and chopped
- 1 ripe pear, peeled, cored and diced
- Few sprigs of thyme
- Sea salt and freshly ground black pepper
- 1 litre vegetable stock
- 125g Stilton, crumbled
- Serve with crusty bread and a swirl of cream
Method
- Add the butter to the cooking pot and select SAUTÉ, Add the onion and gently fry for 5-6 minutes until softened.
- Add the celeriac, potato, pear and thyme to the pan with some salt and pepper and add the vegetable stock, switch to the SOUP setting and cook under pressure for 20 minutes. When cooking has finished use the natural release method.
- Remove the lid and take out any stalks from the thyme. Then blend until smooth using a hand stick blender in the cooking pot, taking care not to scratch the base of the bowl.
- Stir in half the Stilton and allow to gently melt in the soup.
- Divide the soup between warm bowls and sprinkle the remaining Stilton over each portion to serve.
- Serve with a swirl of cream and some warm crusty bread.
Beef Shin Ragu
This is comfort food at its best made with a great cheap cut Shin of Beef. The long slow cooking time tenderises the meat and makes it deliciously tender. This thick meaty sauce needs to be served with wide pasta such as pappardelle Serves 4-6
Ingredients
- 1 tbsp. oil
- 1.5 kg shin of beef, sliced into think pieces
- 75g pancetta, chopped into small pieces
- 1 large onion
- 4 garlic cloves, crushed
- 2 sticks celery, finely chopped
- 2 carrots, finely chopped
- 2 tbsp. tomato puree
- 3 anchovy fillets
- 200ml red wine
- 300ml beef stock
- Bouquet garni made with thyme, rosemary and bay leaf
- Serve with thick pasta such as pappardelle and shaved parmesan
Method
- Add the oil to the cooking pot and select the BROWNING function, brown the beef on all sides you will have to do this in batches so it does not stew; when brown set aside.
- Select the SAUTÉ function and add a little more oil if needed and sauté the pancetta till crisp, and then add the onion, garlic, celery and carrots and sauté till softened this will take about 10 minutes.
- Add the tomato puree and the anchovy fillets and cook for a few minutes. Add the wine and bring to a bubble to reduce slightly then add the stock and bouquet garni.
- Add the beef back to the pan along with any resting juices and switch the unit to SLOW COOK.
- Cook the Ragu for 6-8 hours or until meltingly tender, if you can give it a stir during cooking.
- After the cooking time has finished, remove the beef and shred with 2 forks, increase the heat to a rapid boil and reduce the sauce to a thick consistency. Add the meat back to the pot and stir through.
- Serve with hot freshly cooked pappardelle and shaved parmesan cheese. Downloaded from
Pot Roast Chicken with Rosemary and Garlic
This is one pot cooking at its best. This recipe cooks a whole chicken in 30 minutes; this means that you can have a mid-week roast in no time at all! erves 4-6 people depending on how hungry you are
Ingredients
- 1 tbsp. finely chopped fresh rosemary, plus a few extra sprigs
- 30g soft butter
- 1 lemon, zested
- 2-3 garlic cloves
- 1 tsp. sea salt
- freshly ground black pepper
- 1 medium size chicken (approximately 1.5kg)
- 1 small glass of dry white wine or chicken stock
- 2 onions, peeled and thickly sliced
- 1 tbsp. cornflour/water mixture to thicken
- Serve with a selection of vegetables or a simple salad.
Method
- Start by making the herb butter. Pound the chopped rosemary, butter, lemon zest, garlic, salt and a good grind of black pepper in a mortar and pestle until it is smooth or you could use a mini chopper.
- The aim is to get the butter under the skin of the chicken, so lift the skin slightly and using your fingers loosen the skin from the chicken breast, this creates a ‘pocket’ for you to add the butter.
- Spoon in some of the butter and push it down and around the breast. Repeat with the other side.
- Keep a little back and rub it all over the chicken.
- Slice the lemon in half and add half to the cavity of the chicken along with a sprig of rosemary.
- Use the BROWNING function to sear your chicken on all sides; this will give the chicken some colour when cooked. When browned on all sides remove and set this aside for a minute. Cancel the browning function.
- Add the sliced onions so that they fit in the bottom of the cooking pot. Add the wine or stock to the cooking pot and the last sprig of rosemary to the cooking liquid. Place the chicken on top of the onions, by doing this the chicken does not come into contact with the base where the skin can catch slightly and the onions will add a lovely flavour to the gravy.
- Give the chicken another sprinkle with salt and pepper and a sprinkle with any stray bits of rosemary and secure the lid.
- Select the CHICKEN function and set the time to 30 minutes. Cook under pressure. When the chicken has finished cooking, leave the unit for 10 minutes to give the chicken time to rest.
- Release any remaining pressure and remove the chicken. If you want to brown it further pop it under a hot grill for 5 minutes to crisp the skin.
- Skim any fat away from the juice remaining in the cooking pot and thicken the remaining liquid with the cornflour/water mixture or reduce it down by bringing it back to the boil on the SAUTÉ function and bubble away until reduced, strain through a sieve and serve with the chicken.
Chicken with Chorizo
This dish is a delicious combination of chicken with smoky chorizo; make sure you have lots of crusty bread to mop up the rich sauce.
Ingredients
- 1 tsp. oil
- 8 skinless and boneless chicken thighs, chopped into bite size pieces
- 1 chorizo ring, chopped into bite size pieces
- 2 x red onions, diced
- 2 x garlic cloves
- 2 red peppers, de-seeded and roughly chopped
- 2 sticks celery, sliced
- 1.5 tsp. hot chilli powder
- 1 x 400g tin of cherry tomatoes
- 100ml chicken stock
- 1 x 400g tin of Borlotti beans
- 1 tbsp. chopped parsley
Method
- Add the oil to the pot and select the BROWNING function. Add the chicken pieces and brown on all sides. Remove and set aside for a minute.
- Select SAUTÉ; add the chorizo pieces and cook until crispy, then add the onion and garlic and sauté in the oil from the chorizo until softened slightly.
- Add the add peppers, celery and the chilli powder and stir for 1 minute. Add the chicken back into the cooking pot and add the cherry tomatoes and stock and stir well.
- Change the setting to the CHICKEN function and cook for 15 minutes under pressure.
- When the cooking time has finished, add the beans and parsley replace the lid and leave to stand for 5 minutes to heat the beans through.
- Serve with crusty bread or rice.
South Indian Vegetable Curry with Paneer
This curry is lightly spiced and lovely and fragrant, the addition of Paneer gives the curry more body, serve it with warm naan bread to soak up the sauce.
Ingredients
- 2 tbsp. vegetable oil
- 1 large onion sliced
- 2 tsp. peeled and grated ginger
- 2 garlic cloves, crushed
- 2 tsp. black mustard seeds
- 12-15 fresh curry leaves
- 1 tsp. ground cumin
- 2 tsp. garam masala
- 1 tsp. turmeric
- 1/4 tsp. cracked black pepper
- 1 green chilli, finely chopped
- 400ml coconut milk
- 150ml vegetable stock
- 2 carrots, peeled and diced into big chunks
- 1 small head of cauliflower, broken into florets
- 2 courgettes, chopped into chunky pieces
- 1 large sweet potato, peeled and chopped into chunky pieces
- 200g green beans, trimmed and sliced in half
- 227g block Paneer cheese, cubed into bite size pieces
- 100g baby spinach leaves
- Small bunch coriander, chopped
- Serve with warm naan bread, basmati rice and lemon wedges
Method
- Add the oil to the cooking pot and select the SAUTÉ function add the sliced onion and fry until softened but not coloured, add the ginger, garlic, spices, and chilli and fry until fragrant.
- Add the coconut milk and stock and bring to the boil. Stir in the carrot, cauliflower, courgettes, sweet potato, green beans and paneer and stir well to coat everything in the sauce. Cancel the SAUTÉ function.
- Place the lid onto the unit and select PRESSURE, set it to 5 minutes. Cook under pressure.
- When cooking has finished, release the steam straight away and remove the lid carefully away from you.
- Add spinach and chopped coriander and stir into the curry. Replace the lid and leave to sit for 2-3 minutes to allow the spinach to wilt.
- Serve the curry with warm naan bread and scattered with a little more chopped coriander.
Hearty Winter Soup with Ham Hock
This soup is delicious in the cold winter months and is substantial enough for a main meal. It is thick and wholesome with exceptionally tender meat.
Ingredients
- 1 unsmoked bacon/ham hock
- 2 carrots, peeled and chopped
- 2 celery sticks, chopped
- 1 onion, chopped
- 150g dried red lentils
- 150g dried yellow split peas 80g pearl barley
- 1 tbsp. mixed herbs
- 1.5 litres hot chicken stock
- Freshly ground black pepper
- Serve with crusty bread and butter
Method
- Prepare the bacon/ham hock by removing the rind and as much fat as possible using a sharp knife.
- Place the bacon/ham hock into the cooking pot.
- Add the remaining ingredients, make sure the liquid does not exceed the half way mark and stir well.
- Replace the lid and select the SOUP setting increase the time to 80 minutes.
- When the cooking time has finished cooking. Leave the unit to release the pressure naturally; this should take about 10-15 minutes, only release the lid with the pressure goes down.
- Remove the ham hock and cut into big chunks and add back to the soup, give it a stir.
- Serve in soup bowls with crusty bread on the side.
- Any left overs can be frozen in soup pouches and kept for 3 months.
Perfect Mash Potato
This has got to be one of the best ways to cook potatoes; steaming retains all the nutrients and keeps them dry which makes fantastic creamy mash potato.
Ingredients
- 1kg Maris Piper potatoes evenly sized, washed and left whole
- Knob of Butter
- Splash of Milk/Cream
- Sea salt and freshly ground pepper
Method
- Scrub the potatoes well.
- Fill the cooking pot with water to the 1/5 level on the inside of the pot and place the steaming rack inside the pot.
- Place the potatoes on top of the steaming rack and secure the lid.
- Select the STEAM option and cook under pressure for 15 minutes.
- When cooking has finished release the pressure and using a knife remove the skin from the potatoes, taking care as the potatoes will be very hot!
- Place the potatoes in a bowl add a knob of butter and a good splash of milk or cream.
- Mash the potatoes until smooth and season generously with salt and pepper. For other delicious options, add grated cheese, wholegrain mustard or even a dollop of creamed horseradish sauce.
Boston Style Baked Beans
This is a fantastic side dish perfect with sausages and mashed potato or a perfect side dish for a gang when having a BBQ!
Ingredients
- 500g dried haricot beans, rinsed and picked over to remove any broken beans
- 2 tsp. salt
- 1 tbsp. oil
- 2 litre water
For the Sauce
- 1 tbsp. oil
- 180g smoked bacon lardons
- 1 large onion, chopped
- 100g treacle
- 130g tomato ketchup
- 40g dark brown sugar
- 2 tbsp. wholegrain mustard
- 1 tsp. dry mustard powder
- 1 tbsp. balsamic vinegar
- 1/2 tsp. salt
- 1/4 tsp. ground black pepper
- 1/2 tsp. chilli powder
- 700ml water
Method
- Use a quick soak method to cut down on soaking time for the beans, to do this place the beans, salt , oil and water into the cooking pot and secure the lid. Select the PRESSURE setting and cook under pressure for 4 minutes, then use the quick release method to release the pressure. Drain the beans and set them aside.
- Wipe out the cooking pot and replace into the unit, add the oil and bacon lardons and use the SAUTÉ function to crisp the bacon, when the bacon is crisp add the onion and cook until softened then cancel the setting.
- Add the remaining ingredients to the cooking pot and all of the drained beans, give it a good stir and secure the lid. Cook on the PRESSURE setting for 45 minutes.
- When cooking has finished release the pressure, the beans should be tender but not too soft and still have a slight bite to them, if they are too firm, cook for a further 5 minutes.
NEED HELP
]]>BELLA 4.6 QT Air Fryer with Touchscreen
IMPORTANT SAFEGUARDS
When using electrical appliances, basic safety precautions should always be followed, including the following:
- READ ALL INSTRUCTIONS.
- Do not touch hot surfaces. Use handles or knobs. Use oven mitts or potholders.
- To protect against electric shock do not immerse cord, plugs, or appliance in water or other liquid.
- This appliance is not intended for use by persons (including children) with reduced physical, sensory or mental capabilities, or lack of experience and knowledge, unless they have been given supervision or instruction concerning use of the appliance by a person responsible for their safety.
- Children should be supervised to ensure that they do not play with the appliance.
- Unplug from outlet when not in use and before cleaning. Allow to cool before putting on or taking off parts, and before cleaning the appliance.
- Do not operate any appliance with a damaged cord or plug or after the appliance malfunctions, or has been damaged in any manner. Bring it to a qualified technician for examination, repair or electrical or mechanical adjustment.
- The use of accessory attachments not recommended by the appliance manufacturer may cause injuries.
- Do not use outdoors.
- Do not let cord hang over edge of table or counter, or touch hot surfaces.
- Do not place on or near a hot gas or electric burner, or in a heated oven.
- Extreme caution must be used when moving an appliance containing hot oil or other hot liquids.
- To disconnect, turn both the timer dial and temperature dial to OFF. Then remove plug from wall outlet.
- Do not use appliance for other than intended use.
- Make sure the crisping tray is in place before adding food to be air fried.
- Make sure the frying basket is locked securely into the front of the Air Fryer, while the Air Fryer is in operation.
WARNING: The Air Fryer will not operate unless frying basket is fully closed. CAUTION: After hot air frying, extreme caution must be used when handling the hot frying basket, crisping tray, and cooked foods.
CAUTION, HOT SURFACES: This appliance generates heat and escaping steam during use. Proper precautions must be taken to prevent the risk of burns, fires or other injury to persons or damage to property.
CAUTION: This appliance is hot during operation and retains heat for some time after turning OFF. Always use oven mitts when handling hot materials and allow metal parts to cool before cleaning. Do not place anything on top of the appliance while it is operating or while it is hot.
- All users of this appliance must read and understand this instruction manual before operating or cleaning this appliance.
- The cord to this appliance should be plugged into a 120V AC electrical outlet only.
- If this appliance begins to malfunction during use, immediately unplug the cord. Do not use or attempt to repair the malfunctioning appliance.
- Do not leave this appliance unattended during use.
- Do not immerse power cord in any liquid. If the power cord to this appliance is damaged, it must be replaced by contacting Consumer Service.
- Keep the cord out of reach from children and infants to avoid the risk of electric shock and choking.
- Place the Air Fryer on a flat, heat-resistant work area.
- Do not obstruct the air outlet or air inlets on the back and sides of the Air Fryer, with any objects. Avoid escaping steam from the air outlet during air frying.
- Keep appliance at least 4 inches away from walls or other objects during operation.
- Always use the frying basket handle to remove the frying basket.
- WARNING: After air frying, make sure to place the frying basket on a flat, heat-resistant surface.
- WARNING: Under or over-filling the frying basket may damage the Air Fryer and could result in serious personal injury.
- Never move a hot Air Fryer or an Air Fryer containing hot food. Allow to cool before moving.
WARNING! This Touchscreen Air Convection Fryer should not be used to boil water.
WARNING! This Touchscreen Air Convection Fryer should never be used to deep fry foods.
NOTES ON THE PLUG
This appliance has a polarized plug (one blade is wider than the other). To reduce the risk of electric shock, this plug will fit in a polarized outlet only one way. If the plug does not fit fully into the outlet, reverse the plug. If it still does not fit, contact a qualified electrician. Do not modify the plug in any way.
NOTES ON THE CORD
- A. A short power-supply cord (or detachable power-supply cord) is to be provided to reduce the risk resulting from becoming entangled in or tripping over a longer cord.
- B. Longer detachable power-supply cords or extension cords are available and may be used if care is exercised in their use.
- C. If a long detachable power-supply cord or extension cord is used :
1. The marked electrical rating of the cord or extension cord should be at least as great as the electrical rating of the appliance;
2. If the appliance is of the grounded type, the extension cord should be a grounding-type3-wire cord;
3. The longer cord should be arranged so that it does not drape over the countertop or table top where it can be pulled on by children or tripped over unintentionally
PLASTICIZER WARNING
CAUTION: To prevent Plasticizers from migrating from the finish of the counter top or table top or other furniture, place NON-PLASTIC coasters or place mats between the appliance and the finish of the counter top or table top. Failure to do so may cause the finish to darken; permanent blemishes may occur or stains can appear.
ELECTRIC POWER
If the electrical circuit is overloaded with other appliances, your appliance may not operate properly. It should be operated on a separate electrical circuit from other appliances.
Getting To Know Your 4.6 QT Air Fryer with Touchscreen
Product may vary slightly from illustration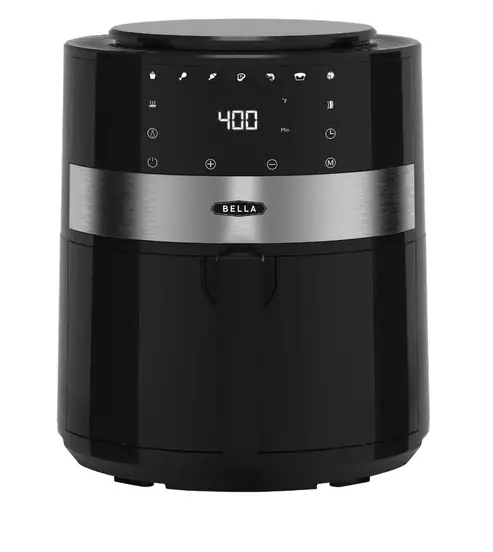
Control Panel Details
- Plug cord in the wall outlet, the white START/PAUSE ( ) button will start flashing.
- Press the START/PAUSE ( ) button. The control panel will illuminate.
- Press the MENU (M) button and select the desired preset option.
- Once the selected preset option illuminates, the Air Fryer starts operating after 3 seconds automatically
Timer Control Buttons
Selecting the timer control ( ), add or decrease cooking time using the + and – symbols.
This enables you to add or decrease cooking time, one minute at a time. Keeping the button held down will rapidly change the time.
Temperature Control Buttons
Selecting the temperature control (), add or decrease temperature using the + and – symbols. This enables you to add or decrease cooking temperature 5°F at a time. Keeping the button held down will rapidly change the temperature. Temperature control range: 150°F – 400°F.
MENU (M) Presets Button
Selecting the MENU (M) presets button enables you to scroll through the 9 preset menu options.
Once selected, the predetermined time and cooking temperature function begins.
NOTE: You can override the MENU presets by increasing or decreasing TIME and TEMP manually.
MENU Preset Choices
9 presets to choose from: Keep Warm, French Fries, Chicken, Fish, Steak, Shrimps, Bake, Pizza and Bacon.
Digital Display
This display will keep track of the temperature and remaining cook time.
Adjustable Control (Temperature and Timer)
The + and – symbols enable you to add or decrease cooking temperature and time.
Control Panel Settings
IMPORTANT! Depending on the thickness and/or density of foods, it may be necessary to use a meat thermometer to check cooking progress after preset TIME has expired.
Before Using for the First Time
- Your Air Fryer is shipped with the frying basket locked into the front of the Air Fryer body. Firmly grasp the handle to open frying basket; then remove the basket from the machine and place on a flat, clean work area.
- Remove all packing material and labels from the inside and outside of the Air Fryer. Check that there is no packaging underneath and around the frying basket.
- Wash the frying basket and crisping tray in hot, soapy water.
- DO NOT IMMERSE THE AIR FRYER BODY IN WATER. Wipe Air Fryer body with a damp cloth. Dry all parts thoroughly.
- To ensure the crisping tray fits snugly into the frying basket drawer, there are 3 rubber tips attached to the sides of the tray. Before using, check to make sure all 3 rubber tips are in place. If they become separated from the tray, simply slide onto the tabs as shown.
Operating Instructions
WARNING! This Air Convection Fryer should not be used to boil water.
WARNING! This Air Convection Fryer should never be used to deep fry foods.
- Place the Air Fryer on a flat, heat-resistant work area, close to an electrical outlet.
- Firmly grasp the frying basket handle to open frying basket; then remove from the machine and place on a flat, clean surface.
- Place the crisping tray into the base of the frying basket.
- Arrange food on top of the crisping tray. Do not overfill frying basket with food. To ensure proper cooking and air circulation, NEVER fill any frying basket more than 2/3 full. When air frying fresh vegetables, we do not recommend adding more than 1-1/2 cups of food to the frying basket.
- Fully insert the frying basket into the front of the Air Fryer.
- Plug cord in the wall outlet. An audible beep will sound and the START/PAUSE ( ) button will appear on a black background.
- To begin, press the START/PAUSE ( ) button.
- The touchscreen control panel will appear.
Manual Operation
- To adjust the default air frying TIME, select timer control button ( ), press the (+) or (–) on the right side of the control panel to advance or decrease TIME in 1 minute increments,
from 1 to 60 minutes.
NOTE: Timer can also be adjusted when time reflects on the digital display - To adjust the default air frying Temperature, select temperature control button ( ), press the (+) or (–) on the left side of the control panel to adjust the TEMP from 150°F
to 400°F in 5 degree increments.
NOTE: Temperature can also be adjusted when temperature reflects on the digital display using - When the desired TIME and TEMP appear on the digital display, the Air Fryer starts operating after 3 seconds automatically. The preset TIME will begin to count down. TEMP and remaining TIME will alternate on the digital display.
- To turn the Air Fryer OFF at any time, or to reset the TIME, simply press and hold the white START/PAUSE ( ) button for a few seconds.
NOTE: To halt air frying immediately, pull the frying basket drawer out of the body at any time. When the drawer is replaced, air frying will resume. - When the remaining TIME reaches 00:00, the white START/PAUSE ( ) button will appear.
9 FOOD MENU (M) PRESETS
(Keep Warm, French Fries, Chicken, Fish, Steak, Shrimps, Bake, Pizza and Bacon)
- To use food MENU options, simply press (M). Each time MENU (M) is pressed, the next food option will illuminate.
- When the desired food menu option icon is illuminated, the Air Fryer starts operating after seconds automatically.
NOTE: The quantity, density, weight of food will alter the total cooking time necessary. Remember, frying smaller batches will result in shorter cooking times and higher food quality. IMPORTANT: Always check food halfway through cooking time to determine final cook
TIME and TEMP. - To adjust the air frying TIME during operation, press (+) or (–) on the right side of the control panel to advance or decrease time in 1 minute increments to 60 minutes. Press the (+) or (–) on the left side of the control panel to adjust TEMP in 5 degree increments.
Air Frying Technique
- Please consult the Air Frying Chart and/or follow package directions for suggested TIME and TEMP.
- Always pat food dry before cooking to encourage browning and avoid excess smoke.
- To assure even cooking/browning, ALWAYS open the basket drawer halfway through the cook time and check, turn or shake foods in the frying basket. Some recipes may call for brush or spray oil halfway through cooking. Adjust TIME or TEMP if needed.
CAUTION: Always use oven mitts when handling the hot air fryer basket.
CAUTION: Hot oil can collect at the base of the drawer. To avoid risk of burns or personal injury, or to avoid oil from contaminating air fried foods, always unlock and remove the frying basket from the drawer before emptying. NEVER turn the drawer upside down with the frying basket attached. - Allow cooked foods to rest for 5 to 10 minutes. Remove the drawer from the machine and place on a flat, heat resistant surface. Then remove frying basket from the drawer.
- Shake air fried foods out onto serving area. Promptly return the frying basket to the drawer and lock into place. Continue air frying subsequent batches, if any.
- To avoid excess smoke, when cooking naturally high fat foods, such as bacon, chicken wings or sausages, it may be necessary to empty fat from the frying basket drawer between batches.
- For crispier results, air fry small batches of freshly breaded foods. Create more surface area by cutting food into smaller pieces. Press breading onto food to help it adhere. Refrigerate breaded foods for at least 30 minutes before frying.
- Arrange breaded food in frying basket so that food is not touching to allow air flow on all surfaces.
- Spray oils work best. Oil is distributed evenly and less oil is needed. Canola, olive, avocado, coconut, grapeseed, peanut, or vegetable oil work well.
- Unplug the Air Convection Fryer when not in use.
A Note on Air Frying Pre-packaged Frozen Foods
- Where microwave ovens often produce hot, mushy results and toaster ovens take forever, air convection frying assures reasonably fast, crispy, delicious results!
- As a rule, depending on the food and amount to be cooked, suggested cook TIMES may have to be reduced slightly. Always check food halfway through cooking time to determine final cook TIME and TEMP.
- Always check cooking progress after TIME has expired.
Air Convection Frying Chart (Includes Preset Food Menu Items)
WARNING! Times are estimated and based on average sizes and weights.
ALWAYS USE A MEAT THERMOMETER TO ENSURE THAT MEAT, POULTRY AND FISH ARE COOKED THOROUGHLY BEFORE SERVING.
NOTE: Frying smaller batches will result in shorter cooking times and higher food quality. Adjust air frying temperatures and times as necessary to suit your taste.
NOTE: Unless food is pre-packaged and pre-oiled, for browned and crispy results, all foods should be lightly oiled before air frying.
| FOOD | TEMP | AIR FRY TIME | ACTION |
| Root Vegetables,
3 – 4 cups fresh (roasted) |
370ºF | 15 – 20 min | toss with oil, shake 3x |
| Asparagus,
3 – 4 cups, fresh thin stems |
370ºF | 7 – 9 min | spray with oil, shake 2x |
| Green Beans, Sugar Snap Peas, 3 – 4 cups fresh | 370ºF | 7 – 9 min | spray with oil, shake 1x |
| Broccoli, 3 – 4 cups fresh (roasted) | 370ºF | 5 – 7 min | spray with oil, shake 3x |
| Brussels Sprouts, halved, 3 – 4 cups fresh | 370ºF | 8 – 10 min | spray with oil, shake 2x |
| Butternut Squash,seeded,
1/2 inch chunks, 3 – 4 cups fresh |
370ºF | 15 min | spray with oil, shake 3x |
| Fennel, fresh, chopped, 3 – 4 cups fresh | 370ºF | 7 – 9 min | spray with oil, shake 2x |
| Fried Sweet Potato Fries
(fresh, hand cut, 1/8 to 1/4-inch thick) |
400ºF | 13 – 15 min | spray with oil, shake 3x |
| French Fries, Idaho Potatoes, 2 – 3 (fresh, hand cut, 1/4 to 1/3 inch thick) (frozen, 1/4 to 1/3 inch thick) | 400ºF
400ºF |
12 min
12 min |
spray with oil, shake 3x spray with oil, shake 3x |
| Meat, Roast, Chops | 360ºF | 25 min | rub or spray with oil, add seasoning, turn over test for doneness |
| Ribeye Steaks, (2) 1.25 lb,
1-1/2 inch thick, room temp. medium rare medium well done |
400ºF
400ºF 400ºF |
Preheat +6 min
Preheat +10 min Preheat +14 min |
rub or spray with oil, add seasoning, turn over test for doneness, rest 15 minutes – check at 12 minutes, rest 15 minutes |
| Hamburgers, 1/3 lb (up to 4), rare – well | 350ºF | Preheat
+3 – 6 min |
spray with oil, add seasoning, turn over test for doneness |
| Chicken Wings, 2-3 lb (fresh/thawed) | 360ºF | 20 min | spray with oil, shake 2x test for doneness |
| Chicken Tenders/Fingers, boneless | 360ºF | 18 – 20 min | spray with oil, shake 1x |
| Chicken Pieces, bone in | 360ºF | 20 – 30 min | spray with oil, turn over test for doneness |
| Fish Filet (fresh, thawed, battered) | 400ºF | 10 min | spray with oil, turn over test for doneness |
| Shrimp (thawed, battered), 1- 2 lb | 320ºF | 8 min | spray with oil, turn over, shake |
PLEASE NOTE:
The USDA recommends that meats such as beef and lamb, etc. should be cooked to an internal temperature of 145ºF/63ºC. Pork should be cooked to an internal temperature of 160ºF/71ºC and poultry products should be cooked to an internal temperature of 170ºF/77ºC – 180ºF/82ºC to be sure any harmful bacteria has been killed. When reheating meat/poultry products, they should also be cooked to an internal temperature of 165ºF/74ºC.
User Maintenance Instructions
This appliance requires little maintenance. It contains no user-serviceable parts. Any servicing requiring disassembly other than cleaning must be performed by a qualified appliance repair technician.
Care & Cleaning Instructions
WARNING! Allow the Air Convection Fryer to cool fully before cleaning.
- Unplug the Air Fryer. Remove frying basket. Make sure the frying basket and crisping tray have cooled completely before cleaning. Use the center hole of the crisping tray to lift crisping tray up and out of the frying basket.
- Wash the frying basket and crisping tray in hot soapy water. Do not use metal kitchen utensils or abrasive cleansers or cleaning products as this may damage the non-stick coating.
IMPORTANT: After cleaning, always check to make sure all 3 rubber tips are securely fastened to the 3 tabs on the crisping tray. - The frying basket and crisping tray are dishwasher-safe. For best results, place in the top rack of your dishwasher to clean.
Storing Instructions
- Make sure the Air Fryer is unplugged and all parts are clean and dry before storing.
- Never store the Air Fryer while it is hot or wet.
- Store Air Fryer in its box or in a clean, dry place.
Recipes
Lemon Za’atar Chicken with Eggplant & Zucchini
Za’atar is popular Middle Eastern spice mixture dating back to ancient times. We have enveloped the chicken with this aromatic blend of thyme, sumac, wild oregano and toasted sesame seeds. Fresh lemon adds moist citrus notes.
The Air Fryer is the perfect tool for preparing moist and luscious, roasted chicken, the frying basket allows drippings (liquid flavor) to permeate the vegetables and stream down into the easy-to-clean drawer.
Serves 6
- 1 (3 1/2 – 4 1/2 lb) whole chicken
- 1 lemon, zested and halved
- 1 teaspoon salt, divided
- 1 Chinese eggplant
- 1 zucchini
- 1 cup za’atar seasoning
- Remove the chicken giblets.
- Rinse the chicken inside and out. Trim all excess fat and use paper towels to pat dry. Work your hands inside the chicken skin to loosen from the meat. Use a sharp paring knife to puncture all fat pockets. Make 3 to 4 slits along the chicken’s backbone to relieve extra fat.
- Liberally coat the chicken inside and out with za’atar. Generously rub za’atar under the chicken skin. Squeeze each lemon half over the chicken; squeeze again and place inside the chicken cavity.
- Tuck the wing tips under the body of the chicken. To ensure crispy skin, refrigerate the chicken uncovered for 30 minutes before air frying.
- Trim the eggplant and zucchini, cut into discs, then use to cover the bottom of the Air Fryer basket. Lay the chicken, breast side down, onto the bed of vegetables.
- Use food MENU preset for CHICKEN ( ). Air Fry at 360°F.
- Turn the chicken over, breast side up. Sprinkle lemon zest over the breast of the chicken.
- Continue air frying CHICKEN at 365ºF for 25 minutes, or until the juices run clear when you cut between a leg and thigh or when a meat thermometer inserted into the thickest part of the thigh reads 170ºF/77ºC – 180ºF/82ºC.
- Remove the chicken and vegetables to a platter and tent with aluminum foil for about 20 minutes. Slice the chicken onto a platter and serve it with the vegetables.
Air Fried Onion Blossom
- Aluminum foil to cover onion 3/4 cup rice flour
- 1 large sweet Vidalia onion 3/4 cup Italian seasoned breadcrumbs
- 3 teaspoons olive oil
- 4 tablespoon Cajun seasoning mix, divided
- 2 tablespoons yogurt
- 1 tablespoon water
- 2 large eggs
- 3 bowl breading station: Mix breadcrumbs with olive oil, 2 tablespoons Cajun seasoning.
- In a small bowl, mix 2 tablespoons Cajun seasoning into the flour.
- In another bowl, beat yogurt, water and eggs.
- Create the Blossom. Peel onion, cut off top. Place cut side down onto a cutting board.
- Starting 1/2 inch from the root, cut downward, all the way to the cutting board. Repeat to make 4 evenly spaced cuts around the onion.
- Continue slicing between each section until there are 8 cuts in total.
- Place sliced onion in an ice water bath for at least 2 hours to overnight. Remove from water, pat dry. Open onion so petals are exposed.
- Place onion in a large bowl. Sprinkle onion generously with flour mixture. Make sure to get in between all petals. Turn onion upside down to remove excess flour.
- Using a ladle, ladle the egg mixture into every crevice. Lift up onion and turn to make sure excess egg drips away.
- Sprinkle onion very generously with breadcrumb mixture. Press breadcrumbs between every petal.
- Place the breaded onion blossom into the frying basket.
- Cover and tent the top of the onion with aluminum foil.
- Use food MENU preset for CHICKEN ( ). Air Fry at 360°F for 20 minutes.
- Check doneness of the onion.
- Remove foil. Increase TEMP to 400ºF and continue air frying for an additional 5 minutes until browned and crisp.
General’s Tso’s Wife’s Air Fried Cauliflower
If General’s Tso had a wife, and she had an Air Fryer, she would surely air fry this scrumptious dish.
- 1 head (4 cups) cauliflower
- 2 tablespoons canola oil
- 4 to 6 seeded and stemmed dried red chilies
Sauce
- 2 tablespoon unseasoned rice vinegar
- 2 teaspoon sesame oil
- 1/4 cup oyster sauce
- 2 tablespoons water, or more as needed
- 2 tablespoon grated ginger
- 4 cloves garlic, grated
Garnish
- Brown rice
- Toasted sesame seeds
- Combine all sauce ingredients in a large bowl. Trim cauliflower into florets and toss into the bowl. Add chilies. Coat the florets well and add to the Air Fryer basket.
- Air fry for 12 to 14 minutes at 365ºF, shake halfway.
Spicy Air Fried Pizza Rolls
Crispy, spicy bites of goodness, dipped in a flavorful tomato sauce, these Pizza Rolls will be the hit of any party or gathering. A great way to use leftovers, the possibilities are endless.
- Olive oil spray
- 2 spicy hot Italian sausages, casings removed
- 2 cups shredded Mozzarella cheese, or any cheese of your choice
- 4 jalapeño peppers, seeds, stems removed, chopped
- 1/2 lb mushrooms, sliced
- Won ton wrappers
- Creamy Tomato Spaghetti Sauce, for dipping
- 1 egg, whisked, to seal the rolls
- Cook the Italian sausage, mushrooms and peppers in the frying basket.
- Use food MENU preset for BACON ( ). Air Fry at 400ºF, stirring every 5 minutes for 10 – 15 minutes until fully browned.
- Drain sausage and veggies onto a plate of paper towels. When cool enough to handle, crumble cooked sausage into small pieces. Combine sausage, mushrooms,
peppers in a small bowl. - Place a won ton wrapper flat onto the working surface. In the lower portion of the wrapper, form a line of ingredients: sausage mixture topped with a handful of cheese.
- Roll once around, then fold in the sides. Continue rolling until the Pizza Roll is formed. Brush a small amount of egg wash onto the end of the wrapper to seal. Repeat until the frying basket is filled.
- Place assembled Pizza Rolls seam-side-down into the Air Fryer basket. Spray with olive oil.
- Air fry at 370ºF for 8 to 10 minutes. Turn Pizza Rolls over halfway through air frying.
- Serve with your favorite tomato sauce for dipping.
Air Fried Zucchini Fries
Serves 4
- 2 zucchini squash, trimmed into spears
- Salt
- Kosher salt, to taste
- 2 tablespoons olive oil
- 1/2 cup panko breadcrumbs
- 2 tablespoons Parmesan herb seasoning
Yogurt Pesto Dip
- 3 tablespoons plain yogurt
- 1 tablespoon basil pesto
- Cut zucchini in half lengthwise. Cut each half into 3 long spears. Cut the spears in half to form zucchini fries.
- Sprinkle the zucchini fries with salt and place in a colander for at least 10 minutes to 2 hours, to draw out excess moisture.
- Blot zucchini dry with paper towels; then add to a large mixing bowl.
- Drizzle olive oil over the zucchini fries and stir until they are all well coated.
- Add panko breadcrumbs, oil and seasoning to a plate, mix well.
- Roll the oiled zucchini into the panko, coating all sides and pressing firmly so that the crumbs adhere.
IMPORTANT: Work in batches, do not overcrowd the Air Fryer basket. - Air fry at 360ºF, until slightly crisp and golden brown, about 10 minutes, turning the spears over halfway through air frying.
- Transfer zucchini fries to a platter, sprinkle with salt. Combine yogurt and pesto in a small dish. Serve immediately.
8 Minute Banana Chocolate Chip Cupcakes
Fresh, moist banana goodness in every bite. Light and sweet, these cup cakes are so easy to make and they bake in 8 just minutes! These sweet bites go anywhere. Grab one with a cup of coffee, kids with a glass of milk. Air fry as many little cakes as you need, then store the remaining batter and air fry fresh cupcakes tomorrow!
- Foil cupcake liners
- Coconut oil baking spray
- 1 (16 oz.) box white cake mix, your favorite brand
- 1 egg white
- 1 egg
- 3 tablespoons vegetable oil
- 1 ripe banana, mashed
- 1 1/4 cup unsweetened vanilla or plain almond milk
- 1 cup crushed chocolate chip or chocolate sandwich cookies
- 1/4 cup chocolate chips
- 1/4 cup butterscotch chips
- Mash the banana in a large bowl. Add the remainder of the ingredients and mix until well blended.
- Place foil cupcake liners into the frying basket. Generously spray foil cupcake liners with coconut oil. Fill cupcake liners equally, no more than 2/3 full with batter.
- Air fry at 365ºF, until golden, about 8 minutes.
- Check for doneness. Insert a toothpick in the center of the cupcake; if it comes out clean cupcakes are fully baked. If not, continue to air fry for 1 additional minute if needed.
Limited TWO-YEAR Warranty
SENSIO Inc. hereby warrants that for a period of TWO YEARS from the date of purchase, this product will be free from mechanical defects in material and workmanship, and for 90 days in respect to non-mechanical parts. At its sole discretion, SENSIO Inc. will either repair or replace the product found to be defective, or issue a refund on the product during the warranty period.
The warranty is only valid for the original retail purchaser from the date of initial retail purchase and is not transferable. Keep the original sales receipt, as proof of purchase is required to obtain warranty validation. Retail stores selling this product do not have the right to alter, modify, or in any way revise the terms and conditions of the warranty.
EXCLUSIONS:
The warranty does not cover normal wear of parts or damage resulting from any of the following: negligent use of the product, use of improper voltage or current, improper routine maintenance, use contrary to the operating instructions, disassembly, repair, or alteration by anyone other than qualified SENSIO Inc. personnel. Also, the warranty does not cover Acts of God such as fire, floods, hurricanes, or tornadoes.
SENSIO Inc. shall not be liable for any incidental or consequential damages caused by the breach of any express or implied warranty. Apart from the extent prohibited by applicable law, any implied warranty of merchantability or fitness for a particular purpose is limited in time to the duration of the warranty. Some states, provinces or jurisdictions do not allow the exclusion or limitation of incidental or consequential damages, or limitations on how long an implied warranty lasts, and therefore, the above exclusions or limitations may not apply to you. The warranty covers specific legal rights which may vary by state, province and/or jurisdiction.
HOW TO OBTAIN WARRANTY SERVICE:
You must contact Customer Service at our toll-free number: 1-866-832-4843.
A Customer Service Representative will attempt to resolve warranty issues over the phone. If the Customer Service Representative is unable to resolve the problem, you will be provided with a case number and asked to return the product to SENSIO Inc. Attach a tag to the product that includes: your name, address, daytime contact telephone number, case number, and description of the problem. Also, include a copy of the original sales receipt. Carefully package the tagged product with the sales receipt, and send it (with shipping and insurance prepaid) to SENSIO Inc.’s address. SENSIO Inc. shall bear no responsibility or liability for the returned product while in transit to SENSIO Inc.’s Customer Service Center.


bellahousewares.com
#myBELLAlife
![]()
![]()
![]()
![]()
IMPORTANT SAFEGUARDS
WARNING: When using electrical appliances, basic safety precautions should always be followed, including the following:
- READ ALL INSTRUCTIONS BEFORE USING APPLIANCE.
- Do not touch hot surfaces. Use handles or knobs.
- To protect against risk of electric shock, do not immerse or partially immerse the cord, plugs, or the entire unit in water or any other liquid.
- This appliance is not intended for use by persons (including children) with reduced physical, sensory or mental capabilities, or lack of experience and knowledge, unless they have been given supervision or instruction concerning use of the appliance by a person responsible for their safety.
- Close supervision is necessary when any appliance is used by or near children.
- Unplug from wall outlet when not in use and before cleaning. Allow to cool before cleaning or storing this appliance.
- Never yank the cord to disconnect the appliance from the outlet. Instead, grasp the plug and pull to disconnect.
- Do not operate any appliance with a damaged cord or plug or after the appliance malfunctions or is dropped or damaged in any manner. Bring the appliance to a qualified service agent for examination, repair or electrical/mechanical adjustment to avoid hazard.
- The use of accessories attachments not recommended by the appliance manufacturer may cause fire, electrical shock or injuries.
- Do not use outdoors. This is for household only.
- Do not use for commercial purposes.
- Do not let the electrical cord hang over the edge of the table or counter, or touch hot surfaces.
- Do not allow appliance to come into contact with any materials that are flammable such as draperies, walls, etc.
- Do not place on or near a hot gas or electric burner or in a heated oven.
- Use on a heat-resistant, flat level surface only.
- Extreme caution must be used when moving an appliance containing hot food, hot water, hot oil or other hot liquids.
- The cord to this appliance should be plugged into a 120V AC electrical outlet only.
- A short power-supply cord is to be provided to reduce the risk resulting from becoming entangled in or tripping over a longer cord.
- To disconnect, remove plug from outlet.
- Always unplug after use. The appliance will remain ON unless unplugged.
CAUTION HOT SURFACES: This appliance generates heat during use. Proper precautions must be taken to prevent the risk of burns, fire or other damage to persons or property. - When using this appliance, provide adequate ventilation above and on all sides for air circulation. Do not allow this appliance to touch curtains, wall coverings, clothing, dish towels or other flammable materials during use.
- Do not use appliance for other than intended use.
FOR HOUSEHOLD USE ONLY SAVE THESE INSTRUCTIONS
ADDITIONAL IMPORTANT SAFEGUARDS
CAUTION: This appliance is hot during operation and retains heat for some time after plugging OUT. Always use oven mitts when handling hot materials and allow metal parts to cool before cleaning. Do not place anything on top of the appliance while it is operating or while it is hot.
- All users of this appliance must read and understand this Instruction Manual before operating or cleaning this appliance.
- Do not leave this appliance unattended during use.
NOTES ON THE PLUG
This appliance has a polarized plug (one blade is wider than the other). To reduce the risk of electric shock, this plug will fit in a polarized outlet only one way. If the plug does not fit fully into the outlet, reverse the plug. If it still does not fit, contact a qualified electrician. Do not modify the plug in any way.
NOTES ON THE CORD
- A. A short power-supply cord (or detachable power-supply cord) is to be provided to reduce the risk resulting from becoming entangled in or tripping over a longer cord.
- B. Longer detachable power-supply cords or extension cords are available and may be used if care is exercised in their use.
- C. If a long detachable power-supply cord or extension cord is used:
1. The marked electrical rating of the cord or extension cord should be at least as great as the electrical rating of the appliance;
2. If the appliance is of the grounded type, the extension cord should be a grounding-type3-wire cord; and
3. The longer cord should be arranged so that it does not drape over the countertop or table top where it can be pulled on by children or tripped over unintentionally.
PLASTICIZER WARNING
CAUTION: To prevent Plasticizers from migrating to the finish of the counter top or table top or other furniture, place NON-PLASTIC coasters or place mats between the appliance and the finish of the counter top or table top. Failure to do so may cause the finish to darken; permanent blemishes may occur or stains can appear.
ELECTRIC POWER
If the electrical circuit is overloaded with other appliances, your appliance may not operate properly. It should be operated on a separate electrical circuit from other appliances.
Getting to know your Cake Pop Maker
Product may vary slightly from illustration

Before Using For The First Time
- Remove all parts included in the box.
- Wash all the parts thoroughly (refer to Cleaning and Maintenance section for more information).
NOTE: Your Cake Pop Maker may emit a small amount of smoke and/or odor when you use it for the first time. This is normal and harmless, however we recommend that you do not eat the first cake pop you make with the Cake Pop Maker.
Using Your Cake Pop Maker
- Plug the cord into your 120 V AC wall outlet.
- The Red Ready Light will turn off when the appliance reaches proper cooking temperature. Once heated, ready times will be faster.
- When the Red Ready Light turns off, using the handle, lift the top lid to the open position and apply a light layer of vegetable oil, olive oil or canola oil to the cooking plates. Pour and spread the cake pop batter evenly onto the lower plate so that the batter fills the lower plate and the peak areas of the plate are covered.
CAUTION: DO NOT USE COOKING SPRAYS. THEY CAN CAUSE A BUILD-UP ON THE COOKING PLATES AND MAY AFFECT THE NON-STICK PERFORMANCE OF THE PRODUCT. - Using the handle, lower the top lid.
- Allow the Cake Pop Maker to cook for 2 – 3 minutes, according to recipe directions. The Red READY light will cycle on and off as the unit maintains baking temperature.
- When the Red ready light turns OFF, using oven mitts gently open the lid by lifting the lid handle; if it pulls, continue baking for 30 seconds and test again. If the cake pops need to bake to a darker finish, close the lid and continue cooking at 20 second intervals until the desired color is achieved.
- Wearing oven mitts, remove cake pops from the cooking plates using a non-metallic utensil. A wooden or heat-proof plastic spatula can be used to remove the cake pops.
CAUTION: To avoid damage to the non-stick surface, never use any sharp, pointed or metal objects.
WARNING: Cooking surfaces are hot, do not touch; use caution until cooking plates are cool. - To make more cake pops, close the Cake Pop Maker until the Red Ready Light appears off, then repeat from step 4.
- When finished baking cake pops, remove plug from wall outlet.
- After it has sufficiently cooled, the heating plates may be wiped clean.
Tips For Perfectly Baked Cake Pops
- The exact amount of batter needed to make perfect full-sized cake pops depends on the typed and consistency of the batter. Use the same ladle or measuring cup each time to determine how much batter you need to fill the lower plate fully so as to cover the peaks in the plate.
- To avoid cake pops with a moist base, kept the cake pops on a wire cooling rack. This will retain the crispness of the cake pops.
User Maintenance Instructions
This appliance requires little maintenance. It contains no user serviceable parts. Do not try to repair it yourself. Contact a qualified appliance repair technician if the product requires servicing.
Cleaning and Maintenance
- Unplug the Cake Pop Maker, and allow it to cool down before cleaning.
- You can easily remove any excess oils or crumbs without disassembling the appliance.
- Never submerge the appliance in water or place it in the dishwasher.
- Use only plastic or wooden utensils on the heating plates. Metal may damage the plates.
- Use a soft cloth on the heating plates and occasionally a metal polish intended for stainless steel on the outer housing. Never use abrasive scouring pads or steel wool.
- If there is hardened batter on the plates, pour a little oil and let it sit for about 5-7 minutes. You can then wipe clean with a paper towel.
- Do not use the Cake Pop Maker for anything other than making cake pops
Preparing Cake Pops
WHAT YOU WILL NEED
Cake mix (or homemade)
FIRST COVERING
Prepared cake frosting (or homemade) Candy melts, various colors Chocolate chips (any flavor/color, including butterscotch) Jam, jelly, preserves, honey
FUN TOPPINGS
Colored sprinkles Chopped nuts Shredded sweetened coconut Small colored candies such as M&M®’s Colored icing tubes Cinnamon sugar Ginger sugar
CAKE POPS SUPPLIES
Lollipop sticks
Styrofoam form to stand pops
- To prepare cake pops: Dip sticks into the melted candy or chips before inserting them into the cake pop. This will help to hold pops into place.
- Stand the cake pops in a Styrofoam form to keep them from touching. Refrigerate for 20-30 minutes before decorating.
- When you are ready to dip, take pops out of the refrigerator no more than 5 at a time.
- Frost cake pops with your favorite frosting or combination of frostings. Then roll into toppings of your choice or press candies or nuts into coating.
- If you are using liquefied candy melts or chips as the first covering:
- Using a microwave-safe bowl, melt 1/4 to 1/2 cup candy melts or any chocolate or flavored
baking chips for 1 minute. Stir well. Microwave for an additional 15 seconds, if necessary.
NOTE: A double-boiler or a pan over boiling water can also be used. - If needed, add a splash of milk to chips before heating to thin dipping mixture.
- Dip pops into the bowl, swirl cakes in the dipping mixture until it is covered. Use a
teaspoon to help drip candy over the cake. Work quickly as the chocolate will begin to get lumpy as it hardens. - Roll cake into toppings of your choice or press candies or nuts into wet coating.
HINT: When using melted white chocolate as the first coating, put some aside to use as a colored drizzle. Melt chocolate and add GEL food coloring until the desired color is achieved. Decorate using colored chocolate in a piping bag or a plastic bag with the corner snipped.
IMPORTANT: Never use liquid food coloring as it will harden immediately and ruin the chocolate.
6. If you are using jam, jelly, preserves or honey: - Place in microwave-safe bowl and heat on HIGH power for 10 seconds.
- Brush pops with melted fruit.
- Roll or dip cake pops into toppings of your choice..
Recipes
E-Z Scratch Chocolate Cake Pops
- 1/2 cup unsalted butter, softened
- 1 cup all-purpose flour
- 1 cup brown sugar
- 1/2 teaspoon cream of tartar
- 2 eggs
- 1/4 cup unsweetened cocoa powder
- 1 teaspoon vanilla extract
- Preheat Cake Pop Maker.
- In a large bowl, using a hand mixer, cream together the butter and brown sugar.
- Beat in the eggs, one at a time, then stir in vanilla.
- In a separate bowl, combine the flour, cream of tartar and cocoa powder; stir into the egg mixture until well blended.
- Bake cake pops following the instructions outlined in Using Your Cake Pop Maker in this instruction manual.
- Cool thoroughly before adding sticks or decorating.
Makes: 24 26 chocolate cake pops
Blondies Cake Pops
- 1 cup sifted all-purpose flour
- 1/4 cup butterscotch chips
- 1/2 teaspoon baking powder
- 6 tablespoons unsalted butter
- 1/4 teaspoon baking soda
- 1 cup packed brown sugar
- 1/2 teaspoon salt
- 1 egg
- 1/2 cup chopped cashews
- 2 teaspoons vanilla extract
- 1/4 cup semisweet chocolate chips
- Preheat Cake Pop Maker.
- Place flour, baking powder, baking soda, and salt in a medium bowl. Sift together.
- Add chopped nuts and chips. Mix dry ingredients well and set aside.
- Melt butter. Add 1 cup firmly packed brown sugar and mix well. Allow to cool slightly.
- Beat egg in small bowl and add to wet ingredients. Add vanilla and mix until well blended.
- Add dry ingredients slowly to the wet ingredients, mixing well. Batter will be thick.
IMPORTANT: Apply a generous coating of oil to both the upper and lower cooking plates before adding batter. - Bake cake pops following the instructions outlined in Using Your Cake Pop Maker in this instruction manual
- Cool thoroughly before adding sticks or decorating.
Makes: 21 23 blondie pops
Limited TWO-YEAR Warranty
SENSIO Inc. hereby warrants that for a period of TWO YEARS from the date of purchase, this product will be free from mechanical defects in material and workmanship, and for 90 days in respect to non-mechanical parts. At its sole discretion, SENSIO Inc. will either repair or replace the product found to be defective, or issue a refund on the product during the warranty period.
The warranty is only valid for the original retail purchaser from the date of initial retail purchase and is not transferable. Keep the original sales receipt, as proof of purchase is required to obtain warranty validation. Retail stores selling this product do not have the right to alter, modify, or in any way revise the terms and conditions of the warranty.
EXCLUSIONS:
The warranty does not cover normal wear of parts or damage resulting from any of the following: negligent use of the product, use of improper voltage or current, improper routine maintenance, use contrary to the operating instructions, disassembly, repair, or alteration by anyone other than qualified SENSIO Inc. personnel. Also, the warranty does not cover Acts of God such as fire, floods, hurricanes, or tornadoes.
SENSIO Inc. shall not be liable for any incidental or consequential damages caused by the breach of any express or implied warranty. Apart from the extent prohibited by applicable law, any implied warranty of merchantability or fitness for a particular purpose is limited in time to the duration of the warranty. Some states, provinces or jurisdictions do not allow the exclusion or limitation of incidental or consequential damages, or limitations on how long an implied warranty lasts, and therefore, the above exclusions or limitations may not apply to you. The warranty covers specific legal rights which may vary by state, province and/or jurisdiction.
HOW TO OBTAIN WARRANTY SERVICE:
You must contact Customer Service at our toll-free number: 1-866-832-4843. A Customer Service Representative will attempt to resolve warranty issues over the phone. If the Customer Service Representative is unable to resolve the problem, you will be provided with a case number and asked to return the product to SENSIO Inc. Attach a tag to the product that includes: your name, address, daytime contact telephone number, case number, and description of the problem. Also, include a copy of the original sales receipt. Carefully package the tagged product with the sales receipt, and send it (with shipping and insurance prepaid) to SENSIO Inc.’s address. SENSIO Inc. shall bear no responsibility or liability for the returned product while in transit to SENSIO Inc.’s Customer Service Center.
![]()
![]()
![]()
![]()
For customer service questions or comments
1-866-832-4843 / [email protected]
Sensio Inc. New York, NY 10016/USA
]]>BELLA 2 Slice Toaster Instruction Manual
WWW.BELLAHOUSEWARES.COM
Register your product and get support
THANK YOU for your purchase

IMPORTANT SAFEGUARDS
- READ ALL INSTRUCTIONS.
- Do not touch hot surfaces. Use handles or knobs.
- To protect against electrical shock do not immerse cord, plugs, or appliance in water or other liquid.
- This appliance is not intended for use by persons (including children) with reduced physical, sensory or mental capabilities, or lack of experience and knowledge, unless they have been given supervision or instruction concerning use of the appliance by a person responsible for their safety.
- Close supervision is necessary when any appliance is used by or near children.
- Unplug from outlet when not in use and before cleaning. Allow to cool before putting on or taking off parts.
- Do not operate any appliance with a damaged cord or plug or after the appliance malfunctions, or has been damaged in any manner. Return appliance to the nearest authorized service facility for examination, repair or adjustment.
- The use of accessory attachments not recommended by the appliance manufacturer may cause injuries.
- Do not use outdoors.
- Do not let cord hang over edge of table or counter, or touch hot surfaces.
- Do not place on or near a hot gas or electric burner, or in a heated oven.
- To disconnect, press the halo lighted CANCEL button, then remove plug from wall outlet.
- Do not use appliance for other than intended use.
- Oversize foods, metal foil packages, or utensils must not be inserted in a Toaster as they may involve a risk of fire or electric shock.
- A fire may occur if Toasters are covered or touching flammable material, including curtains, draperies, walls, and the like, when in operation.
- Extreme caution must be used when moving an appliance containing hot oil or other hot liquids.
- Do not attempt to dislodge food when the Toaster is plugged in.
- Do not operate unattended.
CAUTION!
- DO NOT toast pastries with runny fillings or frosting.
- DO NOT toast torn slices of bread.
- DO NOT place buttered bread or wrapped food into the 2-Slice Toaster.
- DO NOT toast small-size breads, mini-baguettes, breadsticks, etc. in this Toaster.
FOR HOUSEHOLD USE ONLY
SAVE THESE INSTRUCTIONS
ADDITIONAL IMPORTANT SAFEGUARDS
CAUTION HOT SURFACES: This appliance generates heat and escaping steam during use. Proper precautions must be taken to prevent the risk of burns, fires, or other injury to persons or damage to property.
WARNING: ELECTRICAL SHOCK HAZARD. Never attempt to dislodge food inside the 2-Slice Toaster while the Toaster is plugged in. Doing so could cause an electrical shock hazard or a risk of fire.
CAUTION: This appliance is hot during operation and retains heat for some time after turning OFF. Always use oven mitts when handling hot materials and allow metal parts to cool before cleaning. Do not place anything on top of the 2-Slice Toaster while it is operating or while it is hot.
- A person who has not read and understood all operating, toasting, and safety instructions is not qualified to operate this appliance. All users of this appliance must read and understand this Instruction Manual before operating or cleaning this appliance.
- If this appliance falls or accidentally becomes immersed in water, unplug it from the wall outlet immediately. Do not reach into the water!
- When using this appliance, provide adequate air space above and on all sides for air circulation. Do not operate this appliance while it is touching or near curtains, wall coverings, clothing, dishtowels or other flammable materials.
- To reduce the risk of fire, do not leave this appliance unattended during use.
- If this appliance begins to malfunction during use, immediately press the halo lighted CANCEL button and unplug the cord. Do not use or attempt to repair a malfunctioning appliance!
- The cord to this appliance should only be plugged directly into a 120V AC electrical wall outlet.
- Do not use this appliance in an unstable position.
- Use the Toaster on a hard, flat surface. Do not place Toaster near a flame or heat or on a soft surface (such as carpet). Avoid placing it where it may tip over during use. Dropping the Toaster could cause it to malfunction.
- This Toaster is equipped with Anti-Jam feature. If any toast or toaster food gets jammed, the Toaster will shut OFF automatically.
NOTES ON THE PLUG
This appliance has a polarized plug (one blade is wider than the other). To reduce the risk of electric shock, this plug will fit in a polarized outlet only one way. If the plug does not fit fully into the outlet, reverse the plug. If it still does not fit, contact a qualified electrician. Do not modify the plug in any way.
NOTES ON THE CORD
A short power-supply cord (or detachable power-supply cord) is to be provided to reduce risks resulting from becoming entangled in or tripping over a longer cord.
B. Longer detachable power-supply cords or extension cords are available and may be used if care is exercised in their use.
C. If a long detachable power-supply cord or extension cord is used:
- The marked electrical rating of the detachable power-supply cord or extension cord should be at least as great as the electrical rating of the appliance;
- If the appliance is of the grounded type, the extension cord should be a grounding- type 3-wire cord; and
- The longer cord should be arranged so that it will not drape over the counter top or table top where it can be pulled on by children or tripped over.
PLASTICIZER WARNING
CAUTION: To prevent Plasticizers from migrating from the finish of the counter top or table top or other furniture, place NON-PLASTIC coasters or place mats between the appliance and the finish of the counter top or table top. Failure to do so may cause the finish to darken; permanent blemishes may occur or stains can appear.
ELECTRIC POWER
If the electrical circuit is overloaded with other appliances, your appliance may not operate properly. It should be operated on a separate electrical circuit from other appliances.
Getting to Know Your 2 slice toaster
Product may vary slightly from illustration

Before Using for the First Time
- Remove all packaging materials including those that may be inside the toasting slots or toasting lever slot.
- Wipe the exterior with a damp cloth. Dry thoroughly. Do not use abrasive cleaners.
- Do not put the Toaster, cord or plug in water.
- Make sure the crumb tray is locked in position on the bottom of the Toaster and the toasting lever is in the UP position.
- Unwrap power cord from cord storage area on underside of Toaster and plug into a 120V AC outlet.
- Turn the browning control dial to (1), the lightest setting.
- Lower the toasting lever until it locks in place. It is recommended to run 2 cycles of toast without bread before the first use.
NOTE: Toaster may emit a thin smoke on the initial use. This is normal and not detrimental to the performance of the Toaster..
Automatic Centering Guides
Lowering the toasting lever closes the centering guides, and holds the bread or toaster food centrally in the toasting slots.
NOTE: The toasting lever will not lock down unless the Toaster is plugged into a 120V AC electrical outlet.
Toasting Instructions
- Before toasting, make sure the crumb tray is locked in position on the bottom of the Toaster and the toasting lever is in the UP position.
- Make sure no bread or other objects are inside the toasting slots. Place Toaster on a flat, level, heat resistant surface.
- Plug the power cord into a 120V AC electrical outlet.
- Remove all protective wrappings from food before placing into the toasting slot(s).
IMPORTANT: Avoid toasting torn bread slices or small pieces of toaster food that may get lodged in toasting slot(s). - Insert bread or toaster food into the toasting slot(s).
- Turn the browning control dial to the desired shade (1 – 6). To test toasting times for browning, it is best to use both toasting slots; position the browning control dial between (3) and (4) medium; then adjust each subsequent toasting to your preference.
- Lower the toasting lever until locked into place. The automatic centering guides hold food upright for uniform side-to-side toasting.
- When the bread is lowered into position, the CANCEL button’s halo will illuminate, and toasting will begin.
NOTE: The toasting lever will not lock into position unless the Toaster is plugged into a 120V AC electrical outlet.
NOTE: When toasting a single slice, the bread may be placed in any toasting slot.
NOTE: To prevent a fire hazard, never place bread over the opening of the Toaster; always place bread into the slots.
NOTE: DO NOT change the browning selection during the toasting cycle. Press the halo lighted CANCEL button; then turn the browning control dial to adjust. Lower the toasting lever and toast until the desired toast color is achieved. - At the end of the toasting cycle, bread or toaster food will rise automatically. Use the high lift lever to remove smaller toaster foods or breads such as English muffins.
- Remove bread from toasting slot(s). Use care when removing toasted bread as both the toastace and the top of the Toaster will still be hot.
IMPORTANT: Never use a fork or sharp-edged utensil to remove toast, because that may damage the heating element or cause injury. - To interrupt toasting, press the halo lighted CANCEL button.
- Unplug cord from wall outlet when not in use and before cleaning. Do not attempt to dislodge food when the Toaster is plugged in.
Defrost Cycle
Your Toaster both DEFROSTS and TOASTS bread in a single cycle.
IMPORTANT: The DEFROST cycle may be used in addition to the BAGEL and GLUTEN-FREE buttons.
- Plug the power cord into a 120V AC electrical outlet.
- Insert the frozen bread, bagel, or gluten-free bread in the Toaster.
- Turn the browning control dial to the desired shade (1 – 6).
NOTE: When multiple browning buttons have been pressed, (up to 3) it may be necessary to shorten the browning time by setting the browning control dial 2 shades lighter. Check and continue toasting if necessary. - Lower the toasting lever.
- Press the DEFROST button. The defrost button’s halo will illuminate.
- The toasting lever will rise automatically when the toasting cycle is complete.
Bagel Cycle
NOTE: Use the BAGEL cycle for English muffins, too!
- Plug the power cord into a 120V AC electrical outlet.
- Slice bagels or English muffins in half; insert one half in each toasting slot with the cut sides facing the center of the toasting slots.
NOTE: Use either toasting slot when toasting only half a bagel or English muffin. Use slices that fit freely into toasting slots. - Turn the browning control dial to the desired shade (1 – 6).
- Lower the toasting lever until it locks into place.
- Press the BAGEL button. Both the BAGEL and the CANCEL button’s halo will illuminate, and the BAGEL cycle will begin.
- At the end of the BAGEL cycle, the toasting lever, bagel or English muffin will rise automatically, and the Toaster will turn OFF.
- Remove bagel or English muffin from the toasting slot(s). Use care as the top of the Toaster will still be hot.
IMPORTANT: Never use a fork or sharp-edged utensil to remove toast, because that may damage the heating element or cause injury. - To interrupt the BAGEL cycle, press the halo lighted CANCEL button.
- Unplug cord from wall outlet when not in use.
Gluten Free Cycle
Often denser in structure, gluten-free breads and toaster foods require longer cooking times. The GLUTEN FREE setting automatically alters toasting time to give the same degree of browning achieved with other gluten breads.
NOTE: Use either toasting slot when toasting only 1 piece of gluten-free bread or toaster food. Use slices or foods that fit freely into toasting slots.
- Plug the power cord into a 120V AC electrical outlet.
- Insert the bagel, English muffin or toaster food into 1 or both toasting slots.
- Turn the browning control dial to the desired shade (1 – 6).
- Lower the toasting lever until it locks into place. The automatic centering guides hold food upright for uniform side-to-side toasting.
- Press the GLUTEN-FREE button. Both the GLUTEN-FREE and the CANCEL button’s halo will illuminate, and the GLUTEN-FREE cycle will begin.
- At the end of the GLUTEN-FREE cycle, the toasting lever, bread or toaster food will rise automatically, and the Toaster will turn OFF.
- Remove toast from the toasting slot(s). Use care as the top of the Toaster will still be hot.
IMPORTANT: Never use a fork or sharp-edged utensil to remove toast, because that may damage the heating element or cause injury. - To interrupt the GLUTEN-FREE cycle, press the halo lighted CANCEL button.
- Unplug cord from wall outlet when not in use.
Cancel Button
- When the toasting lever is lowered, the CANCEL button’s halo will illuminate, and TOASTING will begin.
- To STOP or interrupt any toasting cycle, press the halo lighted CANCEL button. The bread will automatically rise; the Toaster will turn OFF.
- Unplug cord from wall outlet when not in use.
Convenience Food Toasting
Many varieties of packaged convenience food are available today, both frozen and non-frozen (shelf pastry). Since toaster foods and individual tastes vary, it is difficult to recommend exact browning settings. However, after a little experimentation you will discover the best setting for your needs. You may also wish to refer to the heating instructions on convenience food packaging.
Toaster Pastry
For best results, follow the instructions printed on the pastry package. If the package does not have instructions, position the browning control dial to medium, between (3) and (4). Some pastries may require a second toasting cycle.
NOTE: Do not use this Toaster for toasting pastry items with runny-type frosting or open fillings.
CAUTION: Never leave Toaster unattended when toasting pastries.
Non-Frozen Shelf Pastry
Turn the browning control dial to a lighter setting. For thicker convenience foods, it may be necessary to adjust the browning control dial to a higher setting / longer toasting cycle.
Removing Lodged Foods
NOTE: This Toaster is equipped with Anti-Jam feature. If any toast or toaster food gets jammed, the Toaster will shut OFF automatically.
- If, after toasting, a piece of bread or any other toaster food becomes lodged in any of the toasting slots, unplug the Toaster and allow it to cool.
- Hold the toasting lever down. Turn the Toaster upside down and shake the food loose.
IMPORTANT: Never use a fork or sharp-edged utensil to remove toast, because that may damage the heating element or cause injury. - Pull the crumb tray from the bottom of the Toaster. Wipe the crumb tray with a clean cloth and lock into place.
IMPORTANT POINTS
- Remove all protective wrappings from food before placing into the toasting slot(s).
- For best results, clean the crumb tray frequently.
- Different breads require different browning settings. Press the alo lighted CANCEL button at any time to check toast color.
- When multiple browning buttons have been pressed, (up to 3) it may be necessary to shorten the browning time by setting the browning control dial 2 shades lighter. Check toast color and continue toasting if necessary.
- Do not block extra wide toasting slots. Never place any object over the top opening.
- Do not toast buttered bread, Texas toast, English muffins, bagels or pita bread. Melted butter will cause fire.
- When toasting more than 1 slice of bread, use slices of similar size, thickness and freshness.
- Stale bread, thin bread or sweet bread products, such as tea cakes and fruit loaf, brown much more quickly than ordinary bread, so they should be toasted on the lighter settings.
- Never immerse Toaster, cord or plug in water or other liquid.
- Never use a fork or sharp-edged utensil to remove toast, because that may damage the heating element or cause injury.
USER MAINTENANCE INSTRUCTIONS
This appliance requires little maintenance. It contains no user-serviceable parts. Any servicing requiring disassembly other than cleaning must be performed by a qualified appliance repair technician.
CARE & CLEANING INSTRUCTIONS
CAUTION: Do not immerse Toaster, cord, or plug in water or any other liquid.
CAUTION: Be sure the Toaster is unplugged before cleaning.
CRUMB TRAY: The crumb tray is located on the bottom of the Toaster. Working over a sink or garbage receptacle, pull the crumb tray from the bottom of the Toaster. Wipe the crumb tray with a clean, damp cloth and lock securely into the bottom of the Toaster.
EXTERIOR: Wipe the Toaster exterior with a clean, damp cloth. Do not use abrasive cleaners. Do not put cord, or plug in water or liquid.
STORING INSTRUCTIONS
- Unplug unit, allow to cool, and clean before storing.
- Store Toaster in its box in a clean, dry place.
- Never store Toaster while it is hot or still plugged in.
- Never wrap cord tightly around the appliance; use the storage area on the bottom of the Toaster.
- Do not put any stress on the cord where it enters the unit, as it could cause the cord to fray and break.
Limited TWO-YEAR Warranty
SENSIO Inc. hereby warrants that for a period of TWO YEARS from the date of purchase, this product will be free from mechanical defects in material and workmanship, and for 90 days in respect to non-mechanical parts. At its sole discretion, SENSIO Inc. will either repair or replace the product found to be defective, or issue a refund on the product during the warranty period.
The warranty is only valid for the original retail purchaser from the date of initial retail purchase and is not transferable. Keep the original sales receipt, as proof of purchase is required to obtain warranty validation. Retail stores selling this product do not have the right to alter, modify, or in any way revise the terms and conditions of the warranty.
EXCLUSIONS:
The warranty does not cover normal wear of parts or damage resulting from any of the following: negligent use of the product, use of improper voltage or current, improper routine maintenance, use contrary to the operating instructions, disassembly, repair, or alteration by anyone other than qualified SENSIO Inc. personnel. Also, the warranty does not cover Acts of God such as fire, floods, hurricanes, or tornadoes.
SENSIO Inc. shall not be liable for any incidental or consequential damages caused by the breach of any express or implied warranty. Apart from the extent prohibited by applicable law, any implied warranty of merchantability or fitness for a particular purpose is limited in time to the duration of the warranty. Some states, provinces or jurisdictions do not allow the exclusion or limitation of incidental or consequential damages, or limitations on how long an implied warranty lasts, and therefore, the above exclusions or limitations may not apply to you. The warranty covers specific legal rights which may vary by state, province and/or jurisdiction.
HOW TO OBTAIN WARRANTY SERVICE:
You must contact Customer Service at our toll-free number: 1-866-832-4843. A Customer Service Representative will attempt to resolve warranty issues over the phone. If the Customer Service Representative is unable to resolve the problem, you will be provided with a case number and asked to return the product to SENSIO Inc. Attach a tag to the product that includes: your name, address, daytime contact telephone number, case number, and description of the problem. Also, include a copy of the original sales receipt. Carefully package the tagged product with the sales receipt, and send it (with shipping and insurance prepaid) to SENSIO Inc.’s address. SENSIO Inc. shall bear no responsibility or liability for the returned product while in transit to SENSIO Inc.’s Customer Service Center.
For customer service questions or comments
1-866-832-4843 / [email protected]
]]>