BELLA 17283 7-Egg Cooker Instruction Manual
IMPORTANT SAFEGUARDS
WARNING: When using electrical appliances, basic safety precautions should always be followed, including the following:
- READ ALL INSTRUCTIONS BEFORE USING APPLIANCE.
- Do not touch hot surfaces. Use handles or knobs. Use potholders when removing lid or handling hot containers.
- To protect against electrical shock do not immerse cord, plugs, or appliance in water or other liquid.
- This appliance is not intended for use by persons (including children) with reduced physical, sensory or mental capabilities, or lack of experience and knowledge, unless they have been given supervision or instruction concerning use of the appliance by a person responsible for their safety.
- Close supervision is necessary when any appliance is used by or near children.
- Unplug from outlet when not in use and before cleaning. Allow to cool before putting on or taking off parts.
- Do not operate any appliance with a damaged cord or plug or after the appliance malfunctions, or has been damaged in any manner. Bring it to a qualified technician for examination, repair or for electrical or mechanical adjustment.
- The use of accessory attachments not recommended by the appliance manufacturer may cause injuries.
- Do not use outdoors.
- Do not let cord hang over edge of table or counter, or touch hot surfaces.
- Do not place on or near a hot gas or electric burner, or in a heated oven.
- Extreme caution must be used when moving an appliance containing hot oil or other hot liquids.
CAUTION: To protect against damage or electric shock, do not cook in the base. Cook fresh, whole eggs only in the boiling racks provided.
NOTE: Never operate Egg Cooker without water in the reservoir, or use a liquid other than water for cooking purposes as this may damage the unit. - To disconnect, press the ON/OFF (I/O) button, then remove plug from outlet.
- Do not use appliance for other than intended use.
WARNING: Escaping steam. Use caution. Do not place face near steam vents.
WARNING: To avoid scalding, lift to open lid carefully and allow water to drip into the water reservoir.
CAUTION: The piercing pin on the underside of the water measuring cup is very sharp. Use extreme caution when handling.
ADDITIONAL IMPORTANT SAFEGUARDS
CAUTION HOT SURFACES: This appliance generates heat and escaping steam during use. Proper precautions must be taken to prevent the risk of burns, fires or other injury to persons or damage to property.
- A person who has not read and understood all operating and safety instructions is not qualified to operate this appliance. All users of this appliance must read and understand this instruction manual before operating or cleaning this appliance.
- If this appliance falls or accidentally becomes immersed in water, unplug it from the wall outlet immediately. Do not reach into the water!
- Do not leave this appliance unattended during use.
- If this appliance begins to malfunction during use, immediately unplug the cord. Do not use or attempt to repair a malfunctioning appliance!
- The cord to this appliance should be plugged into a 120V AC electrical wall outlet.
- Do not use this appliance in an unstable position.
CAUTION: To protect against damage or electric shock, do not cook in the base.
WARNING! FOOD SAFETY HAZARD FDA GUIDELINES SUGGEST:
- Consuming raw or undercooked eggs may increase your risk of foodborne illness.
- Thorough cooking is perhaps the most important step in making sure eggs are safe. Cook eggs until both the yolk and the white are firm. Scrambled eggs should not be runny.
- Foods containing eggs should be cooked to 160°F (72°C). Always use a food thermometer to test.
- For recipes that call for raw or undercooked eggs, use pasteurized or fresh organic eggs.
NOTES ON THE PLUG
This appliance has a polarized plug (one blade is wider than the other). To reduce the risk of electric shock, this plug will fit in a polarized outlet only one way. If the plug does not fit fully into the outlet, reverse the plug. If it still does not fit, contact a qualified electrician. Do not modify the plug in any way.
NOTES ON THE CORD
A. A short power-supply cord (or detachable power-supply cord) is to be provided to reduce the risk resulting from becoming entangled in or tripping over a longer cord.
B. Longer detachable power-supply cords or extension cords are available and may be used if care is exercised in their use.
C. If a long detachable power-supply cord or extension cord is used:
- The marked electrical rating of the cord or extension cord should be at least as great as the electrical rating of the appliance;
- If the appliance is of the grounded type, the extension cord should be a grounding-type3-wire cord; and
- The longer cord should be arranged so that it will not drape over the counter top or table top where it can be pulled on by children or tripped over.
PLASTICIZER WARNING
CAUTION: To prevent Plasticizers from migrating to the finish of the counter top or table top or other furniture, place NON-PLASTIC coasters or place mats between the appliance and the finish of the counter top or table top. Failure to do so may cause the finish to darken; permanent blemishes may occur or stains can appear.
ELECTRIC POWER
If the electrical circuit is overloaded with other appliances, your appliance may not operate properly. It should be operated on a separate electrical circuit from other appliances.
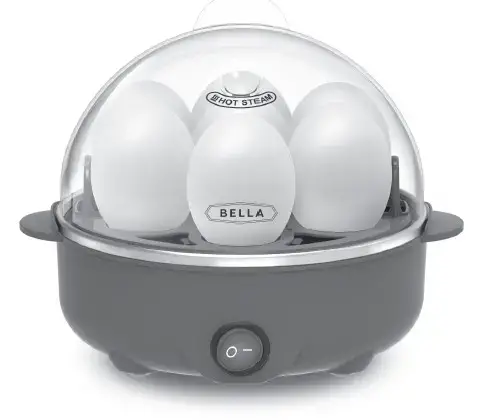
Getting to Know Your Egg Cooker
Product may vary slightly from illustration

Before Using for the First Time
- Carefully unpack all parts of your Egg Cooker. Set the base aside.
- Wash lid, boiling rack, poaching tray, omelet tray and water measuring cup in warm, soapy water. Rinse and dry thoroughly.
CAUTION: The piercing pin on the underside of the water measuring cup is very sharp. Use extreme caution when handling. - Wipe the base’s water reservoir with a damp, non-abrasive cloth.
Operating Instructions
Important!
- ONLY USE COLD EGGS. Eggs may be overcooked if they are not refrigerated until use.
- Store eggs in their carton to assure freshness and to keep the yolks centered.
- This Egg Cooker works best for large sized eggs. It may be necessary to adjust the amount the of water for other sizes.
- Always use cold water, preferably distilled or filtered to reduce mineral deposits.
- Boiled eggs in their shells, may be kept refrigerated for up to 5 days.
Auto Shut-Off Timer
The Egg Cooker is designed with a thermal sensor that detects when water has fully evaporated from the Heating Plate, signaling it to shut off automatically for perfectly cooked eggs and for the beep alert to sound.
NOTE: Avoid unplugging the Egg Cooker in the middle of the cooking cycle. If doing so, the Egg Cooker will not shut off completely and will turn back on when the unit is plugged back in next. However the
thermal sensor will detect no water on the Heating Plate and will automatically shut off within 30 seconds.
When the unit turns off unplug it , otherwise the egg cooker will be in a permanent ON/OFF cycle.
Boiled Eggs
Figure 2
- Place the Egg Cooker on a flat, clean surface.
- Using the water measuring cup, add cold water, preferably distilled or filtered, to the designated SOFT, MEDIUM or HARD boiled mark See Figure 2); then pour into the base’s water reservoir.
NOTE: Always use cold water. - Center the boiling rack on top of the base.
- To avoid broken boiled eggs, wash eggs first, then pierce eggs using the pin on the underside of the water measuring cup.
NOTE: Eggs will cook perfectly with or without piercing. - Place up to 7 eggs in the boiling rack, pierced side up. Add the lid.
- Plug cord into a 120V AC outlet.
- Press the ON/OFF switch to turn the Egg Cooker ON. The water will begin to heat and boil.
IMPORTANT: To ensure proper doneness, eggs must be LARGE sized and COLD out of the refrigerator. - When the eggs are cooked and the water has evaporated, the unit will beep and the egg cooker indicator light will turn off indicating that the cooking process has finished.
- Once cooking is finished, remove the plug from wall outlet.
- Immediately lift lid carefully to avoid scalding, and allow water to drip into the water reservoir.
- Using protective oven mitts or pot holders, use the side handles to carefully lift the boiling rack up and off the base. Rinse boiled eggs with cold water or place in an ice bath to stop cooking. Eggs can be peeled when they are cool enough to handle. CAUTION: The unit and the escaping steam can cause burns or injuries. Precaution must be taken when the unit is in operation or just done cooking
IMPORTANT: Unused shell-on boiled eggs may be refrigerated and used for up to 5 days. - To cook additional eggs repeat step 2 – 11.
- To serve soft or medium-cooked eggs out of their shell, use a knife to break the shell across the top. Use a small teaspoon to enjoy the egg directly from the shell, or use toast strips to dip into the soft yolk.
Poached Eggs and Omelettes
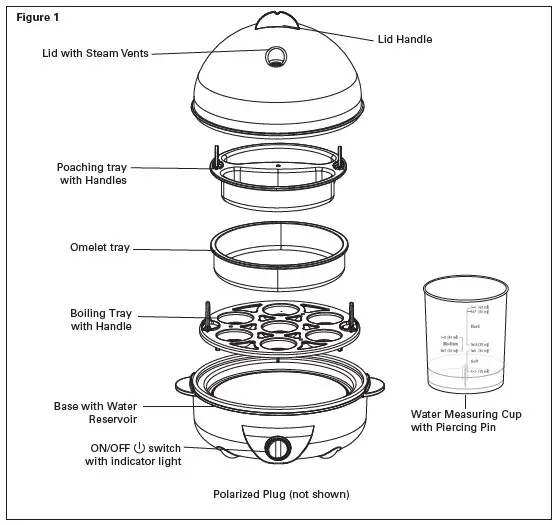
Figure 3
- Using the water measuring cup, add cold water, preferably distilled or filtered, to the POACHED/OMELETTE mark (See Figure 3); then pour into the base’s water reservoir.
NOTE: Always use cold water. - Center boiling rack on top of the base. Rest the poaching tray on top of the boiling rack. (See Figure 1.)
CAUTION: Never place poaching or omelet tray directly onto Heating plate - Poach up to 2 eggs or prepare an omelettes in the trays. For best results you can lightly butter or spray oil on trays.
- Poached Eggs: Crack one egg at a time to add to each poaching section.
- Omelettes: Whisk eggs, one at a time with your favorite add-ins: grated or shredded cheese, small diced tomatoes, sausage crumbles, bacon bits, any small diced cooked vegetables, even leftovers!
Carefully add to each poaching section. DO NOT OVERFILL! - Plug cord into a 120V AC outlet.
- Press the ON/OFF switch to turn the Egg Cooker ON. The water will begin to heat and boil.
- When the eggs are cooked and the water has evaporated, the unit will beep and the egg cooker indicator light will turn off indicating that the cooking process has finished.
- Once cooking is finished, remove the plug from wall outlet.
- Immediately lift lid carefully to avoid scalding, and allow water to drip into the water reservoir.
- Using protective oven mitts or pot holders, use the top handle to carefully lift the poaching tray up and off the base.
- Remove poached eggs/omelettes. Serve immediately.
COOKING EGGS
The cooking times listed below are guidelines on how long to cook eggs for desired doneness. The thermal sensor in the Egg Cooker will automatically shut off when the water has completely evaporated and the eggs are done.
The Time Chart provided is for Medium to Large eggs. Jumbo or XL eggs will require additional water and time for the Egg Cooker to achieve the desired cooking results.
For firmer Medium Eggs, allow the eggs to sit covered in the Egg Cooker for an additional 2-3 minutes before removing them. For extra-firm hard boiled eggs, leave the eggs covered in the Egg Cooker for a few more minutes after the beep alert goes off.
| Doneness | Number of Eggs | Cook Time | Water level (in ml) |
| Soft Boiled | 1-4 eggs | 9 mins | 30 ml |
| 5-7 eggs | 11 mins | 15 ml | |
| Medium Boiled | 1-4 eggs | 11 mins | 40 ml |
| 5-7 eggs | 14 mins | 30 ml | |
| Hard Boiled | 1-4 eggs | 17 mins | 70 ml |
| 5-7 eggs | 20 mins | 60 ml |
User Maintenance Instructions
This appliance requires little maintenance. It contains no user serviceable parts. Do not try to repair it
yourself. Any servicing requiring disassembly other than cleaning, must be performed by a qualified
appliance repair technician. Cleaning Instructions
CAUTION: NEVER IMMERSE BASE UNIT OR CORD IN WATER OR OTHER LIQUID.
- Always unplug and allow to cool completely before cleaning.
- All Egg Cooker parts, with the exception of the base, may be cleaned in the top rack of a dishwasher. To clean by hand, wash in warm, soapy water.
CAUTION: THE BASE UNIT IS EXTREMELY HOT AFTER USE. Allow base to cool completely before cleaning. - To remove mineral deposits, wipe the base’s water reservoir with a paper towel moistened with 1 tablespoon distilled white vinegar. Rinse and dry thoroughly.
- Wipe the exterior of the base with a soft, slightly damp cloth or sponge. Never use abrasive cleansers or scouring pads to clean the base, as they may damage the surfaces.
Storing Instructions
- Never store the Egg Cooker while it is hot or wet. Make sure all parts are clean and dry before storing.
- Store appliance in its box or in a clean, dry place.
- To store, assemble with parts in place with the lid securely fitted on top.
Classic Deviled Eggs
For a simply elegant presentation, fill a pastry bag with the egg yolk mixture (or a zip lock bag with the corner snipped) and pipe about a tablespoon of the mixture into the well of the
egg. Repeat until all the eggs are filled. Experiment with various toppings: salmon roe caviar, scallions, bacon crumbles, chopped olives, sweet pickles, sweet or spicy roasted peppers. Serves 7
- 7 large eggs, hard boiled
- 2 tablespoons capers, chopped
- 1/4 cup mayonnaise
- 1/4 cup sour cream
- 2 teaspoons spicy brown mustard
- 1/4 teaspoon onion powder
- 1/4 teaspoon Tabasco sauce
- smoked Spanish paprika, for garnish
- Crack egg shells and carefully peel under cool running water. Gently dry with paper towels.
- Slice hard boiled eggs in half lengthwise. Remove yolks and place in a medium mixing bowl. Place the whites on a deviled egg serving platter.
- Using a fork, mash egg yolks into a fine crumble. Add the remaining ingredients and mix well.
- Spoon heaping teaspoons or pipe the yolk mixture into the egg white. Sprinkle with paprika before serving.
Chicken Cobb Salad with Creamy Basil Blue Cheese Dressing
My family loves a Cobb salad, and this is a wonderful recipe. It makes plain old, shredded iceberg lettuce shine. Bacon, hard boiled eggs, chicken, tomatoes, blue cheese, avocado, green onion and dressing.
Serves 4
Creamy Basil Blue Cheese Dressing
- 1 cup mayonnaise
- 1/2 cup buttermilk
- 1/2 cup sour cream
- 3 dashes Worcestershire sauce
- 4 oz. blue cheese, crumbled
- 4 tablespoons chives, chopped
- 4 tablespoons fresh basil, chopped
- 1/4 teaspoon salt
- 1/2 teaspoon freshly ground black pepper, to taste
Chicken
- 2 boneless, skinless chicken breasts, sliced into 8 thin strips
- salt and freshly ground black pepper
Salad
- 3 hearts of romaine lettuce, chopped
- 4 large eggs, hard boiled
- 8 slices bacon
- 1 cup artichoke hearts, quartered
- 2 vine ripened tomatoes, seeded, chopped
- 2 ripe avocados, diced
- 1 red onion, chopped
- Prepare the bacon: Cut bacon into 1-inch strips. Fry bacon in a grill pan or heavy skillet over medium-high heat. Remove bacon and all grease, leaving 1 tablespoon bacon grease in the pan or skillet.
- Prepare the chicken: Season the chicken, then grill on medium-high heat in the bacon grease for 2 to 3 minutes per side until done. Remove from the pan and set aside to cool.
- For the blue cheese dressing: In a bowl, whisk together the mayonnaise, buttermilk sour cream and Worcestershire sauce and mix until smooth. Stir in the blue cheese, chives,
basil, salt and pepper. Cover and refrigerate for at least 2 hours before serving to allow the flavors to develop. - For the salad: Arrange the chopped lettuce in a large bowl or on a large platter. Add rows of salad ingredients: chopped grilled chicken, chopped or quartered hard boiled eggs, bacon, artichoke hearts, tomatoes, avocados, and chopped red onion.
- Drizzle the Creamy Basil Blue Cheese Dressing over the salad before serving.
Peppadew and Cheese Deviled Eggs
We’ve spun a southern favorite into an elegant appetizer and kicked it up with peppadew peppers to add a slightly sweet and spicy note. Serves 7
- 7 large eggs, hard boiled
- 1/3 cup mayonnaise
- 1/4 lemon, juiced
- 1/4 cup chopped peppadew peppers
- 2 tablespoons shredded cheddar cheese
- 1-1/2 tablespoon brown spicy mustard
- Kosher salt, to taste
- 1/2 teaspoon cayenne pepper, more to taste
- Crack egg shells and carefully peel under cool running water. Gently dry with paper towels.
- Slice hard boiled eggs in half lengthwise. Remove yolks and place in a medium mixing bowl. Place the whites on a deviled egg serving platter.
- Using a fork, mash egg yolks into a fine crumble. Add the remaining ingredients and mix well.
- Spoon heaping teaspoons or pipe the yolk mixture into the egg white shells. Dust with cayenne before serving.
Loaded Turkey Meatloaf
This old world meatloaf features decorative white and yellow rings running through middle of the slices. This dish was originated in Germany where it has been said that immigrants brought
meatloaf with them to Southern Brazil where it was adapted to include a hardboiled egg stuffed inside. In Hungary, Stefania meatloaf is a favorite where a long meatloaf is baked in a oaf pan with hard boiled eggs in the middle.
Meatloaf
- 1 lb. ground turkey, dark meat preferred
- 1 cup onion, chopped finely
- 1 clove of garlic, minced
- 1 bunch fresh parsley, chopped finely
- 2 tablespoons dried oregano
- 2 eggs
- 1/4 cup Italian seasoned breadcrumbs
- 1/3 cup barbeque sauce, as topping
Stuffing
- 2 tablespoons olive oil
- 2 tablespoons chili oil
- 1 cup fresh mushrooms, chopped
- shisito peppers, chopped
- 1/2 onion, sliced
- 1 cup zucchini, grated
- 4 hard boiled eggs
- Prepare Meatloaf. Place all meatloaf ingredients in a large bowl. Mix by hand until combined.
- Spread plastic wrap onto the working surface. Empty meat onto the center of the plastic wrap.
Use your hands to press into a square, approximately 13-inches wide x14-inches deep. - Prepare stuffing. Sauté all ingredients in a large pan until the onions are soft and browned.
- Add a layer of the stuffing over the meat.
- Arrange a line of 4 eggs down the center of the meat and stuffing.
- Roll the loaf. Use the plastic wrap to lift the front of the meat up and over the eggs. Pull the top of the plastic wrap down. Firmly grasp both corners of the back of the wrap and pull the meat up and over the backside of the eggs to form a loaf. Using a brush or a spoon, spread the barbeque sauce over the top of the loaf.
- Bake at 350°F for 25 minutes. Use a meat thermometer to check for an internal temperature of 170°F – 180°F. Continue cooking for 5 minutes, if needed.
Poached Eggs
- 3 large eggs
- Salt and pepper, for garnish
- Using the water measuring cup add cold water into the base’s water reservoir.
- Center boiling rack on top of the base. Rest the poaching tray on top of the boiling rack.
- Crack one egg at a time to add to each poaching section.
- Add the lid and Press the ON/OFF Button to turn the Egg Cooker ON.
- In 6-8 minutes, when the eggs are cooked and the water has evaporated, the Egg Cooker red READY indicator light will turn off.
- Remove poached eggs/omelettes. Sprinkle with salt and pepper before serving.
Limited TWO-YEAR Warranty
SENSIO Inc. hereby warrants that for a period of TWO YEARS from the date of purchase, this product will be free from mechanical defects in material and workmanship, and for 90 days in respect to non-mechanical parts. At its sole discretion, SENSIO Inc. will either repair or replace the product found to be defective, or issue a refund on the product during the warranty period.
The warranty is only valid for the original retail purchaser from the date of initial retail purchase and is not transferable. Keep the original sales receipt, as proof of purchase is required to obtain warranty validation. Retail stores selling this product do not have the right to alter, modify, or in any way revise the terms and conditions of the warranty.
EXCLUSIONS:
The warranty does not cover normal wear of parts or damage resulting from any of the following: negligent use of the product, use of improper voltage or current, improper routine maintenance, use contrary to the operating instructions, disassembly, repair, or alteration by anyone other than qualified SENSIO Inc. personnel. Also, the warranty does not cover Acts of God such as fire, floods, hurricanes, or tornadoes.
SENSIO Inc. shall not be liable for any incidental or consequential damages caused by the breach of any express or implied warranty. Apart from the extent prohibited by applicable law, any implied warranty of merchantability or fitness for a particular purpose is limited in time to the duration of the warranty. Some states, provinces or jurisdictions do not allow the exclusion or limitation of incidental or consequential damages, or limitations on how long an implied warranty lasts, and therefore, the above exclusions or limitations may not apply to you. The warranty covers specific legal rights which may vary by state, province and/or jurisdiction.
HOW TO OBTAIN WARRANTY SERVICE:
You must contact Customer Service at our toll-free number: 1-866-832-4843.
A Customer Service Representative will attempt to resolve warranty issues over the phone. If the Customer Service Representative is unable to resolve the problem, you will be provided with a case number and asked to return the product to SENSIO Inc. Attach a tag to the product that includes: your name, address, daytime contact telephone number, case number, and description of the problem. Also, include a copy of the original sales receipt. Carefully package the tagged product with the sales receipt, and send it (with shipping and insurance prepaid) to SENSIO Inc.’s address. SENSIO Inc. shall bear no responsibility or liability for the returned product while in transit to SENSIO Inc.’s Customer Service Center.