![]()
BELLA 2 Slice Toaster Instruction Manual
WWW.BELLAHOUSEWARES.COM
Register your product and get support
THANK YOU for your purchase

IMPORTANT SAFEGUARDS
- READ ALL INSTRUCTIONS.
- Do not touch hot surfaces. Use handles or knobs.
- To protect against electrical shock do not immerse cord, plugs, or appliance in water or other liquid.
- This appliance is not intended for use by persons (including children) with reduced physical, sensory or mental capabilities, or lack of experience and knowledge, unless they have been given supervision or instruction concerning use of the appliance by a person responsible for their safety.
- Close supervision is necessary when any appliance is used by or near children.
- Unplug from outlet when not in use and before cleaning. Allow to cool before putting on or taking off parts.
- Do not operate any appliance with a damaged cord or plug or after the appliance malfunctions, or has been damaged in any manner. Return appliance to the nearest authorized service facility for examination, repair or adjustment.
- The use of accessory attachments not recommended by the appliance manufacturer may cause injuries.
- Do not use outdoors.
- Do not let cord hang over edge of table or counter, or touch hot surfaces.
- Do not place on or near a hot gas or electric burner, or in a heated oven.
- To disconnect, press the halo lighted CANCEL button, then remove plug from wall outlet.
- Do not use appliance for other than intended use.
- Oversize foods, metal foil packages, or utensils must not be inserted in a Toaster as they may involve a risk of fire or electric shock.
- A fire may occur if Toasters are covered or touching flammable material, including curtains, draperies, walls, and the like, when in operation.
- Extreme caution must be used when moving an appliance containing hot oil or other hot liquids.
- Do not attempt to dislodge food when the Toaster is plugged in.
- Do not operate unattended.
CAUTION!
- DO NOT toast pastries with runny fillings or frosting.
- DO NOT toast torn slices of bread.
- DO NOT place buttered bread or wrapped food into the 2-Slice Toaster.
- DO NOT toast small-size breads, mini-baguettes, breadsticks, etc. in this Toaster.
FOR HOUSEHOLD USE ONLY
SAVE THESE INSTRUCTIONS
ADDITIONAL IMPORTANT SAFEGUARDS
CAUTION HOT SURFACES: This appliance generates heat and escaping steam during use. Proper precautions must be taken to prevent the risk of burns, fires, or other injury to persons or damage to property.
WARNING: ELECTRICAL SHOCK HAZARD. Never attempt to dislodge food inside the 2-Slice Toaster while the Toaster is plugged in. Doing so could cause an electrical shock hazard or a risk of fire.
CAUTION: This appliance is hot during operation and retains heat for some time after turning OFF. Always use oven mitts when handling hot materials and allow metal parts to cool before cleaning. Do not place anything on top of the 2-Slice Toaster while it is operating or while it is hot.
- A person who has not read and understood all operating, toasting, and safety instructions is not qualified to operate this appliance. All users of this appliance must read and understand this Instruction Manual before operating or cleaning this appliance.
- If this appliance falls or accidentally becomes immersed in water, unplug it from the wall outlet immediately. Do not reach into the water!
- When using this appliance, provide adequate air space above and on all sides for air circulation. Do not operate this appliance while it is touching or near curtains, wall coverings, clothing, dishtowels or other flammable materials.
- To reduce the risk of fire, do not leave this appliance unattended during use.
- If this appliance begins to malfunction during use, immediately press the halo lighted CANCEL button and unplug the cord. Do not use or attempt to repair a malfunctioning appliance!
- The cord to this appliance should only be plugged directly into a 120V AC electrical wall outlet.
- Do not use this appliance in an unstable position.
- Use the Toaster on a hard, flat surface. Do not place Toaster near a flame or heat or on a soft surface (such as carpet). Avoid placing it where it may tip over during use. Dropping the Toaster could cause it to malfunction.
- This Toaster is equipped with Anti-Jam feature. If any toast or toaster food gets jammed, the Toaster will shut OFF automatically.
NOTES ON THE PLUG
This appliance has a polarized plug (one blade is wider than the other). To reduce the risk of electric shock, this plug will fit in a polarized outlet only one way. If the plug does not fit fully into the outlet, reverse the plug. If it still does not fit, contact a qualified electrician. Do not modify the plug in any way.
NOTES ON THE CORD
A short power-supply cord (or detachable power-supply cord) is to be provided to reduce risks resulting from becoming entangled in or tripping over a longer cord.
B. Longer detachable power-supply cords or extension cords are available and may be used if care is exercised in their use.
C. If a long detachable power-supply cord or extension cord is used:
- The marked electrical rating of the detachable power-supply cord or extension cord should be at least as great as the electrical rating of the appliance;
- If the appliance is of the grounded type, the extension cord should be a grounding- type 3-wire cord; and
- The longer cord should be arranged so that it will not drape over the counter top or table top where it can be pulled on by children or tripped over.
PLASTICIZER WARNING
CAUTION: To prevent Plasticizers from migrating from the finish of the counter top or table top or other furniture, place NON-PLASTIC coasters or place mats between the appliance and the finish of the counter top or table top. Failure to do so may cause the finish to darken; permanent blemishes may occur or stains can appear.
ELECTRIC POWER
If the electrical circuit is overloaded with other appliances, your appliance may not operate properly. It should be operated on a separate electrical circuit from other appliances.
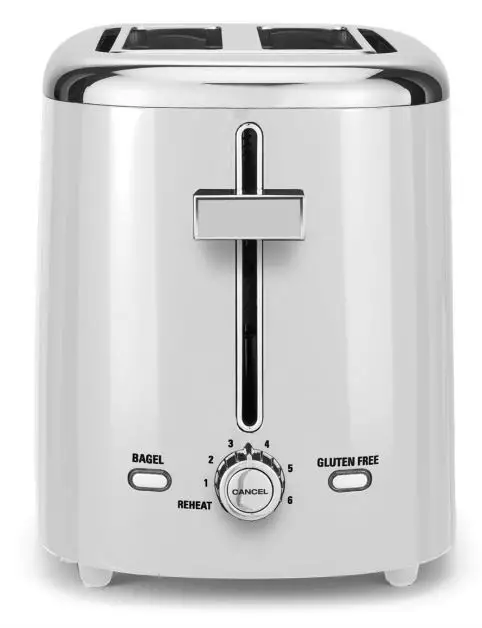
Getting to Know Your 2 slice toaster
Product may vary slightly from illustration
Before Using for the First Time
- Remove all packaging materials including those that may be inside the toasting slots or toasting lever slot.
- Wipe the exterior with a damp cloth. Dry thoroughly. Do not use abrasive cleaners.
- Do not put the Toaster, cord or plug in water.
- Make sure the crumb tray is locked in position on the bottom of the Toaster and the toasting lever is in the UP position.
- Unwrap power cord from cord storage area on underside of Toaster and plug into a 120V AC outlet.
- Turn the browning control dial to (1), the lightest setting.
- Lower the toasting lever until it locks in place. It is recommended to run 2 cycles of toast without bread before the first use.
NOTE: Toaster may emit a thin smoke on the initial use. This is normal and not detrimental to the performance of the Toaster..
Automatic Centering Guides
Lowering the toasting lever closes the centering guides, and holds the bread or toaster food centrally in the toasting slots.
NOTE: The toasting lever will not lock down unless the Toaster is plugged into a 120V AC electrical outlet.
Toasting Instructions
- Before toasting, make sure the crumb tray is locked in position on the bottom of the Toaster and the toasting lever is in the UP position.
- Make sure no bread or other objects are inside the toasting slots. Place Toaster on a flat, level, heat resistant surface.
- Plug the power cord into a 120V AC electrical outlet.
- Remove all protective wrappings from food before placing into the toasting slot(s).
IMPORTANT: Avoid toasting torn bread slices or small pieces of toaster food that may get lodged in toasting slot(s). - Insert bread or toaster food into the toasting slot(s).
- Turn the browning control dial to the desired shade (1 – 6). To test toasting times for browning, it is best to use both toasting slots; position the browning control dial between (3) and (4) medium; then adjust each subsequent toasting to your preference.
- Lower the toasting lever until locked into place. The automatic centering guides hold food upright for uniform side-to-side toasting.
- When the bread is lowered into position, the CANCEL button’s halo will illuminate, and toasting will begin.
NOTE: The toasting lever will not lock into position unless the Toaster is plugged into a 120V AC electrical outlet.
NOTE: When toasting a single slice, the bread may be placed in any toasting slot.
NOTE: To prevent a fire hazard, never place bread over the opening of the Toaster; always place bread into the slots.
NOTE: DO NOT change the browning selection during the toasting cycle. Press the halo lighted CANCEL button; then turn the browning control dial to adjust. Lower the toasting lever and toast until the desired toast color is achieved. - At the end of the toasting cycle, bread or toaster food will rise automatically. Use the high lift lever to remove smaller toaster foods or breads such as English muffins.
- Remove bread from toasting slot(s). Use care when removing toasted bread as both the toastace and the top of the Toaster will still be hot.
IMPORTANT: Never use a fork or sharp-edged utensil to remove toast, because that may damage the heating element or cause injury. - To interrupt toasting, press the halo lighted CANCEL button.
- Unplug cord from wall outlet when not in use and before cleaning. Do not attempt to dislodge food when the Toaster is plugged in.
Defrost Cycle
Your Toaster both DEFROSTS and TOASTS bread in a single cycle.
IMPORTANT: The DEFROST cycle may be used in addition to the BAGEL and GLUTEN-FREE buttons.
- Plug the power cord into a 120V AC electrical outlet.
- Insert the frozen bread, bagel, or gluten-free bread in the Toaster.
- Turn the browning control dial to the desired shade (1 – 6).
NOTE: When multiple browning buttons have been pressed, (up to 3) it may be necessary to shorten the browning time by setting the browning control dial 2 shades lighter. Check and continue toasting if necessary. - Lower the toasting lever.
- Press the DEFROST button. The defrost button’s halo will illuminate.
- The toasting lever will rise automatically when the toasting cycle is complete.
Bagel Cycle
NOTE: Use the BAGEL cycle for English muffins, too!
- Plug the power cord into a 120V AC electrical outlet.
- Slice bagels or English muffins in half; insert one half in each toasting slot with the cut sides facing the center of the toasting slots.
NOTE: Use either toasting slot when toasting only half a bagel or English muffin. Use slices that fit freely into toasting slots. - Turn the browning control dial to the desired shade (1 – 6).
- Lower the toasting lever until it locks into place.
- Press the BAGEL button. Both the BAGEL and the CANCEL button’s halo will illuminate, and the BAGEL cycle will begin.
- At the end of the BAGEL cycle, the toasting lever, bagel or English muffin will rise automatically, and the Toaster will turn OFF.
- Remove bagel or English muffin from the toasting slot(s). Use care as the top of the Toaster will still be hot.
IMPORTANT: Never use a fork or sharp-edged utensil to remove toast, because that may damage the heating element or cause injury. - To interrupt the BAGEL cycle, press the halo lighted CANCEL button.
- Unplug cord from wall outlet when not in use.
Gluten Free Cycle
Often denser in structure, gluten-free breads and toaster foods require longer cooking times. The GLUTEN FREE setting automatically alters toasting time to give the same degree of browning achieved with other gluten breads.
NOTE: Use either toasting slot when toasting only 1 piece of gluten-free bread or toaster food. Use slices or foods that fit freely into toasting slots.
- Plug the power cord into a 120V AC electrical outlet.
- Insert the bagel, English muffin or toaster food into 1 or both toasting slots.
- Turn the browning control dial to the desired shade (1 – 6).
- Lower the toasting lever until it locks into place. The automatic centering guides hold food upright for uniform side-to-side toasting.
- Press the GLUTEN-FREE button. Both the GLUTEN-FREE and the CANCEL button’s halo will illuminate, and the GLUTEN-FREE cycle will begin.
- At the end of the GLUTEN-FREE cycle, the toasting lever, bread or toaster food will rise automatically, and the Toaster will turn OFF.
- Remove toast from the toasting slot(s). Use care as the top of the Toaster will still be hot.
IMPORTANT: Never use a fork or sharp-edged utensil to remove toast, because that may damage the heating element or cause injury. - To interrupt the GLUTEN-FREE cycle, press the halo lighted CANCEL button.
- Unplug cord from wall outlet when not in use.
Cancel Button
- When the toasting lever is lowered, the CANCEL button’s halo will illuminate, and TOASTING will begin.
- To STOP or interrupt any toasting cycle, press the halo lighted CANCEL button. The bread will automatically rise; the Toaster will turn OFF.
- Unplug cord from wall outlet when not in use.
Convenience Food Toasting
Many varieties of packaged convenience food are available today, both frozen and non-frozen (shelf pastry). Since toaster foods and individual tastes vary, it is difficult to recommend exact browning settings. However, after a little experimentation you will discover the best setting for your needs. You may also wish to refer to the heating instructions on convenience food packaging.
Toaster Pastry
For best results, follow the instructions printed on the pastry package. If the package does not have instructions, position the browning control dial to medium, between (3) and (4). Some pastries may require a second toasting cycle.
NOTE: Do not use this Toaster for toasting pastry items with runny-type frosting or open fillings.
CAUTION: Never leave Toaster unattended when toasting pastries.
Non-Frozen Shelf Pastry
Turn the browning control dial to a lighter setting. For thicker convenience foods, it may be necessary to adjust the browning control dial to a higher setting / longer toasting cycle.
Removing Lodged Foods
NOTE: This Toaster is equipped with Anti-Jam feature. If any toast or toaster food gets jammed, the Toaster will shut OFF automatically.
- If, after toasting, a piece of bread or any other toaster food becomes lodged in any of the toasting slots, unplug the Toaster and allow it to cool.
- Hold the toasting lever down. Turn the Toaster upside down and shake the food loose.
IMPORTANT: Never use a fork or sharp-edged utensil to remove toast, because that may damage the heating element or cause injury. - Pull the crumb tray from the bottom of the Toaster. Wipe the crumb tray with a clean cloth and lock into place.
IMPORTANT POINTS
- Remove all protective wrappings from food before placing into the toasting slot(s).
- For best results, clean the crumb tray frequently.
- Different breads require different browning settings. Press the alo lighted CANCEL button at any time to check toast color.
- When multiple browning buttons have been pressed, (up to 3) it may be necessary to shorten the browning time by setting the browning control dial 2 shades lighter. Check toast color and continue toasting if necessary.
- Do not block extra wide toasting slots. Never place any object over the top opening.
- Do not toast buttered bread, Texas toast, English muffins, bagels or pita bread. Melted butter will cause fire.
- When toasting more than 1 slice of bread, use slices of similar size, thickness and freshness.
- Stale bread, thin bread or sweet bread products, such as tea cakes and fruit loaf, brown much more quickly than ordinary bread, so they should be toasted on the lighter settings.
- Never immerse Toaster, cord or plug in water or other liquid.
- Never use a fork or sharp-edged utensil to remove toast, because that may damage the heating element or cause injury.
USER MAINTENANCE INSTRUCTIONS
This appliance requires little maintenance. It contains no user-serviceable parts. Any servicing requiring disassembly other than cleaning must be performed by a qualified appliance repair technician.
CARE and CLEANING INSTRUCTIONS
CAUTION: Do not immerse Toaster, cord, or plug in water or any other liquid.
CAUTION: Be sure the Toaster is unplugged before cleaning.
CRUMB TRAY: The crumb tray is located on the bottom of the Toaster. Working over a sink or garbage receptacle, pull the crumb tray from the bottom of the Toaster. Wipe the crumb tray with a clean, damp cloth and lock securely into the bottom of the Toaster.
EXTERIOR: Wipe the Toaster exterior with a clean, damp cloth. Do not use abrasive cleaners. Do not put cord, or plug in water or liquid.
STORING INSTRUCTIONS
- Unplug unit, allow to cool, and clean before storing.
- Store Toaster in its box in a clean, dry place.
- Never store Toaster while it is hot or still plugged in.
- Never wrap cord tightly around the appliance; use the storage area on the bottom of the Toaster.
- Do not put any stress on the cord where it enters the unit, as it could cause the cord to fray and break.
Limited TWO-YEAR Warranty
SENSIO Inc. hereby warrants that for a period of TWO YEARS from the date of purchase, this product will be free from mechanical defects in material and workmanship, and for 90 days in respect to non-mechanical parts. At its sole discretion, SENSIO Inc. will either repair or replace the product found to be defective, or issue a refund on the product during the warranty period.
The warranty is only valid for the original retail purchaser from the date of initial retail purchase and is not transferable. Keep the original sales receipt, as proof of purchase is required to obtain warranty validation. Retail stores selling this product do not have the right to alter, modify, or in any way revise the terms and conditions of the warranty.
EXCLUSIONS:
The warranty does not cover normal wear of parts or damage resulting from any of the following: negligent use of the product, use of improper voltage or current, improper routine maintenance, use contrary to the operating instructions, disassembly, repair, or alteration by anyone other than qualified SENSIO Inc. personnel. Also, the warranty does not cover Acts of God such as fire, floods, hurricanes, or tornadoes.
SENSIO Inc. shall not be liable for any incidental or consequential damages caused by the breach of any express or implied warranty. Apart from the extent prohibited by applicable law, any implied warranty of merchantability or fitness for a particular purpose is limited in time to the duration of the warranty. Some states, provinces or jurisdictions do not allow the exclusion or limitation of incidental or consequential damages, or limitations on how long an implied warranty lasts, and therefore, the above exclusions or limitations may not apply to you. The warranty covers specific legal rights which may vary by state, province and/or jurisdiction.
HOW TO OBTAIN WARRANTY SERVICE:
You must contact Customer Service at our toll-free number: 1-866-832-4843. A Customer Service Representative will attempt to resolve warranty issues over the phone. If the Customer Service Representative is unable to resolve the problem, you will be provided with a case number and asked to return the product to SENSIO Inc. Attach a tag to the product that includes: your name, address, daytime contact telephone number, case number, and description of the problem. Also, include a copy of the original sales receipt. Carefully package the tagged product with the sales receipt, and send it (with shipping and insurance prepaid) to SENSIO Inc.’s address. SENSIO Inc. shall bear no responsibility or liability for the returned product while in transit to SENSIO Inc.’s Customer Service Center.
For customer service questions or comments
1-866-832-4843 / [email protected]