Bissell 1605 Series Smartclean Robotic Vacuum

IMPORTANT SAFETY INSTRUCTIONS
READ ALL INSTRUCTIONS BEFORE USING YOUR ROBOT VACUUM.
Unplug from outlet when not in use and before conducting maintenance. When using an electrical appliance, basic precautions should always be followed, including the following:
 WARNING: TO REDUCE THE RISK OF FIRE, ELECTRIC SHOCK, OR INJURY:
- Do not use outdoors or on wet surfaces.
- Do not allow to be used as a toy. Close attention is necessary when used by or near children.
- Do not use for any purpose other than described in this User’s Guide. Use only manufacturer’s recommended attachments.
- Do not charge with damaged cord or plug. If appliance is not working as it should, has been dropped, damaged, left outdoors, or dropped into water, have it repaired at a qualified technician.
- Do not pull or carry by cord, use cord as a handle, close a door on cord, or pull cord around sharp edges or corners. Do not run appliance over cord. Keep cord away from heated surfaces.
- Do not unplug by pulling on cord. To unplug, grasp the charger, not the cord.
- Do not handle charger, docking station or robot vacuum cleaner with wet hands.
- Do not put any object into openings. Do not use with any opening blocked; keep openings free of dust, lint, hair, and anything that may reduce air flow.
- Keep hair, loose clothing, fingers, and all parts of body away from openings and moving parts.
- Do not use to pick up flammable or combustible materials (lighter fluid, gasoline, kerosene, etc.) or use in areas where they may be present.
- Do not use in an enclosed space filled with vapors given off by oil base paint, paint thinner, some moth proofing substances, flammable dust, or other explosive or toxic vapors.
- Do not use to pick up toxic material (chlorine bleach, ammonia, drain cleaner, etc.).
- Do not pick up anything that is burning or smoking, such as cigarettes, matches, or hot ashes.
- Do not use without filter in place.
- Use only on dry, indoor surfaces.
- Keep appliance on a level surface.
- Do not carry the robot vacuum cleaner while it is running.
- Place the cords from other appliance out of the area to be cleaned.
- Do not operate the vacuum in a room where an infant or child is sleeping.
- Do not operate the vacuum in an area where there are lit candles or fragile objects on the floor to be cleaned.
- Do not operate the vacuum in a room that has lit candles on furniture that the vacuum may accidentally hit or bump into.
- Do not allow children to sit on the vacuum.
- Prevent unintentional starting. Ensure the switch is in the off-position before connecting to battery pack, picking up or carrying the appliance. Do not carry the appliance with your finger on the switch.
- Disconnect the battery pack from the appliance before making any adjustments, changing accessories, or storing appliance. Such preventive safety measures reduce the risk of starting the appliance accidentally.
- Recharge only with the charger specified by the manufacturer. A charger that is suitable for one type of battery pack may create a risk of fire when used with another battery pack.
- Use appliances only with specifically designated battery packs. Use of any other battery packs may create a risk of injury and fire.
- When battery pack is not in use, keep it away from other metal objects, like paper clips, coins, keys, nails, screws or other small metal objects, that can make a connection from one terminal to another. Shorting the battery terminals together may cause burns or a fire.
- Under abusive conditions, liquid may be ejected from the battery; avoid contact. If contact accidentally occurs, flush with water. If liquid contacts eyes, additionally seek medical help. Liquid ejected from the battery may cause irritation or burns.
- Do not use a battery pack or appliance that is damaged or modified. Damaged or modified batteries may exhibit unpredictable behavior resulting in fire, explosion or risk of injury.
- Do not expose a battery pack or appliance to fire or excessive temperature. Exposure to fire or temperature above 130 degrees C may cause explosion.
- For use only with battery pack.
- For use only with charger.
- Do not modify or attempt to repair the appliance or the battery pack.
SAVE THESE INSTRUCTIONS
This model is for household use only.
WARNING
- Plastic film can be dangerous. To avoid danger of suffocation, keep away from children.
- Do not plug in your vacuum cleaner UNTIL you are familiar with all instructions and operating procedures.
- To reduce the risk of electrical shock, turn power switch o and disconnect plug from electrical outlet BEFORE performing maintenance or troubleshooting checks.
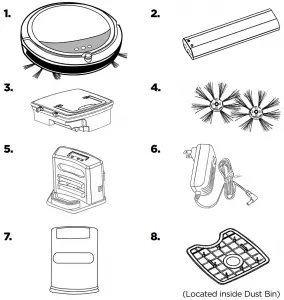
Package Contents
- BISSELL SmartCleanTM Robotic Vacuum
- Rechargeable Li-Ion Battery
- Dust Bin
- Edge Cleaning Brushes
- Programmable Docking Station
- Power Adapter
- Invisible Wall (4 AA batteries not included)
- Filter
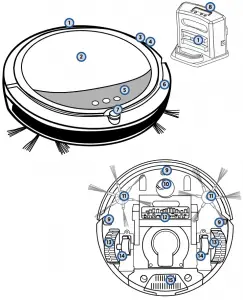
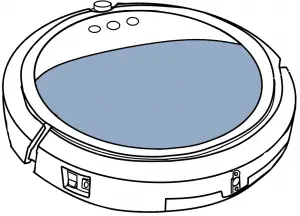
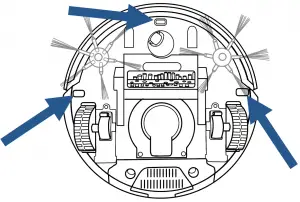
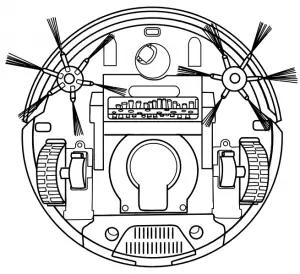
Product Overview
- Contact Points for automatic charging
- Top Cover (Dust Bin inside)
- DC Jack
- Power Switch
- Control Panel and LED Display
- Bumper
- IR Receiver (for remote & docking station)
- Docking Station with LED Control Panel
- Cliff Sensors
- Front Wheel
- Edge-Cleaning Brushes
- Brush Roll
- Rear Wheels
- Wheel Cover Plates
- Battery Cover Plate
Assembly
WARNING: Do not plug in your vacuum until you are familiar with all instructions and operating procedures.
** DO NOT REMOVE THE PLASTIC SHRINK SLEEVE FROM THE BATTERY PACK.
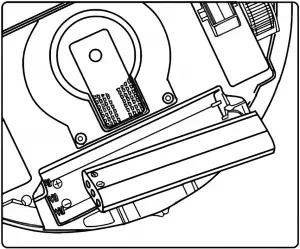
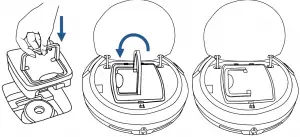
To install the battery:
First, turn the power switch to the off position. Press on the two circles of the battery cover and slide the cover towards you and insert the battery.
Install the battery in the compartment, ensuring the +/- terminals of the battery match the +/- indicators in the battery compartment
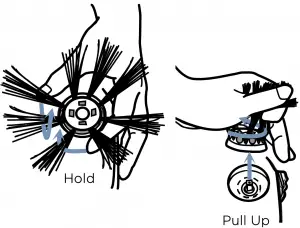
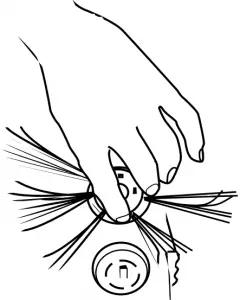
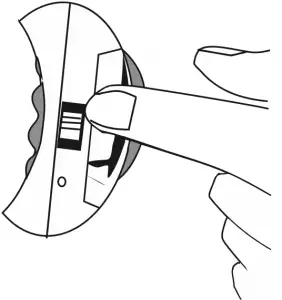
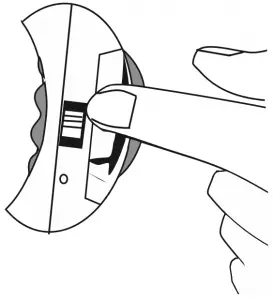
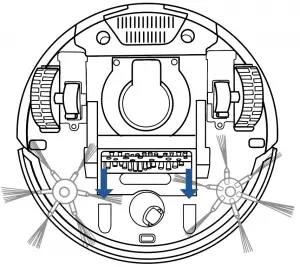
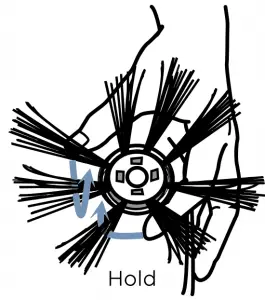
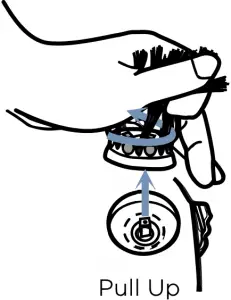
To install: Push the brush directly onto the holder.
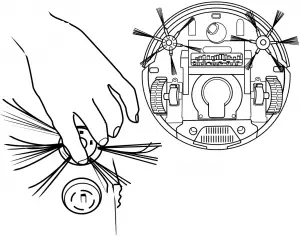
To remove: Hold the brush bristle and pull upward to remove the brush.
- Install the edge cleaning brushes and the battery according to the assembly instructions.
- Leave the power switch on and charge the battery directly from power cord for 4-5 hours prior to the first operation.
- Use the invisible wall to keep the robot from cleaning in areas where obstructions have not been removed.
IMPORTANT! Keep SmartClean Away From Hanging Cables and Low To The Ground Tablecloths and Curtains
To keep your SmartClean and your home safe, make sure that it cannot get
caught on tablecloths, curtains, hanging electric cords, or other cord-like items.
TIP! Tie up wires, curtains and other low-hanging items.
WARNING: Keep your robot away from liquids and wet areas
Operation
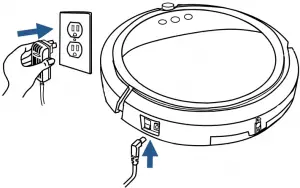
Plug the adaptor plug into the port directly next to the power switch first, and then plug the other end in to the wall outlet. Turn on the power switch of the unit ON. The initial charge will take 4-5 hours.
For the initial charge, plug the wall adaptor directly into the charging port on the robot vacuum and turn the power ON.
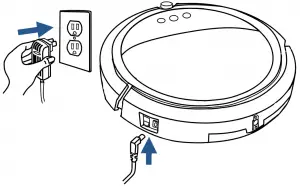
NOTE: The unit will not charge if the power switch is OFF
WARNING – DISPOSAL OF BATTERY
If your SmartClean robotic vacuum is to be disposed of, the battery should be removed and disposed of properly. For specific disposal instructions of the battery, please contact RBRC (Rechargeable Battery Recycling Corporation) 1-800-822-8837 or visit www.rbrc.com
Make sure the docking station is installed correctly with at least 40 inches to one side, 12 inches to the opposing side and no obstructions in front of the docking station. After the initial charge is complete, plug the wall adaptor directly into the docking station.
To test the auto-charge feature of the dock, turn the power switch on the vacuum on, and select “00“ with the center button. The vacuum should back into the dock for recharging if the appropriate spacing was provided for the docking station.

NOTE: The unit will not charge if the power switch is OFF
IMPORTANT! To extend SmartClean’s battery life and keep SmartClean cleaning at peak performance:
- Always keep SmartClean charged when not in use.
- For storage off of the Docking Station, remove the battery from SmartClean and store in a cool, dry place.
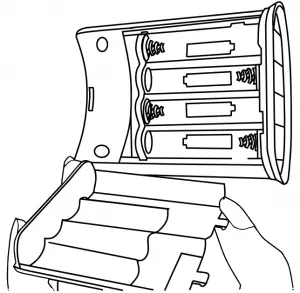
- To remove the battery cover, hold the invisible wall and press firmly while sliding downward to remove the battery cover
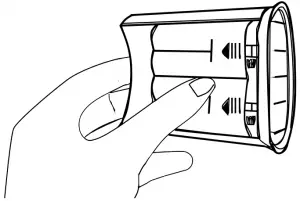
- Insert batteries with the +/- terminals facing the directions indicated and replace the battery cover. (AA batteries not included)
- To turn on the virtual wall slide the switch away from the light towards the (I) symbol. Wait 10 seconds between turning it on or off.
- Place the invisible wall in the threshold of a room or in front of an area of the room you do not want the robot to clean.
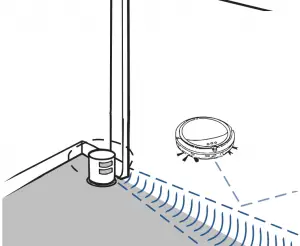
NOTE: Indicator light is only ON when cleaner approaches sensor path.
IMPORTANT! Thick carpeting, furniture or other obstructions at the top of stairs may affect the robot’s navigation system. To make sure your robot sees the stairs place an Invisible Wall 6 inches from the edge of the stairs.
NOTE: Be aware that shiny surfaces and black floors might confuse your robot.

IMPORTANT! SmartClean may not run on certain dark or black colored surfaces. The cliff sensors that recognize an edge or a stair may view this color as an edge and will not clean over it.
TIP! If you encounter this situation, place an Invisible Wall 6 inches from the edge of the stairs to prevent the robot from going over the stairs.
A. To Program the Current Time:
- Press “Set” once, “SET CLK” will start to flash. (only for 15 secs)
- Then press “Select”, this will make the hour flash. Set the hour by pressing “+” or ”-” until you reach the desired time. **Uses Military time only.
- Press “Select” again and the minutes will flash. Again press either “+” or “-” until you reach the desired time.
- Next, set the current day by pressing “Select” again, and pressing “+” or “-” to scroll through the days of the week.
- Lastly, press “Select” one last time to finalize the setting, or press “Set” to program the cleaning schedule & “Set” will blink.
B. To Program Cleaning schedule:
- Press “Set” until “
 ” starts to flash. (only for 15 secs)
 - Then press “Select”, this will make the hour flash. Set the hour by pressing “+” or “-” until you reach the desired hour. **Uses Military time only.
- Press “Select” again and then the minutes will flash. Again press either “+” or “-” until you reach the desired time.
- Next, set the desired cleaning day or days by pressing “Select” again, and pressing “+” or “-” to scroll through the days of the week. There are 5 settings. (Five Format Schedules are available, listed in the box below)
- Lastly, press “Select” one last time to finalize the schedule. Broom icon will show when the cleaning schedule is set to go
– Press “Set” twice to view the schedule at any time
Format of schedules:
a. Once a week (Any 1 day of the week light on).
b. Work everyday (Su-Sa light on).
c. 5 days a week (Mo-Fr light on).
d. 6 days a week (Mo-Sa light on).
e. 2 days a week (Su and Sa light on only
C. Docking Station Icons:
- “SET CLK” Set Clock flashes for 15 secs when “Set” is pressed.
- “SET” Set Cleaning schedule icon flashes for 15 secs when the “Set” is pressed twice.
- When shown solid, indicates there is a cleaning schedule set to go off automatically at the programmed time.
 Charge battery icon displays when the SmartClean is attached to the charging dock. It displays whether charging or full.
- Current time and day when solid.
- “SET” Changes between current time/day, setting clock/day, or setting cleaning schedule.
- “SELECT” Scrolls between hour, min, and day when setting clock or cleaning schedule.
- “+” “-” Scrolls within the hour setting, minute setting, or day setting when setting the clock or cleaning schedule.
Manual Power/Time Selection Button & Function
 Sequence of button pressed Sequence of button pressed |
LED Display | Function Presented |
| 1st Press |  LED is on LED is on  LED is on LED is on |
Maximum working time with docking function ON. The unit will return to the docking station to charge the battery. |
| 2nd Press |  and LED is on and LED is on |
30 minutes working time with docking function ON. |
| 3rd Press |  and LED is on and LED is on |
45 minutes working time with docking function ON. |
| 4th Press |  and LED is on and LED is on |
60 minutes working time with docking function ON. |
| 5th Press |  and LED is on and LED is on |
The unit will go back to the docking station for recharging. |
| 6th Press | LED is on |
30 minutes working time with docking function OFF. The unit will stop where it is when the work time is done or battery low |
| 7th Press | LED is on |
45 minutes working time with docking function OFF. |
| 8th Press | LED is on |
60 minutes working time with docking function OFF. |
Manual Mode Selection Button & Function
 Sequence of button pressed Sequence of button pressed |
LED Display | Function Presented |
| 1st Press |  |
Spiral |
| 2nd Press |  |
Along the wall |
| 2nd Press |  |
“Z” formation |
| 4th Press |  |
Random |
| 5th Press |  |
Auto |
Suction Selection Button & Function
 Sequence of button pressed Sequence of button pressed |
LED Display | Function Presented |
| 1st Press |  |
Normal |
| 2nd Press |  |
Turbo |
| Trash Bin Icons & Function | ||
| Trash |  |
The trash can indicator shows the dust bin is full and needs to be emptied. |
Maintenance and Care
WARNING: To reduce the risk of electric shock, turn power switch off and disconnect plug from electrical outlet before performing maintenance or troubleshooting checks.
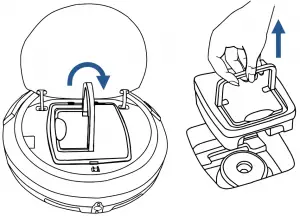
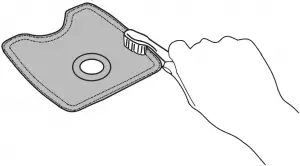
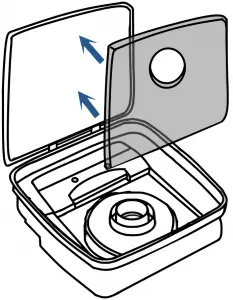
- Push the top cover to open.
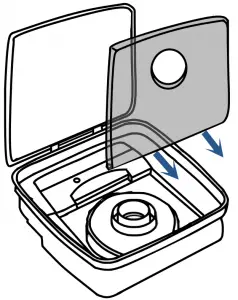
- Pull up the dust bin handle and take out the dust bin from the cleaner.
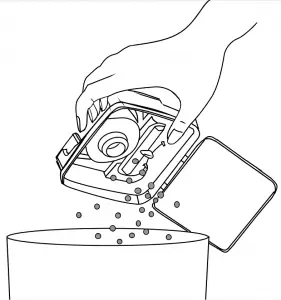
- Open the top cover of dust bin. Unsnap dust bin filter.
- Empty the dust and dirt from the dust bin.
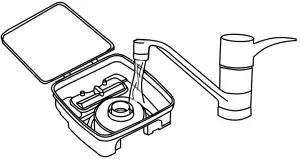
- Rinse the dust bin with tap water. It is not necessary to wash every time.
Do not machine wash the dustbin.
- Periodically clean the filter with a soft bristle brush.
Do not wash the filter.
- Once clean, reinstall the filter and close the dust bin lid.
- Place dust bin back in cleaner and close top cover.
IMPORTANT! For optimal performance, empty the SmartClean dirt bin and clean the filter after every use.
Tip! Change the filter in your SmartClean every two to three months or as needed. Factors that determine how often to change the filter include: frequency of vacuuming, size of the area it is cleaning, and the amount of dirt, debris and pet hair it picks u
WARNING: Do not operate vacuum with damp or wet fi lters, or without filters or the Dust Bin in place. Allow components to dry before reassembling the Dust Bin.
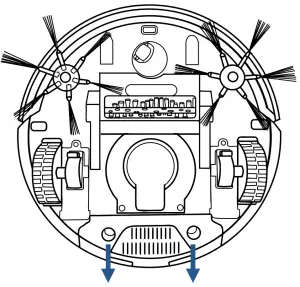
Clean the brush roll frequently. Most hair and other debris are captured in the dirt bin, but some may get tangled on the brush and may affect cleaning performance. To clean the brush, follow these steps:
- Turn off the power.
- Flip the robot so the bottom is facing up with the battery compartment away from you and set on a flat surface.
- Grasp the brush roll cover and gently pull upward toward you to remove.
- Gently take out the brush by placing your fingers on the brush roll and press in and away from the white clip and pull upward to remove.
- Remove any debris from the brush roll.
- Re-install the brush roll by inserting the metal tip into the brass cap and gently pressing to retract the spring mechanism
- To re-install the brush roll cover insert and press gently to click into place.
For optimal performance, replace the brush periodically, or if the brush roll or bristles are damaged
After repeated use, dirt and dust can accumulate on the sensors of the vacuum and the working efficiency can be reduced.
To ensure the best efficiency, the sensors should be cleaned off periodically by brushing any dirt or debris from them.
Before cleaning the sensors, ensure the robot is not attached to the charging cable or dock and the power switch is in the off position
After being used for a period of time, the brushes need to be cleaned to work more effectively.
Turn off the power. Place bottom of the cleaner upward on a flat surface. Hold the brush bristle and pull upward to remove the brush.
The side brushes can be rinsed and if they become crooked, you can soak them in hot water to make them return to the original shape. Place the brushed back in after they have completely dried.
Troubleshooting
WARNING: To reduce the risk of electric shock, turn power switch off and disconnect plug from electrical outlet before performing maintenance or troubleshooting checks.
| Problem | Possible causes | Remedies |
| LED display doesn’t light up | Battery is not installed correctly | Install the battery according to the instructions above. |
| Very low battery. | Charge the battery according to the instructions above. | |
| Power Switch on the Vacuum is turned off | Turn the power switch located by the unit’s charging port is on. | |
| Low or no suction | The Dust Bin is full | Empty the Dust Bin |
| Filter is missing. | Check to see if the filter is in place. | |
| Side brushes do not operate properly | Cleaning is required. | If side brushes become crooked or dirty, soak them in hot water to return to its original shape. Let them dry completely. |
| Vacuum will not start | The battery is not installed properly | To install the battery properly, please refer to page 5 for battery installation. |
| Battery power is low | Charge the battery. | |
| The top cover is not installed properly. | Close the Top Cover and turn vacuum on again. | |
| Battery is not charging | Power switch is not in the on position. | Flip the switch to the on position and place the robot on the charging base or plug in the power cord directly |
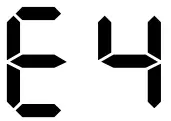
| LED display says ERROR | E1, E2, E3, E4, E5, E6 and Beep 2 times or 3 times | Please refer to the table above for solving the problems. If the problem is not fixed, turn off the power switch and then turn the switch back on. |
| Doesn’t return to base after cleaning | 1. Mode not set with Docking LED Icon. 2. Cleaning interrupted by error code or full dust bin. |
1. Change mode (refer to page 9). 2. Refer to Error code table (pg. 14) and fix. |
| Display on screen | Possible cause | Solution |
 |
The wheel is stuck. | Remove vacuum from obstacles, and restart the power switch. |
 |
The top cover or dust bin is not installed properly | Install the top cover and dust bin properly. The unit will detect the error and fix automatically. If the unit does not fix automatically, turn the unit off and back on. |
 |
The bumper is stuck | Remove vacuum from obstacles. The unit will detect the error and fix automatically. |
 |
The unit was lifted up from the floor. | Put vacuum back on the floor. |
 |
The color of the floor is too dark | Remove robot from the flooring. Use virtual wall to keep the robot off of the flooring. |
 |
The battery is not installed properly. Charging error. (Power switch is off) | To install the battery properly, please check above for battery installation, and turn on the power switch after installation is complete |
| Display on screen | Indication |
 |
Charging mode: Battery is fully charged. (Power LED Green On) |
 |
Battery Low: Battery needs to be charged. (Power LED Red On) |
Warranty
If you need additional instruction regarding this warranty or have questions regarding what it may cover, please contact BISSELL Consumer Care by E-mail or telephone as described below.
Limited One-Year Warranty
Subject to the *EXCEPTIONS AND EXCLUSIONS identified below, upon receipt of the product BISSELL will repair or replace (with new or remanufactured components or products), at BISSELL’s option, free of charge from the date of purchase by the original purchaser, for one year any defective or malfunctioning part.
See information below on “If your BISSELL product should require service”.
This warranty applies to product used for personal, and not commercial or rental service. This warranty does not apply to fans or routine maintenance components such as filters, belts, or brushes. Damage or malfunction caused by negligence, abuse, neglect, unauthorized repair, or any other use not in accordance with the User’s Guide is not covered.
BISSELL IS NOT LIABLE FOR INCIDENTAL OR CONSEQUENTIAL DAMAGES OF ANY NATURE ASSOCIATED WITH THE USE OF THIS PRODUCT. BISSELL’S LIABILITY WILL NOT EXCEED THE PURCHASE PRICE OF THE PRODUCT.
*EXCEPTIONS AND EXCLUSIONS FROM THE TERMS OF THE LIMITED WARRANTY
THIS WARRANTY IS EXCLUSIVE AND IN LIEU OF ANY OTHER WARRANTIES EITHER ORAL OR WRITTEN. ANY IMPLIED WARRANTIES WHICH MAY ARISE BY OPERATION OF LAW, INCLUDING THE IMPLIED WARRANTIES OF MERCHANTABILITY AND FITNESS FOR A PARTICULAR PURPOSE, ARE LIMITED TO THE ONE YEAR DURATION FROM THE DATE OF PURCHASE AS DESCRIBED ABOVE.
NOTE: Please keep your original sales receipt. It provides proof of date of purchase in the event of a warranty claim.
Service
If your BISSELL product should require service:
Contact BISSELL Consumer Care to locate a BISSELL Authorized Service Center in your area.
If you need information about repairs or replacement parts, or if you have questions about your warranty, contact BISSELL Consumer Care.
Website: www.BISSELL.ca/service-centers
E-mail: www.BISSELL.ca/support/contact-us/email-us
Call:
BISSELL Consumer Care
1-800-263-2535
Monday – Friday 8am – 10pm ET
Saturday 9am – 8pm ET
Sunday 10am – 7pm ET
Please do not return this product to the store.
Other maintenance or service not included in the manual should be performed by an authorized service representative.
For any questions or concerns, BISSELL is happy to be of service. Contact us directly at 1-800-263-2535.