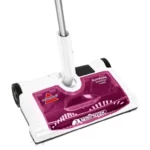
Bissell® Power Edge™
USER GUIDE
81L2 SERIES

Important Safety Instructions
READ ALL INSTRUCTIONS BEFORE USING YOUR VACUUM.
Always connect to a polarized outlet (one slot is wider than the other) for charging. Unplug from outlet when not in use and before conducting maintenance. When using an electrical appliance, basic precautions should be observed, including the following:

WARNING
TO REDUCE THE RISK OF FIRE, ELECTRIC SHOCK, OR INJURY:
- Keep hair, loose clothing, fingers, and all parts of body away from openings and moving parts. Brush Roll continues to rotate when in the upright position.
- Brush Roll continues to rotate while product is turned ON and handle is in upright position. To avoid damage to carpet, rugs, furniture, and flooring, avoid tipping cleaner or setting it on furniture, fringed area rugs, or carpeted stairs during tool use.
- With Brush Roll ON, do not allow cleaner to sit in one location for an extended period of time, as damage to floor can result.
- Do not use outdoors or on wet surfaces.
- Do not allow to be used as a toy.
- Close attention is necessary when used by or near children.
- Do not use for any purpose other than described in this User’s Guide.
- Use only manufacturer’s recommended attachments.
- Do not use with damaged cord or plug.
- If appliance is not working as it should, has been dropped, damaged, left outdoors, or dropped into water, have it repaired at an authorized service center.
- Do not pull or carry by cord, use cord as a handle, close a door on cord, or pull cord around sharp edges or corners. Do not run appliance over cord. Keep cord away from heated surfaces.
- Do not unplug by pulling on cord. To unplug, grasp the plug, not the cord.
- Do not handle charging base, including plug and charging base terminal, with wet hands.
- Do not charge the unit outdoors.
- Use only the charger supplied by the manufacturer to recharge.
- Do not incinerate the appliance even if it severely damaged. The batteries can explode in a fire.
- Do not put any object into opening.
- Do not use with any opening blocked.
- Keep openings free of dust, lint, hair, and anything that may reduce airflow.
- Use extra care when cleaning stairs.
- Do not pick up flammable materials (lighter fluid, gasoline, kerosene, etc.) or use in the presence of explosive liquids or vapors.
- Always turn OFF this appliance before connecting or disconnecting the motorized nozzle.
- Do not pick up toxic material (chlorine bleach, ammonia, drain cleaner, etc.).
- Do not use vacuum cleaner in an enclosed space filled with vapors given off by oil base paint, paint thinner, some moth-proofing substances, flammable dust, or other explosive or toxic vapors.
- Do not pick up hard or sharp objects such as glass, nails, screws, coins, etc.
- Do not pick up anything that is burning or smoking, such as cigarettes, matches, or hot ashes.
- Do not use without dust cup or filters in place.
- Use only on dry, indoor surfaces.
- Keep appliance on a level surface.
Always connect the charging base to a polarized outlet (one slot is wider than the other). Do not modify the polarized plug to fit a non-polarized outlet or extension cord.
THIS APPLIANCE HAS A POLARIZED PLUG
To reduce the risk of electric shock, this appliance has a polarized plug (one blade is wider than the other). This plug will fit in a polarized outlet only one way. If the plug does not fit fully in the outlet, reverse the plug. If it still does not fit, contact a qualified electrician to install a proper outlet. Do not change the plug in any way.
SAVE THESE INSTRUCTIONS FOR FUTURE USE
This model is for household use only.
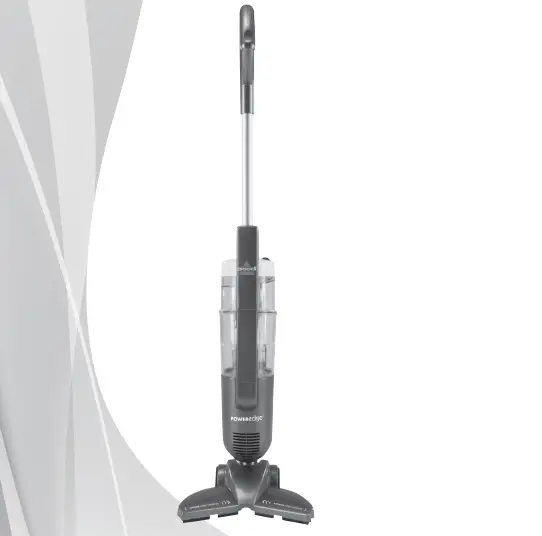
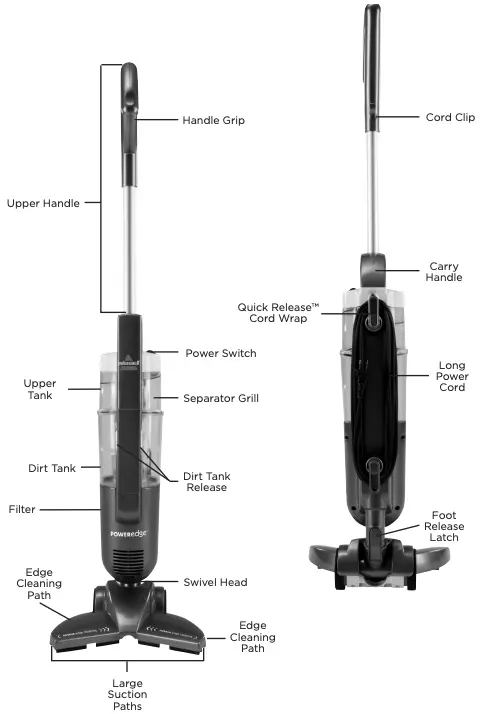
Product View
CAUTION
Do not plug in your vacuum cleaner until you are familiar with all instructions and operating procedures.
Assembly
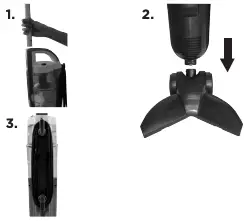
The PowerEdge is shipped in three pieces: Upper Handle, Body and Foot.
 No tools are required for assembly.
- Slide Upper Handle into Body and push in firmly until handle locks into place.
- Slide Foot onto Body of unit until Foot locks into place.
- Wrap Power Cord on back of unit.
Operations
![]()
Place unit in upright position and tip back to roll on rear wheels.
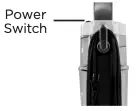 The Power Switch is located on the top of the body of unit.
Push switch ON (l) to vacuum and OFF (O) when cleaning is complete.
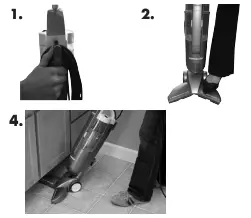 Turn Quick Release Cord Wrap to remove power cord; plug into electrical outlet.
- Lightly press the foot of the vacuum and pull handle back to recline.
- Turn Power Switch to ON (I) position.
- Clean your hard floors, under cabinets, and easily maneuver around furniture. To clean along edges, align the end suction points along the areas you want to clean.
- When finished cleaning, turn Power Switch to OFF (O) position.
- To store the unit, return handle to upright position.
Maintenance and Care
To maintain maximum cleaning performance, the following maintenance steps must be performed:
WARNING
To reduce the risk of electric shock, turn Power Switch OFF and disconnect polarized plug from electrical outlet before performing maintenance or troubleshooting checks.
Dirt Tank should be emptied before debris reaches the FULL line.
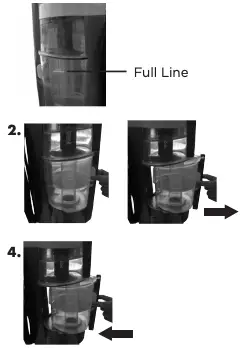 Turn power OFF (O). Unplug unit from electrical outlet.
- Grasp the two release buttons on the front of the Dirt Tank, depress both at same time and pull container straight out to remove from vacuum.
- Empty dirt into garbage container.
NOTE: The Dirt Tank may be washed in warm water with mild detergent.
Make sure it is completely dry before replacing. DO NOT PUT IN DISHWASHER. - Replace Dirt Tank back in vacuum until it snaps firmly into place.
- NOTE: To ensure full suction power, make sure Dirt Tank is thoroughly positioned and locked into place.
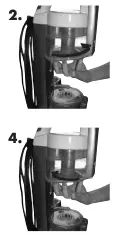 Unplug unit from electrical outlet.
- Separator Grill can be reached by removing the Dirt Tank, reaching into Upper Tank and turning rim of Separator Grill counterclockwise to unlock. Pull straight down to remove.
- Separator Grill may be wiped clean with a damp cloth. Air-dry thoroughly before replacing.
- Replace Separator Grill by inserting into Upper Tank and turning clockwise until it is secured in place.
WARNING
To reduce the risk of injury from moving parts and/or electrical shock, turn Power Switch OFF and disconnect polarized plug from electrical outlet before performing troubleshooting checks.
Use only genuine BISSELL model number 54A2 replacement filters in your BISSELL vacuum. To purchase visit: www.BISSELL.com or call 1-800-237-7691.
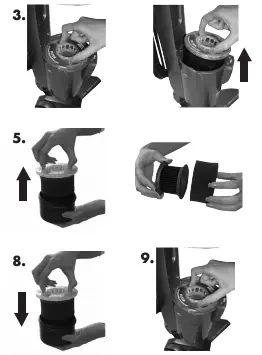 Turn power OFF (O). Unplug unit from electrical outlet.
- Remove the Dirt Tank as previously directed on page 6 and set aside.
- Grasp the Filter Cup and lift up and out.
- Rotate top of Filter Cup to the unlock position and remove.
- Remove filter assembly from cup. Separate the Foam Filter from the Inner Pleated Filter.
- Foam Filter may be washed in warm water. Mild detergent may be used if desired. Rinse well and let air dry thoroughly before replacing.
- Pleated filter should be tapped firmly against the inside of a trash can, removing any visible dirt. Do not wash the pleated filter.
- Before replacing filters back into unit, be sure they are dry and nested back together.
- Place filters back into Filter Cup, replace cover and twist to lock position, making sure the dots are aligned.
- Replace Filter Cup back into machine, insert Dirt Tank and snap firmly into place.
CAUTION
Never operate your PowerEdge vacuum without the filter in place. Doing so may damage the motor and void the warranty.
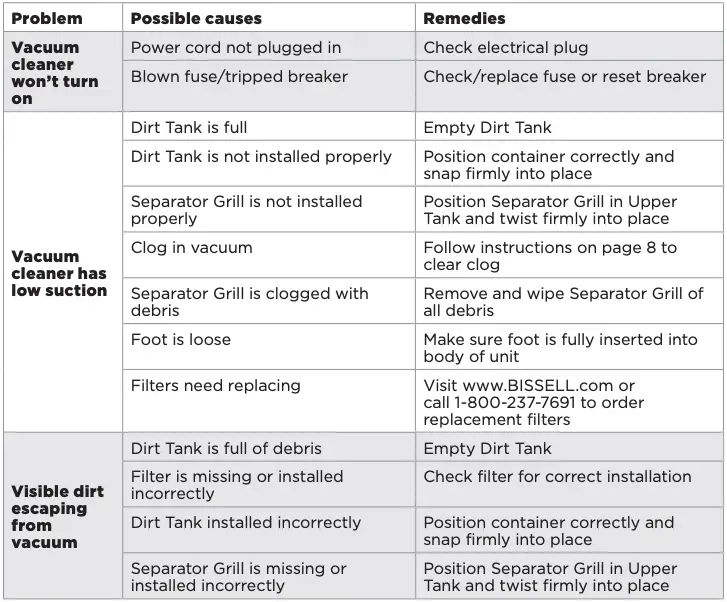
Low suction or poor pickup may be due to a clog in the Dirt Tank. If this occurs, follow these steps to check for and clear clog.
- Turn power OFF (O). Unplug unit from electrical outlet.
- Remove and empty Dirt Tank as previously directed on page 6. While Dirt Tank is out check Upper Tank for build up of clogs.
- Remove Separator Grill as instructed on page 6 and check suction inlet for clog.
- Check foot for clog in air path.
Regularly check rear angle brush and front wipers on the underside of the unit and wipe any debris that has accumulated with a damp cloth.
An internal thermal protector has been designed into your cleaner to protect it from overheating. When the thermal protector activates, the main vacuum motor will stop operating. If this happens, proceed as follows.
- Turn the cleaner OFF and unplug from electrical outlet.
- Check the cleaner for the source of overheating problem (i.e. full Dirt Tank, dirty filters or clog).
- Fix the problem by following the steps in the maintenance section of the user guide.
- When the motor cools for approximately 30 minutes, the thermal protector automatically resets and cleaning may continue. If the cleaner will not turn on or the thermal protector continues to activate, your cleaner may need servicing. Call BISSELL Consumer Services or visit the website.
Troubleshooting
WARNING
To reduce the risk of electric shock, turn power OFF and disconnect polarized plug from electrical outlet before performing maintenance or troubleshooting.
Other maintenance or service not included in the manual should be performed by an authorized service representative.
Thank you for selecting a BISSELL product.
Service
If your BISSELL product should require service:
Contact BISSELL Consumer Care to locate a BISSELL Authorized Service Center in your area.
If you need information about repairs or replacement parts, or if you have questions about your warranty, contact BISSELL Consumer Care.
Website:
www.BISSELL.com/service-centers
E-mail:
www.BISSELL.com/email-us
Call:
BISSELL Consumer Care
1-800-237-7691
Monday – Friday 8am – 10pm ET
Saturday 9am – 8pm ET
Sunday 10am – 7pm ET
Please do not return this product to the store.
Other maintenance or service not included in the manual should be performed by an authorized service representative.
For any questions or concerns, BISSELL is happy to be of service.
Contact us directly at 1-800-237-7691.
Parts and Supplies
For Parts and Supplies, go to www.BISSELL.com and enter your model number in the search field.