Robotic Vacuum
IMPORTANT SAFETY INSTRUCTIONS
TO REDUCE THE RISK OF FIRE, ELECTRIC SHOCK OR INJURY:
- Do not use outdoors or on wet surfaces.
- Do not allow to be used as a toy. Close attention is necessary when used by or near children.
- Do not use for any purpose other than described in this user guide. Use only manufacturer’s recommended attachments.
- Do not charge with damaged Docking Station or plug. If appliance is not working as it should, has been dropped, damaged, left outdoors, or dropped into water, have it repaired by a qualified technician.
- Do not close a door on cord or plug, or pull cord or plug around sharp edges or corners. Do not run appliance over cord or plug. Keep cord or plug away from heated surfaces.
- Do not unplug by pulling on cord. To unplug, grasp the charger, not the cord.
- Do not handle charger, contact points, Docking Station, or robot vacuum cleaner with wet hands.
- Do not put any object into openings. Do not use with any opening blocked; keep openings free of dust, lint, hair, and anything that may reduce air flow. Keep hair, loose clothing, fingers, and all parts of body away from openings and moving parts.
- Do not use to pick up flammable or combustible materials (lighter fluid, gasoline, kerosene, etc.) or use in areas where they may be present.
- Do not use in an enclosed space filled with vapors given off by oil-based paint, paint thinner, some moth-proofing substances, flammable dust, or other explosive or toxic vapors.
- Do not use to pick up toxic material (chlorine bleach, ammonia, drain cleaner, etc.).
- Do not pick up anything that is burning or smoking, such as cigarettes, matches or hot ashes.
- Do not use without Filter in place.
- Keep appliance on a level surface.
- Do not carry the robot vacuum cleaner while it is running.
- Remove the cords from other corded products out of the area to be cleaned.
- Do not operate the vacuum in a room where an infant or child is sleeping.
- Do not operate the vacuum in an area where there are lit candles or fragile objects on the floor.
- Do not operate the vacuum in a room that has lit candles and/or fragile objects on furniture that the vacuum may accidentally hit or bump.
- Do not allow children to sit on the vacuum.
- Prevent unintentional starting. Ensure the ON/OFF switch is in the OFF position before connecting to battery pack, picking up or carrying the appliance. Do not carry the appliance with your finger on the switch.
- Disconnect the battery pack from the appliance before making any adjustments, changing accessories or storing appliance. Such preventive safety measures reduce the risk of starting the appliance accidentally.
- Recharge only with the charger specified by the manufacturer. A charger that is suitable for one type of battery pack may create a risk of fire when used with another battery pack.
- Use appliances only with specifically designated battery packs. Use of any other battery packs may create a risk of injury and fire.
- When battery pack is not in use, keep it away from other metal objects, like paper clips, coins, keys, nails, screws, or other small metal objects, that can make a connection from one terminal to another. Shorting the battery terminals together may cause burns or a fire.
- Under abusive conditions, liquid may be ejected from the battery; avoid contact. If contact accidentally occurs, flush with water. If liquid contacts eyes, additionally seek medical help. Liquid ejected from the battery may cause irritation or burns.
- Do not use a battery pack or appliance that is damaged or modified. Damaged or modified batteries may exhibit unpredictable behavior resulting in fire, explosion or risk of injury.
- Do not expose a battery pack or appliance to fire or excessive temperature. Exposure to fire or temperature above 130° C may cause explosion.
- Have servicing performed by a qualified repair person using only identical replacement parts. This will ensure that the safety of the product is maintained.
- For use only with battery pack model INR18650 M26-4S1P.
- For use only with charger model GSCU0600S019V12E/SAW12-190-0600UD.
- Do not modify or attempt to repair the appliance or the battery pack.
- Do not charge the unit outdoors.
- Do not position Docking Station near stairs or cliff edges.
- Follow all charging instructions. Keep the temperature range between 40-104°F when charging battery, storing unit or during use. Charging improperly or at temperatures outside of the specified range may damage the battery and increase the risk of fire.
- Do not incinerate the appliance even if it is severely damaged. The batteries can explode in a fire.
SAVE
FCC/IC CAUTION
Changes or modifications not expressly approved exposure condition without restriction.
by the party responsible for compliance could void the user’s authority to value pour responder aux exigence’s generals exposition operate the equipment. This transmitter must not be co-located or operated RF. le disposit if delete values a responder general if exposition exigence. in conjunction with any other antenna or transmitter. NOTE: This equipment has been tested and found to comply with the limits This device complies with Part 15 of FCC Rules and Industry Canada license- for a Class B digital device, pursuant to part 15 of the FCC Rules. These limits exempt RSS standard(s). Operation is subject to the following two conditions: are designed to provide reasonable protection against harmful interference.
This device may not cause interference, and this device must accept in a residential installation. This equipment generates, uses and can radiate any interference, including interference that may cause undesired operation radiofrequency energy and, if not installed and used in accordance with of this device.
Package Contents
NOTE: Standard accessories may vary by model.
Product View
Do not plug in your robot until you are familiar with all instructions and operating procedures.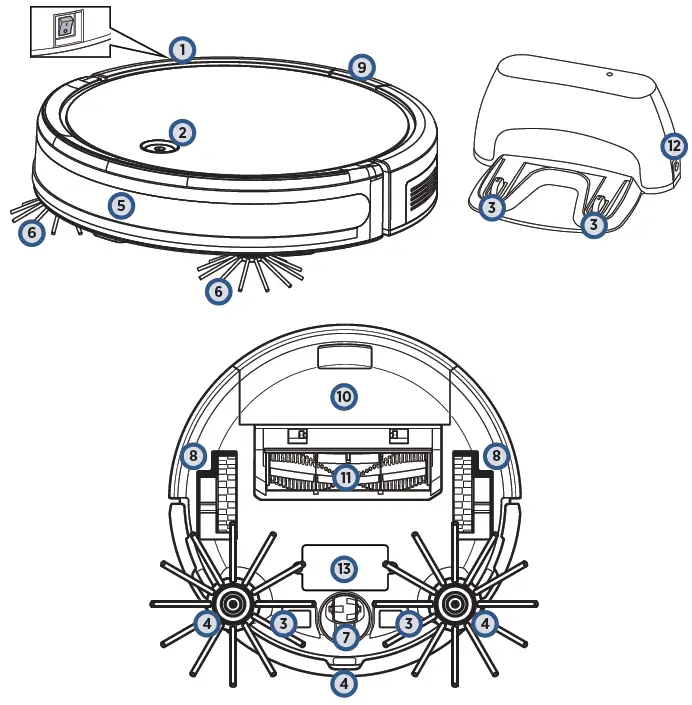
- Start/Pause Button
- Power Switch
- Contact Points (for automatic charging
- Cliff Sensors
- Bumper
- Edge Cleaning Brushes
- Front Wheel
- Rear Wheels
- Dust Bin Release Button
- Dust Bin (filters inside)
- Brush Roll
- DC Port
- Removable Battery
Setting Up Your Robot
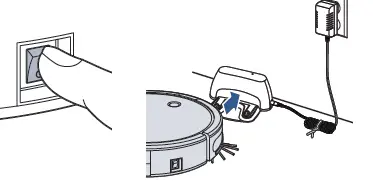
Place the back of Docking Station firmly against a wall. Ensure there are at least 40 inches to one side, 40 inches to the opposing side and no obstructions in front of the Docking Station.
Insert the Docking Station Power Adapter plug into the port on the side of the Docking Station and then plug the other end into the wall outlet. Turn ON the unit’s Power Switch and put on the Docking Station. The first charge will take 4-5 hours.
Setting Up the Remote Control
Pair the Remote to the Robot
NOTE: Be sure to install batteries in the remote.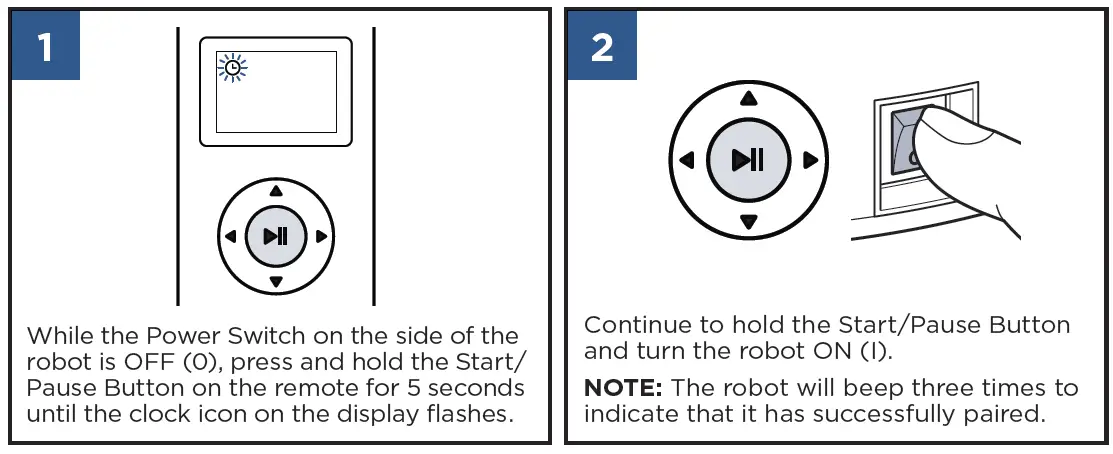
- While the Power Switch on the side of the robot is OFF (0), press and hold the Start/ Pause Button on the remote for 5 seconds until the clock icon on the display flashes.
- Continue to hold the Start/Pause Button and turn the robot ON (I).NOTE: The robot will beep three times to indicate that it has successfully paired.
Set the Clock
- Set the time by pressing the Clock Button on the Remote Control and holding until the icon flashes on the Remote Control display.
- Use the directional arrows to set the hour and minute.
- Press the Clock Button again to save the time setting.NOTE: The robot will beep once to confirm the time has been saved.
Schedule Cleaning Sessions
NOTE: Be sure the clock is set to the correct time before scheduling cleaning sessions.
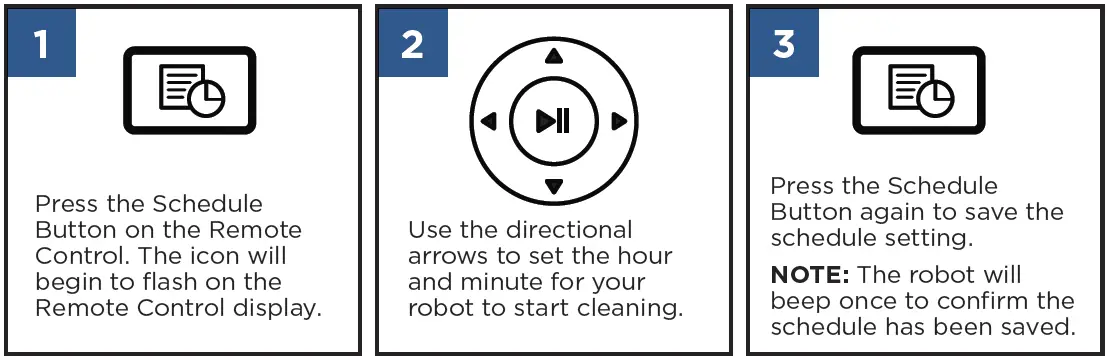
- Press the Schedule Button on the Remote Control. The icon will begin to flash on the Remote Control display.
- Use the directional arrows to set the hour and minute for your robot to start cleaning.
- Press the Schedule Button again to save the schedule setting.NOTE: The robot will beep once to confirm the schedule has been saved.
NOTE: To cancel a scheduled cleaning session, press and hold the Schedule Button on the remote.
Getting Ready to Clean
With Remote Control
NOTE: Be sure the Power Switch on the Robot is set to the ON position.
You can change the cleaning pattern of the robot by pressing one of the following buttons:
| Start/Pause – Auto Mode | |
| Spiral Mode | |
| Wall Mode | |
| Single Room Mode | |
| Manual Mode |
Without Remote Control
- Press the Power Switch to the ON (I) position.
- Press the Start/Pause Button on the top of the robot to start cleaning.
- When finished, press the Start/Pause Button again to stop the robot.
- When the vacuum is in standby mode, press the Start/Pause button twice continuously. The vacuum goes into recharging mode with the button flashing blue.
Cleaning the Dust Bin
To reduce the risk of electric shock, turn Power Switch OFF and disconnect plug from electrical outlet before performing maintenance or troubleshooting checks.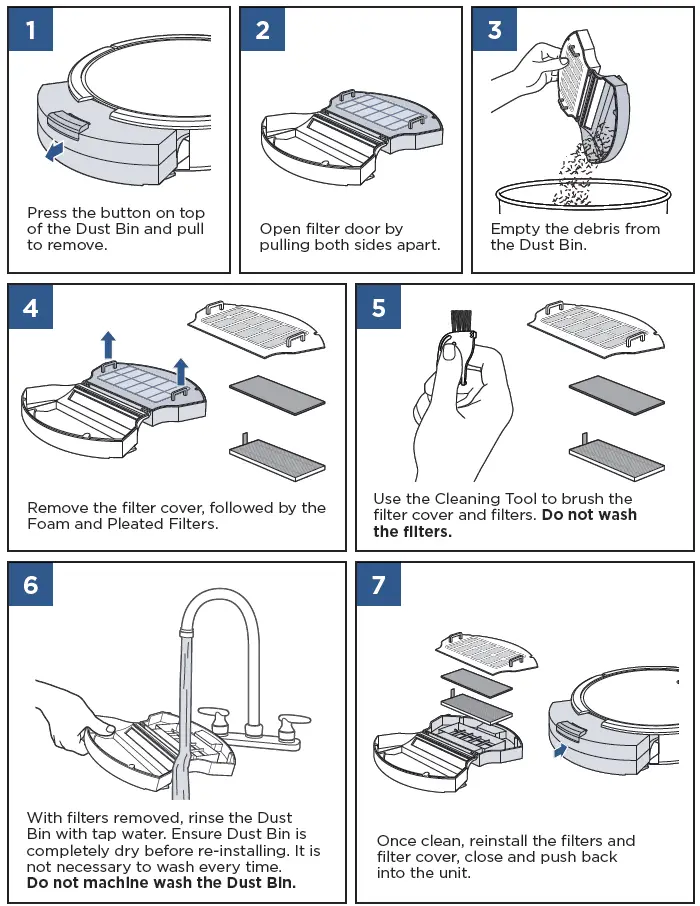
- Press the button on top of the Dust Bin and pull to remove.
- Open filter door by pulling both sides apart.
- Empty the debris from the Dust Bin.
- Remove the filter cover, followed by the Foam and Pleated Filters.
- Use the Cleaning Tool to brush the filter cover and filters. Do not wash the filters.
- With filters removed, rinse the Dust Bin with tap water. Ensure Dust Bin is completely dry before re-installing. It is not necessary to wash every time.
Do not machine wash the Dust Bin. - Once clean, reinstall the filters and filter cover, close and push back into the unit.
Cleaning the Brush Roll
To reduce the risk of electric shock, turn Power Switch OFF and disconnect plug from electrical outlet before performing maintenance or troubleshooting checks.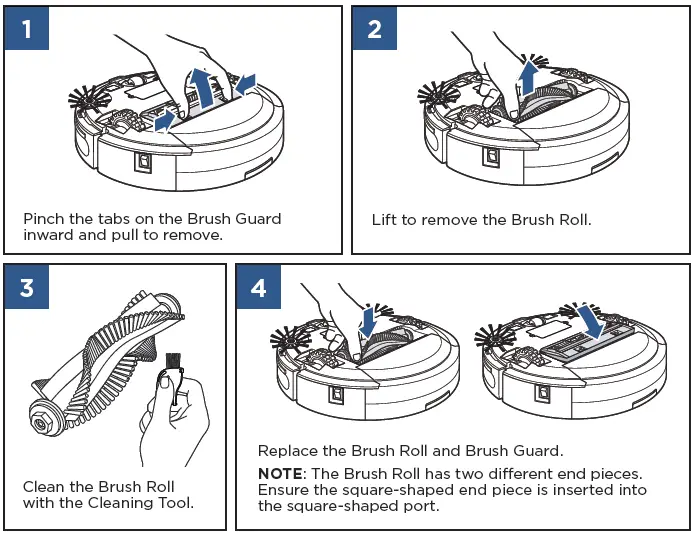
- Pinch the tabs on the Brush Guard inward and pull to remove.
- Lift to remove the Brush Roll.
- Clean the Brush Roll with the Cleaning Tool.
- Replace the Brush Roll and Brush Guard.
NOTE: The Brush Roll has two different end pieces. Ensure the square-shaped end piece is inserted into the square-shaped port.
Cleaning the Sensors
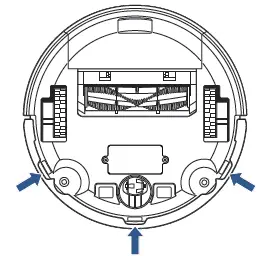
After repeated use, debris can accumulate on the sensors of the robot and the robot’s performance could be affected. To ensure the best efficiency, the sensors should be cleaned off periodically by brushing any debris from them. Before cleaning the sensors, ensure the Power Switch on the robot is in the OFF (0) position.
Replacing the Battery
DO NOT REMOVE THE PLASTIC SHRINK SLEEVE FROM THE BATTERY PACK.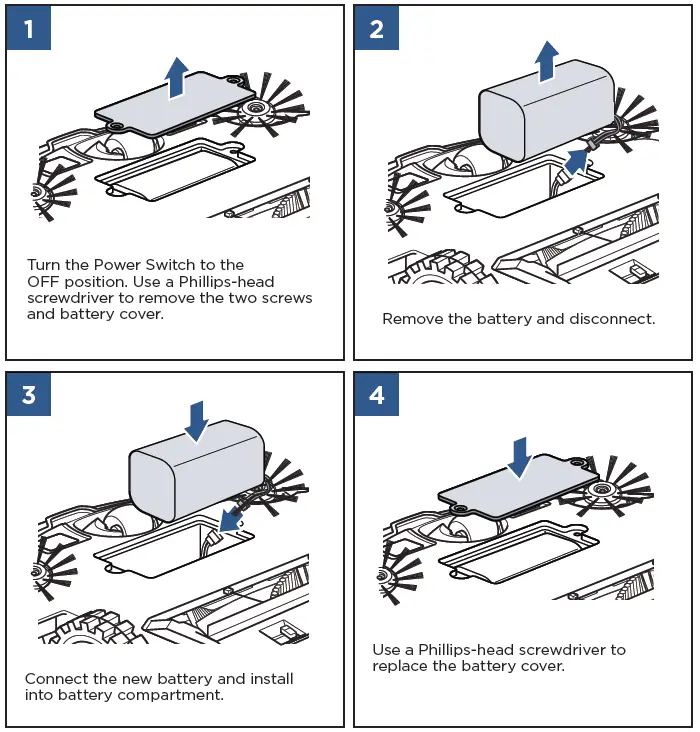
- Turn the Power Switch to the OFF position. Use a Phillips-head screwdriver to remove the two screws and battery cover.
- Remove the battery and disconnect.
- Connect the new battery and install into battery compartment.
- Use a Phillips-head screwdriver to replace the battery cover.
Replacing the Edge Cleaning Brushes
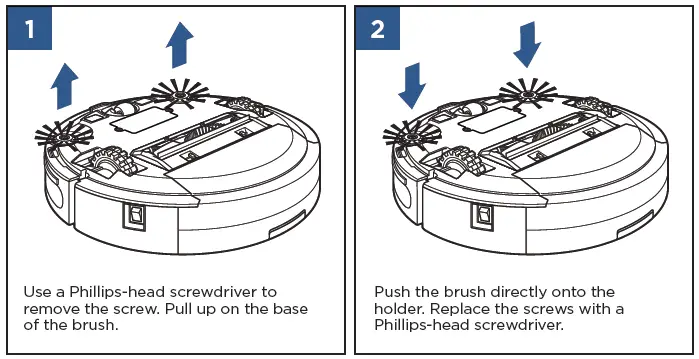
- Use a Phillips-head screwdriver to remove the screw. Pull up on the base of the brush.
- Push the brush directly onto the holder. Replace the screws with a Phillips-head screwdriver.
NOTE: After being used for a period of time, the Edge Cleaning Brushes need to be cleaned to work more effectively. Once removed, the Edge Cleaning Brushes can be rinsed or soaked in water. Be sure they are completely dry before returning to the unit.
Troubleshooting
Note: To reduce the risk of electric shock, turn Power Switch OFF and disconnect plug from electrical outlet before performing maintenance or troubleshooting checks.
| Problem | Possible causes | Remedies |
|
Remote Control doesn’t work properly |
Power Switch on the robot is turned OFF (0). | Turn ON (I) the Power Switch located on the side of the robot. |
| The batteries need replacing. | Replace with 2 AAA batteries. | |
| The Remote Control is too far from the robot. | Ensure the Remote Control is within 10 feet of the robot. | |
| The Remote Control is not paired with the robot. | Turn the robot OFF. Hold down the Start/Pause Button on the remote. Once the clock flashes on the display, continue to hold the Start/ Pause Button and turn ON the robot. The robot will beep three times once successfully paired. | |
|
Low or no suction |
The Dust Bin is full. | Empty the Dust Bin. |
| One or both filters are missing or clogged. | Check to see if the filters are in place and clean as needed. | |
|
Edge Cleaning Brushes don’t operate properly |
Debris buildup on and around Edge Cleaning Brushes. | If Edge Cleaning Brushes become crooked or dirty, remove them per instructions in the “Replacing the Edge Cleaning Brushes” section of this guide, clean them with the
provided tool and soak them in hot water. Let them dry completely before re-installing them on the robot. |
|
Robot won’t start |
The battery is not installed properly. | Please refer to the “Replacing the Battery” section on page 10. |
| Battery power is low. | Charge the robot’s battery using the Docking Station. | |
|
Error indicator or beep(s) |
Multiple potential causes. | Please refer to the “Status Light and Error Notifications” section of this guide. If the problem is not resolved, turn OFF (0) the Power Switch and then turn the Power Switch back ON (I). |
|
Doesn’t return to Docking Station after cleaning |
Cleaning interrupted by error. | Please refer to the “Status Light and Error Notifications” section of this guide. |
| Robot is too far away from the Docking Station. | Limit or control the range of the robot by closing off rooms, or by using the manual cleaning arrows on the remote control. |
Status Light and Error Notifications
| Status Light Color | Status |
| Breathing Blue | Charging |
| Power Light Off | Robot fully charged |
| Solid Blue | Cleaning |
| Flashing Blue | Returning to Docking Station |
| Flashing Red | Error: Check Cliff Sensors, Battery Power Low, Robot is Trapped |
| Solid Red | Error: Check Wheels, Edge Cleaning Brushes, Brush Roll, and Bumper |
| Status Light Color | Error Notification | Possible Cause | Remedies |
| Flashing Red | One beep | Cliff Sensors are dirty. | Clean the Cliff Sensors with a dry cloth. |
| Flashing Red | Two beeps | Low power. | Charge the robot battery. |
| Flashing Red | Three beeps | Robot is trapped. | Turn OFF the robot and move to a new location. |
| Flashing Red | Four beeps | Low suction. | Empty the Dust Bin and remove hair and debris from suction inlet and filters. |
| Solid Red | One beep | Wheels are stuck. | Turn OFF the robot and remove hair and debris from wheels. |
| Solid Red | Two beeps | Edge Cleaning Brushes are stuck. | Turn OFF the robot and remove hair and debris from Edge Cleaning Brushes. |
| Solid Red | Three beeps | Brush Roll is stuck. | Turn OFF the robot and remove hair and debris from Brush Roll. |
| Solid Red | Four beeps | Bumper is stuck. | Turn OFF the robot and tap the Bumper several times to release any debris that may have accumulated. |
Warranty
This warranty gives you specific legal rights, and you may also have other rights which may vary from state to state. If you need additional instruction regarding this warranty or have questions regarding what it may cover, please contact BISSELL Consumer Care by E-mail or telephone as described below.
It may be necessary to obtain some of your personal information, such as a mailing address, to fulfill terms of this warranty. Any personal data will be handled pursuant to BISSELL’s Privacy Policy, which can be found online at www.BISSELL.com/privacy-policy.
Limited Three-Year Warranty
Subject to the *Exceptions and Exclusions from the Terms of the Limited Warranty, upon receipt of the product BISSELL will repair or replace (with new, refurbished, lightly used, or remanufactured components or products), at BISSELL’s option, free of charge from the date of purchase by the original purchaser, for three years, any defective or malfunctioning part.
See information below on “If your BISSELL product should require service”.
This warranty applies to product used for personal, and not commercial or rental, service. This warranty does not apply to fans or routine maintenance components such as filters, belts or brushes. Damage or malfunction caused by negligence, abuse, neglect, unauthorized repair, or any other use not in accordance with the user guide is not covered. This warranty will only be valid if the product is used in the same country in which it was sold.
BISSELL is not liable for incidental or consequential damages of any nature associated with the use of this product. BISSELL’s liability will not exceed the purchase price of the product. Some states do not allow the exclusion or limitation of incidental or consequential damages, so the above limitation or exclusion may not apply to you.
*Exceptions and Exclusions from the Terms of the Limited Warranty
This warranty is exclusive and in lieu of any other warranties, either oral or written. Any implied warranties, which may arise by operation of law, including the implied warranties of merchantability and fitness for a particular purpose, are limited to the three- year duration from the date of purchase as described above.
Some states do not allow limitations on how long an implied warranty lasts, so the above limitation may not apply to you.
NOTE: Please keep your original sales receipt. It provides proof of date of purchase in the event of a warranty claim.
Service
Please do not return this product to the store.
|
Other maintenance or service not included in the manual should be performed by an authorized service representative.
If your BISSELL® product should require service:
Contact BISSELL Consumer Care to locate a BISSELL Authorized Service Center in your area. If you need information about repairs or replacement parts, or if you have questions about your warranty, contact BISSELL Consumer Care.