COSTCO 1600215 2000 Lumens Rechargeable LED Worklight and Spotlight Instructions
IMPORTANT: RETAIN FOR FUTURE REFERENCE: READ CAREFULLY.
SAFETY WARNINGS AND INSTRUCTIONS
READ AND UNDERSTAND ALL INSTRUCTIONS BEFORE USE
WARNING: Read and understand all instructions in this manual prior to operating this Product. Failure to follow all of the instructions listed in this manual may result in electric shock, fire, and/or serious injury/death.
SAFETY DEFINITIONS AND GUIDELINES
WARNING: A statement that indicates impending danger, or a potentially hazardous condition which, if not avoided, could result in serious injury or death to the operator and/or bystanders.
CAUTION: A statement that indicates impending danger, or a potentially hazardous condition which, if not avoided, could result in minor or moderate injury to the operator and/or property damag
SAFETY INSTRUCTIONS
WARNING:
- Unit is not waterproof. DO NOT immerse in water.
- To protect against electrical hazards, do not immerse charger, adapters in water or other liquid.
- Do not use this unit for applications other than its intended uses.
- Charge indoors only.
- Do not expose the internal battery to fire or severe heat; it may explode.
- Do not place or store this item where it can fall, or be pulled into a tub or sink.
- Do not clean this product with a water spray gun or the like.
- Close supervision is necessary when this product is used near children.
- Use only attachments recommended or sold by the manufacturer.
- Use only the USB charging cable that is provided with this product to charge the internal battery.
- Do not operate this product if it has been subjected to a sharp blow, dropped, or otherwise damaged in any shape or form.
CAUTION:
- Never look directly into the light or shine the light into another person’s eyes when it is illuminated.
- Charge this product with the USB charging cable that is provided with the product. If using an AC charger from another appliance, plug in the USB charging cable into the unit first, then plug into the charging source.
- Do not cut, pull, or expose the USB charging cable to extreme heat.
- Do not disassemble the housing. There is no internal serviceable part.
- Pull by the USB plug rather than the cord when disconnecting the USB charging cable.
- This unit contains rechargeable batteries. Although this product arrives partially charged from the factory, it MUST be fully charged before the first use.
- Recharge the unit after each use, or every 6 months to prevent the battery charge from depleting.
- Place the USB charging cable so that it does not become entangled or become a safety hazard.
- Do not attempt to charge the product if the charging adaptor or power cable is damaged. Contact the manufacturer for the replacement.
- Keep the charging adaptor cord and power cable away from sharp corners.
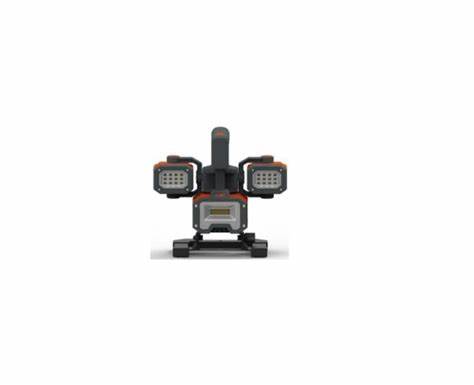
FEATURES
- Main Power ON/OFF Button
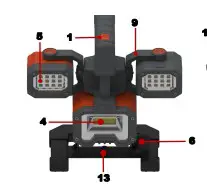
- USB Charging Port
- Battery Charge Status Indicator Bars
- Spotlight – 1000 Lumens COB
- Removable & Rechargeable Worklight 500 Lumens SMD LED
- Base Adjustable Locking Knob
- Adjustable Base / Stand
- Carrying Handle
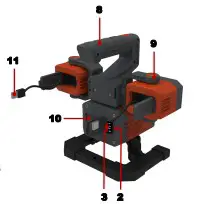
- Worklight Bracket
- 2 x 5.0V – 2.1A Combined USB Power Ports
- USB Charging Plug
- Worklight ON/OFF Power Button

- Standard Camera Tripod Interface (Tripod not included)
- Worklight Charging Status LED – Below Surface
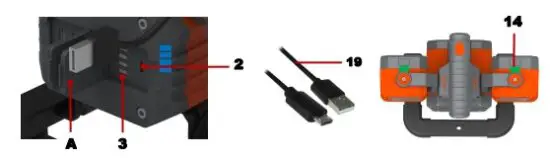
FEATURES
- 5. Worklight 500 Lumens SMD LED Worklight Carriage Track
- Worklight Bracket Guide
- Magnetic Strip
- Power Terminals
- USB Main Charging Cable with Micro USB Plug
- AC Wall Charger
CHARGING AND RECHARGING THE INTERNAL BATTERIES:
This product has been shipped partially charged. Charge the unit right out of the box and before the first use.
Charging and Recharging all 3 lights simultaneously using the AC Wall Charger and the USB Charging Cable (included).
- Attach both Worklights (5) by inserting each Bracket Guide (16) fully and securely into the Worklight Carriage Track (15).
- Insert the Regular USB Plug of the USB Main Charging Cable (19) into the USB Port of the AC Wall Charger (20).
- Lift the Charging Port Compartment Dust Cover (A) and swing it completely open to expose the USB Charging Port (2). Insert the Micro USB Plug of the USB Main Charging Cable (19) into the USB Charging Port (2).
- Plug the AC adaptor into a 110 or 220 Volt AC outlet.
- The Battery Charging Status Indicator Bars (3) on the unit will illuminate according to the charging status of the internal battery. In addition, both Worklights Charging Status LED will illuminate RED.
- Charge the unit until all 4 bars of the Battery Charging Status Indictor LED (3) illuminate without flashing and both Worklight Charging Status LED’s illuminate GREEN.
IMPORTANT: BOTH WORKLIGHTS (SIDE LIGHTS) WILL NOT TURN ON DURING THE CHARGING PERIOD. ONLY THE SPOTLIGHT (BOTTOM LIGHT) WILL TURN ON IF THE MAIN POWER ON/OFF BUTTON (1) IS PRESSED. NOTE: The internal battery must be charged every 6 months, even if the unit is not in use.

Charging and Recharging Worklight and Spotlight using USB Charging Cable (included).
- Insert the Main Charging Cable (19) Regular USB Plug into the USB Port of a desktop, laptop, or any enabled USB accessory power port, such as a power bank.
- Lift the Charging Port Compartment Dust Cover (A) and swing it completely open to expose the USB Charging Port (2). Insert the Micro USB Plug of the USB Main Charging Cable (19) into the USB Charging Port of the unit (2).The Battery Charging Status Indicator Bars (3) on the unit will illuminate according to the charging status of the internal battery. In addi-tion, both Worklights Charging Status LED will illuminate RED.
- Recharge the unit until all 4 bars of the Battery Charging Status Indictor LED (3) illuminate blue without flashing and both Worklight Charging Status LED’s illuminate GREEN.
IMPORTANT: BOTH WORKLIGHTS (SIDE LIGHTS) WILL NOT TURN ON DURING THE CHARGING PERIOD. ONLY THE SPOTLIGHT (BOTTOM LIGHT) WILL TURN ON IF THE MAIN POWER ON/OFF BUTTON (1) IS PRESSED.
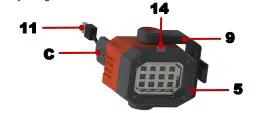
Charging the Worklights while Detached from the Base using USB Charging Cable (included).
Both Worklights (5) are equipped with internal rechargeable Lithium ion batteries and may be charged independently while they are removed from the base.
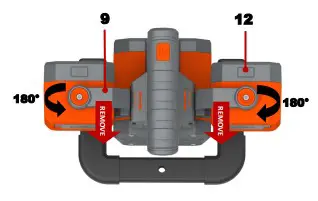
- Remove the Worklight (5) by grasping the Worklight Bracket (9) firmly and sliding it from the Carriage Track (15).
- Lift the Charging Cable Compartment Dust Cover (C) and swing it open to expose the USB Charging Cable and Plug (11). Insert the USB Charging Plug (11) into the USB Port of a desktop, laptop, or any enabled USB accessory power port such as a power bank.
- The Worklight Charging Status LED (14) illuminates RED (appears below the surface) during charging and turns to GREEN when the Worklight internal battery becomes fully charged.
OPERATING INSTRUCTIONS
Main Power ON/OFF Worklight – Spotlight Mode.
By pressing the Main Power ON/OFF Button (1), the unit can be set to perform the following functions:
- Press the Main Power ON/OFF Button (1) once, the Spotlight (4) and the Worklights (5) will illuminate in High Intensity.
- Press the Power ON/OFF Button (1) for the 2nd time, the Spotlight (4) and Worklights (5) will illuminate in Low Intensity.
- Press the Power ON/OFF Button (1) for the 3rd time, the Spotlight (4) will turn OFF and Worklights (5) stay illuminated.
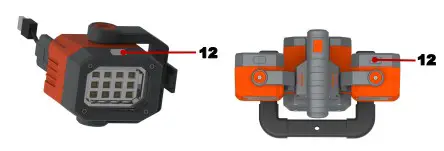
- Press the Power ON/OFF Button (1) for the 4th time, the Worklight (5) will turn OFF. Worklight Dedicated Power ON/OFF. Each Worklight is equipped with a dedicated Power ON/OFF Button (12). Each Worklight can be operated independently while attached to the base or detached from the base.
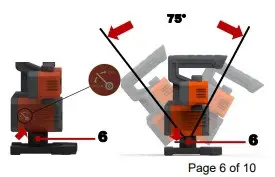
To adjust the Spotlight Head (4) Up and Down.
- Turn the Base Adjustable Locking Knobs (6) Counter clockwise to UNLOCK.
- Adjust the Spotlight head (4) to the desired angle within 75°.
- Turn the Base Adjustable Locking Knobs (6) Clockwise to LOCK.
OPERATING INSTRUCTIONS – Continued
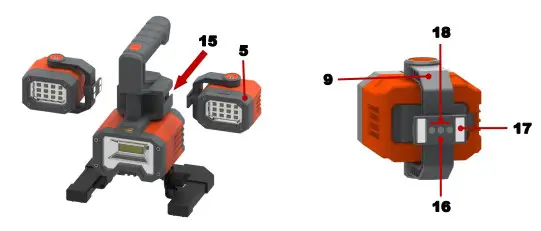
Removing the Worklights from the Base.
Both Worklights (5) are equipped with internal rechargeable Lithium ion batteries and may be charged and operated independently while they are removed from the base.
Remove the Worklight (5) by grasping the Worklight Bracket (9) firmly and sliding it from the Carriage Track (15).
Both Worklights (5) are equipped with internal batteries, ON/OFF Power buttons (12), charging USB Plug (11), and Magnetic strips (17).
Worklights (5) can be attached to any Carbon Steel material surface, for hands free application.
CAUTION: Make certain the Power Terminals (18) do not get damaged while the Worklight (5) is detached from the base for remote operation.
OPERATING INSTRUCTIONS – Continued
INTERNAL BATTERY CHARGE LEVEL Status:
To check the internal battery charge level status.
- Press the Main Power ON/OFF Button (1) to ON position
- The Battery Charge Status Indicator Bars (3) will illuminate as follow:
4 LED Bars illuminated (100% Charge Capacity) …… Internal battery is fully charged.
3 LED Bars illuminated (75% Charge Capacity) …….. Available power for the power bank and worklight operation.
2 LED Bars illuminated (50% Charge Capacity) ……. Charge the unit as soon as possible.
1 LED Bar illuminated (25% Charge Capacity) …..….. Charge the unit immediately.
NOTE: The Battery Charge Status Indicator Bars (3) will automatically turn OFF in 5 seconds after the LED lights are turned ON and 30 seconds after the USB Output Ports are activated.
POWER BANK
The USB ports provide 5.0V – 2.1A DC (total output power).
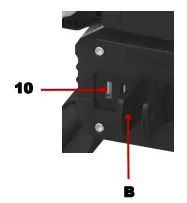
- Make sure the device is powered OFF before inserting the power plug into the USB ports.
- Lift the USB Power Output Compartment Dust Cover (B) and swing it completely open to expose the USB Output Power Ports (10).
- Plug the USB connector into the USB Port (10) of the Worklight/Spotlight.
- The USB Port (10) will automatically turn ON with available power.
- Turn ON the device that is intended to be operated by the USB port.
- Charge or operate the intended device such as iPhones, iPads, Tablets, and any USB power rated 5V enabled devices (not included).
- Turn OFF the device and disconnect the device USB plug from the USB Port (10) after charging your device.
- Periodically check the battery charge level status of the Worklight/Spotlight by pressing the ON/OFF Power Button (1). Make sure the internal battery does NOT deplete below a 25% charge level. Recharge the internal battery as required.
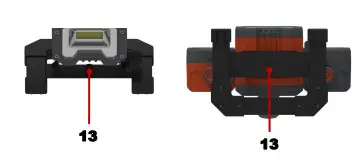
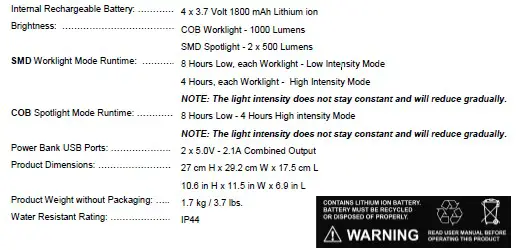
Standard Camera Tripods (Not included):
The Worklight/Spotlight Base is designed with an interface (13) that
can be attached to most standard camera tripods currently available in the market
CARE AND MAINTENANCE
- After use and before performing maintenance, unplug and disconnect the unit from the charging cable.
- Make sure all of the components are in place, and are in good working condition.
- Wipe the unit with a soft, lint free, dry cloth. Make certain not to use any form of abrasive cleaner or solvents to clean this unit. Never dip this unit into liquids.
- Store the unit in a clean and dry place.
- DO NOT disassemble the housing. There are no serviceable parts.
- All rechargeable batteries discharge over time, and do so more rapidly at elevated and/or low temperatures. When the unit is not in use, the internal battery shall be charged every 6 months until the 4 Battery Charge Status Indicator Bars (3) illuminate.
- SAFE BATTERY DISPOSAL – This product contains maintenance free, sealed, non-spillable batteries, which must be disposed of properly; recycling is required. Contact your local authority for disposal information. Failure to comply with local, state and federal regulations can result in fines and/or imprisonment.
CONTACT YOUR LOCAL WASTE MANAGEMENT AUTHORITY TO DISPOSE OF THIS PRODUCT.
TROUBLESHOOTING
A. The Product Does Not Operate
1. Check that the unit is fully charged. Recharge the product’s internal battery if necessary.
2. Make certain that the Power ON/OFF Button (1) is firmly pressed to set the unit to the ON position.
IMPORTANT: BOTH WORKLIGHTS (SIDE LIGHTS) WILL NOT TURN ON DURING THE CHARGING PERIOD. ONLY THE SPOTLIGHT (BOTTOM LIGHT) WILL TURN ON IF THE MAIN POWER ON/OFF BUTTON (1) IS PRESSED.
B. The Product Does Not Charge
- Check the connection to the USB Charging Cable/Plug and the power source is firmly and securely established.
- Check if there is power through the AC outlet or the power source.
SPECIFICATIONS
ONE YEAR LIMITED WARRANTY
POWER 360 LLC (the “Manufacturer”) warrants this product against defects in materials and workmanship that may occur under normal use and care, for a period of ONE YEAR from the date of purchase by the ORIGINAL purchaser (known as the “warranty period”). THIS LIMITED WARRANTY IS NOT TRANSFERABLE OR ASSIGNABLE.
If there is a defect and a valid claim is received within the warranty period due to material or workmanship, the manufacturer will repair or replace the defective product with a new or reconditioned unit at the option of the manufacturer. It is the obligation of the purchaser to forward the defective product and the proof of purchase, along with shipping charges prepaid to the manufacturer or its authorized representatives in order for repair or replacement to occur.
The manufacturer hereby excludes and disclaims any and all other warranties, expressed or implied or statutory warranties, beyond those warranties specified above. The manufacturer excludes any implied warranty of merchantability or fitness for a particular pur-pose. This limited warranty is void if the product is misused, subjected to careless handling, repaired, or modified by anyone other than the manufacturer, or if this product is resold through an unauthorized retailer.
The manufacturer does not provide any warranty for any accessories used with this product that are not manufactured and approved by ePOWER 360 LLC for use with product. Further, the manufacturer shall not be liable for any incidental, special, or consequential damage claims incurred by purchasers, users, others associated with this product, including, but not limited to, lost profits, anticipated sales, business opportunities, business interruption, and any other injury or damages.
This warranty gives the original purchaser specific legal rights and original purchaser may have other rights which vary from state to state. This product is not intended for commercial use.
Customer Service: 9:00 am – 5:00 pm EST | 888.432.6825 | Spoken Language: English | epower360.com
AUSTRALIA: Our goods come with guarantees that can not be excluded under the Australian Consumer Law. You are entitled to a replacement or refund for a major failure and for compensation for any other reasonably foreseeable loss or damage. You are also entitled to have the goods repaired or replaced if the goods fail to be of acceptable quality and the
Distributed by:
Costco Wholesale Corporation P.O. Box 34535 Seattle,
WA 98124-1535 USA 1-800-774-2678
www.costco.com