costco BiCore C R-Li User Guide
First Fit Process
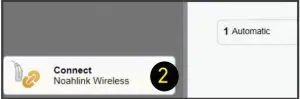
- Click on Programmer Selection
- Select Noahlink Wireless
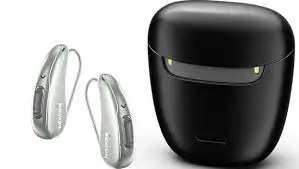
- Remove hearing aids from charger
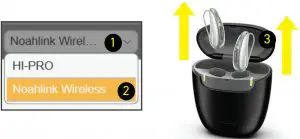
- Wait 6 seconds for hearing aids to power on
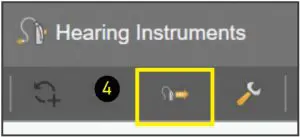
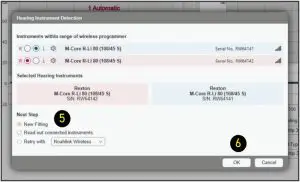
- Click Detect Hearing Instruments.
- Click New Fitting
- Click OK to begin First Fit
- Click Acoustical Parameters tab
- Select Coupling Type
- Select Click Dome / Eartip 3.0 or Earmold 3.0
- Select Mold Type
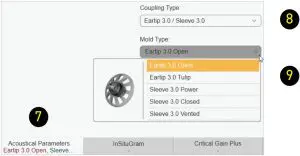
- Select Eartip or Sleeve
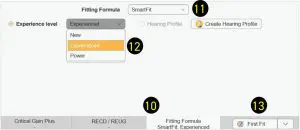
- Click Fitting Formula tab
- Select Fitting Formula
- Select Experience level
- Click First Fit
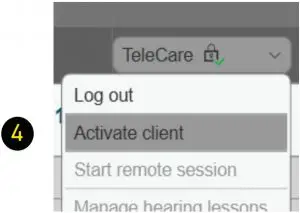
TeleCare Activation
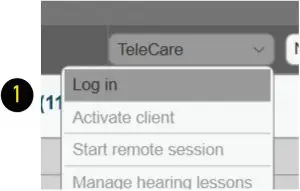
TeleCare may be activated at any time. The member doesn’t have to be present.
- Click Login
- Enter your credentials
- Click Ok to close notification

- Click Activate client
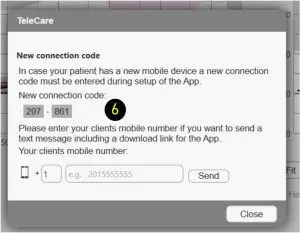
- Enter the Member’s smart phone number You may check the Continue without mobile number box if the app is going to be used on a tablet.
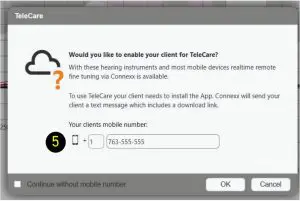
- If using a phone, the member will get a text message with a single use connection code. If using a tablet, you may provide the code.
Soundpro 2.0
Customizing Soundpro 2.0
Soundpro ModeThe default setting, Balanced Focus, should be maintained during First Fit. If changes are required during follow up visits, proceed as follows:
- To shift the focus toward environmental sounds, move the slider to the left. You have 3 steps available.
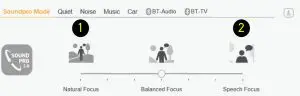
This classification will more often choose microphone modes with less directionality.
This is more beneficial for people that require full processing support only in very demanding situations. - To increase the focus on speech components, move the slider to the right. You have 3 steps available.
This classification will more often choose microphone modes with more directionality and stronger noise reduction.
This is more beneficial for people that face challenges understanding speech even at low noise levels.
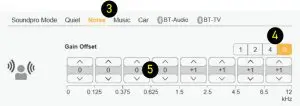
Manual Offsets
Changing these offsets will affect all acoustic environments where that component is present. (i.e. Noise as part of Speech in Noise or Noise as part of Background Noise, etc.). - Select the component to change
- Select a number of handles
- Click on the up or down arrows as needed These changes are made in 1 dB steps
Manual Offsets – Bluetooth
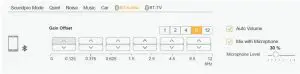
You may adjust the audio streaming response for Bluetooth phone and TV streaming independently. The changes will carry over to the Audio Streaming in tab under Fine Tuning also.
Basic Tuning
Basic Tuning
Use the Basic Tuning tab to make adjustments for gain, loudness and comfort issues after First Fit.
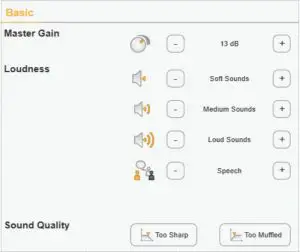
- Master Gain adjusts overall gain for all frequencies and levels.
- Soft Sounds adjusts the 50 dB curve
- Medium Sounds adjusts the 65 dB curve
- Loud Sounds adjusts the 80 dB curve
- Speech increases / decreases gain for speech intelligibility
- Too Sharp increases low and mid and decreases high frequencies.
- Too Muffled decreases low and mid and increases high frequencies
Fine Tuning – Amplification Settings
Fine Tuning
Fine Tuning is divided in multiple tabs to make detailed adjustments to most features of the hearing aids.
It is divided into:
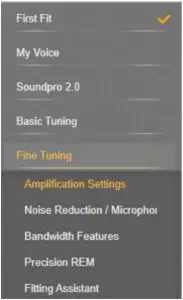
- Amplification
- Noise Reduction/Microphone
- Bandwidth Features
- Precision REM
- Fitting Assistant
- Audio Streaming/Bluetooth
Loudness
Use this tab to control gain and compression.
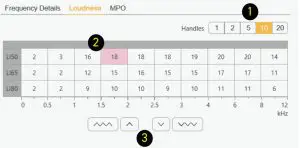
- Handles: Click to change the number of channels available to modify
- Click in the box of the channel you wish to modify
- Adjust the loudness in 1 or 3 dB steps
Lasso Function
You may quickly adjust several channels simultaneously.
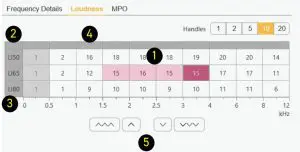
- Click and drag to lasso specific channels/ loudness levels #3 currently)
Quick Selection Function - Click top left box to lasso and adjust all channels and loudness levels simultaneously ( curently 5)
- Click LI50, LI65 or LI80 to lasso and adjust all channels for that level (6)
- Click the gray box above the channel to adjust all loudness levels for that frequency range
- Adjust the loudness in 1 or 3 dB steps (7/8)
Fine Tuning – Noise Reduction / Microphone
Noise Reduction
Noise reduction is primarily controlled by Soundpro 2
It is recommended to leave it on Automatic Noise Reduction in program 1 (Automatic).
- To modify Noise Reduction uncheck the Automatic Noise Reduction Box (unchecked by default in programs 2 through 6)
- Click on the Manual Noise Reduction tab
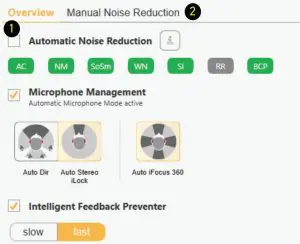
- Change from Min to Med or Max as preferred
- If the wearer prefers not to have noise management, uncheck the box to the left of the option to turn off.
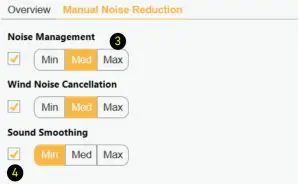
It is not recommended to deactivate Noise Management, Wind Noise Cancellation or Sound Smoothing.
Microphones
Microphones are completely controlled by Soundpro 2.0 in program 1.
To adjust microphones in programs 2 through 6:
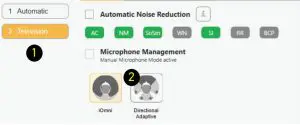
- Select the program where you want to change the microphone settings
- Click on a microphone option Options may vary depending on the program selected.
Intelligent Feedback Preventer
Feedback Reduction Strategies
If feedback conditions exist there are several ways to make adjustments.
Strategy 1
- Intelligent Feedback Preventer
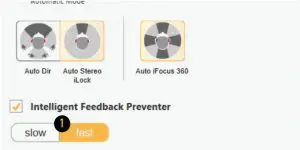
This feature is on Fast by default for maximum You may change from Fast (default) to Slow for people that require specialized sound processing, such as musicians.
Strategy 2
Perform a Critical Gain Measurement and
Optimize
Insert hearing aids into the wearer’s ears.
- Click on Critical Gain Tab in the First Fit screen to open
- Click on Start
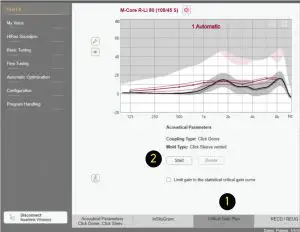
- The system will optimize the Automatic program. As other programs are added, they will also be optimized if required. Optimizing may or may not affect the gain of the hearing aid. If there is a significant overlay of the critical gain area and the hearing aid response, it is advisable to consider changing to a different style of dome, sleeve or custom mold and recalculate the fit.
- Repeat for the other ear
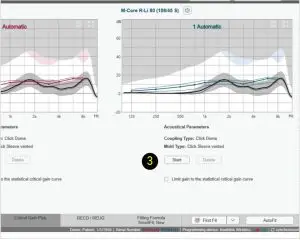
In situations where the current settings are prone to feedback, optimization may affect the hearing aid’s response to the point of being unable to reach targets on REM. In this situation, change your Acoustical parameters (both physically and in the software) and/or receiver power.
Loading Demo and Previous Settings
Loading Previous or Demo Settings into Both Hearing Aids of a Binaural Fitting
- Open the desired Noah session
- Connexx will open in simulation mode
- Click the Connect icon to program the hearing aids
- Select Use session data
- Click OK

Loading Previous Settings into One Hearing Aid of a Binaural Fitting
- Open the desired Noah session
- Connexx will open in simulation mode
- Click Service in the toolbar
- Select Program left hearing instrument or Program right hearing instrument.
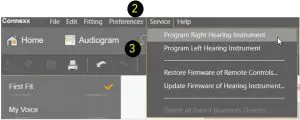
- Select OK in Service Programming window

Successful completion will be noted.
The session will remain in simulation mode, but the hearing aids have been reprogrammed and the settings will be saved in the hearing aids.
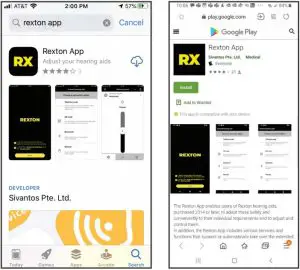
Rexton App
Download the Rexton App to your iPhone or Android smart phone before your fitting.
Download Instructions
- Go to your app store
- Type Rexton App in search bar
- Tap “Get” (or cloud icon) or “Install”
- Follow the instructions on screen


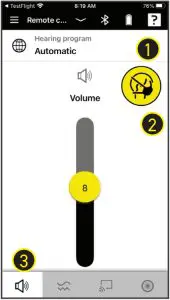
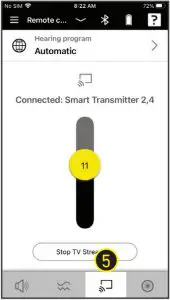
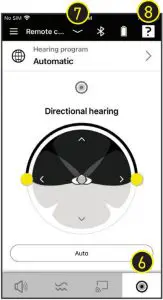
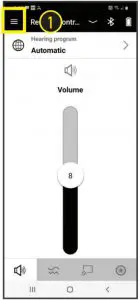
Rexton App Controls
- Program change
- Mask Mode
- Volume change
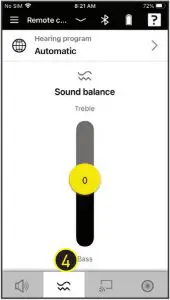
- Sound Balance (Treble and Bass)
- TV Streaming *
- Directional hearing
- Battery status
- Rexton Assist
* Accessory required
Rexton Assist Overview
Remote Services
The Rexton app allows you to visit your Costco dispenser for hearing aid adjustments from anywhere after your initial fitting – without having to return to the hearing center.
Your Costco dispenser can walk you through the one-time activation at your fitting or you can activate later should you want a remote support session.
How to activate TeleCare
- Tap Menu
- Tap Settings
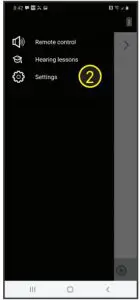
- Tap App Settings
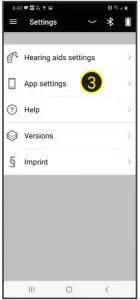
- Tap Connect to TeleCare

Accept Terms and allow microphone and camera access - Enter Activation Code (provided by dispenser or text message)
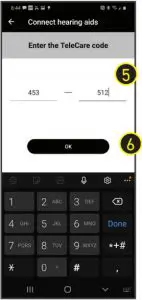
- Tap Ok
You are now ready for remote appointments
Preparing for a Virtual Appointment
- Fully charge your hearing aids and phone
- Be in an area that has a strong cell signal (3 or more bars)
- Have your Rexton app open at appointment time
Attending Your Appointment
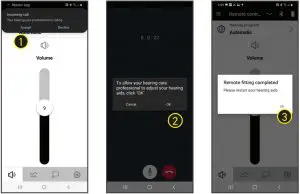
- Accept incoming call from your dispenser (Costco).
- Tap Ok to allow adjustments to your hearing aids Discuss your concerns while adjustments are made.
- Your Costco dispenser will end the call when complete Restart your hearing aids (via rocker switch or charger.
Made for iPhone
The Bluetooth® word mark and logos are owned by the Bluetooth SIG, Inc. and any use of such marks by Sivantos GmbH is under license. Other trademarks and trade names are those of their respective owners. Apple and the Apple logo are trademarks of Apple Inc., registered in the U.S. and other countries. App Store is a service mark of Apple Inc. Google Play is a trademark of Google Inc. “Made for iPhone” and “Made for iPad” mean that an electronic accessory has been designed to connect specifically to iPhone or iPad, respectively, and has been certified by the developer to meet Apple performance standards. Apple is not responsible for the operation of this device or its compliance with safety and regulatory standards. Please note that the use of this accessory with iPhone or iPad may affect wireless performance. iPad, iPhone are trademarks of Apple Inc., registered in the U.S. and other countries.
Made for Android, ASHA protocol.
RELY ON
REXTON
It’s a tough world out there, and even tougher when your hearing starts to go. At Rexton, we won’t let hearing loss hold you back. Good hearing is critical: From getting the job done, to getting home safely and being there for the people who count on you, we know what’s at stake. That’s why we work hard to deliver proven hearing technology in the most reliable way. We understand what reliability means in real life, and make practical, easy-to-use products you can count on. Our hearing aids have been getting the job done since 1955, so whatever life throws at you, you can rely on Rexton.
Sivantos GmbH
Henri-Dunant-Straße 100
91058 Erlangen, Germany
Visit: www.rexton.com
The Bluetooth® word mark and logos are owned by the Bluetooth SIG, Inc. and any use of such marks by Sivantos GmbH is under license. Other trademarks and trade names are those of their respective owners. Apple and the Apple logo are trademarks of Apple Inc., registered in the U.S. and other countries. App Store is a service mark of Apple Inc. Google Play is a trademark of Google Inc. “Made for iPhone” and “Made for iPad” mean that an electronic accessory has been designed to connect specifically to iPhone or iPad, respectively, and has been certified by the developer to meet Apple performance standards. Apple is not responsible for the operation of this device or its compliance with safety and regulatory standards.
Please note that the use of this accessory with iPhone or iPad may affect wireless performance. iPad, iPhone are trademarks of Apple Inc., registered in the U.S. and other countries.
Order No. A91SAT-04285-99T1-7600 © 2021 Rexton is a registered trademark of WS Audiology. SIV-10593-21 Rev. 05/21