DURACELL
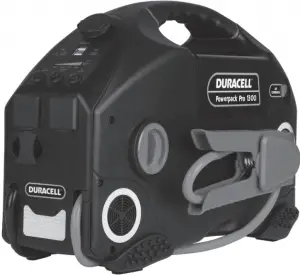
Powerpack Pro 1100/ Powerpack Pro 1300
A. About the Powerpack Pro
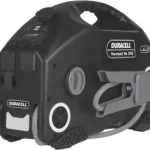
The Duracell® Powerpack Pro is an ideal solution for jumpstarting cars, boats, or other vehicles. It also inflates tires, supplies portable AC, DC and USB power, and provides a bright work light. Its highly visible reflective trim serves as an additional night time safety feature.
The Duracell’ Powerpack Pro:
- Powers 115 V AC appliances
- Powers 12V DC appliances
- Powers 5 V USB devices
- Jurnissterts vehicle engines
- Provides lighting for emergency use
- Inflates vehicle tiros and small sports equipment
- Reflective urn provides high insibilsty at right
Comprehensive protection
Reverse polarity protection
The reverse polarity LEO will light up wren you connect the wrong terminals. The reverse polarity alarm will also beep.
Over current protection
The built in charger protects against over current when it is recharging.
Over voltage protection
The built in charger will shut off when the voltage reaches the limit.
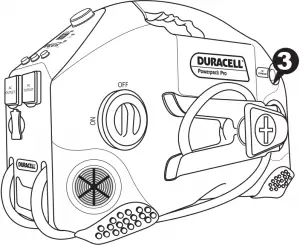
B. What’s Included
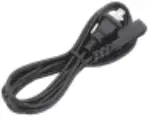
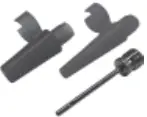
1. Powerpack Pro 2. AC charging cord 3. Inflation accessories
1. Charging/recharging your Powerpack
 IMPORTANT – BEFORE YOU START
Please fully charge your Powerpack before using it for the first lime II is also recommended to fully recharge your Powerpack after each use.
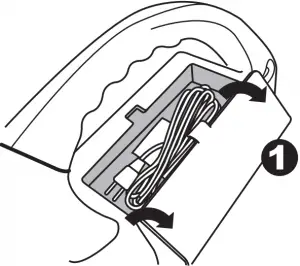
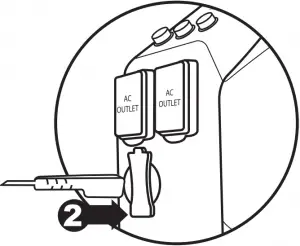
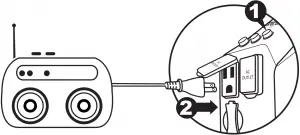
- Locate the AC charging cord stored in the compartment near the Powerpack’s handle.
- Plug the cord into the Powerpack’s AC charging input.
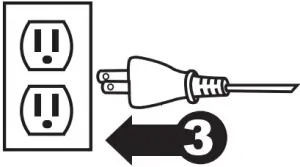
- Plug the other end of the cord into an AC wall outlet.
- Charging time is approximately 24 hours from a fully discharged battery to a full recharge. The Battery Status LED will turn green when fully charged.
- It is safe to leave the Powerpack plugged into an AC wall outlet so that it is always fully charged and ready when you need it. The charging current will automatically reduce to “maintenance” mode once the Powerpack has been fully charged.
Powerpack Charging: Important Notes
- Do not operate DC appliances with the Duracell® Powerpack Pro while the powerpack is being recharged with the AC cord. The AC cord may be permanently damaged if 12V DC appliances are operated while the AC cord is connected.
- If you keep the powerpack in storage, the battery will discharge over time. Remember to recharge the battery every three months to keep the powerpack operational.
- If the voltage in your wall outlet is less than 120V AC, it may take more than 24 hours to fully recharge the Powerpack. If, after 24 hours of charging, the Battery Status LED remains red, continue to charge the unit for another 12 hours. The unit will be ready for use even if the Battery Status LED remains red.
2. Checking the battery level
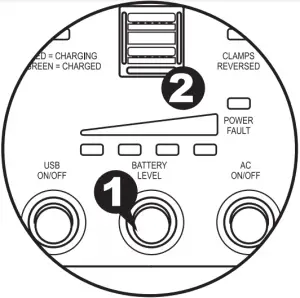
- Push the Battery Level button on the front panel.
- The LED gauge will display the current level of available battery power:
• Fully charged: All LEDs (one red, one yellow and two green) are illuminated when the battery is full.
• Completely discharged: Only the red LED is illuminated when the battery is completely empty.
Battery Level: Important Notes
Battery fuel gauge status is only accurate when the Powerpack has been disconnected from all appliances and all charging sources for 15 minutes.
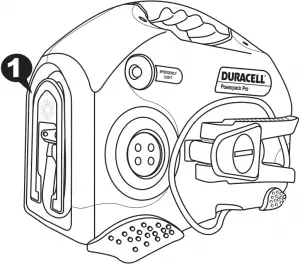
3. Using the LED light
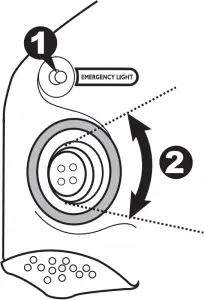
- Push the “Emergency Light” button to turn on the LED light.
- Gently swivel the lens up and down to aim the light beam.
- Push the “Emergency Light” button again to turn off the light.
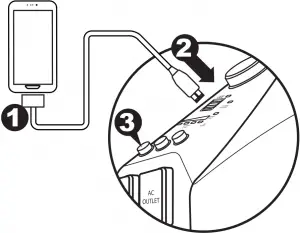
4. Using the USB ports
The Powerpack’s dual USB ports can charge two USB devices at once, sup plying up to 2.4 total Amps of current.
- Connect your USB device (smartphone, tablet, etc.) to your own USB cable.
- Plug the USB cable into the Powerpack’s USB port.
- Push the “USB On/Off” button.
- Charging will begin. The Powerpack will adjust the amount of current supplied to each device based on its requirements.
- Push the “USB On/Off’ button again when done.
5. Using the AC outlets
The Powerpack’s dual AC outlets ports can power two AC appliances at once, up to a total of 240W for Powerpack Pro 1100, or 480W for Powerpack Pro
1300. For best results, ensure that your Powerpack is fully charged before using the AC outlets.
- Press the AC outlet ON/OFF Switch to the ON position.
- Open the protective cover on the AC power outlet and plug the AC appliance in.
- Fully recharge the Powerpack as soon as possible after each use.
- In the event of an overload, low battery voltage or overheating, the Powerpack automatically shuts down.
AC Appliances: Important Notes
Understanding appliance wattage
- AC appliances are rated by how much electrical power (in watts) they consume. The fewer watts an AC appliance uses, the longer the powerpack will operate before recharging is required.
- Some appliances may be difficult or impossible to operate from the Powerpack if they have a high surge rating or are not suitable for use with the Powerpack.
Trouble Appliances
To avoid damage to your AC appliance, the Powerpack is not recommended for use with the following:
- Electronics that modulate RF (radio frequency) signals on the AC line.
- Speed controllers found in some fans, power tools, kitchen appliances, and similar appliances.
- Some chargers for small rechargeable batteries can be damaged.
- Metal halide arc (MHI) lights can be damaged.
High Surge Appliances
“Surge” power is the initial amount of power required to start an appliance.
- Appliances such as televisions and appliances with motors consume much more power than their average (continuous use) rating when they are first switched on. This may exceed the capabilities of the Powerpack and trigger the safety overload shutdown circuit.
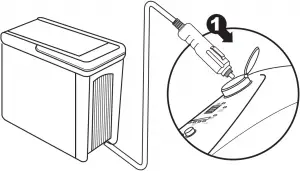
6. Using the 12V DC power outlet
The Powerpack can operate 12V DC appliances (such as those that plug into a vehicle’s lighter socket) that draw 20 Amps of power or less.
- Open the protective cover on the DC power outlet and plug your appliance into the port.
- Turn the appliance on (if required). The Powerpack will automatically supply power to your appliance.
- Fully recharge the Powerpack as soon as possible after use.
12V DC Outlet: Important Notes
Battery power drain
- As the DC power outlet is internally wired directly to the Powerpack’s battery, it does not automatically switch off. Check the battery status periodically to prevent total battery discharge.
- Extended operation of a 12V DC appliance may result in excessive battery discharge.
High-consumption DC appliances
- If your 12V DC appliance draws more than 20 Amps, the Powerpack’s internal circuit breaker shuts off the power to your appliance. You will not be able to use this appliance with the Powerpack. If shutoff occurs, unplug your appliance. The Powerpack’s internal circuit breaker automatically resets after a few seconds.
7. Jump-starting your vehicle
IMPORTANT – BEFORE YOU START
Please read these critical safety instructions carefully before jump-starting a car with the Powerpack.
Fire Safety
- Never allow jump-start cables’ red and black clamps to touch each other or another common metal conductor. This could damage the Powerpack and/or create a sparking/explosion hazard. Always switch OFF the Jump-Start power switch and store the jump-start clamps in the appropriate holder on each side of the Powerpack after use.
- Do not crank your vehicle’s engine for more than 4 seconds. The jump-start feature is designed for short term operation only. Operating the jump-start feature for more than 4 seconds may damage the Powerpack.
- Always allow the Powerpack to cool down for at least 3 minutes after each jump-start.
Personal Safety
- Always turn OFF the vehicle or boat ignition and all accessories.
- Engage the park or emergency brake and place the transmission in park for an automatic or neutral for a manual.
- If jump-starting a boat engine, purge the engine compartment and bilge of all fumes.
- Position the Duracell® Powerpack Pro on a flat, stable surface near the battery and away from all moving parts of the engine. Ensure that the jump-starting power switch is OFF.
Jump-starting your vehicle
- Remove the clamps from the holsters on each side of the Powerpack.
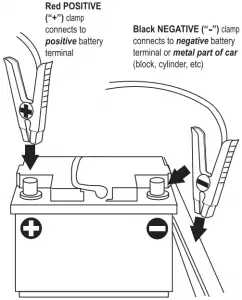
- Connect the red positive (+) clamp of the cables to the positive (+) terminal of the engine battery. The battery’s positive terminal is usually larger in diameter than the negative terminal. In most vehicles, the battery’s positive terminal has a red wire connected to it.
- Connect the black negative (-) clamp of the cables to the engine block, cylinder head, or other stationary heavy metal part of the motor.
4. If the “Clamps Reversed” LED illuminates, then reverse polarity has been detected. Disconnect the jump-start clamps from the vehicle’s battery and redo steps 1 and 2.
5. Switch ON the jump-starting power switch. Before starting the engine, make sure the Duracell® Powerpack Pro and the cables are clear of belts and fans.
6. Crank the engine for 4 seconds or until it starts, whichever is first.
8. Using the air compressor
IMPORTANT – BEFORE YOU START
Please read these critical safety instructions carefully before using the Powerpack’s air compressor.
Fire Safety
- The compressor is designed for short term operation only. Operating the compressor over an extended period of time will cause the compressor unit to overheat which could lead to fire.
- The powerpack cannot be used to inflate large capacity inflatables such as float tubes, large air mattresses, and inflatable boats. These types of products require extended inflating times that may damage the compressor.
- Always allow the compressor to cool down for 10 minutes after each 10 minutes of continuous operation.
Personal Safety
- Never leave the compressor unattended while in operation. Keep out of reach of children.
- The compressor is capable of inflating to 150 PSI. Do not exceed the recommended pressure of either the compressor or the object being inflated. If either recommended pressure is exceeded, an explosion may result.
- If the pressure gauge on the compressor indicates more than twice the recommended pressure for the object you are inflating, and you have only started to inflate the object, the valve connector is incorrectly connected to the valve stem. This may damage the Powerpack. Remove and reattach the valve connector to the valve stem.
Inflating tires (car, motorcycle, bicycle)
1. Remove the air compressor hose from the rear of the Powerpack.
2. Place the valve connector securely on the tire valve stem, push it as far as possible to allow normal airflow, and close the thumb latch. If necessary, use a supplied nozzle adapter.
3. Press the Air Compressor switch to turn the compressor on, and inflate your tire to its recommended pressure.
4. Switch the compressor off after appropriate pressure is reached.
5. Open the thumb latch and remove the valve connector from the valve stem.
6. Check the air pressure of the tire with a pressure gauge.
Inflating tires (car, motorcycle, bicycle)
- Place the valve connector fully on or into the valve receptacle on the item.
- Turn the compressor on and inflate to appropriate pressure.
You may also use a supplied nozzle adapter:
1. Locate proper nozzle adapter stored in the compartment near the Power pack’s handle.

2. Insert nozzle adapter into the valve receptacle of the item.
3. Turn the compressor off before removing nozzle adapter from valve stem.
4. Remove nozzle adapter from valve connector and return it to the storage compartment.
9. Connecting to an external battery
You can extend battery operating times by connecting the Powerpack to a larger external battery. For example, an external 54Ah battery gives approximately three times the operating time of the Powerpack’s own internal 18Ah or 15Ah battery.
IMPORTANT – BEFORE YOU START
Please read these critical safety instructions carefully before connecting the Powerpack to an external battery for the first time.
Fire Safety
- Never allow jump-start cables’ red and black clamps to touch each other or another common metal conductor. This could damage the Powerpack and/or create a sparking/explosion hazard.
- Jump-start cable clamps must be connected positive to positive (red clamp to battery “+”) and negative to negative (black clamp to battery “-“). A reverse polarity connection (positive to negative) may damage the Powerpack and/or create a sparking/explosion hazard.
Personal Safety
- Use a sealed, non-spillable external battery for indoor use. Common auto and marine batteries are not suitable for indoor use unless their fumes are vented outdoors. Common auto and marine batteries contain acid, which is hazardous if spilled.
- Wear eye protection and protective clothing when connecting the powerpack to an external battery.
To connect the Powerpack Pro to an external battery using the jump-start cables:
- Ensure that the jump-start power switch is OFF.
- Connect the red positive (+) clamp of the cables to the positive (+) terminal of the external battery.
- Connect the black negative (-) clamp of the cables to the negative (-) terminal of the external battery
- If the “Clamps Reversed” LED illuminates, then reverse polarity has been detected. Disconnect the jump-start clamps from the vehicle’s battery and redo steps 1 and 2.
- Disconnect the jump-start clamps from the battery and redo steps 2 and 3 in this procedure.
- Switch ON the jump-start power switch.
To disconnect:
7. Ensure that the jump-start power switch is OFF.
8. Remove the red positive (+) clamp, and then remove the black negative (-) clamp from the external battery terminals.
9. Store the jump-start clamps in the appropriate holder on each side of the Powerpack.
10. Recharge the powerpack as soon as possible after use.
10. Powerpack maintenance
Battery charging
All rechargeable batteries gradually discharge when left standing, and you need to recharge them periodically to maintain maximum battery capacity. The charger within the Powerpack is designed to regulate the charging process, ensuring that the battery is always fully charged but never
overcharged. To ensure safe recharging and maximum battery life, recharge the Powerpack only with the supplied charger.
Battery charging: Important notes
Please be sure to fully recharge your Powerpack every three months. This is important to maintain maximum life and usability of your Powerpack’s battery.
Leaving a battery in a discharged state may result in permanent battery damage and poor jump-starting performance.
Personal Safety
- Disconnect all sources of AC power and DC power before performing any type of maintenance to prevent accidental shock.
- Do not attempt to recharge the Duracell® Powerpack Pro battery if it is frozen. Gradually warm the frozen battery to 32 °F (0 °C) before recharging.
- Please see Section 1: “Charging/Recharging your Powerpack” for full instructions.
- Please also refer to Section 2: “Checking the battery level” for addi tional information.
- In addition to recharging the Powerpack’s battery, it is recommended to periodically clean the outside of the Powerpack with a damp cloth to remove the accumulated dust and dirt.
11. Recycling
If it’s rechargeable, it’s recyclable! Battery-Biz is committed to environmental responsibility and has established a program for recycling Duracel® rechargeable battery-related products.
For instructions on how to recycle this product visit http://www.call2recycle.org.
12. Troubleshooting
Below are some common problems that can occur with the Powerpack. If you cannot solve your problem, contact your dealer or Duracell Customer Service at (800) 842-2127.
Problem: AC appliance will not operate
Possible Cause : Solution
AC appliance rated more than 300 W (Powerpack Pro 1100) or 600 W (Powerpack Pro 1300): the safety overload has tripped.
Use an AC appliance with a lower power rating.
AC appliance is rated less than 300 W (Powerpack Pro 1100) or 600 W (Powerpack Pro 1300): high starting surge has tripped the safety overload.
AC appliance may exceed the Duracell® Powerpack Pro’s surge capability. Use an AC appliance with a starting surge within the Duracell® Powerpack surge rating.
Battery has discharged to 10.5 V.
Turn OFF the AC Power ON/OFF switch and recharge the Duracell® Powerpack.
Duracell® Powerpack Pro has overheated due to poor ventilation or excessively warm environmental conditions.
Turn the AC Power ON/OFF switch OFF and allow the Duracell® Powerpack Pro to cool for 15 minutes or more. Clear blocked openings or remove objects covering the unit, then restart the Duracell® Powerpack and move it to a cooler environment.
Problem: Overload shutdown.
Possible Cause : Solution
Appliance power requirements exceed the capability of the Duracell® Powerpack Pro.
Unplug the appliance and confirm that the appliance’s power requirement is 300 W (Powerpack Pro 1100) / 600 W (Powerpack Pro 1300) or less before attempting to restart the appliance.
Problem: Measured AC output voltage is too low.
Possible Cause : Solution
Using an average-reading AC voltmeter to read output voltage.
The modified sine wave output of the Duracell® Powerpack requires a true RMS reading meter, such as the Fluke 87 series, for accurate measurement.
Duracell® Powerpack Pro battery is almost fully discharged.
Press Battery Level button to verify battery status and recharge the Duracell® Powerpack Pro as necessary. Battery Level LEDs are only accurate when the unit has been disconnected from all appliances and all charging sources for 15 minutes.
Problem: Battery Status LED is red and has not changed to green after 24 hours of charging.
Possible Cause : Solution
The voltage at the AC wall outlet is less than 120VAC.
Use AC wall outlet that supplies 120VAC.
Continue to charge the unit for another 12 hours; the unit will be ready to use even if the Battery Status light remains red.
Problem: The engine being jump-started will not start.
Possible Cause : Solution
Duracell® Powerpack Pro battery is not fully charged.
Recharge the Duracell® Powerpack Pro battery.
The engine condition is poor.
Have the engine serviced.
The engine start capacity exceeds the Duracell® Powerpack Pro jump-start capability.
Use a higher power Duracell® Powerpack Pro.
Problem: The jump-start clamps measure zero volts.
Possible Cause : Solution
Jump-start power switch is OFF.
Turn the jump-start power switch ON.
Duracell® Powerpack Pro battery needs to be recharged.
Recharge the battery.
Problem: The compressor runs, but won’t inflate.
Possible Cause : Solution
The valve connector may not be securely placed on the valve stem.
Make sure the valve connector is securely placed on the valve stem before closing the thumb latch.
The item being inflated may have a leak.
Make sure the item being inflated doesn’t have a leak. Check the compressor hose for any breaks or leaks.
Problem: The compressor runs slowly.
Possible Cause : Solution
The compressor may have overheated from excessive use.
Turn off the compressor and let it cool down.
Battery voltage is too low.
Check the condition of the internal battery. The battery may need to be recharged or replaced.
13. User reference: Tire inflation
The information in the table below is for reference only. For precise pressure specifications, refer to the information supplied with the item to be inflated.
Type of tire Typical pressure specifica tions (PSI)
Automotive tires
520-13 26
A-78-14 26
E78-14 30
H-78-14 24
HR-78-15 28
Bicycle tires
27 x 1 1/4 85
20 x 1 1/2 40
Other Inflatables
Football 13
Basketball 9
Volleyball 5
Lawn tractor tire 22
14. Specifications
Important notes
All specifications are subject to change without notice.
12V DC section
Internal battery type
Sealed/non-spillable, AGM (Absorbed Glass Mat) lead-acid
Internal battery voltage (nominal)
12V DC
Internal battery capacity (minimum)
DR300PWR……………………….. 12Ah
DR600PWR……………………….. 18Ah
DC power socket (maximum continu ous load)
20 A with automatic reset.
AC power section
Output power
• Continuous output power
DR300PWR……………240W
DR600PWR…………… 480W
• Output power (5 minutes)
DR300PWR……………. 300W
DR600PWR……………. 600W
• Peak AC output surge capacity
DR300PWR……………. 480W
DR600PWR……………. 750W
Output voltage 115V AC (RMS)
Output frequency 60Hz
Output wave form Modified sine wave
No load current draw <0.5 A DC
Input voltage range 10V to 15V DC
Low battery alarm 10.5V DC
Low battery shutdow 10.0V DC
High battery voltage shutdown 16V DC
Over temperature shutdown <194° F (90° C
Overload shutdow Yes, automatic reset
AC output short circuit protection Yes, automatic reset
Fuse (Internal)
DR300PWR…40Ax 1 (MAX),
DR600PWR…35Ax 2 (MAX)
Operating temperature range 32°-104 °F (0°-40 °C)
Storage temperature range 68°-122° F (-20° C –50°C)
Internal battery charging controller system
AC input voltage range 100-240V AC
AC input frequency 50/60Hz
Output voltage 15V DC
Rated voltage in floating charge 13.2Vdc@30mA
Empty load power < 0.5W
Safety standards ETL (for the charger)
Efficiency standards BC
Air compressor
Pressure 160 PSI (lb/in)
Physical specifications
Length 15.2 in. / 38.5 cm
Width 9.3 in. / 23.7 cm
Height 10.7 in. / 27.2 cm
Weight
DR300PWR………16.8 lbs. / 7.6 kg
DR600PWR………20.9 lbs. / 9.5 kg
Accessories
AC cord 52.4 in. (133cm)
Compressor nozzles Red air nozzle, blue air nozzle, inflator needle
15. Contacting Customer Support
If you experience any problems or have any questions regarding your DURACELL® product, free technical support is available. Prior to calling, please review the technical support tips below. Call from a phone where you have access to your mobile device.
Be prepared to provide the following information:
– Name, address and telephone number
– Name of the DURACELL® product – Make and model of your device
– Symptoms of the problem(s) and what led to them
Technical Support is available by telephone:
U.S. and Canada (800) 300-1857
Outside of the US/Canada: (805) 437-7765
Written inquires should be directed to:
Battery-Biz Inc.
DURACELL® Product Inquiry
1380 Flynn Road, Camarillo, CA93012, USA
16. Warranty and Return Information
Two Year Limited Warranty
The DURACELLP product carries a limited warranty against defects in material and workmanship under normal use and service for two years from the original date of purchase. The manufacturer or distributor, at its option, shall repair or replace the defective unit covered by this warranty. Please retain the dated sales receipt as evidence of the date of purchase as it will be required for any warranty service. In order to keep the warranty in effect, the product must have been handled and used as described in the instructions accompanying this warranty. This warranty does not cover any damage due to accident, misuse, abuse or negligence.
Disclaimer Of Warranty
The limited warranty described herein is your sole remedy. To the extent permitted by law, the manufacturer and distributor disclaim all other implied or express warranties including all warranties of merchantability and/or fitness for any particular purpose.
Limitation Of Liability
Except to the extent of repairing or replacing this product as expressly stated in the limited warranty described herein, the manufacturer and distributor shall not be liable for any damages, whether direct, indirect, incidental, special, consequential, exemplary, or otherwise, including lost revenues, lost profits, loss of use of software, loss or recovery of data, rental of replacement equipment, downtime, damage to property, and third-party of replacement equipment, downtime, damage to property, and third-party claims, arising out of any theory of recovery, including statutory, contract or tort. Not withstanding the term of any limited or implied warranty, or in the event that any limited warranty fails of its essential purpose, in no event will the manufacturer’s and distributors entire liability exceed the purchase price of this product. Some states and provinces do not allow the exclusion or limitation of incidental or consequential damages so the above limitations or exclusions may not apply to you. This limited warranty gives you specific legal rights. You may have other rights which vary from state to state and province to province.
WARNING
Pursuant to California Proposition 65, this product contains chemical(s) known to the State of California to cause cancer, birth defects, or other reproductive harm.
© 2016 Duracell. DURACELL’ is a registered trademark of Duracell, U.S. Operations, Inc., used under license. All rights reserved. All logos and trademarks are used for identification purposes only and may be trademarks or registered trademarks of their respective holders of their respective holders.
UM-DRPP300-600 Rev 20170111