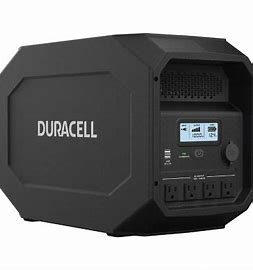
DURACELL® PowerSource 660 User Guide
Before You Start
 VERY IMPORTANT: CHARGE BEFORE USE
CHARGE BEFORE USE for at least 24 hours. For the life of the product keep it plugged in OR recharge every 3 months to prevent permanent battery damage.
IMPORTANT SAFETY INSTRUCTIONS
When using Duracell PowerSource 660, basic precautions should always be followed, including the following:
Operating the Duracell® PowerSource 660 incorrectly or misusing it may damage the equipment or create hazardous conditions for the user. See all WARNING statements below.
SAVE THESE INSTRUCTIONS-This manual contains important instructions. They need to be followed during installation and operation of this product.
Instructions Pertaining to Risk of Fire, Electric Shock or Injury to Persons
 WARNING
When using this product, basic precautions should always be followed, including the following:
- Read all the instructions before using the product.
- Do not put fingers or hands into the product.
- Use of an attachment not recommended or sold by power pack manufacturer may result in a risk of fire, electric shock, or injury to persons.
- To reduce risk of damage to the electric plug and cord, pull the plug rather than the cord when disconnecting the power pack.
- Do not use a battery pack or appliance that is damaged or modified. Damaged or modified batteries may exhibit unpredictable behavior resulting in fire, explosion or risk of injury.
- Do not operate the power pack with a damaged cord or plug, or a damaged output cable.
- Do not disassemble the power pack, take it to a qualified service person when service or repair is required. Incorrect reassembly may result in a risk of fire or electric shock.
- To reduce the risk of electric shock, unplug the power pack form the outlet before attempting any instructed servicing.
 WARNING: Risk of explosive gases
- WORKING IN VICINITY OF A LEAD ACID BATTERY IS DANGEROUS. BATTERIES GENERATE EXPLOSIVE GASES DURING NORMAL BATTERY OPERATION. FOR THIS REASON, IT IS OF THE UTMOST IMPORTANCE THAT YOU FOLLOW THE INSTRUCTIONS EACH TIME YOU USE THE POWER PACK.
- TO REDUCE RISK OF BATTERY EXPLOSION, FOLLOW THESE INSTRUCTIONS AND THOSE PUBLISHED BY BATTERY MANUFACTURER AND MANUFACTURER OF ANY EQUIPMENT YOU INTEND TO USE IN VICINITY OF THE BATTERY. REVIEW CAUTIONARY MARKING ON THESE PRODUCTS AND ON ENGINE.
 PERSONAL PRECAUTION
- Consider having someone close enough by to come to your aid when you work near a lead-acid battery.
- Have plenty of fresh water and soap nearby in case battery acid contacts skin, clothing, or eyes.
- Wear complete eye protection and clothing protection. Avoid touching eyes while working near battery.
- If battery acid contacts skin or clothing, wash immediately with soap and water. If acid enters eye, immediately flood eye with running cold water for at least 10 minutes and get medical attention immediately.
- NEVER smoke or allow a spark or flame in vicinity of battery or engine.
- Be extra cautious to reduce risk of dropping a metal tool onto battery. It might spark or short-circuit battery or other electrical part that may cause explosion.
- Remove personal metal items such as rings, bracelets, necklaces, and watches when working with a lead-acid battery. A lead-acid battery can produce a short-circuit current high enough to weld a ring or the like to metal, causing a severe burn.
- When charging the intemal battery, work in a well ventilated area and do not restrict ventilation in any way.
- Under abusive conditions, liquid may be ejected from the battery; avoid contact. If contact accidentally occurs, flush with water. If liquid contacts eyes, additionally seek medical help. Liquid ejected from the battery may cause irritation or bums.
- Do not expose a power pack to fire or excessive temperature. Exposure to fire or temperature above 130°C may cause explosion. The temperature of 130°C can be replaced by the temperature of 265°F.
- Have servicing performed by a qualified repair person using only identical replacement parts. This will ensure that the safety of the product is maintained.
SAVE THESE INSTRUCTIONS
 WARNING: Risk of injury or loss of life
Do not use this product in connection with life support systems or other medical equipment or devices.
Features
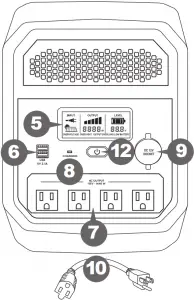
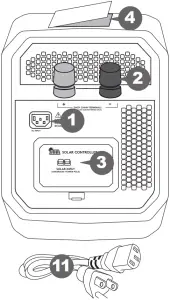
- AC input port: Use AC cord provided or UL approved extension cord.
- Daisy chain terminals: Connects to external 12V lead-acid batteries only
- Solar charge controller: Connects to 12V, 40-100W solar panel
- Storage tray: Holds AC input and output extension cords and user manual
- LED Screen: indicates charging status, power draw from the PowerSource when providing backup power, or battery capacity (%).
- USB ports: Provide up to 2.1A to charge USB devices.
- AC outlets: Provide up to 1440 Watts of household power. (4 outlets total).
- Charging LED:
• Flashes when charging
• Solid when charged - DC accessory socket: Powers 12V devices.
- Output extension cord: Extends the reach of the AC outlets for easier connection to your household electronics and appliances
- AC input cord: Plugs into the AC input port to power and charge the Powersource 660 from any wall outlet
- Power button: Turns the Powersource 660 unit on/off
Reading The LCD Display
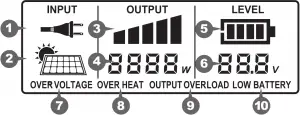
- AC Input: Input source is wail AC
- Solar input: Input source is solar panel (sold separately)
- Bar graph Watt meter: 5 bars is maximum rated continuous output
- Digital Watt meter: Displays output power in Wafts (W)
- Fuel gauge: Displays battery level
- Battery voltage
- Over voltage warning: Input over voltage
- Overheat: Inverter overheating; will shut down
- Output overload: Inverter overload; will shut down
- Low battery level: Internal battery low; please recharge the unit
Installation and Operation
 WARNING: Shock hazard
If the input plug is connected and wall AC outlet power is present, the outlets will be energized.
 IMPORTANT
The PowerSource 660 should be placed in a dry, well ventilated area with at least 6 inches of space in front and back of the unit for proper ventilation.
 CAUTION: Equipment damage
- Do not plug surge-protected power bars into the units 115 VAC outlets.
- Do not connect an AC power source to the 115 VAC outlets.
Using the PowerSource 660
- Plug the AC input cord directly into a wall outlet (not into a surge protector or power strip). This will charge the unit and maintain the battery in optimal condition. You may leave it connected when not in use.
- Turn on the unit by pressing the power button for one second.

The LCD screen ,power inverter, USB ports and Instant-On UPS function will turn on. The LCD screen will dim after one minute to save power; a touch of the “Power Button” will restore the brightness.
Charging with a solar panel
- Use a 12V, 40-100W solar panel.
- The PowerSource 660 has a built-in solar charge controller. Do not use a panel with its own charge controller.
- Connect the solar panel to the solar controller input terminals.
- If the AC input is connected, the PowerSource will use the AC input instead of the solar input.
Backup Power Feature
The instant-on UPS function provides uninterrupted power to connected devices in the case of a power failure or other utility problems such as brownouts. Note: The unit must be ON for this function to work. See “Run Time on Typical Products” section for run times. When utility power is restored, the unit will automatically begin to recharge
AC Power Capabilities
Total power of devices : Operate on utility power? : Operate on backup power?
Up to 1440 W : Yes : Yes (up to 1440 W continuous in backup power mode)
Over 1440 W : No. supplementary protector may trip. : No. Overload shutdown.
To check the total power consumption of the products plugged into PowerSource 660 during backup power mode, press the Power button and view the Output Power (W) on the screen.
To test the PowerSource 660 backup power capabilities after installing the unit, unplug the AC power cord to simulate a power outage and ensure the products connected to the PowerSource 660 continue operating. You can test the surge capabilities of the PowerSource 660 by turning connected products on and off while the unit is unplugged. If products fail to operate or the screen shows an error message, see “Troubleshooting”.
Run Time on Typical Products(c)
Product Watts/VVatt-Hrs (a) Run Time (h) / Recharges(X)(b)
iPhone 8 7 Wh 60X
iPhone XR 11 Wh 40X
iPhone XS 10 Wh 40X
iPad Pro 11″ 29 Wh 14x
Laptop 90W, 55Wh battery 90 W 8X
LED string lights (50 lights) 3.5W 150 h
Speakers 60 W 8 h
Table lamp – LED bulb 7 W 70 h
32- LED/LCD TV 48 W 20 h
Desktop computer 150 W 3 h
8.8 cu. ft. freezer 80 W 7 h
Mini fridge 1.7 Cu ft 30 W 16 h
Sump pump ‘A HP 300W 1.5h
Microwave 900 W 0.5 h
- (a) Average power consumption as measured on loads tested under regular operating conditions. Rated power may differ from average power consumption.
- (b) Run time as measured on tested loads.
- (c) If you plug in devices that have a high power requirement (a large refrigerator), the charge level can drop very quickly and you may not obtain all the capacity; if you’re recharging devices that draw lower power (30W) you will get closer to the rated capacity.
GUIDELINES FOR USE
Important: The PowerSource 660 is not suitable for use with certain products and loads. The continuous output wattage of this product is limited to 1440 watts total when supplying backup power from its batteries. This limit applies to the total of all items plugged into the product.
This output wattage is not sufficient to run products designed to produce large amounts of heat, including space heaters and pellet stove igniters.
PRECAUTIONS FOR USING RECHARGEABLE APPLIANCES
 CAUTION: Equipment damage
When the PowerSource 660 is supplying backup power from its battery, its output is a non-sinusoidal modified sine wave, which is different from pure sine wave utility-supplied electricity. Certain types of load equipment may be damaged.
Most rechargeable battery-operated equipment uses a separate charger or transformer that is plugged into an AC receptacle and produces a low voltage charging output. Some chargers for rechargeable batteries can be damaged if connected to the PowerSource 660.
Do not use the following with the PowerSource 660:
- Small battery-operated appliances like flashlights, razors and night lights that can be plugged directly into an AC receptacle to recharge.
- Some chargers for battery packs used in hand power tools. These chargers display a warning label stating that dangerous voltages are present at the battery terminals.
 NOTE:
NOTE:
If you are unsure about using your rechargeable appliance with the PowerSource 660, contact the equipment manufacturer to determine the rechargeable appliance’s compatibility with the modified sine wave (non-sinusoidal) AC wave form.
PRODUCTS WITH POTENTIAL PROBLEMS
Some products, including the types listed below, may be damaged if they are connected to the PowerSource 660:
- Speed controllers found in some fans, power tools, kitchen appliances, garage door openers, and other loads may be damaged.
- Metal halide arc (MHI) lights can be damaged.
 CAUTION: GROUNDING INSTRUCTIONS
This product must be grounded. If it should malfunction or breakdown, grounding provides a path of least resistance for electric current to reduce the risk of electric shock. This product is equipped with a cord having an equipment grounding conductor and a grounding plug. The plug must be plugged into an outlet that is properly installed and grounded in accordance with all local codes ordinances.
WARNING — Improper connection of the equipment grounding conductor is able to result in a risk of electric shock. Check with a qualified electrician if you are in doubt as to whether the product is properly grounded. Do not modify the plug provided with the product — if it will not fit the outlet, have a proper outlet installed by a qualified electrician.
Caution: Floating Grounding. Ground is floating when AC input cord is not connect to a wall outlet.
Power Management Tips
During a power outage, maximizing PowerSource 660 run time is essential to keep your home/small office running or to stay connected to the outside world through a TV, radio or phones. Therefore, in order to maximize the run time for combinations of office products plugged into PowerSource 660, you may want to use the following altematives:
Use… Instead of…
Inkjet printer Laser printer
Laptop, or desktop computer with LCD monitor Desktop computer with CRT monitor
Monitor energy saving mode settings Bright monitor settings
21 or 32″ LCD/LED TVs Big screen TVs
LED lamps Incandescent lamps
Attaching An External Battery (Extending the PowerSource 660’s Battery Capacity)
You can extend the run time for your devices by attaching an external 12V battery in parallel using the Daisy-chain terminal (see Features). To attach an external battery you will need to purchase battery cables with ring terminals. We recommend 2AWG cables, 3 ft. long. If a permanent installation is required we recommend using a 200A in-line fuse.
Replacing the PowerSource 660’s Internal Battery
 CAUTION: Shock hazard
Before attempting to replace the battery, please consult with an electrician or mechanic.
- Remove the 6 hex head screws.
- Pull lid off.
- Use ratchet tool with a 10mm socket to disassemble battery cables. *Note: Make sure to not lose or drop washers which are located on both sides of the battery cables. Once cables are loose, place the cables out of the way to avoid any shock hazards.
- Use ratchet tool with a 13mm socket to remove the battery brace. *Note: Make sure to not lose or drop washers when removing brace.
- Carefully lift the battery. *CAUTION: Battery is heavy!
- Place new battery into the DR660PSS. *Note: Please see Specifications for battery compatibility.
- Re-attach the battery brace.
- Re-attach the battery cables onto your new battery.
- Place the lid back onto the DR660PSS.
- Screw the 6 hex head screws to secure the lid onto the DR660PSS.
Operation Guide
Operation LCD Display Notes
Charging from wall: Plugged into wall AC outlet, PowerSource 660 is off and battery is charging LCD screen is blank.
- LCD: Off
- Charge LED: Blinking when charging and solid when charged
Charging, UPS ready: Plugged in wall AC outlet, PowerSource 660 is ON and ready to provide instant backup power. 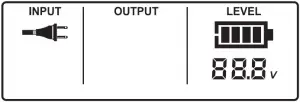 •
•
- LCD: On
- INPUT: AC cord icon
- OUTPUT: Blank, power is passing from AC wall source, inverter is not providing power.
- LEVEL: Battery level and Battery voltage is displayed
Backup Power: After power outage the PowerSource 660 instantly provides power to connected devices 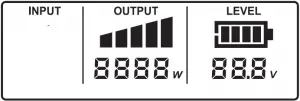
- INPUT: Blank, there is no input from the wall
- OUTPUT: Displays output graph and output wattage supplied by Inverter
- LEVEL: Shows battery level and battery voltage – Battery level is voltage based so you may see sudden changes in Battery Level and Voltage when loads chnage.
Charging from Solar source only, PowerSource 660 OFF: Solar panel connected, Wall AC not connected LCD screen is blank.
- LCD: Off
- Charge LED: Blinking when charging and solid when charged
Charging from Solar source only, PowerSource 660 ON: Solar panel connected, Wall AC not connected, PowerSource 660 ON 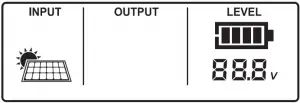
- LCD: On
- INPUT: solar icon
- OUTPUT: Blank
- LEVEL: Battery level and Battery voltage is displayed.
Low battery warning: Battery is almost empty. 
- OUTPUT: Shows power draw
- LEVEL: Flashing battery level and voltage (10.5V +- .5V)
- WARNING: “LOW BATTERY” warning is flashing with beeping sound
Low battery shutdown: Battery is empty. LCD screen is off (unit is shut down) At (9.5V +- .5V) LCD and Inverter turns OFF to protect the battery from over-discharge.
Overload: Excessive Inverter load 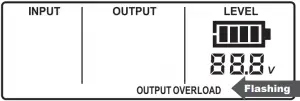
- OUTPUT: Blank; the Inverter has shut down.
- LEVEL: Shows current battery level and voltage
- WARNING: ‘OUTPUT OVERLOAD” Warning flashes with beeping sound.
- REMEDY: Check wattage of connected devices to make sure they do not exceed the rated output of 1440W Higher wattage loads will run for short periods until the overload or over heat protection.
Over Heat: Inverter temperature exceed due to poor ventilation or excessive load 
- OUTPUT: Blank, the Inverter has shutdown.
- LEVEL: Shows current battery level and voltage
- WARNING:”OVER HEAT” Warning flashes with beeping sound
- REMEDY: Check ventilation openings, surrounding area and room temperature toensure proper airflow.
Over Voltage: The battery voltage is excessively high 
- LEVEL: Flashing battery level and voltage (16V +- .5V)
- WARNING: “OVER VOLTAGE” warning is flashing with beeping sound
- REMEDY. The inverter protects itself from high voltages by shutting down. Higher voltage external batteries or chargers can raise the battery voltage. Check external inputs.
Specifications
Electrical Specifications
Output Specifications
Continuous output power 1440 W
Surge power (momentary) 2880 W
Output voltage (nominal) 115 VAC ± 10%
Output frequency 60 Hz
Output wave form Modified sine wave
UPS Transfer time 5. 20 millisecond
Surge suppression Yes
Inverter on (no-load current draw) < 0.8 A (battery drain)
Charging time 24 hours for an empty battery
DC Specifications
Internal battery type Sealed lead acid
Internal battery capacity 55 Amp-Hour (660 Watt-Hour)
Internal battery voltage 12 VDC (nominal)
Low battery alarm 10.5 (+1- 0.5) VDC
Low battery shutdown 9.5 (+/- 0.5) VDC
Charging current (built-in charger) 6 ADC maximum
Accessory socket 12VDC (nominal), 20A
USB Ports 2 ports: 5V, 2.1A each
Solar Charge Controller Specifications
Solar panel compatibility 12V nominal, open circuit voltage <= 20V, wattage <=100W
Solar controller type PWM
Solar connector Anderson Powerpole PP15-45
Protections Reverse connection, short-circuit, reverse charging, under voltage
General Specifications
Operating/Storage temperature 32° to 104° F (0° to 40° C)/ -4° to 104° F (-20° to 50° C)
Dimensions (L x W x H) 19.9 x 8.9 x 12.8″ (50.5 x 22.6 x 32.4 cm)
Weight 56.2 lb (25.5 kg)
Approvals UL2743
FCC part 15
BC (CEC)
DOE
NOTE: All specifications are subject to change without notice
Recycling
Battery-Biz is committed to environmental responsibility and recommends that electronic devices be disposed of property. Please contact your local city offices for information on recycling and disposal programs for e-waste.
For instructions on how to recycle this product visit http://www.call2recycle.org.
Contacting Customer Support
If you experience any problems or have any questions regarding your DURACELL& product, free technical support is available. Prior to calling, please review the technical support tips below.
Call from a phone where you have access to your mobile device
Be prepared to provide the following information:
– Name, address and telephone number
– Name of the DURACELL& product
– Make and model of your device
– Symptoms of the problem(s) and what led to them
– Proof of Purchase
Technical Support is available by telephone:
U.S. and Canada (800) 300-1857
Outside of the US/Canada: (805) 437-7765
Written inquires should be directed to:
Battery-Biz Inc.
DURACELL& Product Inquiry
1380 Flynn Road, Camarillo, CA 93012, USA
Email Inquiries should be sent to our customer service email: [email protected]
Warranty And Returns
Two Year Limited Warranty
The DURACELL® product carries a limited warranty against defects in material and workmanship under normal use and service for two years from the original date of purchase. The manufacturer or distributor, at its option, shall repair or replace the defective unit covered by this warranty. Please retain the dated sales receipt as evidence of the date of purchase as it will be required for any warranty service. In order to keep the warranty in effect, the product must have been handled and used as described in the instructions accompanying this warranty. This warranty does not cover any damage due to accident, misuse, abuse or negligence.
Disclaimer Of Warranty
The limited warranty described herein is your sole remedy. To the extent permitted by law, the manufacturer and distributor disclaim all other implied or express warranties including all warranties of merchantability and/or fitness for any particular purpose.
Limitation Of Liability
Except to the extent of repairing or replacing this product as expressly stated in the limited warranty described herein, the manufacturer and distributor shall not be liable for any damages, whether direct, indirect, incidental, special, consequential, exemplary, or otherwise, including lost revenues, lost profits, loss of use of software, loss or recovery of data, rental of replacement equipment, downtime, damage to property, and third-party claims, arising out of any theory of recovery, including statutory, contract or tort. Not withstanding the term of any limited or implied warranty, or in the event that any limited warranty fails of its essential purpose, in no event will the manufacturer’s any limited or implied warranty, or in the event that any limited warranty fails of its essential purpose, in no event will the manufacturer’s and distributors entire liability exceed the purchase price of this product. Some states and provinces do not allow the exclusion or limitation of incidental or consequential damages so the above limitations or exclusions may not apply to you. This limited warranty gives you of incidental or consequential damages so the above limitations or exclusions may not apply to you. This limited warranty gives you specific legal rights. You may have other rights which vary from state to state and province to province.
FCC Information to the User
This equipment has been tested and found to comply with the limits for a Class B digital device, pursuant to part 15 of the FCC Rules. These limits are designed to provide reasonable protection against harmful interference in a residential installation. This equipment generates, uses and can radiate radio frequency energy and, if not installed and used in accordance with the instructions, may cause harmful interference to radio communications. However, there is no guarantee that interference will not occur in a particular installation. If this equipment does cause harmful interference to radio or television reception, which can be determined by turning the equipment off and on, the user is encouraged to try to correct the interference by one or more of the following measures:
- Reorient or relocate the receiving antenna.
- Increase the separation between the equipment and the receiver.
- Connect the equipment into an outlet on a circuit different from that to which the receiver is connected.
- Consult the dealer or an experienced radio/TV technician for help.
© 2019 DURACELL, Bethel, CT 06801. Duracell is a registered trademark of Duracell U.S. Operations, Inc., used under license. All rights reserved. All logos and trademarks are used for identification purposes only and may be trademarks or registered trademarks of their respective holders.
UM-DR660EN Rev 2019326
