When you get a new Emerson Alarm Clock CKS1507, it's often hard to know how to set it up. Luckily, there's a user manual for your device. The following guide should help you to use this manual and help you to get the most out of your alarm clock.
Sections in this Manual
- WARNING
- Important Safety Instructions
- Preparation For Use
- Important Notes
- Package Contents
- Location of Controls and Indicators
- Setting the Time Zone
- Setting the Time
- Daylight Saving and Leap Year Adjustments
- Setting the Alarm
- Listening to FM Radio
- Recall Favorable Station
- Sleeping to Music Timer
- Level Dimmer Control
- Night Lighting
- Enjoying Audio Source via AUX IN Jack
- USB for Charging
- Changing the Lithium Battery
- Care and Maintenance
- LIMITED WARRANTY
- FAQS
![Emerson Alarm Clock [CKS1507 w/ Radio] User Manual Image](https://itsmanual.com/wp-content/uploads/2022/11/Emerson-Alarm-Clock-CKS1507.png)
SmartSet ® Clock Radio,
With Auto-Time Setting System, 1.4″Blue Jumbo Display, Dual Alarms, FM Radio, USB Charge Out, Night Light and Bluetooth Speaker
CKS1507
Alarm Clock Radio with Bluetooth,USB
Visit our web site at www.emersonradio.com
WARNING
TO PREVENT FIRE OR SHOCK HAZARD , DO NOT USE THIS PLUG WITH AN EXTENSION CORD,RECEPTACLE OR OTHER OUTLET UNLESS THE BLADES CAN BE FULLY INSERTED AND THERE IS NO BLADE EXPOSURE . TO PREVENT FIRE OR SHOCK HAZARD, DO NOT EXPOSE THIS APPLIANCE TO RAIN OR MOISTURE.

- WARNING: SHOCK HAZARD – DO NOT OPEN
- Caution Marking and rating plate was located at rear enclosure of the apparatus.
- Attention should be drawn to the environmental aspects of battery disposal;
- Minimum distances 10cm around the apparatus for sufficient ventilation;
- The ventilation should not be impeded by covering the ventilation openings with items, such as newspapers , table-cloths, curtains, etc.
- No naked flame sources , such as lighted candles, should be placed on the apparatus;
- The use of apparatus in moderate climates.t
- To reduce the risk of fire or electric shock, do not expose this apparatus to rain or moisture .
Do not ingest the battery, Chemical Burn Hazard
This product contains a coin/button cell battery. If the coin/button cell battery is swallowed, it can cause severe internal burns in just 2 hours and can lead to death . Keep new and used batteries away from children.
If the battery compartment does not close securely, stop using the product and keep it away from children. If you think batteries might have been swallowed or placed inside any part of the body, seek immediate medical attention.
When a plug on the unit is used as a disconnect device. this unit must remain readily accessible.
The batteries (battery pack or batteries installed) shall not be exposed to excessive heat such as sunshine, fire or the like.
ATTENTION Danger of explosion if the battery is not replaced correctly. Replace only with the same type or equivalent type The appliance must not be exposed to water dripping or splashing and that no objects filled with liquids such as vases should be placed on the appliance.
IC Warning
This device complies with Industry Canada License-exempt RSS standard(s).Operation is subject to the following two conditions:(1)this device may not cause interference. and (2)this device must accept any interference, including interference that may cause undesired operation of the device.
RF warning statement
The device has been evaluated to meet general RF exposure requirement. To maintain compliance with RSS-102- Radio Frequency (RF) Exposure guidelines, this equipment should be install led and operated with a minimum distance of 20cm between the radiator and your body.
FCC Note
FCC Part 15.19 Warning Statement
THIS DEVICE COMPLIES WITH PART 15 OF THE FCC RULES.OPERATION IS SUBJECT TO THE FOLLOWING TWO CONDITIONS:(1 )THIS DEVICE MAY NOT CAUSE HARMFUL INTERFERENCE, AND(2)THIS DEVICE MUST ACCEPT ANY INTERFERENCE RECEIVED. INCLUDING INTERFERENCE THAT MAY CAUSE UNDESIRED OPERATION.
FCC Part 15.21 Warning Statement
NOTE: THE GRANTEE IS NOT RESPONSIBLE FOR ANY CHANGES OR MODIFICATIONS NOT EXPRESSLY APPROVED BY THE PARTY RESPONSIBLE FOR COMPLIANCE.SUCH MODIFICATIONS COULD VOID THE USER AUTHORITY TO OPERATE THE EQUIPMENT.
FCC Part 15.105 Warning Statement
Note: This equipment has been tested and found to comply with the limits for a class B digital device ,pursuant to part 15 of the FCC Rules. These limits are designed to provide reasonable protection against harmful interference in a residential installation .This equirement generates, uses and can radiate radio frequency energy and, if not installed and used in accordance with the instructions, may cause harmful interference to radio communications. However there is no guarantee that interference will not occur in a particular installation. If this equipment does cause harmful interference to radio communications. However there is no guarantee that interference to radio communication .If this equirement does cause harmful interference to radio or television reception, which can be determined by turning the equirement off and on ,the user is encouraged to try to correct the interference by one or more of the following measures:
- Reorient or relocate the receiving antenna .
- Increase the separation between the requirement and receiver.
- connect the requirement into an outlet on a circuit different from that to which the receiver is connected.
- consult the dealer or an experienced radio/TV technician for help.
RF warning statement
The device has been evaluated to meet general RF exposure requirement.
To maintain compliance with FCC”s RF exposure guidelines, this equipment should be installed and operated with a minimum distance of 20cm between the radiator and your body.
Important Safety Instructions
- Read these instructions. Keep these instructions. Follow all instructions. Heed all warnings.
- Do not use this apparatus near water.
- Clean only with a dry cloth.
- Do not block any ventilation openings. Install in accordance with the manufacturer’s instructions.
- Do not install near any heat sources such as radiators, heaters, stoves, or other apparatus(including amplifiers) that produce heat.
- Do not defeat the safety purpose of the polarized or grounding-type plug. A polarized plug has two blades with one wider than the other. A grounding-type plug has two blades and a third grounding prong. The wide blade or the third prong is provided for your safety. If the provided plug does not fit into your outlet, ask an electrician to replace the obsolete outlet.
- Protect the power cord from being walked on or pinched particularly at plugs, convenience receptacles and the point where they exit from the apparatus.
- Only use attachments/ accessories specified by the manufacturer.
- Unplug this apparatus during lightning storms or when unused for long periods of time.
- Refer all servicing to qualified service personnel. Servicing is required when the apparatus has been damaged in any way, such as power-supply cord or plug is damaged, liquid has been spilled or objects have fallen into the apparatus. the apparatus has been exposed to rain or moisture. does not operate normally, or has been dropped.
- Use only with the cart, stand, tripod, bracket, or table specified by the manufacturer. or sold with the apparatus. When a cart is used, use caution when moving the cart/ apparatus combination to avoid injure from tip-over.
- The AC adapter must not be exposed to dripping or splashing and no objects filled with liquids, such as vases, shall be placed on apparatus.
- The AC adapter is used as a disconnect device and it must remain readily accessible during intended use. In order to disconnect the apparatus from the AC power completely, the AC adapter must be removed from the AC outlet completely.
- The battery must not be exposed to excessive heat such as sunshine, fire, etc.
CAUTION: Danger of explosion if the battery is incorrectly replaced. Replace only with the same or equivalent type.
Preparation For Use
Unpacking And Set Up
- Remove the radio from the carton and remove all packing material from the radio. Save the packing material. If possible, in case the radio ever needs to be serviced or transported. The original carton and packing material is the only safe way to pack your radio to protect it from damage in transit.
- Remove any descriptive labels or stickers on the front or top of the cabinet. Do not remove any labels or stickers from the back or bottom of the cabinet.
- Note the serial number on the bottom of your radio and write this number in the space provided on the Warranty page of this manual.
- Place your radio on a level surface such as a table, desk or shelf, convenient to an AC outlet, out of direct sunlight, and away from sources of excess heat, dirt, dust, moisture, humidity, or vibration.
- Unwind the Line cord connecting the AC adapter and extend it to its full length . The FM antenna is built in to this cord. It must be fully extended to provide the best FM reception.
Protect Your Furniture
This model is equipped with non-skid rubber ‘feet’ to prevent the product from moving when you operate the controls. These ‘feet’ are made from non-migrating rubber material specially formulated to avoid leaving any marks or stains on your furniture. However certain types of oil based furniture polishes , wood preservatives, or cleaning sprays may cause the rubber ‘feet’ to soften. and leave marks or a rubber residue on the furniture. To prevent any damage to your furniture we strongly recommend that you purchase small self-adhesive felt pads, available at hardware stores and home improvement centers everywhere, and apply these pads to the bottom of the rubber ‘feet’ before you place the product on fine wooden furniture.
Power Source
This radio is designed to operate on normal 120V 60Hz AC power only. Do not attempt to operate the radio on any other power source . You could cause damage to the radio that is not covered by your warranty. This radio should be connected to an AC outlet that is always ‘live’. Do not connect it to an outlet that is controlled by a wall switch. When the power to the radio is interrupted, the built-in lithium battery takes over to maintain the time and alarm settings. To maximize the life of the lithium battery keep the radio connected to a ‘live’ AC outlet at all times.
Important Notes
- Avoid installing this unit in places exposed to direct sunlight or close to heat-radiating appliances such as: electric heaters, on top of other stereo equipment that radiates heat, places lacking ventilation, dusty areas, places subject to constant vibration and/or humid or moist areas.
- Operate controls and switches as described in the manual.
- Before turning on the power, make certain that the AC adapter is properly installed.
- When moving the set, be sure to first disconnect the AC adapter.
Package Contents

Location of Controls and Indicators

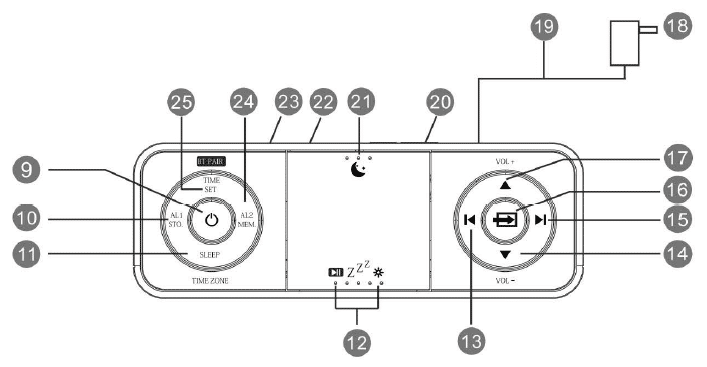
- ALARM 1 Radio/Buzzer Indicators
- AM Indicator ( ‘On’=AM, ‘Off’=PM)
- AUX Indicator
- DAY of WEEK Indicators
- LOW BATTERY Indicator
- MHZ (FM Radio) Indicator
- BT (Bluetooth) Indicator
- ALARM 2 Radio/Buzzer Indicators (located on back of unit)
- POWER ( ‘On’/Standby) Button
- ALARM 1/STORE(FM station ) Button
- SLEEP/TIME ZONE Button
- PAUSE/SNOOZE/DIMMER Button
- SET/TUNE DOWN Buttons
- VOLUME- DOWN Button
- SET/TUNE UP Button
- SOURCE (FM, Bluetooth, AUX) Button
- VOLUME+ UP Button
- AC Adapter
- FM Antenna(cable)
- BACKUP BATTERY Compartment
- Night Light On/Off Button
- USB Charge Out
- AUX IN Jack
- ALARM 2/MEMORY(FM station)
- TIME SET/FM Frequency Display
Setting the Time Zone
Initial Default Setting at Clock Mode
The first time you connect your new SmartSet® clock radio to the AC outlet the internal computer will automatically set the time correctly for the Eastern Time Zone, which is the initial default setting. The display will scan for a few seconds and then show the correct Day and Time in the Eastern zone. If you live in the Eastern Time zone, there's nothing else to do.
Your clock is set correctly and running.
If you don't not live in the Eastern Time zone you must change the default zone display to your own zone. You only do this one time and the SmartSet®will remember the new default zone setting and will always return to that setting after power interruption.
There are 7 time zones programmed into your SmartSet®clock radio as follows:
- ZONE 1 -Atlantic Time
- ZONE 2 -Eastern Time (Default Setting)
- ZONE 3 -Central Time
- ZONE 4 -Mountain Time
- ZONE 5 -Pacific Time
- ZONE 6 -Yukon Time
- ZONE 7 -Hawaiian Time

Setting the Time
Year, Date and Time Display
To display Year. Date and Time sequentially, short press TIME SET once for each

Manual Time Adjustments

Note: To skip manual adjustments, keep it idle for 5 seconds to resume to clock display mode.
Daylight Saving and Leap Year Adjustments
All Daylight Saving and Leap Year adjustment are made automatically by the SmartSet internal computer as follow:
Start of Daylight Saving time:
At 2:00 AM on the 2nd Sunday in March, the clock will automatically advance to 3:00 AM
End of Daylight Saving time:
At 3:00 AM on the 1st Sunday in November, the clock will automatically reset to 2:00 AM
Leap Year:
At 12:00 Midnight on February 28th , the calendar display will change to”2 29″ .
Setting the Alarm
The alarm can only be set in standby mode where the function of Radio , Bluetooth, and AUX are disabled (i.e. indicators of “MHz “,” BT” ,and “AUX” are OFF)

Adjusting Alarm Week Mode
Press and Hold “AL 1″ or”AL2”,then press “DOWN” or “UP” to adjust: Weekdays (Monday to Friday), Weekends (Saturday and Sunday) or Everydays (Monday to Sunday)

Wake To Radio and Alarm Volume Setting
- Press POWER button to turn the unit ON.
- Press SOURCE button to select FM Radio mode.
- Tune to or recall from Memory the station that you wish to hear when the alarm comes ON.
- Press Vol+ or Vol- to set the maximum radio volume at which the alarm will reach gradually at wake up time.
- Default alarm volume is U08 for radio volume set up between UOO-U08(before the unit turned OFF to standby mode). For a louder alarm , set up radio volume above U08 before the unit turned OFF.
Snooze Alarm
When the Alarm comes ON, press SNOOZE button z22, to pause it for 9 minutes .Snooze Alarm will not repeat after one hour. To turn off Snooze Alarm mode ,press the POWER button once.

Listening to FM Radio


Recall Favorable Station
- Press the POWER button to turn the unit ON
- Press the SOURCE button to select Bluetooth (bt) mode ( “BT” flashes for pairing)
- Enable your Bluetooth device and select CKS1507 from its Available/Paired device list. After paring successfully, the unit will prompt and “BT” will become solid
- Automatic connection with your Bluetooth devices is possible if they have been paired successfully with this unit before.
- After paired. you can play your music through this Bass Boosted Bluetooth Speaker.

Sleeping to Music Timer
Press the Power button (‘.) to turn ON the unit, and press SOURCE button to select either FM Radio, Bluetooth or AUX mode to play radio or music

- Press and hold the SLEEP button. The display will show the sleep timer.
- Press Up or Down button to choose your desired sleep timer (02-90 minutes). , Release all buttons, the sleep timer will start counting down and turn off the unit when the desired sleep timer elapsed.
- To display the sleep timer during the countdown process, press the SLEEP button.
- To cancel the sleep timer during the countdown process, press the POWER button to shut off the unit.
Level Dimmer Control
The brightness of the clock display can be set at High/Medium/Low level in standby, Radio and AUX modes with a press of the ZZZ button

Night Lighting
Press the NIGHT LIGHT button to turn the blue nightlight ON or OFF when needed

Enjoying Audio Source via AUX IN Jack
Press the POWER button to turn the unit ON
Press SOURCE button until “AUX” appears on LED display, connect your audio or mobile device and play music through the unit with the 3.5mm earphone jack.

USB for Charging
Output 5V up to 1.5A for charging mobile phone or portable digital audio player.

Note: Charging current drawn from the unit may vary due to different USB charging cable condition or battery charging characteristics
Changing the Lithium Battery

The battery backup is intended for short power outages only. The unit’s primary functions cannot run on the battery backup alone. This unit uses a button cell battery that will last up to 1 year and maintains the time.
WARNING
DANGER OF EXPLOSION IF BATTERY IS INCORRECTLY REPLACED. REPLACE ONLY WITH THE SAME OR EQUIVALENT TYPE. DO NOT INGEST BATTERY,CHEMICAL BURN HAZARD
This product contains a coin/button cell battery. If the coin/button cell battery is swallowed it can cause severe internal bums in just 2 hours and can lead to death. Keep new and used batteries away from children .If the battery compartment does not close securely stop using the product and keep it away from children. If you think batteries might have been swallowed or placed inside any part of the body seek immediate medical attention.
The apparatus must not be exposed to dripping or splashing and objects filled with liquids, such as vases, must not be placed on the apparatus.

This marking indicates that this product should not be disposed of with other household wastes throughout the country .To prevent possible harm to the environment or human health from uncontrolled waste disposal, recycle this unit responsibly so as to promote the re-use of material resources. To return your used device, please use return and collection systems or contact the retailer where the product was purchased as they know how to safely recycle this product.
Care and Maintenance
Care Of Cabinet
If the cabinet becomes dusty. wipe it with a soft cloth. If the cabinet becomes smudged or dirty, clean it with a soft, slightly dampened cloth. Never allow water or any liquid to get inside the cabinet. Never use any abrasive cleaners or cleaning pads as these will damage the finish of your radio .
Lithium Battery Precautions
- Dispose of the old battery properly. Do not leave it lying around where a young child or pet could play with or swallow it. If the battery is swallowed, contact a physician immediately.
- The battery may explode if mistreated. Do not attempt to recharge it or disassemble it. Do not dispose of the old battery in a fire.
LIMITED WARRANTY
Emerson Radio Corp. warrants this product to be free from manufacturing defects in original material, including original parts, and workmanship under normal home use and conditions (“manufacturing defect”) for a period of ninety (90) days from date of the original purchase in, and if used in the United States. Should service be necessary under this warranty, Emerson will provide the following at our Return Repair Facility provided the manufacturing defect is verified along with the date of
purchase:
- Repair service for ninety (90) days from date of original purchase at no charge for labor and parts.
To Receive Authorization to Return a Defective Item , please contact Emerson Customer Service at 1-800-898-9020. Have your Model number, Serial Number and dated Proof of Purchase with you when you call .
In the event the product must be returned to Emerson:
- Pack the unit in a well-padded heavy corrugated box. Please insure the item is well padded to avoid damage while in transit back to our facility. If the item incurs damage, it will NOT be replaced and the consumer will be responsible for return freight costs to receive their same unit back.
- Enclose your check or money order payable to Emerson Radio in the amount of $10 to cover return shipping and handling costs.
- Enclose a note with your name, address, phone number, Return Authorization number and brief reason for returning the unit.
- Enclose a copy of your proof of purchase (warranty service will not be provided without dated proof of purchase).
- Ship the unit prepaid via UPS or parcel post (SHIP INSURED and obtain a
tracking number).
NOTE: This warranty does not cover:
- Damage to equipment not properly connected to the product.
- Cost incurred in the shipping of the product to and from Emerson’s Return Facility.
- Damage or improper operation of unit caused by customer abuse, misuse, negligence or failure to follow operating instructions (including cleaning instructions) provided with the product.
- Ordinary adjustments to the product which can be performed by customer as outlined in the owner’s manual.
- Signal reception problems caused by external antenna or cable systems.
- Products not purchased in the United States.
- Damage to product if used outside the United States.
THIS WARRANTY IS NON-TRANSFERABLE AND APPLIES ONLY TO THE ORIGINAL PURCHASER AND DOES NOT EXTEND TO SUBSEQUENT OWNERS OF THE PRODUCT. ANY APPLICABLE IMPLIED WARRANTIES, INCLUDING THE WARRANTY OF MERCHANTABILITY, ARE LIMITED IN DURATION TO A PERIOD OF THE EXPRESSED WARRANTY AS PROVIDED HEREIN BEGINNING WITH THE DATE OF ORIGINAL PURCHASE AT RETAIL AND NO WARRANTIES, WHETHER EXPRESSED OR IMPLIED, SHALLAPPLYTOTHE PRODUCT THEREAFTER. EMERSON MAKES NO WARRANTY AS TO THE FITNESS OF THE PRODUCT FOR ANY PARTICULAR PURPOSE OR USE.THE EXTENT OF EMERSON RADIO CORP’S LIABILITY UNDER THIS LIMITED WARRANTY IS THE REPAIR OR REPLACEMENT PROVIDED ABOVE AND, IN NO EVENT, SHALL EMERSON RADIO CORP’S LIABILITY EXCEED THE PURCHASE PRICE PAID BY THE PURCHASER OF THE PRODUCT. UNDER NO CIRCUMSTANCES SHALL EMERSON RADIO CORP. BE LIABLE FOR ANY LOSS, DIRECT, INDIRECT, INCIDENTAL, SPECIAL, OR CONSEQUENTIAL DAMAGE ARISING OUT OF OR IN CONNECTION WITH THE USE OF THIS PRODUCT. THIS WARRANTY IS VALID ONLY IN THE UNITED STATES OF AMERICA.THIS WARRANTY GIVES YOU SPECIFIC LEGAL RIGHTS. HOWEVER, YOU MAY HAVE OTHER RIGHTS WHICH MAY VARY FROM STATE TO STATE. SOME STATES DO NOT ALLOW LIMITATIONS ON IMPLIED WARRANTIES OR EXCLUSION OF CONSEQUENTIAL DAMAGE, THEREFORE THESE ESTRICTIONS MAY NOT APPLY TO YOU.
The serial number can be found on the back cabinet We suggest that you record the serial number of your unit in the space below for future reference
Model Number: CKS1507
Serial Number: 10-90-1402A
FAQS
Is this electric or strickly battery operated?
Electric but has a battery backup
How do you change time zones?
According to the instruction manual that came with mine, 1) press and hold the ‘sleep’, 2) short press the ‘reverse’ or the ‘forward’. Zone 1 is Atlantic Time, 2 is Eastern Time (which is the default setting), 3 is Central, 4 is Mountain, 5 is Pacific, 6 is Yukon and 7 is Hawaiian.
does this alarm clock have to be plugged in?
As stated several times, the radio is electric with a battery backup, so yes, it has to be plugged in.
Does this have built in speakers?
Yes, it has a built in speaker.
How long can the product be used?
Years
What is al1 sto. and al2mem difference?
AL1 sto. button allows you to store your favorite radio station. You have 20 stations saved as designated by P01 through P20. AL2 mem button recalls the station that was stored.
Will this alarm clock Bluetooth to headphones?
No
how do you set the alarm for one time?
For this product: Emerson CKS1507, you need to do the following; Press and hold AL1 or AL2 and the UP or DOWN arrow on the opposite side of the clock to select the weekdays and weekends for alarm. The left and right buttons allow you to select value of (hours / minutes). To select hours or minutes while you are adjusting AL1 or AL2 you need to push the center button where the Arrows are. Remember, you need to press and hold the AL1 or AL2 button while selecting the time and day for the alarm.
can led display be turned off all the way?
No
How do you change the radio stations?
Turn on the Radio by pushing the Power Button then Press the Tune Up or Tune Down Button to your desired radio station.
How long can the product be used?
Indefinitely.
Is it a plug in?
Yes. If you can’t find it on Amazon for less than $20 try Walmart. Also a great radio and night light.
What is the difference between CKS1507 and CKS1508?
The difference is that CKS1508 has a clock display on the top of the unit, while CKS1507 does not.
How do I set the time on my alarm clock?
Press and hold SET until you hear a beep (about 5 seconds). Then use the UP/DOWN buttons to set the hour and press SET to confirm. Use the UP/DOWN buttons to set the minutes and press SET to confirm.
How do I set my alarm?
Use the UP/DOWN buttons to select AM or PM. Press SET to select AM or PM. Use UP/DOWN buttons to select hour and press SET to confirm. Use UP/DOWN buttons to select minutes and press SET to confirm. You will hear two short beeps when your alarm is set.
How do I turn off my alarm?
Press SNOOZE once, your alarm will turn off temporarily for 9 minutes. Press SNOOZE again, your alarm will turn off temporarily for 5 minutes. Press SNOOZE again, your alarm will turn off temporarily for 1 minute. If you want to stop snoozing, just press SNOOZE once more and your alarm will sound again in 9 minutes.
Is this radio Bluetooth compatible to pair in my Android smartphone?
Actually it is, just looked in the manual.
how do you delete alarms?
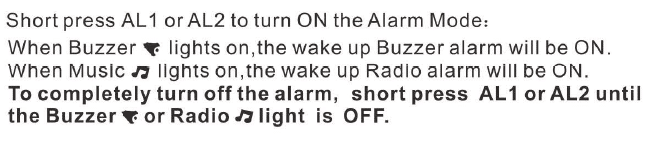
Short press AL1 or AL2 until the buzzer or radio light is off.
Patent Information : U.S. Patent 6,657,344