GARMIN APPROACH S12 Golf Watch

Introduction

See the Important Safety and Product Information guide in the product box for product warnings and other important information.
Device Overview

- UP : Hold to turn the device on and off.
Press to scroll through menus and settings. During play, press to scroll through hazards, layups, and doglegs. - DOWN: Press to scroll through menus and settings. During
play, press to scroll through hazards, layups, and doglegs. - OK: Press to start a round of golf.
Press to choose menu options and acknowledge messages.
During play, press to access in-round features. - BACK: Press to return to the previous screen.
Getting Started
When using your device the first time, you should complete these tasks to set it up and get to know the basic features.
- Hold to turn on the device (Device Overview, page 1).
- Answer the device prompts about your preferred language and units of measure.
- Pair your smartphone (Pairing Your Smartphone, page 1). Pairing your smartphone gives you access to scorecard syncing, course updates, live scoring on the Garmin Golf™ app, software updates, and more.
- Charge the device completely so that you have enough charge for a round of golf (Charging the Device, page 1).
Pairing Your Smartphone
To use the connected features of the Approach device, it must be paired directly through the Garmin Golf app, instead of from the Bluetooth® settings on your smartphone.
- From the app store on your smartphone, install and open the Garmin Golf app.
- From the Approach device, press OK, and select Settings > Pair Phone.
- From the


> Add Device, and follow the instructions in the app to complete the pairing process.


Charging the Device
|
| This device contains a lithium-ion battery. See the Important Safety and Product Information guide in the product box for product warnings and other important information. |
 |
| To prevent corrosion, thoroughly clean and dry the contacts and the surrounding area before charging or connecting to a computer. Refer to the cleaning instructions (Device Care, page 4). |
- Plug the small end of the USB cable into the charging port on your device.
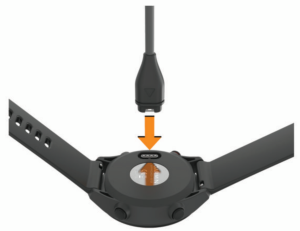
- Plug the large end of the USB cable into a USB charging port.
- Charge the device completely.

Product Updates
On your computer, install Garmin Express™ (www.garmin.com/express). On your smartphone, install the Garmin Golf app.
This provides easy access to these services for Garmin® devices:
- Software updates
- Data uploads to Garmin Golf
- Product registration
Setting Up Garmin Express
- Connect the device to your computer using a USB cable.
- Go to garmin.com/express.
- Follow the on-screen instructions.
Playing Golf
Before you can play golf, you must wait until the device acquires satellite signals, which may take 30 to 60 seconds.
- Press OK.
- Select Play Golf.
The device locates satellites, calculates your location, and selects a course if there is only one course nearby. - If the course list appears, select a course from the list.
- Follow the on-screen instructions to complete the setup and start a round.
The device shows the current hole you are playing, and automatically transitions when you move to a new hole.
NOTE: Because pin locations change, the device calculates the distance to the front, middle, and back of the green, but not the actual pin location.

- Current hole number.
- Distances to the front, middle, and back of the green.
- Approximate view of the green. You can move the flag (Golf Menu, page 2).
- Par for the hole.
Hole View in Big Numbers Mode

- Current hole number.
- Par for the hole.
- Distance to the middle of the green.
NOTE: You can press DOWN to view all distances to the green. - Distances to the front, middle, and back of the green.
During a round, you can press OK to access additional features in the golf menu.
Change Hole: Allows you to manually change the hole (Changing Holes, page 2).
Move Flag: Allows you to move the pin location to get a more
precise distance measurement (Viewing the Green, page 2).
Measure Shot: Allows you to measure the distance to your ball (Measuring a Shot, page 2).
Scorecard: Opens the scorecard for the round (Keeping Score, page 2).
Sunrise/Sunset: Shows the sunrise, sunset, and twilight times for the current day.
Golf Settings: Allows you to customize golf settings and features (Golf Settings, page 2).
End Round: Ends the current round (Ending a Round, page 3).
Press OK, and select Settings > Golf Settings to customize golf settings and features.
Background Color: Sets the background color to black or white.
Scoring: Enables scoring.
Stat Tracking: Enables detailed statistics tracking while playing golf.
Penalties: Enables penalty stroke tracking.
Big Numbers: Changes the size of the numbers on the hole view screen.
Golf Distance: Sets the unit of measure used while playing golf.
Club Sensors: Allows you to set up your Approach CT10 club sensors.
Your device is compatible with Approach CT10 golf club sensors. When paired with a full set of club sensors installed on all your golf clubs, you can automatically track your golf shots, including location, distance, and club type. See the owner’s manual for your club sensors for more information (garmin.com /manuals/ApproachCT10).
While playing a round, you can take a closer look at the green and move the pin to get a more precise distance measurement.
- Press OK.
- Select Move Flag.
- Press UP and DOWN to move the pin location.
The distances on the hole view screen are updated to reflect the new pin location. The pin location is saved for only the current round.
- While playing golf, press OK.
- Select Measure Shot.
- Walk to your ball.
TIP: You can press DOWN to reset the measurement.
When you are playing with Approach CT10 club sensors, you can press DOWN to view your previous shots.
You can view distances to course features, such as hazards, layups, and doglegs, for par 4 and 5 holes.
While playing golf, press UP or DOWN to scroll through the features that are ahead of you on the hole.
" sizes="(max-width: 300px) 100vw, 300px" alt="" width="300" height="228" data-ezsrcset="https://manuals.plus/wp-content/uploads/2021/09/Screenshot_7-401-300x228.png 300w,https://manuals.plus/wp-content/uploads/2021/09/Screenshot_7-401-1024x780.png 1024w,https://manuals.plus/wp-content/uploads/2021/09/Screenshot_7-401-768x585.png 768w,https://manuals.plus/wp-content/uploads/2021/09/Screenshot_7-401.png 1068w" data-ezsrc="https://manuals.plus/wp-content/uploads/2021/09/Screenshot_7-401-300x228.png" />
- For large hazards, the distances to the front and back of the hazard appear on the screen. For small hazards, layups, and doglegs, the distance to the feature appears.
- The feature type appears on the screen.
- The green is represented as a half circle at the top of the screen. The line below the green represents the center of the fairway.
- Features for the current hole are shown below the green in approximate locations relative to the fairway. Hazards are identified using sequential letters according to the distance from the tee box.
You can change the hole manually from the hole view screen.
- Press OK.
- Select Change Hole.
- Select a hole
When scoring is enabled, you are prompted to enter your score when you are on the green. You can adjust the score manually at any time during a game.
- While playing golf, press OK.
- Select an option:
• If scoring is not enabled, select Start Scoring.
• If scoring is enabled, select Scorecard. - If necessary, press UP or DOWN to select a hole, and press OK.
- Press UP or DOWN to set the score, and press OK.
Enabling Statistics Tracking
When you enable statistics tracking on the device, you can view your statistics for the current round. You can compare rounds and track improvements using the Garmin Golf app.
- Press OK.
- Select Settings > Golf Settings > Stat Tracking.
Recording Statistics
Before you can record statistics, you must enable statistics tracking (Enabling Statistics Tracking, page 3).
- From the scorecard, select a hole.
- Enter the total number of strokes taken, including putts, and press OK.
- Set the number of putts taken, and press OK.
NOTE: The number of putts taken is used for statistics tracking only and does not increase your score. - If necessary, select an option:
NOTE: If you are on a par 3 hole or using Approach CT10 sensors, fairway information does not appear.
• If your ball hit the fairway, select In Fairway.
• If your ball missed the fairway, select Missed Left or Missed Right. - If necessary, enter the number of penalty strokes.
Before you can view your club statistics, such as distance and accuracy information, you must pair the device with Approach CT10 golf club sensors (Golf Settings, page 2).
- While playing golf, press OK.
- Select Club Stats.
- Select a club.
Ending a Round
- Press OK.
- Select End Round.
Bluetooth Connected Features
This device includes Bluetooth connected features for your compatible mobile device using the Garmin Golf app.
Scorecard uploads to Garmin Golf: Automatically sends scorecards to the Garmin Golf app when you sync your device. This allows you to view detailed statistics and participate in online leaderboards.
Software updates: Allows you to receive updates for your device software using the Garmin Golf app.
Course updates: Allows you to receive the latest course updates using the Garmin Golf app.
- Press OK.
- Select Settings > Phone.
- Select the Status toggle switch to turn off the Bluetooth smartphone connection on your Approach device.
Refer to the owner’s manual for your mobile device to turn off Bluetooth technology on your mobile device.
The Garmin Golf app allows you to upload scorecards from your compatible Garmin device to view detailed statistics and shot analyses. Golfers can compete with each other at different courses using the Garmin Golf app. More than 42,000 courses have leaderboards that anyone can join. You can set up a tournament event and invite players to compete.
The Garmin Golf app syncs your data with your Garmin Connect™ account. You can download the Garmin Golf app from the app store on your smartphone.
Automatic Course Updates
Your Approach device features automatic course updates with the Garmin Golf app. When you connect your device to your smartphone, the golf courses you use most frequently are updated automatically.
Before you can update your device software, you must download and install the Garmin Express application and add your device.
- Connect the device to your computer using the USB cable.
When new software is available, the Garmin Express application sends it to your device. - After the Garmin Express application finishes sending the update, disconnect the device from your computer. Your device installs the update.
Press OK, and select Settings > System.
Language: Sets the language displayed on the device.
Time: Adjusts the time settings (Time Settings, page 3).
Golf Distance: Sets the units of measure used on the device (Changing the Units of Measure, page 3).
Gender: Sets the user gender. This is used for gender-specific course ratings for select tees when calculating handicaps, and for gender-specific par values (where available).
USB Mode: Sets the device to use mass storage mode or Garmin mode when connected to a computer.
Reset: Allows you to reset user data and settings (Restoring All Default Settings, page 5).
Software Update: Allows you to install software updates downloaded using Garmin Express.
Press OK, and select Settings > System > Time.
Time Format: Sets the device to show time in a 12-hour or a 24-hour format.
Set Time: Allows you to set the time manually or automatically based on your paired mobile device or GPS location.
Sync with GPS: Allows you to manually sync the time when you change time zones, or to update for daylight saving time.
Setting the Time Manually
By default, the time is set automatically when the device acquires satellite signals or is paired with your mobile device.
- Press OK.
- Select Settings > System > Time > Set Time > Manual > Time.
- Press UP and DOWN to set the hour, minutes, and AM or PM.
- Press OK.
Changing the Units of Measure
You can customize the units of measure for distance.
- Press OK.
- Select Settings > System > Time > Set Time > Manual > Time.
- Press UP and DOWN to set the hour, minutes, and AM or PM.
- Press OK.
Device Information
- Slide the quick-release pin on the spring bar to remove the band.
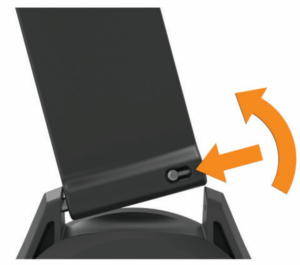
- Insert one side of the spring bar for the new band into the device.
- Slide the quick-release pin, and align the spring bar with the opposite side of the device.
- Repeat steps 1 through 3 to change the other band.

| Battery type | Rechargeable, built-in lithium-ion battery |
| Battery life | Watch only: up to 10 wk. Playing golf: up to 30 hr. NOTE: The actual battery life of a fully charged battery depends on how much time you use GPS. Exposure to extremely cold temperatures also reduces battery life. |
| Water rating | 5 ATM1 |
| Operating temperature range | From -20º to 60ºC (from -4º to 140ºF) |
| Charging temperature range | From 0º to 45ºC (from 32º to 113ºF) |
| Wireless frequency/ protocol | 2.4 GHz @ 4.16 dBm maximum |
- Avoid extreme shock and harsh treatment, because it can degrade the life of the product.
- Avoid pressing the keys under water.
- Do not use a sharp object to clean the device.
- Avoid chemical cleaners, solvents, and insect repellents that can damage plastic components and finishes.
- Thoroughly rinse the device with fresh water after exposure to chlorine, salt water, sunscreen, cosmetics, alcohol, or other harsh chemicals.
- Prolonged exposure to these substances can damage the case.
- Do not store the device where prolonged exposure to extreme temperatures can occur, because it can cause permanent damage.
Cleaning the Device
|
| Even small amounts of sweat or moisture can cause corrosion of the electrical contacts when connected to a charger. Corrosion can prevent charging and data transfer. |
- Wipe the device using a cloth dampened with a mild detergent solution.
- Wipe it dry.
After cleaning, allow the device to dry completely.
TIP: For more information, go to garmin.com/fitandcare.
Long-Term Storage
When you do not plan to use the device for several months, you should charge the battery to at least 50% before you store the device. You should store the device in a cool, dry place with temperatures around the typical household level. After storage, you should fully recharge the device before using it.
You can view device information, such as the unit ID, software version, regulatory information, and license agreement.
- Press OK.
- Select Settings > About.
Viewing E-label Regulatory and Compliance Information
The label for this device is provided electronically. The e-label may provide regulatory information, such as identification numbers provided by the FCC or regional compliance markings, as well as applicable product and licensing information.
- Press OK.
- Select Settings > About.
Troubleshooting
My device cannot find nearby golf courses
If a course update is interrupted or canceled before it completes, your device may be missing course data. To repair missing course data, you must update the courses again.
- Download and install course updates from the Garmin Express application (Updating the Software Using Garmin Express, page 3).
- Safely disconnect your device.
- Go outside, and start a test round of golf to verify the device finds nearby courses.
The Approach S12 device is compatible with smartphones using Bluetooth technology.
Go to garmin.com/ble for compatibility information.
My phone will not connect to the device
If your phone will not connect to the device, you can try these tips.
- Turn off your smartphone and your device, and turn them back on again.
- Enable Bluetooth technology on your smartphone.
- Update the Garmin Golf app to the latest version.
- Remove your device from the Garmin Golf app and the Bluetooth settings on your smartphone to retry the pairing process.
- If you bought a new smartphone, remove your device from the Garmin Golf app on the smartphone you intend to stop using.
- Bring your smartphone within 10 m (33 ft.) of the device.
- On your smartphone, open the Garmin Golf app, select
- Press OK, and select Settings > Phone > Pair Phone.
- Press OK.
- Press DOWN three times.
- Press OK two times.
- Select your language.
- Verify you selected the correct units of measure setting on the device (Changing the Units of Measure, page 3).
- Verify you selected the correct units of measure setting on your Garmin Golf account.
If the units of measure on the device do not match your Garmin Golf account, your device settings may be overwritten when you sync your device.
My device does not display the correct time or date
The device updates the time and date when the device acquires GPS signals or when you have paired a smartphone. You should start a round of golf to acquire GPS signals or sync your device with the Garmin Golf app. When the device acquires GPS signals or syncs with the Garmin Golf app, you receive the correct time when you change time zones and updates for daylight saving time.
NOTE: The time does not update automatically if you have set it manually (Time Settings, page 3).
- Press and hold

- Press

You can reset all of the device settings to the factory default values. You should sync your device with the Garmin Golf app to upload your activity data before you reset the device.
- Press OK.
- Select Settings > System > Reset.
- Select an option:
- To reset all of the device settings to the factory default values and delete all user-entered information and activity history, select Delete Data and Reset Settings.
- To reset all of the device settings to the factory default values and save all user-entered information and activity history, select Reset Default Settings.
The device may need a clear view of the sky to acquire satellite signals. The time and date are set automatically based on the GPS position.
TIP: For more information about GPS, go to www.garmin.com/aboutGPS.
- Go outdoors to an open area.
The front of the device should be oriented toward the sky. - Wait while the device locates satellites.
It may take 30–60 seconds to locate satellite signals.
Improving GPS Satellite Reception
- Frequently sync the device to your Garmin account:
◦ Connect your device to a computer using the USB cable and the Garmin Express application.
◦ Sync your device to the Garmin Golf app using your Bluetooth enabled smartphone.
While connected to your Garmin account, the device downloads several days of satellite data, allowing it to quickly locate satellite signals. - Take your device outside to an open area away from tall buildings and trees.
- Remain stationary for a few minutes.
You can find more information about this product on the Garmin website.
- Go to support.garmin.com for additional manuals, articles, and software updates.
- Go to buy.garmin.com, or contact your Garmin dealer for information about optional accessories and replacement parts.