![]()
VÍVOFIT® 2 OWNER’S MANUAL
Owner’s Manual
© 2015 Garmin Ltd. or its subsidiaries
All rights reserved. Under copyright laws, this manual may not be copied, in whole or in part, without the written consent of Garmin. Garmin reserves the right to change or improve its products and to make changes in the content of this manual without the obligation to notify any person or organization of such changes or improvements. Go to www.garmin.com for current updates and supplemental information concerning the use of this product. Garmin®, the Garmin logo, ANT+®, and vívofit® are trademarks of Garmin Ltd. or its subsidiaries, registered in the USA and other countries. Garmin Connect™, Garmin Express™, and USB ANT Stick™ are trademarks of Garmin Ltd. or its subsidiaries. These trademarks may not be used without the express permission of Garmin.
App StoreSM is a service mark of Apple Inc. The Bluetooth® word mark and logos are owned by Bluetooth SIG, Inc. and any use of such marks by Garmin is under license. google Play™ is a trademark of Google Inc. Mac® is a trademark of Apple Inc., registered in the U.S. and other countries. Windows® is a registered trademark of Microsoft Corporation in the United States and other countries. Other trademarks and trade names are those of their respective owners.
This product is ANT+® certified. Visit www.thisisant.com/directory for a list of compatible products and apps.
vívofit 2 Owner’s Manual
![]() WARNING
WARNING
See the Important Safety and Product Information guide in the product box for product warnings and other important information.
Always consult your physician before you begin or modify any exercise program.
Getting Started
To get the most out of your vívofit 2 devices, Garmin® recommends setting it up with your computer or compatible mobile device.
- Go to www.garminconnect.com/vivofit2.
- Select an option:
• If you are using a computer to set up your device, plug the wireless USB ANT Stick™ into an empty USB port, and download and install the Garmin Express™ setup software(Downloading the Software, page 1).
• If you are using a mobile device to set up your device, install and open the Garmin Connect™ Mobile app (Downloading the Mobile App, page 1). - Select device key 1 to turn on the device.
 When you turn on the device for the first time, it is in pairing mode. If your device is not in pairing mode when you turn it on, you must hold the device key until PAIR appears.
NOTE: Until you pair your device and complete the setup process, the device has limited functionality. - Follow the instructions on your computer or mobile device to pair your vívofit 2 devices and complete the setup process.
- Synchronize your step count with your Garmin Connect account (Synchronizing Your Data with Your Computer, page 1) (Synchronizing Your Data with the Garmin Connect Mobile App, page 1).
Downloading the Software
- From your computer, go to www.garminconnect.com/vivofit2.
- Select an option:
• If you are using a Windows® operating system, select
Download for Windows, and follow the on-screen instructions.
• If you are using a Mac® operating system, select
Download for Mac, and follow the on-screen instructions.
Downloading the Mobile App
You can use the Garmin Connect Mobile app to pair your vívofit 2 devices and complete the setup process. This allows you to share and analyze data and download software updates from your mobile device. Unlike other Bluetooth® devices that are paired from the Bluetooth settings on your mobile device, your vívofit 2 devices must be paired directly through the Garmin Connect Mobile app.
NOTE: Your mobile device must support Bluetooth Smart in order to pair with your vívofit 2 devices and synchronize data. Go to www.garmin.com/ble for compatibility information.
- From your mobile device, go to www.garminconnect.com/vivofit2.
- Select the App StoreSM button or the Google Play™ button, and follow the on-screen instructions.
Synchronizing Your Data with Your Computer
You should synchronize your data regularly to track your progress in the Garmin Connect application.
- Bring the device within 3 m (10 ft.) of your computer.
- Hold the device key until SYNC appears.
- View your current data in the Garmin Connect application.
Pairing Your Device with Multiple Computers
You can pair your vívofit 2 devices with multiple computers. For example, you can pair your vívofit 2 devices with your home and work computers. Go to buy.garmin.com, or contact your Garmin dealer for information about optional accessories and replacement parts.
- Plug the USB ANT Stick into a computer USB port.
- Download the Garmin Express setup software for Windows or Mac (Downloading the Software, page 1).
- Hold the device key until PAIR appears.
- Follow the instructions on your computer to pair your vívofit 2 devices and complete the setup process.
- If necessary, repeat steps 1 through 4 for each additional computer.
Synchronizing Your Data with the Garmin Connect Mobile App
You should synchronize your data regularly to track your progress in the Garmin Connect Mobile app.
Your device periodically synchronizes data with the Garmin Connect Mobile app without any action required. You can also manually synchronize your data at any time.
- Bring the device within 3 m (10 ft.) of your mobile device.
- Hold the device key until SYNC appears.
- View your current data in the Garmin Connect Mobile app.
Pairing Multiple Mobile Devices
You can pair your vívofit 2 devices with multiple mobile devices.
For example, you can pair your vívofit 2 devices with a smartphone and a tablet.
- Install and open the Garmin Connect Mobile app on your mobile device (Downloading the Mobile App, page 1).
- Hold the device key until PAIR appears.
- Follow the instructions on your mobile device to pair your vívofit 2 devices and complete the setup process.
- If necessary, repeat steps 1-3 for each additional mobile device.
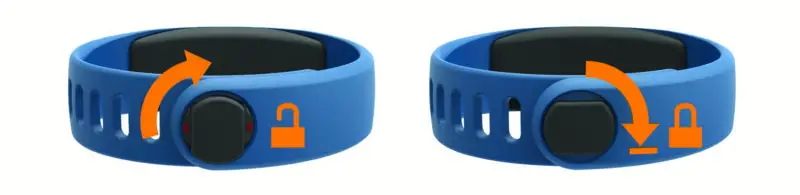
Wearing the Device
- Select a band that fits best on your wrist (Replacing the Band, page 5).
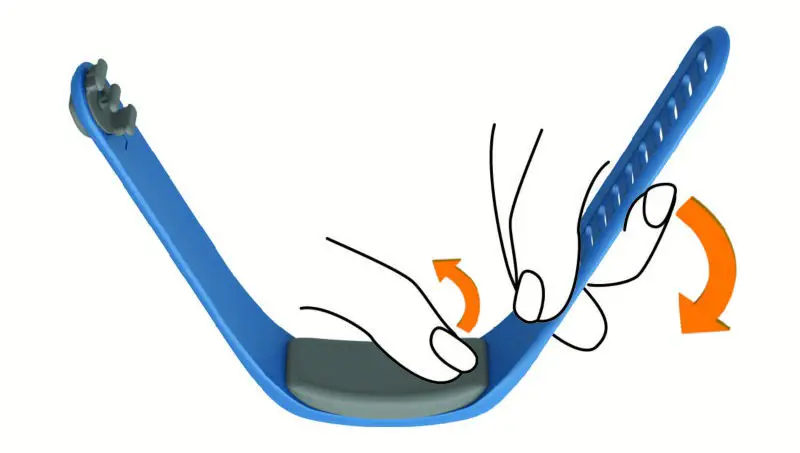
- Make sure the pegs on the clasp are fully inserted into the band.
When the pegs are fully inserted, the device fits securely against your wrist. - Turn the clasp to the locked position.
Red marks on the clasp indicate the unlocked position
 http://j.mp/vivo2clasp
NOTE: To prevent the loss, the clasp must be turned to the locked position while wearing the device. - Wear the device all day and night (Using Sleep Tracking, page 2).
Icons
Icons appear at the bottom of the display. Each icon represents a different feature. You can select the device key to cycle through the different device features.
| The total number of steps taken for the day. | |
| GOAL | The number of remaining steps needed to reach your step goal for the day. The device learns and proposes a new goal for you at the beginning of each day. |
| KM or MI | The distance traveled in kilometers or miles for the current day. |
| The number of total calories burned for the current day, including both active and resting calories. | |
| The current time of day and date is based on your location. The device updates the time and date when you synchronize your device to a computer or mobile device. | |
| Your current heart rate and heart rate zone from a paired heart rate monitor. |
Auto Goal
Your device creates a daily step goal automatically, based on your previous activity levels. As you move during the day, the device counts down the number of remaining steps in your daily goal. When you reach your step goal, the device displays GOAL+ and begins counting the number of steps taken that exceed your daily goal.
If you choose not to use the auto goal feature, you can set a personalized step goal on your Garmin Connect account.
Move Bar
Sitting for prolonged periods of time can trigger undesirable metabolic state changes. The move bar reminds you to keep moving. After one hour of inactivity, the move bar appears.
The device also beeps if alert tones are turned on (Device Settings, page 3). Additional segments appear after every 15 minutes of inactivity.
![]()
You can reset the move bar by walking a short distance.
Key Functions
You can hold the device key to cycle through the secondary key functions.
| Backlight | Turns on the backlight. The backlight turns off automatically. |
| START | Starts a timed activity. |
| STOP | Stops a timed activity. |
| SYNC | Sends data to your computer or mobile device. |
| SLEEP | Starts sleep mode. |
| PAIR | Pairs your vivo& 2 devices with your computer or mobile device. |
Starting a Fitness Activity
Before you can use an optional ANT+® heart rate monitor for your activity, you must put on the sensor and pair it with your device (Pairing Your ANT+ Heart Rate Monitor, page 3).
You can record a timed fitness activity, such as a walk or run, which can be sent to your Garmin Connect account.
- Hold the device key until START appears.
The timer begins.
NOTE: The device does not record your fitness activity or optional ANT+ sensor data until you start the timer. - Start your activity.
TIP: You can select the device key to cycle through your activity data while the timer is running. - After you complete your activity, hold the device key until STOP appears.
A summary appears. The device displays the total time, distance traveled, steps taken, and calories burned during the activity. - Select the device key to end the summary and return to the default screen.
Your device attempts to send your activity data to your Garmin Connect account.
Sleep Tracking
While you are sleeping, the device monitors your movement.
Sleep statistics include total hours of sleep, sleep levels, and sleep movement. You can set your normal sleep hours in the user settings on your Garmin Connect account. You can view your sleep statistics on your Garmin Connect account.
Using Sleep Tracking
Using sleep mode turns off the move alert. If you do not use sleep mode, your device still records sleep statistics. You can view sleep statistics on your Garmin Connect account.
- Wear the device while sleeping.
- Hold the device key until SLEEP appears.
- When you wake, hold the device key to exit sleep mode.
History
Your device keeps track of your daily steps and sleeps statistics, as well as your timed fitness activities and optional ANT+ sensor information. This history can be sent to your Garmin Connect account.
Your device stores your activity data for up to 3 weeks.
NOTE: When using a heart rate monitor, your data storage is significantly reduced (approximately 12 days).
When the data storage is full, the device deletes the oldest files to make room for new data.
Garmin Connect
You can connect with your friends on your Garmin Connect account. Garmin Connect gives you the tools to track, analyze, share, and encourage each other. Record the events of your active lifestyle including runs, walks, rides swims, hikes, and more.
You can create your free Garmin Connect account when you pair your device with your phone using the Garmin Connect
The mobile app or you can go to www.garminconnect.com/vivofit2.
Track your progress: You can track your daily steps, join a friendly competition with your connections, and meet your goals.
Store your activities: After you complete and save a timed activity with your device, you can upload that activity to your Garmin Connect account and keep it as long as you want.
Analyze your data: You can view more detailed information about your activity, including time, distance, heart rate, calories burned, and customizable reports.
NOTE: Some data requires an optional accessory such as a heart rate monitor.
![]()
Share your activities: You can connect with friends to follow each other’s activities or post links to your activities on your favorite social networking sites.
Manage your settings: You can customize your device and user settings on your Garmin Connect account.
Customizing Your Device
Device Settings
You can customize your device settings and user settings on your Garmin Connect account. From the devices widget, select Device Settings.
Visible Screens: This allows you to customize the screens that appear on your device.
Default Screen: Sets the default home screen on the device.
Alert Tones: This allows you to turn alert tones on and off. The device beeps when alert tones are turned on.
Auto Goal: This allows your device to determine your step goal automatically.
NOTE: After you disable this feature, you must enter your step goal manually.
Time Format: Sets the device to display time in a 12-hour or 24hour format.
Units: Sets the device to display the distance traveled in kilometers or miles.
Custom Step Length: This allows your device to more accurately calculate the distance traveled using your custom step length.
Heart Rate: This allows you to estimate your maximum heart rate and determine custom heart rate zones.
ANT+ Heart Rate Monitor
Your device can be used with wireless ANT+ sensors. For more information about compatibility and purchasing optional sensors, go to http://buy.garmin.com.
Putting On the Optional Heart Rate Monitor
NOTICE
The heart rate monitor may cause chafing when used for long periods of time. To alleviate this issue, apply an anti-friction lubricant or gel to the center of the module where it contacts your skin. Do not apply anti-friction gel or lubricant on the electrodes. Do not use gels or lubricants that contain sunscreen.
You should wear the heart rate monitor directly on your skin, just below your sternum. It should be snug enough to stay in place during your activity.
- Push one tab 1 of the strap through slot 2 in the heart rate monitor module.

- Press the tab down.

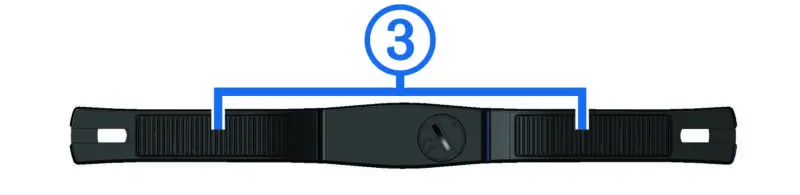
- Wet the electrodes 3 on the back of the module to create a strong connection between your chest and the heart rate monitor module.
- Wrap the strap around your chest and attach it to the other side of the heart rate monitor module.
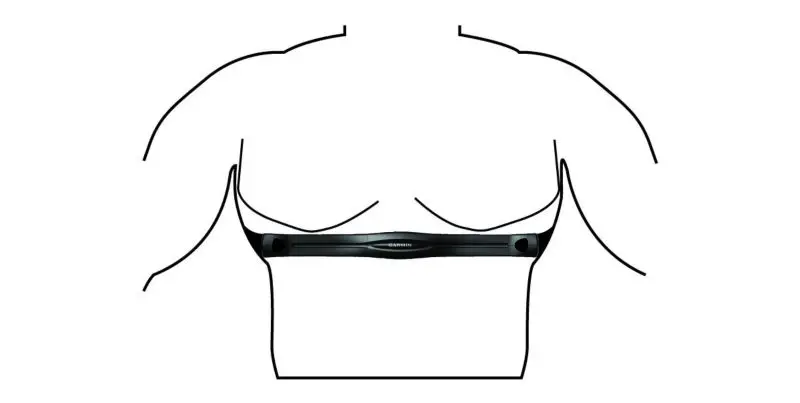 The Garmin logo should be right-side up.
 - Bring the device within 3 m (10 ft.) of the heart rate monitor.
After you put on the heart rate monitor, it is active and sending data.
Pairing Your ANT+ Heart Rate Monitor
Before you can pair your heart rate monitor, you must enable the heart rate data screen on your vívofit 2 devices. For more information about customizing the device screens, see Device Settings, page 3.
NOTE: If your device was packaged with a heart rate monitor, the heart rate data screen is already enabled and the heart rate monitor is paired.
- Put on the heart rate monitor.
- Bring the device within 3 m (10 ft.) of the sensor.
NOTE: Stay 10 m (33 ft.) away from other ANT+ sensors while pairing. - Select the device key until HEART appears.
When the sensor is paired with your device, your heart rate and heart rate zone appear.
About Heart Rate Zones
Many athletes use heart rate zones to measure and increase their cardiovascular strength and improve their level of fitness. A heart rate zone is a set range of heartbeats per minute. The five commonly accepted heart rate zones are numbered from 1 to 5 according to increasing intensity. Generally, heart rate zones are calculated based on percentages of your maximum heart rate.
Fitness Goals Knowing your heart rate zones can help you measure and improve your fitness by understanding and applying these principles.
- Your heart rate is a good measure of exercise intensity.
- Training in certain heart rate zones can help you improve
cardiovascular capacity and strength.
If you know your maximum heart rate, you can use the table (Heart Rate Zone Calculations, page 6) to determine the best heart rate zone for your fitness objectives.
If you do not know your maximum heart rate, use one of the calculators available on the Internet. Some gyms and health centers can provide a test that measures maximum heart rate.
The default maximum heart rate is 220 minus your age.
Device Information
| Battery type | Two user-replaceable CR1632 batteries |
| Battery life | 1+ yr. |
| Operating temperature range | From -10° to 60°C (from 14° to 140°F) |
| Radiofrequency/protocol | 2.4 GHz ANT+ wireless communications protocol Bluetooth wireless technology |
| Water rating | 5 ATM1 |
Heart Rate Monitor Specifications
| Battery type | User-replaceable CR2032, 3 volts |
| Battery life | Approximately 3 years (1 hour per day) |
| Operating temperature range | From -10° to 50°C (from 14° to 122°F) |
| Radiofrequency/ protocol | 2.4 GHz ANT+ wireless communications protocol |
| Water rating | 1 ATM2
NOTE: This product does not transmit heart rate data while swimming. |
Device Care
NOTICE
Avoid extreme shock and harsh treatment, because it can degrade the life of the product.
Do not use a sharp object to clean the device.
Avoid chemical cleaners, solvents, and insect repellents that can damage plastic components and finishes.
Thoroughly rinse the device with fresh water after exposure to chlorine, saltwater, sunscreen, cosmetics, alcohol, or other harsh chemicals. Prolonged exposure to these substances can damage the case.
Do not place in high-temperature environments, such as a clothes dryer.
Do not store the device where prolonged exposure to extreme temperatures can occur, because it can cause permanent damage.
Cleaning the Device
- Wipe the device using a cloth dampened with a mild detergent solution.
- Wipe it dry.
Caring for the Heart Rate Monitor
NOTICE
A build-up of sweat and salt on the strap can decrease the ability of the heart rate monitor to report accurate data.
- Rinse the strap after every use.
- Hand washes the strap occasionally, using a tiny amount of mild detergent, such as dishwashing liquid.
NOTE: Using too much detergent may damage the strap. - Do not put the strap in a dryer.
- When drying the strap, hang it up or lay it flat.
1The device withstands pressure equivalent to a depth of 50 m. For more information, go to www.garmin.com/waterrating.
2The device withstands pressure equivalent to a depth of 10 m. For more information, go to www.garmin.com/waterrating.
User-Replaceable Batteries
![]() WARNING
WARNING
See the Important Safety and Product Information guide in the product box for product warnings and other important information.
Replacing the vívofit 2 Device Batteries
Before you can replace the device batteries, you must obtain two CR1632 batteries.
- Remove the module from the band.

- Use a small Phillips screwdriver to remove the four screws on the front of the module.
- Remove the cover and batteries.
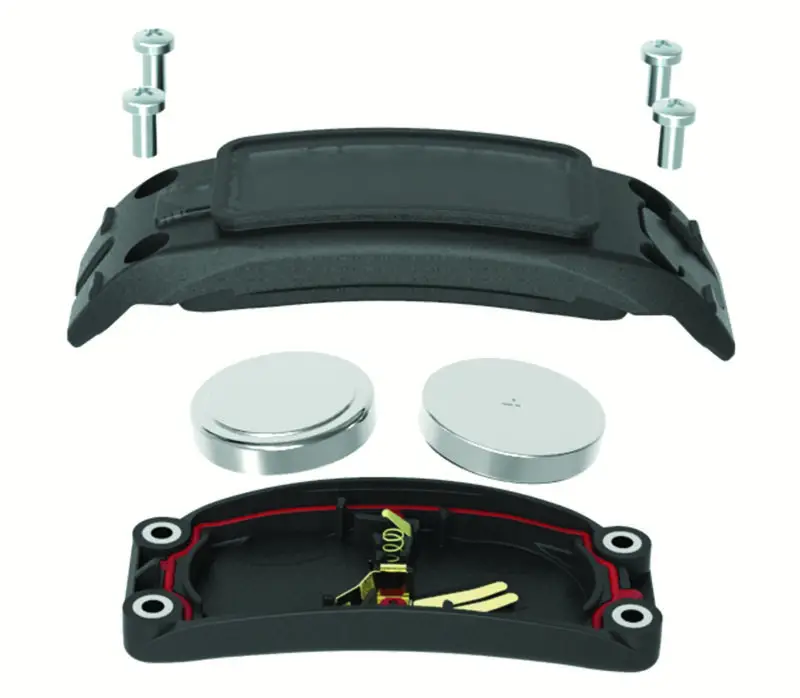
- Apply a small amount of petroleum jelly to each side of the new batteries using a cotton swab.
- Insert the new batteries.
NOTE: Do not damage or lose the gasket. - Replace the front cover and the four screws.
- Tighten the four screws equally and firmly.
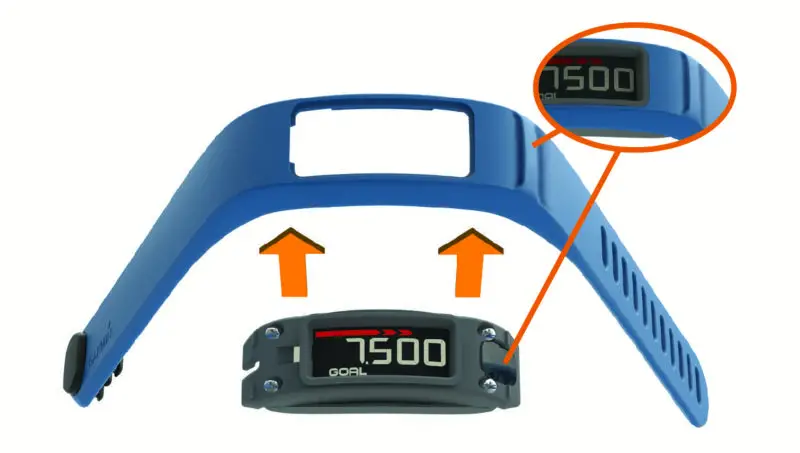
- Insert the module into the band.
The device key on the module must be aligned with the key on the band.
Replacing the Heart Rate Monitor Battery
- Locate the circular battery cover on the back of the heart rate monitor.
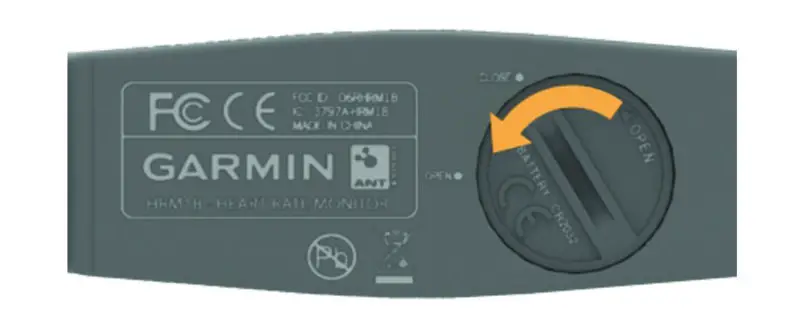
- Use a coin to twist the cover counter-clockwise until it is loose enough to remove (the arrow points to OPEN).
- Remove the cover and the battery.
- Wait 30 seconds.
- Insert the new battery with the positive side facing up.
NOTE: Do not damage or lose the O-ring gasket. - Use a coin to twist the cover clockwise back into place (the arrow points to CLOSE).
After you replace the heart rate monitor battery, you may need to pair the heart rate monitor with the device again.
Troubleshooting
My device won’t turn on
If your device no longer turns on, you may need to replace the batteries.
Go to Replacing the vívofit 2 Device Batteries, page 4.
My step count does not seem accurate
If your step count does not seem accurate, you can try these tips.
- Wear the device on your non-dominant wrist.
- Carry the device in your pocket when pushing a stroller or lawnmower.
- Carry the device in your pocket when actively using your hands or arms only.
NOTE: The device may interpret some repetitive motions, such as washing dishes, folding laundry, or clapping your hands, as steps.
The step counts on my device and my Garmin Connect account don’t match
The step counts on your Garmin Connect account updates when you synchronize your device.
- Select an option:
• Synchronize your step count with the Garmin Connect application (Synchronizing Your Data with Your Computer, page 1).
• Synchronize your step count with the Garmin Connect Mobile app (Synchronizing Your Data with the Garmin Connect Mobile App, page 1). - Wait while the device synchronizes your data. Synchronizing can take several minutes.
NOTE: Refreshing the Garmin Connect Mobile app or the Garmin Connect application does not synchronize your data or update your step count.
My device does not display the correct time
The device updates the time and date when you synchronize your device to a computer or mobile device. You should synchronize your device to receive the correct time when you change time zones, and to update for daylight saving time.
- Confirm that your computer or mobile device displays the correct local time.
- Select an option:
• Synchronize your device to a computer (Synchronizing Your Data with Your Computer, page 1).
• Synchronize your device to a mobile device (Synchronizing Your Data with the Garmin Connect Mobile App, page 1).
The time and date are updated automatically.
I don’t have a computer or mobile device
You can turn on the device and use it with limited functionality until you complete the setup process on a computer or mobile device. Prior to set up, you can use only the step count, auto goal, move bar, and heart rate monitor (if packaged with your device). Your device resets your step count once a day. The device attempts to reset your step count while you are sleeping, based on your inactivity level from your first day of use. Your device does not store any history data until setup is complete.
Set up the device on a computer or compatible mobile device (Getting Started, page 1) to use additional device features.
NOTE: Setup is a one-time process, and it allows you to use all available device features.
Turning on the Device
Select the device key.
![]()
Replacing the Band
- Remove the module from the band.

- Insert the module into the replacement band.
The device key on the module must be aligned with the key on the band.
Installing the Device in the Belt Clip
NOTICE
Do not attach the belt clip to objects thicker than 6 mm.
You can use the optional belt clip to attach the device to your waistband, belt, or shirt pocket. Go to buy.garmin.com, or contact your Garmin dealer for information about optional accessories.
- Remove the module from the band.
- Insert the device into the left side of the flexible silicone clip by stretching the clip material around the device.
The device key on the module must align with the key on the right side of the belt clip.
![]()
Software Update
When a software update is available, your device automatically downloads the update when you synchronize your device with your Garmin Connect account.
A countdown appears during the update process. When the update is complete, your device restarts.
Appendix
Heart Rate Zone Calculations
| Zone | % of Maximum Heart Rate | Perceived Exertion | Benefits |
| 1 | 50-60% | Relaxed, easy pace, rhythmic breathing | Beginning-level aerobic training reduces stress |
| 2 | 60-70% | Comfortable pace, slightly deeper
breathing, conversation possible |
Basic cardiovascular training, good recovery pace |
| 3 | 70-80% | Moderate pace, more difficult to hold a conversation | Improved aerobic capacity, optimal cardiovascular training |
| 4 | 80-90% | The fast pace and a bit uncomfortable, breathing forcefully | Improved anaerobic capacity and threshold, improved speed |
| 5 | 90-100% | Sprinting pace, unsustainable for a long period of time, labored breathing | Anaerobic and muscular endurance increased power |
Software License Agreement
BY USING THE DEVICE, YOU AGREE TO BE BOUND BY THE TERMS AND CONDITIONS OF THE FOLLOWING SOFTWARE LICENSE AGREEMENT. PLEASE READ THIS AGREEMENT CAREFULLY.
Garmin Ltd. and its subsidiaries (“Garmin”) grant you a limited license to use the software embedded in this device (the “Software”) in the binary executable form in the normal operation of the product. Title, ownership rights, and intellectual property rights in and to the Software remain in Garmin and/or its third-party providers.
You acknowledge that the Software is the property of Garmin and/or its third-party providers and is protected under the United States of America copyright laws and international copyright treaties. You further acknowledge that the structure, organization, and code of the Software, for which source code is not provided, are valuable trade secrets of Garmin and/or its third-party providers and that the Software in source code form remains a valuable trade secret of Garmin and/or its third-party providers. You agree not to decompile, disassemble, modify, reverse assemble, reverse engineer, or reduce to human-readable form the Software or any part thereof or create any derivative works based on the Software. You agree not to export or re-export the Software to any country in violation of the export control laws of the United States of America or the export control laws of any other applicable country.
Limited Warranty
THIS LIMITED WARRANTY GIVES YOU SPECIFIC LEGAL RIGHTS, AND YOU MAY HAVE OTHER LEGAL RIGHTS, WHICH VARY FROM STATE TO STATE (OR BY COUNTRY OR PROVINCE). GARMIN DOES NOT EXCLUDE, LIMIT OR SUSPEND OTHER LEGAL RIGHTS YOU MAY HAVE UNDER
THE LAWS OF YOUR STATE (OR COUNTRY OR PROVINCE). FOR A FULL UNDERSTANDING OF YOUR RIGHTS YOU SHOULD CONSULT THE LAWS OF YOUR STATE, COUNTRY, OR PROVINCE.
Non-aviation products are warranted to be free from defects in materials or workmanship for one year from the date of purchase. Within this period, Garmin will, at its sole option, repair or replace any components that fail in normal use. Such repairs or replacement will be made at no charge to the customer for parts or labor, provided that the customer shall be responsible for any transportation cost. This Limited Warranty does not apply to (i) cosmetic damage, such as scratches, nicks, and dents; (ii) consumable parts, such as batteries, unless product damage has occurred due to a defect in materials or workmanship; (iii) damage caused by accident, abuse, misuse, water, flood, fire, or other acts of nature or external causes; (iv) damage caused by service performed by anyone who is not an authorized service provider of Garmin; (v) damage to a product
that has been modified or altered without the written permission of Garmin, or (vi) damage to a product that has been connected to power and/or data cables that are not supplied by Garmin. In addition, Garmin reserves the right to refuse warranty claims against products or services that are obtained and/or used in contravention of the laws of any country. Garmin navigation products are intended to be used only as a travel aid and must not be used for any purpose requiring precise measurement of direction, distance, location or topography. Garmin makes no warranty as to the accuracy or completeness of map data.
This Limited Warranty also does not apply to, and Garmin is not responsible for, any degradation in the performance of any Garmin navigation product resulting from its use in proximity to any handset or other device that utilizes a terrestrial broadband network operating on frequencies that are close to the frequencies used by any Global Navigation Satellite System (GNSS) such as the Global Positioning Service (GPS). Use of such devices may impair reception of GNSS signals.
TO THE MAXIMUM EXTENT PERMITTED BY APPLICABLE LAW, THE WARRANTIES AND REMEDIES CONTAINED IN THIS LIMITED WARRANTY ARE EXCLUSIVE AND IN LIEU OF, AND GARMIN EXPRESSLY DISCLAIMS, ALL OTHER WARRANTIES AND REMEDIES, WHETHER EXPRESS, IMPLIED, STATUTORY, OR OTHERWISE, INCLUDING WITHOUT LIMITATION ANY IMPLIED WARRANTY OF MERCHANTABILITY OR FITNESS FOR A PARTICULAR PURPOSE, STATUTORY REMEDY OR OTHERWISE. THIS LIMITED WARRANTY GIVES YOU SPECIFIC LEGAL RIGHTS, AND YOU MAY HAVE OTHER LEGAL RIGHTS, WHICH VARY FROM STATE TO STATE AND FROM COUNTRY TO COUNTRY. IF IMPLIED WARRANTIES CANNOT BE
DISCLAIMED UNDER THE LAWS OF YOUR STATE OR COUNTRY, THEN SUCH WARRANTIES ARE LIMITED IN DURATION TO THE DURATION OF THIS LIMITED WARRANTY. SOME STATES (AND COUNTRIES AND PROVINCES) DO NOT ALLOW LIMITATIONS ON HOW LONG AN IMPLIED WARRANTY LASTS, SO THE ABOVE LIMITATION MAY NOT APPLY TO YOU.
IN NO EVENT SHALL GARMIN BE LIABLE IN A CLAIM FOR BREACH OF WARRANTY FOR ANY INCIDENTAL, SPECIAL, INDIRECT, OR CONSEQUENTIAL DAMAGES, WHETHER RESULTING FROM THE USE, MISUSE, OR INABILITY TO USE THIS PRODUCT OR FROM DEFECTS IN THE PRODUCT. SOME STATES (AND COUNTRIES AND PROVINCES) DO NOT ALLOW THE EXCLUSION OF INCIDENTAL OR CONSEQUENTIAL DAMAGES, SO THE ABOVE LIMITATIONS MAY NOT APPLY TO YOU.
If during the warranty period you submit a claim for warranty service in accordance with this Limited Warranty, then Garmin will, at its option: (i) repair the device using new parts or previously used parts that satisfy Garmin’s quality standards, (ii) replace the device with a new device or a refurbished device that meets Garmin’s quality standards, or (iii) exchange the device for a full refund of your purchase price. SUCH REMEDY SHALL BE YOUR SOLE AND EXCLUSIVE REMEDY FOR ANY
BREACH OF WARRANTY. Repaired or replaced devices have a 90-day warranty. If the unit sent in is still under its original warranty, then the new warranty is 90 days or to the end of the original 1-year warranty, whichever is longer.
Before seeking warranty service, please access and review the online help resources available on support.garmin.com. If your device is still not functioning properly after making use of these resources, contact a Garmin Authorized service facility in the original country of purchase or follow the instructions on support.garmin.com to obtain warranty service. If you are in the United States, you can also call 1-800-800-1020.
If you seek warranty service outside of the original country of purchase, Garmin cannot guarantee that the parts and products needed to repair or replace your product will be available due to differences in product offerings and applicable standards, laws, and regulations. In that case, Garmin may in its sole discretion and subject to applicable laws, repair or replace your product with comparable Garmin products and parts, or require you to ship your product to a Garmin Authorized service facility in the country of original purchase or to a Garmin Authorized service facility in another country that can service your product, in which case you will be responsible for complying with all applicable import and export laws and regulations and for paying all customs duties, V.A.T., shipping fees, and other associated taxes and charges. In some cases, Garmin and its dealers may be unable to service your product in a country outside of the original country of purchase or return a repaired or replaced product to you in that country due to applicable standards, laws or regulations in that country.
Online Auction Purchases: Products purchased through online auctions are not eligible for rebates or other special offers from Garmin warranty coverage. Online auction confirmations are not accepted for warranty verification. To obtain warranty service, an original or copy of the sales receipt from the original retailer is required. Garmin will not replace missing components from any package purchased through an online auction.
International Purchases: A separate warranty may be provided by international distributors for devices purchased outside the United States depending on the country. If applicable, this warranty is provided by the local in-country distributor and this distributor provides local service for your device. Distributor warranties are only valid in the area of intended distribution.
Australian Purchases: Our goods come with guarantees that cannot be excluded under the Australian Consumer Law. You are entitled to a replacement or refund for a major failure and for compensation for any other reasonably foreseeable loss or
Index
| A accessories 3 activities 2 activity tracking 2 ANT Agent 1 ANT+ sensors 3 pairing 3 applications 1 B bands 5 battery, replacing 4 belt clip 5 C cleaning the device 4 computer 1 D data 2 storing 2 transferring 2 G Garmin Connect 1–3 H heart rate monitor 3, 4 zones 3, 6 history 1, 2 sending to computer 1, 2 |
I icons 2 K keys 2, 5 P pairing 1 smartphone 1 pairing ANT+ sensors 3 R replacement parts 5 replacing the battery 4 S saving activities 2 settings, device 3 sleep mode 2 smartphone, pairing 1 software, updating 6 software license agreement 6 specifications 4 storing data 2 T time of day 5 timer 2 troubleshooting 5 U updates, software 6 USB ANT Stick 1 |
![]() support.garmin.com
support.garmin.com
![]()
GUID-B5C1B03C-C7F3-4AC5-BC76-5BF7E2688051 v6
July 2020