Garmin Vivosmart 4 User Manual
© 2018 Garmin Ltd. or its subsidiaries
All rights reserved. Under the copyright laws, this manual may not be copied, in whole or in part, without the written consent of Garmin. Garmin reserves the right to change or improve its products and to make changes in the content of this manual without obligation to notify any person or organization of such changes or improvements. Go to www.garmin.com for current updates and supplemental information concerning the use of this product.
Garmin®, the Garmin logo, ANT+®, Auto Lap®, Edge®, VIRB®, and vívosmart® are trademarks of Garmin Ltd. or its subsidiaries, registered in the USA and other countries. Body Battery™, Garmin Connect™, Garmin Express™, Garmin Move IQ™, and Toe-to-Toe™ are trademarks of Garmin Ltd. or its subsidiaries. These trademarks may not be used without the express permission of Garmin.
Android™ is a trademark of Google Inc. Apple® is a trademark of Apple Inc., registered in the U.S. and other countries. The BLUETOOTH® word mark and logos are owned by Bluetooth SIG, Inc. and any use of such marks by Garmin is under license. The Cooper Institute®, as well as any related trademarks, are the property of The Cooper Institute. Advanced heartbeat analytics by Firstbeat. Other trademarks and trade names are those of their respective owners.
This product is ANT+® certified. Visit www.thisisant.com/directory for a list of compatible products and apps.
M/N: A03430
Introduction
WARNING
See the Important Safety and Product Information guide in the product box for product warnings and other important information.
Always consult your physician before you begin or modify any exercise program.
Setting Up the Device
Before you can use your device, you must plug it into a power source to turn it on.
To use the vívosmart 4 device, you must set it up using a smartphone or computer. When using a smartphone, the device must be paired directly through the Garmin Connect™ app, instead of from the Bluetooth® settings on your smartphone.
- From the app store on your smartphone, install the Garmin Connect app.
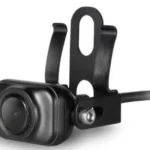
- Pinch the charging clip (1).
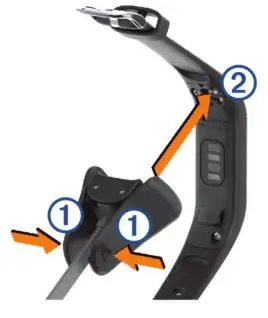
- Align the clip with the contacts on the back of the device .
- Plug the USB cable into a power source to turn on the device (Charging the Device, page 9).
Hello! appears when the device turns on.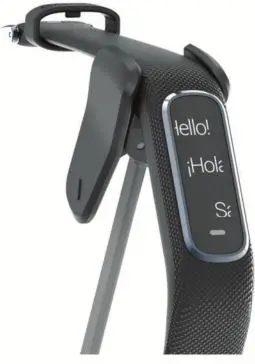
- Select an option to add your device to your Garmin Connect account:
• If this is the first device you have paired with the Garmin Connect app, follow the on-screen instructions.
• If you have already paired another device with the Garmin Connect app, from the or menu, select Garmin Devices > Add Device, and follow the on-screen instructions.
After you pair successfully, a message appears, and your device syncs automatically with your smartphone.
Wearing the Device
- Wear the device above your wrist bone.
NOTE: The device should be snug but comfortable. For more accurate heart rate readings, the device should not move while running or exercising. For pulse oximeter readings, you should remain motionless.
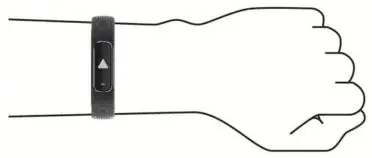 NOTE: The optical sensor is located on the back of the device.
- See Tips for Erratic Heart Rate Data, page 11 for more information about wrist-based heart rate.
- See Tips for Erratic Pulse Oximeter Data, page 11 for more information about the pulse oximeter sensor.
- For more information about accuracy, go to garmin.com/ataccuracy.
- For more information about device wear and care, go to www.garmin.com/fitandcare.
Using the Device
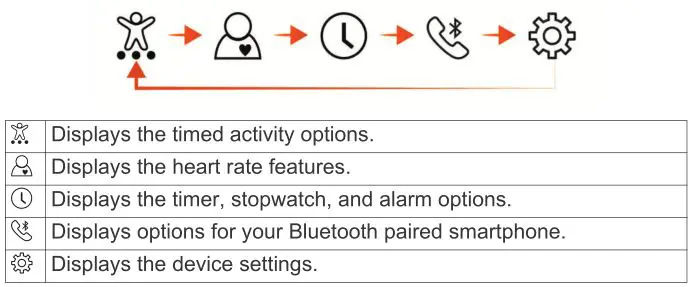
Menu Options
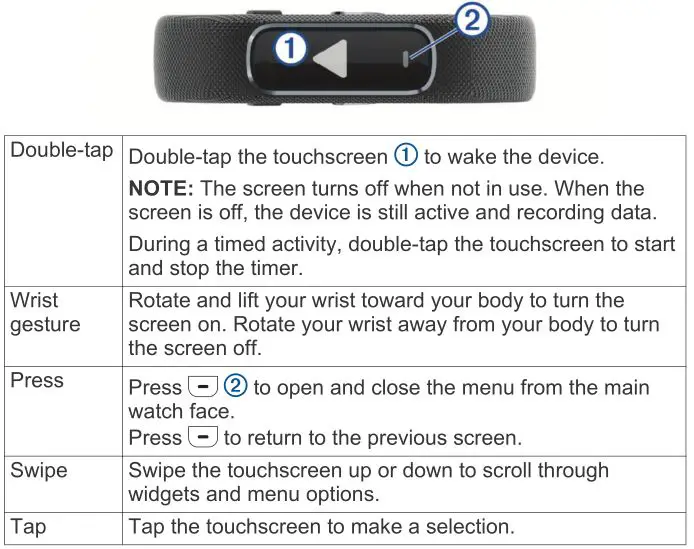
You can press to view the menu.
TIP: Swipe to scroll through the menu options.
Viewing Battery Power
You can view the remaining battery power on your device.
Hold the time and date screen for a few seconds.
The remaining battery power appears as an image.
Widgets
Your device comes preloaded with widgets that provide at-a-glance information. You can swipe the touchscreen to scroll through the widgets. Some widgets require a paired smartphone.
NOTE: You can use the Garmin Connect app to select the watch face and add or remove widgets, such as music controls for your smartphone (Customizing Activity Options, page 8).
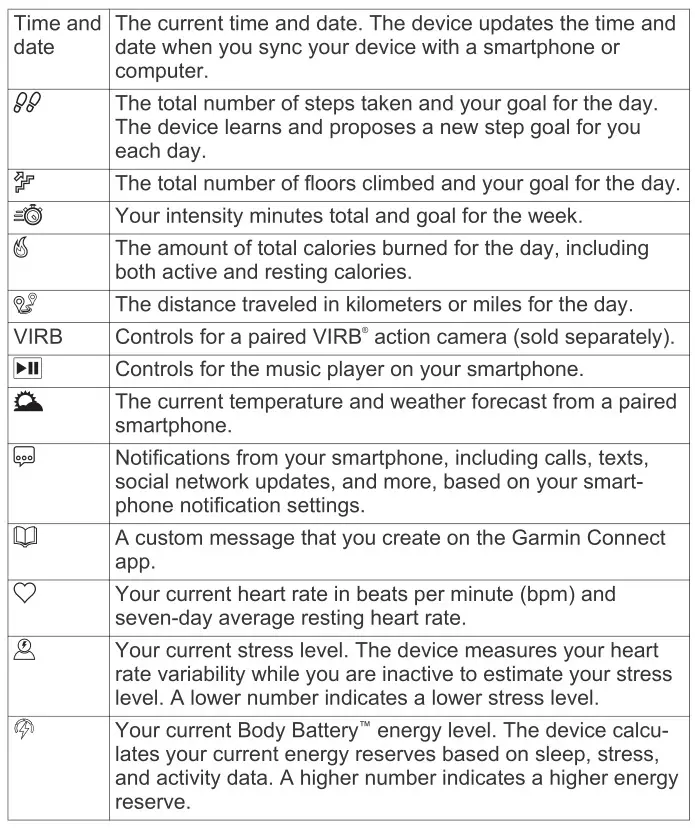
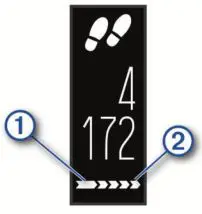
Step Goal
Your device creates a daily step goal automatically, based on your previous activity levels. As you move during the day, the device records your progress (1) toward your daily goal (2). Your device begins with a default goal of 7,500 steps per day.

If you choose not to use the auto goal feature, you can disable it and set a personalized step goal on your Garmin Connect account (Activity Tracking Settings, page 9).
Viewing the Move Bar
Sitting for prolonged periods of time can trigger undesirable metabolic state changes. The move bar reminds you to keep moving.
Swipe to view the steps widget.
After one hour of inactivity, the move bar (1) appears.
NOTE: After a brief timeout, the move bar is replaced by your step goal for the day.
Additional segments (2) appear after every 15 minutes of inactivity.
NOTE: You can reset the move bar by walking a short distance.
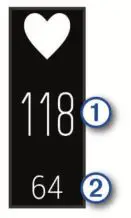
Viewing the Heart Rate Widget
The heart rate widget displays your current heart rate in beats per minute (bpm). For more information on heart rate accuracy, go to garmin.com/ataccuracy.
Swipe to view the heart rate widget.
The widget shows your current heart rate and your resting heart rate (About Heart Rate Zones, page 12).
Intensity Minutes
To improve your health, organizations such as the World Health Organization recommend at least 150 minutes per week of moderate intensity activity, such as brisk walking, or 75 minutes per week of vigorous intensity activity, such as running. The device monitors your activity intensity and tracks your time spent participating in moderate to vigorous intensity activities (heart rate data is required to quantify vigorous intensity). You can work toward achieving your weekly intensity minutes goal by participating in at least 10 consecutive minutes of moderate to vigorous intensity activities. The device adds the amount of moderate activity minutes with the amount of vigorous activity minutes. Your total vigorous intensity minutes are doubled when added.
Earning Intensity Minutes
Your vívosmart 4 device calculates intensity minutes by comparing your heart rate data to your average resting heart rate. If heart rate is turned off, the device calculates moderate intensity minutes by analyzing your steps per minute.
- Start a timed activity for the most accurate calculation of intensity minutes.
- Exercise for at least 10 consecutive minutes at a moderate or vigorous intensity level.
- Wear your device all day and night for the most accurate resting heart rate.
Improving Calorie Accuracy
The device displays an estimate of your total calories burned for the current day. You can improve the accuracy of this estimate by walking briskly for up to 15 minutes.
- Swipe to view the calories screen.
- Select .
NOTE: appears when calories need to be calibrated. This calibration process only needs to be completed once. If you have already recorded a timed walk or run, may not appear. - Follow the on-screen instructions.
Heart Rate Variability and Stress Level
Your device analyzes your heart rate variability while you are inactive to determine your overall stress. Training, physical activity, sleep, nutrition, and general life stress all impact your stress level. The stress level range is from 0 to 100, where 0 to 25 is a resting state, 26 to 50 is low stress, 51 to 75 is medium stress, and 76 to 100 is a high stress state. Knowing your stress level can help you identify stressful moments throughout your day. For best results, you should wear the device while sleeping. You can sync your device with your Garmin Connect account to view your all-day stress level, long-term trends, and additional details.
Using the Relaxation Timer
You can use the relaxation timer to perform a guided breathing exercise.
- Swipe to view the stress level widget.
- Tap the touchscreen.
- Select to start the relaxation timer.
- Follow the on-screen instructions.
The device vibrates, signaling you to breathe in or out (Setting the Vibration Level, page 8).
Your updated stress level appears when the relaxation timer ends.
Body Battery
Your device analyzes your heart rate variability, stress level, sleep quality, and activity data to determine your overall Body Battery level. Like a gas gauge on a car, it indicates your amount of available reserve energy . The Body Battery level range is from 0 to 100, where 0 to 25 is low reserve energy, 26 to 50 is medium reserve energy, 51 to 75 is high reserve energy, and 76 to 100 is very high reserve energy.
Your device also displays a trending arrow indicating if your energy reserve is increasing, decreasing, or holding steady (2).
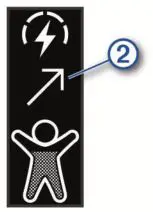
You can sync your device with your Garmin Connect account to view your most up-to-date Body Battery level, long-term trends, and additional details (Tips for Improved Body Battery Data, page 11).
Sleep Tracking
While you are sleeping, the device automatically detects your sleep and monitors your movement during your normal sleep hours. You can set your normal sleep hours in the user settings on your Garmin Connect account. Sleep statistics include total hours of sleep, sleep levels, and sleep movement. You can view your sleep statistics on your Garmin Connect account.
NOTE: Naps are not added to your sleep statistics. You can use do not disturb mode to turn off notifications and alerts, with the exception of alarms (Using Do Not Disturb Mode, page 7).
VIRB Remote
The VIRB remote function allows you to control your VIRB action camera using your device. Go to www.garmin.com/VIRB to purchase a VIRB action camera.
Controlling a VIRB Action Camera
Before you can use the VIRB remote function, you must enable the remote setting on your VIRB camera. See the VIRB Series Owner’s Manual for more information. You must also enable the VIRB screen on your vívosmart 4 device (Customizing Activity Options, page 8).
- Turn on your VIRB camera.
- On your vívosmart 4 device, swipe to view the VIRB screen.
- Wait while the device connects to your VIRB camera.
- Select an option:
• To record video, select . The video counter appears on the vívosmart 4 device.
• To stop recording video, select .
• To take a photo, select .
Bluetooth Connected Features
The vívosmart 4 device has several Bluetooth connected features for your compatible smartphone using the Garmin Connect app.
Notifications: Alerts you to notifications from your smartphone, including calls, texts, social network updates, calendar appointments, and more, based on your smartphone notification settings.
Weather updates: Displays the current temperature and weather forecast from your smartphone.
Music controls: Allows you to control the music player on your smartphone.
Find my phone: Locates your lost smartphone that is paired with your vívosmart device and currently within range.
Find my device: Locates your lost vívosmart device that is paired with your smartphone and currently within range.
Activity uploads: Automatically sends your activity to the Garmin Connect app as soon as you open the app.
Software updates: Your device wirelessly downloads and installs the latest software update.
Viewing Notifications
When your device is paired with the Garmin Connect app, you can view notifications from your smartphone on your device, such as text messages and emails.
- Swipe to view the notifications widget.
- Select View.
The most recent notification appears in the center of the touchscreen. - Tap the touchscreen to select the notification.
TIP: Swipe to view older notifications.
The entire message scrolls on the device. - Tap the touchscreen, and select X to dismiss the notification.
Managing Notifications
You can use your compatible smartphone to manage notifications that appear on your vívosmart 4 device.
Select an option:
• If you are using an iPhone® device, go to the iOS ® notifications settings to select the items to show on the device.
• If you are using an Android ™ smartphone, from the Garmin Connect app, select Settings > Notifications.
Viewing Incoming Calls
When your device is paired with the Garmin Connect app, you can view incoming calls from your smartphone on your device.
When an incoming call appears on your device, select an option:
NOTE: Available options vary based on your smartphone.
- Tap the touchscreen and select to accept the call on your smartphone.
- Tap the touchscreen and select to decline the call.
- Select to dismiss the notification.
- Select , if you have a smartphone with Android, to send an automatic reply to the caller.
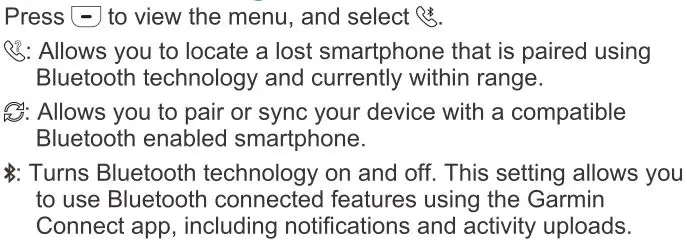
Locating a Lost Smartphone
You can use this feature to help locate a lost smartphone that is paired using Bluetooth wireless technology and currently within range.
- Press to view the menu.
- Select
 .
.
The vívosmart 4 device searches for your paired smartphone. An audible alert sounds on your smartphone, and the Bluetooth signal strength appears on the device screen. The Bluetooth signal strength increases as you move closer to your smartphone.
Music Controls
The music control widget allows you to control music on your smartphone using your vívosmart 4 device. The widget controls the currently active or most recently active media player app on your smartphone. If no media player is active, the widget does not display track information, and you must start playback from your phone.
Connected GPS
With the connected GPS feature, your device uses the GPS antenna in your smartphone to record GPS data for walk, run, or bike activities (Recording an Activity with Connected GPS, page 4). The GPS data, including location, distance, and speed, appears in the activity details in your Garmin Connect account.
NOTE: To use the connected GPS feature, enable smartphone app permissions to always share location to the Garmin Connect app.
Clock
Using the Stopwatch
- Press to view the menu.
- Select clock icon > stopwatch icon.
- Double-tap the touchscreen to start the timer.
- Double-tap the touchscreen to stop the timer.
- If necessary, select to reset the timer.
Starting the Countdown Timer
- Press to view the menu.
- Select clock icon > countdown icon.
- Swipe to set the timer.
- Tap the center of the touchscreen to select the time and move to the next screen.
- Double-tap the touchscreen to start the timer.
- If necessary, double-tap the touchscreen to pause and resume the timer.
- If necessary, select to reset the timer.
Using the Alarm Clock
- Set alarm clock times and frequencies on your Garmin Connect account (Sound and Alert Settings, page 8).
- Press to view the menu.
- Select clock icon > Alarm Icon.
- Swipe to scroll through the alarms.
- Select an alarm to turn it on or off.
When the alarm is turned on, appears on the time and date widget.
Training
Recording a Timed Activity
You can record a timed activity, which can be saved and sent to your Garmin Connect account.
- Press to view the menu.
- Select training icon.
- Swipe to scroll through the activity list, and select an option:
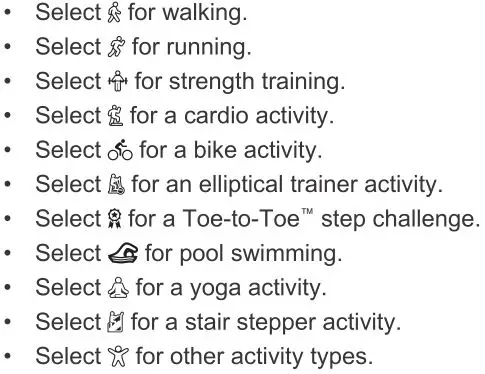 NOTE: You can use the Garmin Connect app to add or remove timed activities (Customizing Activity Options, page 8).
 - Double-tap the touchscreen to start the timer.
- Start your activity.
TIP: You can double-tap the touchscreen to stop and resume the timer. - Tap to view additional data screens, which appear at the top of the touchscreen.
- After you complete your activity, double-tap the touchscreen to stop the timer.
- Select an option:
• Select to save the activity.
• Select to delete the activity.
• Select to resume the activity.
Recording an Activity with Connected GPS
You can connect the device to your smartphone to record GPS data for your walk, run, or bike activity.
- Press to view the menu.
- Select training icon.
- Select , , or .
- Select to connect the device to your Garmin Connect account.
(call icon) appears on the device.
NOTE: If you cannot connect the device to your smartphone, you can select to continue the activity. GPS data will not be recorded. - Double-tap the touchscreen to start the activity timer.
- Start your activity. Your phone must be in range during the activity.
- After you complete your activity, double-tap the touchscreen to stop the activity timer.
- Select an option:
• Select to save the activity.
• Select to delete the activity.
• Select to resume the activity.
Recording a Strength Training Activity
You can record sets during a strength training activity. A set is multiple repetitions (reps) of a single move.
- Press to view the menu.
- Select training icon > Strength Training icon.
- Swipe to set up rep counting.
- Select Rep Counting.
- Tap the touchscreen to turn rep counting on.
- Press to return to the activity timer screen.
- Double-tap the touchscreen to start the activity timer.
- Start your first set.
The device counts your reps and displays your current heart rate and rep count (Customizing Data Fields, page 9). - Press to finish a set. A rest timer appears.
- During a rest, select an option:
• To view additional data screens, tap the top of the touchscreen.
• To edit your rep count, tap .
• To view the time and date or music controls widgets, swipe up or down.
• To pause the activity, double-tap the touchscreen. - Press to begin the next set.
- Repeat steps 8 through 10 until your activity is complete.
- After you complete your activity, double-tap the touchscreen to stop the activity timer.
- Select an option:
• Select to save the activity.
• Select to delete the activity.
• Select to resume the activity.
Tips for Recording Strength Training Activities
- Do not look at the device while performing reps. You should interact with the device at the beginning and end of each set, and during rests.
- Focus on your form while performing reps.
- Perform bodyweight or free weight exercises.
- Perform reps with a consistent, wide range of motion. Each rep is counted when the arm wearing the device returns to the starting position.
NOTE: Leg exercises may not be counted. - Turn on automatic set detection to start and stop your sets.
- Save and send your strength training activity to your Garmin Connect account.
You can use the tools in your Garmin Connect account to view and edit activity details.
Recording a Swim Activity
NOTE: Heart rate is not available while swimming.
- Press to view the menu.
- Select > .
- Select your Skill Level.
- Select a Pool Size.
- Double-tap the touchscreen to start the activity timer. The device records activity data only while the activity timer is running.
- Start your activity.
The device automatically records swim intervals, or pool lengths, displaying them at the top of the touchscreen. - After you complete your activity, double-tap the touchscreen to stop the timer.
- If necessary, select to edit the number of lengths.
- Press .
- Select an option:
• Select to edit the number of lengths.
• Select to save the activity.
• Select to delete the activity.
• Select to resume the activity.
Tips for Recording Swim Activities
• Start the timer before entering the pool.
• For best results, do not switch stroke types during a swim activity.
• Dry off the display before editing the number of lengths.
• Edit the number of lengths so the device can more accurately count your lengths in the future.
• If you don’t need to edit the number of pool lengths, wait until the auto save timer begins automatically at the end of a timed swim.
Starting a Toe-to-Toe Challenge
You can start a 2-minute, Toe-to-Toe challenge with a friend who has a compatible device.
- Press to view the menu.
- Select > to challenge another player in range (3 m).
NOTE: Both players must start a challenge on their device.
If the device cannot find any players within 30 seconds, the challenge times out. - Tap the player’s name.
- Double-tap the touchscreen to start the activity timer.
The device counts down for 3 seconds before the timer starts. - Get steps for 2 minutes.
When 3 seconds remain, the device buzzes until the time expires. - Bring the devices in range (3 m).
The devices display the steps for each player and first or second place.
Players can tap to start another challenge or exit the menu.
Heart Rate Features
The vívosmart device has a heart rate menu, enabling you to view wrist-based heart rate data.

Pulse Oximeter
The vívosmart device has a wrist-based pulse oximeter to gauge the saturation of oxygen in your blood. Knowing your oxygen saturation can help you determine how your body is adapting to exercise and stress. Your device gauges your blood oxygen level by shining light into the skin and checking how much light is absorbed. This is referred to as SpO 2 .
On the device, your pulse oximeter readings appear as an SpO 2 percentage. On your Garmin Connect account, you can view additional details about your pulse oximeter readings, including trends over multiple days (Activating Pulse Oximeter Sleep Tracking, page 6). For more information on pulse oximeter accuracy, go to garmin.com/ataccuracy.
Getting Pulse Oximeter Readings
You can manually begin a pulse oximeter reading on your device at any time. The accuracy of these readings can vary based on your blood flow, the device placement on your wrist, and your stillness.
- Wear the device above your wrist bone.
The device should be snug but comfortable. - Press to view the menu.
- Select > .
- Hold the arm wearing the device at heart level while the device reads your blood oxygen saturation.
- Keep still.
The device displays your oxygen saturation as a percentage.

NOTE: You can customize the pulse oximeter settings in your Garmin Connect account (Activity Tracking Settings, page 9).
Activating Pulse Oximeter Sleep Tracking
You can set your device to measure your blood oxygen level, or SpO 2 , for up to 4 hours during your defined sleep window (Tips for Erratic Pulse Oximeter Data, page 11).
- From the settings menu in the Garmin Connect app, select Garmin Devices.
- Select your device.
- Select Activity Tracking > Pulse Ox.
- Select Pulse Ox Sleep Tracking.
NOTE: Unusual sleep positions could cause abnormally low sleep-time SpO 2 readings.
Setting an Abnormal Heart Rate Alert
CAUTION
This feature only alerts you when your heart rate exceeds or drops below a certain number of beats per minute, as selected by the user, after a period of inactivity. This feature does not notify you of any potential heart condition and is not intended to treat or diagnose any medical condition or disease. Always defer to your health care provider for any heart-related issues.
You can set the heart rate threshold value in your Garmin Connect account (Sound and Alert Settings, page 8).
- Press to view the menu.
- Select > > Abnormal Heart Rate Alerts.
- Select High or Low.
- Tap the screen once to enable the alert.
Each time you exceed or drop below the custom value, a message appears and the device vibrates.
NOTE: You must enable the alert on your device and your Garmin Connect account.
Broadcasting Heart Rate Data to Garmin Devices
You can broadcast your heart rate data from your vívosmart 4 device and view it on paired Garmin devices. For example, you can broadcast your heart rate data to an Edge® device while cycling, or to a VIRB action camera during an activity.
NOTE: Broadcasting heart rate data decreases battery life.
- Press to view the menu.
- Select > .
The vívosmart 4 device starts broadcasting your heart rate data.
NOTE: You can swipe to view the time and date widget while broadcasting heart rate data. - Pair your vívosmart 4 device with your Garmin ANT+® compatible device.
NOTE: The pairing instructions differ for each Garmin compatible device. See your owner’s manual. - Press to stop broadcasting your heart rate data.
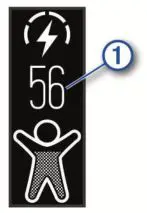
About VO2 Max. Estimates
VO2 max. is the maximum volume of oxygen (in milliliters) you can consume per minute per kilogram of body weight at your maximum performance. In simple terms, VO2 max. is an indication of athletic performance and should increase as your level of fitness improves.
On the device, your VO2 max. estimate appears as a number and description. On your Garmin Connect account, you can view additional details about your VO2 max. estimate, including your fitness age. Your fitness age gives you an idea of how your fitness compares with a person of the same gender and different age. As you exercise, your fitness age can decrease over time.
VO2 max. data is provided by Firstbeat Analytics. VO2 max. analysis is provided with permission from The Cooper Institute® . For more information, see the appendix (VO2 Max. Standard Ratings, page 12), and go to www.CooperInstitute.org.
Getting Your VO2 Max. Estimate
The device requires wrist-based heart rate data and a timed 15 minute brisk walk or run to display your VO2 max. estimate.
- Press to view the menu.
- Select > .
If you have already recorded a 15 minute brisk walk or run, your VO2 max. estimate may appear. The device updates your VO2 max. estimate each time you complete a timed walk or run. - Follow the on-screen instructions to get your VO2 max. estimate. A message appears when the test is complete.
- To manually start a VO2 max. test to get an updated estimate, tap your current reading and follow the instructions. The device will update with your new VO2 max. estimate.
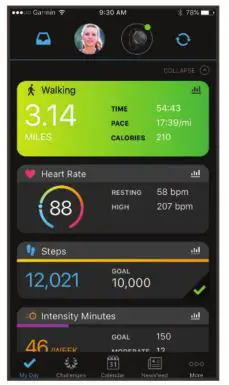
Garmin Connect
You can connect with your friends on your Garmin Connect account. Your Garmin Connect account gives you the tools to track, analyze, share, and encourage each other. Record the events of your active lifestyle including runs, walks, rides, swims, hikes, and more.
You can create your free Garmin Connect account when you pair your device with your phone using the Garmin Connect app, or you can go to connect.garmin.com.
Track your progress: You can track your daily steps, join a friendly competition with your connections, and meet your goals.
Store your activities: After you complete and save a timed activity with your device, you can upload that activity to your Garmin Connect account and keep it as long as you want.
Analyze your data: You can view more detailed information about your activity, including time, distance, heart rate, calories burned, and customizable reports.
Share your activities: You can connect with friends to follow each other’s activities or post links to your activities on your favorite social networking sites.
Manage your settings: You can customize your device and user settings on your Garmin Connect account.
Garmin Move IQ ™
When your movements match familiar exercise patterns, the Move IQ feature automatically detects the event and displays it in your timeline. The Move IQ events show activity type and duration, but they do not appear in your activities list or newsfeed.
The Move IQ feature can automatically start a timed activity for walking and running using time thresholds you set in the Garmin Connect app. These activities are added to your activities list.
Syncing Your Data with the Garmin Connect App
Your device automatically syncs data with the Garmin Connect app each time you open the app. Your device periodically syncs data with the Garmin Connect app automatically. You can also manually sync your data at any time.
- Bring the device near your smartphone.
- Open the Garmin Connect app.
TIP: The app can be open or running in the background. - Press to view the menu.
- Select > .
- Wait while your data syncs.
- View your current data in the Garmin Connect app.
Syncing Your Data with Your Computer
Before you can sync your data with the Garmin Connect application on your computer, you must install the Garmin Express ™ application (Setting Up Garmin Express, page 7).
- Connect the device to your computer using the USB cable.
- Open the Garmin Express application.
The device enters mass storage mode. - Follow the on-screen instructions.
- View your data on your Garmin Connect account.
Pairing Multiple Mobile Devices
You can pair your vívosmart 4 device with multiple mobile devices. For example, you can pair your vívosmart 4 device with a smartphone and a tablet.
- Install and open the Garmin Connect app on your mobile device (Garmin Connect, page 7).
- On your vívosmart 4 device, press to view the menu, and swipe to select > to enter pairing mode.
- Follow the instructions on your mobile device to pair your vívosmart 4 device and complete the setup process.
- If necessary, repeat steps 1-3 for each additional mobile device.
Setting Up Garmin Express
- Connect the device to your computer using a USB cable.
- Go to www.garmin.com/express.
- Follow the on-screen instructions.
Customizing Your Device
Device Settings
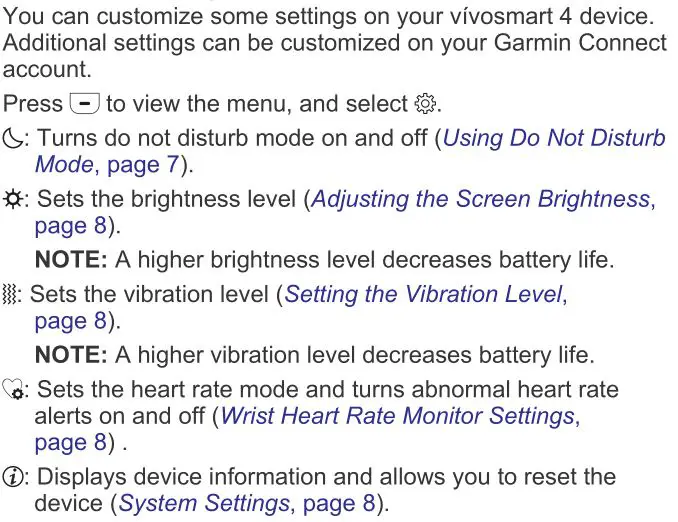
Using Do Not Disturb Mode
You can use do not disturb mode to turn off vibrations and the backlight for alerts and notifications. For example, you can use this mode while sleeping or watching a movie.
- To manually turn on or off do not disturb mode, press , select > .
- To automatically turn on do not disturb mode during your sleep hours, go to the device settings in the Garmin Connect app, and select Sounds & Alerts > Do Not Disturb During Sleep.
Adjusting the Screen Brightness
- Press to view the menu.
- Select > .
- Select an option:
• To manually adjust the brightness, select a number between 1 and 7.
• To allow the device’s ambient light sensor to automatically adjust the brightness based on your environment, select Auto.
NOTE: The screen brightness affects battery life.
Setting the Vibration Level
- Press to view the menu.
- Select > .
- Tap the screen to select the vibration level.
NOTE: A higher vibration level decreases battery life.
Wrist Heart Rate Monitor Settings
Press to view the menu, and select > .
Heart Rate Mode: Allows you to turn the wrist heart rate monitor on or off. You can use the Activity Only option to use the wrist heart rate monitor only during timed activities.
Abnormal Heart Rate Alerts: Allows you to set the device to alert you when your heart rate exceeds or drops below a set threshold after a period of inactivity (Sound and Alert Settings, page 8).
System Settings
Press to view the menu, and select > .
Software: Displays the software version.
Regulatory: Displays the regulatory information.
Reset: Allows you to delete user data and reset settings (Restoring All Default Settings, page 11).
Unit ID & Licenses: Displays the unit ID and license agreement information.
Bluetooth Settings
Garmin Connect Settings
You can customize your device settings, activity options, and user settings on your Garmin Connect account. Some settings can also be customized on your vívosmart 4 device.
• From the Garmin Connect app, select or , select Garmin Devices, and select your device.
• From the devices widget in the Garmin Connect application, select your device.
After customizing settings, you must sync your data to apply the changes to your device (Syncing Your Data with the Garmin Connect App, page 7) (Syncing Your Data with Your Computer, page 7).
Appearance Settings
From your Garmin Connect device menu, select Appearance.
NOTE: Some settings appear in a subcategory in the settings menu. App or website updates may change these settings menus.
Widgets: Allows you to customize the widgets that appear on your device and reorder the widgets in the loop.
Home Widget: Allows you to set the widget that appears after a period of inactivity.
Custom Widget: Allows you to enter a custom message that appears in the widget loop.
Watch Face: Allows you to select the watch face.
Display Options: Allows you to customize your display.
Timeout: Sets the length of time before the backlight turns off.
NOTE: A longer timeout decreases battery life.
Gesture: Sets the backlight to turn on when you rotate your wrist toward your body to view the device.
Sound and Alert Settings
From your Garmin Connect device menu, select Sounds & Alerts.
Alarms: Allows you to set alarm clock times and frequencies for your device.
Smart Notifications: Allows you to enable and configure phone notifications from your compatible smartphone. You can filter notifications by During an Activity or Not During an Activity.
Abnormal Heart Rate Alerts: Allows you to set the device to alert you when your heart rate exceeds or drops below a set threshold after a period of inactivity. You can set the Alert Threshold.
Relax Reminders: Allows you to set the device to alert you when your stress level is unusually high. The alert encourages you to take a moment to relax, and the device prompts you to begin a guided breathing exercise.
Bluetooth Connection Alert: Allows you to enable an alert informing you when your paired smartphone is no longer connected using Bluetooth technology.
Do Not Disturb During Sleep: Sets the device to turn on do not disturb mode automatically during your sleep hours (User Settings, page 9).
Customizing Activity Options
You can select activities to display on your device.
- From your Garmin Connect device menu, select Activity Options.
- Select Edit.
- Select the activities to display on your device.
NOTE: The walking and running activities cannot be removed. - If necessary, select an activity to customize its settings, such as alerts and data fields.
Marking Laps
You can set your device to use the Auto Lap® feature, which marks a lap automatically at every kilometer or mile. This feature is helpful for comparing your performance over different parts of an activity.
NOTE: The Auto Lap feature is not available for all activities.
- From the settings menu in the Garmin Connect app, select Garmin Devices.
- Select your device.
- Select Activity Options.
- Select an activity.
- Select Auto Lap.
Customizing Data Fields
You can change the data field combinations for the screens that appear while the activity timer is running.
NOTE: You cannot customize Pool Swim.
- From the settings menu in the Garmin Connect app, select Garmin Devices.
- Select your device.
- Select Activity Options.
- Select an activity.
- Select Data Fields.
- Select a data field to change it.
Activity Tracking Settings
From your Garmin Connect device menu, select Activity Tracking.
NOTE: Some settings appear in a subcategory in the settings menu. App or website updates may change these settings menus.
Activity Tracking: Turns activity tracking features on and off.
Auto Activity Start: Allows your device to create and save timed activities automatically when the Move IQ feature detects you have been walking or running for a minimum time threshold. You can set the minimum time threshold for running and walking.
Custom Stride Length: Allows your device to more accurately calculate the distance traveled using your custom stride length. You can enter a known distance and the number of steps it takes to cover the distance, and Garmin Connect can calculate your step length.
Daily Floors Climbed: Allows you to enter a daily goal for the number of floors to climb.
Daily Steps: Allows you to enter your daily step goal. You can use the Auto Goal option to allow your device to determine your step goal automatically.
Move Alert: Allows your device to display a message and move bar on the time of day screen when you have been inactive for too long. The device also beeps or vibrates if audible tones are turned on.
NOTE: This setting decreases battery life.
Move IQ: Allows you to turn on and off Move IQ events. The Move IQ feature automatically detects activity patterns, such as walking and running.
Pulse Ox: Allows your device to record up to four hours of pulse oximeter readings while you sleep.
Set as Preferred Activity Tracker: Sets this device to be your primary activity tracking device when more than one device is connected to the app.
Weekly Intensity Minutes: Allows you to enter a weekly goal for the number of minutes to participate in moderate to vigorous intensity activities. The device also allows you to set a heart rate zone for moderate intensity minutes and a higher heart rate zone for vigorous intensity minutes. You can also use the default algorithm.
User Settings
From your Garmin Connect device menu, select User Settings.
Personal Information: Allows you to enter your personal details, such as birth date, gender, height, and weight.
Sleep: Allows you to enter your normal sleep hours.
Heart Rate Zones: Allows you to estimate your maximum heart rate and determine custom heart rate zones.
General Settings
From your Garmin Connect device menu, select General.
Device Name: Allows you to set a name for the device.
Wrist Worn On: Allows you to customize which wrist the device is worn on.
NOTE: This setting is used for strength training and gestures.
Time Format: Sets the device to display time in a 12-hour or 24-hour format.
Date Format: Sets the device to display the date in a month/day or day/month format.
Language: Sets the device language.
Units: Sets the device to display the distance traveled in kilometers or miles.
Device Information
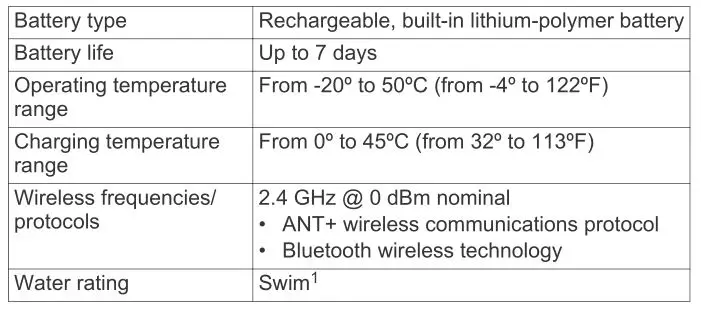
Specifications
Viewing Device Information
You can view the unit ID, software version, and regulatory information.
- Press to view the menu.
- Select settings icon > (i).
- Swipe to view the information.
Charging the Device
WARNING
This device contains a lithium-ion battery. See the Important Safety and Product Information guide in the product box for product warnings and other important information.
NOTICE
To prevent corrosion, thoroughly clean and dry the contacts and the surrounding area before charging or connecting to a computer. Refer to the cleaning instructions in the appendix.
- Pinch the sides of the charging clip (1) to open the arms on the clip.

- Align the clip with the contacts (2), and release the arms of the clip.
- Plug the USB cable into a power source.
- Charge the device completely.
¹The device withstands pressure equivalent to a depth of 50 m. For more information, go to www.garmin.com/waterrating.
Tips for Charging Your Device
- Connect the charger securely to the device to charge it using the USB cable (Charging the Device, page 9). You can charge the device by plugging the USB cable into a Garmin approved AC adapter with a standard wall outlet or a USB port on your computer.
- View the remaining battery graphic on the device information screen (Viewing Battery Power, page 1).
Device Care
NOTICE
Avoid extreme shock and harsh treatment, because it can degrade the life of the product.
Do not use a sharp object to clean the device.
Never use a hard or sharp object to operate the touchscreen, or damage may result.
Avoid chemical cleaners, solvents, and insect repellents that can damage plastic components and finishes.
Thoroughly rinse the device with fresh water after exposure to chlorine, salt water, sunscreen, cosmetics, alcohol, or other harsh chemicals. Prolonged exposure to these substances can damage the case.
Do not place in high temperature environments, such as a clothes dryer.
Do not store the device where prolonged exposure to extreme temperatures can occur, because it can cause permanent damage.
Cleaning the Device
NOTICE
Even small amounts of sweat or moisture can cause corrosion of the electrical contacts when connected to a charger. Corrosion can prevent charging and data transfer.
- Wipe the device using a cloth dampened with a mild detergent solution.
- Wipe it dry.
After cleaning, allow the device to dry completely.
TIP: For more information, go to www.garmin.com/fitandcare.
Troubleshooting
Is my smartphone compatible with my device?
The vívosmart 4 device is compatible with smartphones using Bluetooth technology.
Go to www.garmin.com/ble for compatibility information.
My phone will not connect to the device
- Bring the device within range of your smartphone.
- If your devices are already paired, turn Bluetooth off on both devices, and turn it back on.
- If your devices are not paired, enable Bluetooth technology on your smartphone.
- On your smartphone, open the Garmin Connect app, select or , and select Garmin Devices > Add Device to enter pairing mode.
- On your device, press to view the menu, and swipe to select > to enter pairing mode.
My device will not connect to the phone GPS
- Bring the device within range of your smartphone.
- Enable GPS on your smartphone.
- Check your phone’s settings to verify that the phone’s location services are enabled for the Garmin Connect app.
- Go to an open area with a clear view of the sky, away from tall buildings and trees.
- Remain stationary for several minutes.
Activity Tracking
For more information about activity tracking accuracy, go to garmin.com/ataccuracy.
My step count does not seem accurate
If your step count does not seem accurate, you can try these tips.
- Wear the device on your non-dominant wrist.
- Carry the device in your pocket when pushing a stroller or lawn mower.
- Carry the device in your pocket when actively using your hands or arms only.
NOTE: The device may interpret some repetitive motions, such as washing dishes, folding laundry, or clapping your hands, as steps.
The step counts on my device and my Garmin Connect account don’t match
The step count on your Garmin Connect account updates when you sync your device.
- Select an option:
• Sync your step count with the Garmin Connect application (Syncing Your Data with Your Computer, page 7).
• Sync your step count with the Garmin Connect app (Syncing Your Data with the Garmin Connect App, page 7). - Wait while the device syncs your data. Syncing can take several minutes.
NOTE: Refreshing the Garmin Connect app or the Garmin Connect application does not sync your data or update your step count.
My stress level does not appear
Before the device can detect your stress level, wrist-based heart rate monitoring must be turned on.
The device samples your heart rate variability throughout the day during periods of inactivity to determine your stress level. The device does not determine your stress level during timed activities.
If dashes appear instead of your stress level, be still, and wait while the device measures your heart rate variability.
My intensity minutes are flashing
When you exercise at an intensity level that qualifies toward your intensity minutes goal, the intensity minutes flash.
Exercise for at least 10 consecutive minutes at a moderate or vigorous intensity level.
The floors climbed amount does not seem accurate
Your device uses an internal barometer to measure elevation changes as you climb floors. A floor climbed is equal to 3 m (10 ft.).
- Locate the small barometer holes on the back of the device, near the charging contacts, and clean the area around the charging contacts.
The barometer performance may be affected if the barometer holes are obstructed. You can rinse the device with water to clean the area.
After cleaning, allow the device to dry completely. - Avoid holding handrails or skipping steps while climbing stairs.
- In windy environments, cover the device with your sleeve or jacket as strong gusts can cause erratic readings.
Tips for Erratic Heart Rate Data
If the heart rate data is erratic or does not appear, you can try these tips.
- Clean and dry your arm before putting on the device.
- Avoid wearing sunscreen, lotion, and insect repellent under the device.
- Avoid scratching the heart rate sensor on the back of the device.
- Wear the device above your wrist bone. The device should be snug but comfortable.
- Warm up for 5 to 10 minutes and get a heart rate reading before starting your activity.
NOTE: In cold environments, warm up indoors. - Rinse the device with fresh water after each workout.
Tips for Erratic Pulse Oximeter Data
If the pulse oximeter data is erratic or does not appear, you can try these tips.
- Remain motionless while the device reads your blood oxygen saturation.
- Wear the device above your wrist bone. The device should be snug but comfortable.
- Hold the arm wearing the device at heart level while the device reads your blood oxygen saturation.
- Clean and dry your arm before putting on the device.
- Avoid wearing sunscreen, lotion, and insect repellent under the device.
- Avoid scratching the optical sensor on the back of the device.
- Rinse the device with fresh water after each workout.
Tips for Improved Body Battery Data
- Your Body Battery level updates when you sync your device with your Garmin Connect account.
- For more accurate results, wear the device while sleeping.
- Rest and good sleep charge your Body Battery.
- Strenuous activity, high stress, and poor sleep can cause your Body Battery to drain.
- Food intake, as well as stimulants like caffeine, has no impact on your Body Battery.
My device does not display the correct time
The device updates the time and date when you sync your device to a computer or mobile device. You should sync your device to receive the correct time when you change time zones, and to update for daylight saving time.
- Confirm that your computer or mobile device displays the correct local time.
- Select an option:
• Sync your device to a computer (Syncing Your Data with Your Computer, page 7).
• Sync your device to a mobile device (Syncing Your Data with the Garmin Connect App, page 7).
The time and date are updated automatically.
My device is in the wrong language
You can change the device language selection if you have accidently selected the wrong language on the device.
- On your smartphone, open the Garmin Connect app, select or , and select Garmin Devices.
- Select your device.
- Select General > Language.
- Select your language.
- Sync your device.
Maximizing Battery Life
- Decrease the screen brightness and timeout (Adjusting the Screen Brightness, page 8).
- Turn off wrist gestures (Appearance Settings, page 8).
- In your smartphone notification center settings, limit the notifications that appear on your vívosmart 4 device (Managing Notifications, page 3).
- Turn off smart notifications (Sound and Alert Settings, page 8).
- Turn off Bluetooth wireless technology when you are not using connected features (Bluetooth Settings, page 8).
- Turn off pulse oximeter sleep tracking (Activity Tracking Settings, page 9).
- Stop broadcasting heart rate data to paired Garmin devices (Broadcasting Heart Rate Data to Garmin Devices, page 6).
- Turn off wrist-based heart rate monitoring (Wrist Heart Rate Monitor Settings, page 8).
NOTE: Wrist-based heart rate monitoring is used to calculate vigorous intensity minutes, VO2 max., stress level, and calories burned.
Restoring All Default Settings
You can restore all of the device settings back to the factory default values.
- Press to view the menu.
- Select settings > ( i ) > Reset.
- Select an option:
- To reset all of the device settings to the factory default values and save all user-entered information and activity history, select Reset Default Settings.
- To reset all of the device settings to the factory default values and delete all user-entered information and activity history, select Delete Data and Reset Settings.
An informational message scrolls in the device.
- Press [ – ].
- Select √.
Product Updates
On your computer, install Garmin Express (www.garmin.com/express). On your smartphone, install the Garmin Connect app. This provides easy access to these services for Garmin devices:
- Software updates
- Data uploads to Garmin Connect
- Product registration
Updating the Software Using the Garmin Connect App
Before you can update your device software using the Garmin Connect app, you must have a Garmin Connect account, and you must pair the device with a compatible smartphone (Setting Up the Device, page 1).
Sync your device with the Garmin Connect app (Syncing Your Data with the Garmin Connect App, page 7).
When new software is available, the Garmin Connect app automatically sends the update to your device. The update is applied when you are not actively using the device. When the update is complete, your device restarts.
Updating the Software Using Garmin Express
Before you can update your device software, you must download and install the Garmin Express application and add your device (Syncing Your Data with Your Computer, page 7).
- Connect the device to your computer using the USB cable. When new software is available, the Garmin Express application sends it to your device.
- After the Garmin Express application finishes sending the update, disconnect the device from your computer. Your device installs the update.
Getting More Information
- Go to support.garmin.com for additional manuals, articles, and software updates.
- Go to buy.garmin.com, or contact your Garmin dealer for information about optional accessories and replacement parts.
- Go to www.garmin.com/ataccuracy. This is not a medical device. The pulse oximeter feature is not available in all countries.
Appendix
Fitness Goals
Knowing your heart rate zones can help you measure and improve your fitness by understanding and applying these principles.
- Your heart rate is a good measure of exercise intensity.
- Training in certain heart rate zones can help you improve cardiovascular capacity and strength.
If you know your maximum heart rate, you can use the table (Heart Rate Zone Calculations, page 12) to determine the best heart rate zone for your fitness objectives.
If you do not know your maximum heart rate, use one of the calculators available on the Internet. Some gyms and health centers can provide a test that measures maximum heart rate. The default maximum heart rate is 220 minus your age.
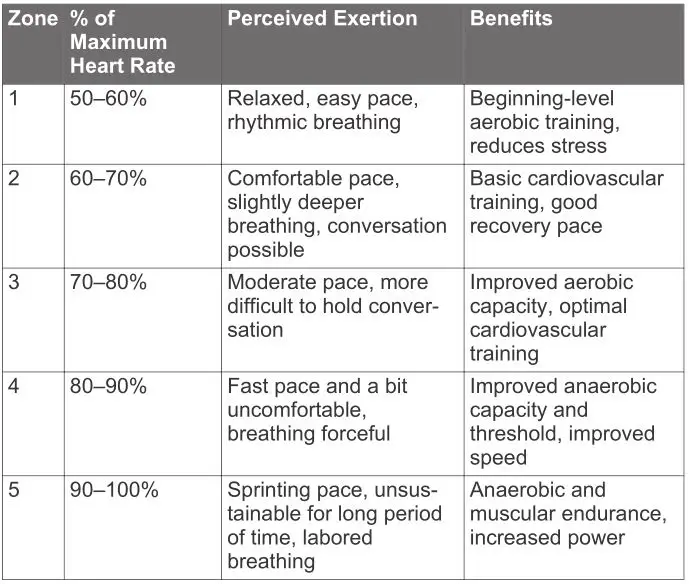
About Heart Rate Zones
Many athletes use heart rate zones to measure and increase their cardiovascular strength and improve their level of fitness. A heart rate zone is a set range of heartbeats per minute. The five commonly accepted heart rate zones are numbered from 1 to 5 according to increasing intensity. Generally, heart rate zones are calculated based on percentages of your maximum heart rate.
Heart Rate Zone Calculations
VO2 Max. Standard Ratings
These tables include standardized classifications for VO2 max. estimates by age and gender.
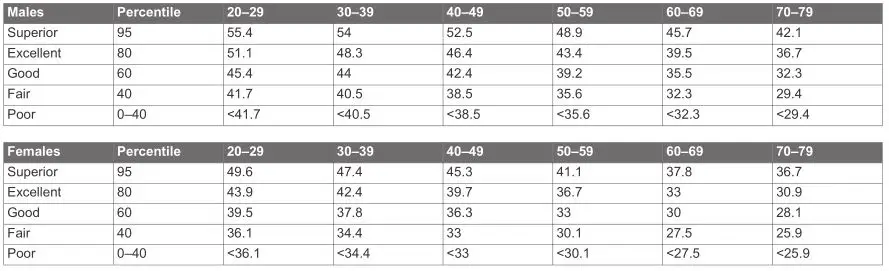
Data reprinted with permission from The Cooper Institute. For more information, go to www.CooperInstitute.org.

March 2021