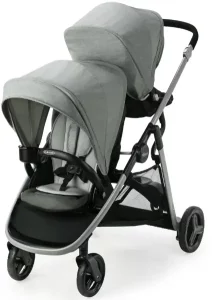

GRACO READY2GROW Series Stroller
WARNING
Failure to follow these warnings and the assembly instructions could result in serious injury or death. Only use product as instructed.
PLEASE SAVE OWNER’S MANUAL FOR FUTURE USE.
ADULT ASSEMBLY REQUIRED.
NEVER LEAVE child unattended. Always keep child in view while in stroller.
AVOID SERIOUS INJURY from falling or sliding out. Always use seat belt. After fastening buckles, adjust belts to get a snug fit around your child.
AVOID FINGER ENTRAPMENT: Keep your child away and use care when folding and unfolding the stroller. Be certain the stroller is fully erected and latched before allowing your child near the stroller.
AVOID STRANGULATION:
DO NOT place items with a string around your child’s neck, suspend strings from this product, or attach strings to toys.
NEVER USE STROLLER ON STAIRS or escalators. You may suddenly lose control of the stroller or your child may fall out. Also, use extra care when going up or down a step or curb.
STROLLER TO BE USED only
at walking speed. Product not intended for use while jogging, skating, etc.
USE OF THE FRONT SEAT, BENCH SEAT OR STANDING PLATFORM with a child weighing more than 50 lb (22.5 kg) or taller than 45 in. (114 cm) will cause excessive wear and stress on the stroller.
USE OF THE REAR SEAT with a child weighing more than 40 lb (18 kg) or taller than 43 in. (109 cm) will cause excessive wear and stress on the stroller.
TIPPING HAZARD! DO NOT OVERLOAD FRONT SEAT, REAR SEAT, BENCH SEAT OR STANDING PLATFORM PAST THE MANUFACTURERS RECOMMENDED WEIGHT RATING.
TO PREVENT TIPPING, do not place more than 1 lb (0.5 kg) on the cup holder.
TO AVOID BURNS, never put hot liquids in the cup holder.
TO PREVENT A HAZARDOUS, UNSTABLE CONDITION, never place purses, shopping bags, parcels or accessory items on the handle or canopy.
TO PREVENT A HAZARDOUS, UNSTABLE CONDITION, do not place more than 10 lb (4.5 kg) in the storage basket.
DO NOT use storage basket as a child carrier.
NEVER ALLOW YOUR STROLLER to be used as a toy.
DISCONTINUE USING YOUR STROLLER should it become damaged or broken.
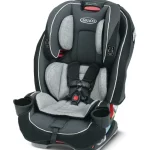
ONLY USE THE TODDLER SEATS PROVIDED WITH THIS STROLLER.
TO AVOID INJURY TO YOUR
CHILD: THIS STROLLER IS ONLY COMPATIBLE WITH GRACO® SNUGRIDE® INFANT CAR SEATS WITH CLICK CONNECT™.
Only use with Graco® infant car seats that have the Click Connect™ logo. Improper use of this stroller with other manufacturers’ car seats may result in serious injury or death.
- READ THE MANUAL provided with your Graco car seat before using it with your stroller.
- ALWAYS SECURE your child with the car seat harness when using the car seat in the stroller. If your child is already in the car seat, check that the child is secured with the harness.
TO PUT CHILDREN IN THE STROLLER:
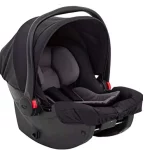
- You may use this stroller with two infant car seats. Refer to the sections “To Attach Graco® Infant Car Seat to Rear Position” and “To Attach Graco Infant Car Seat to Front Position”
pages 37-46. Only use a GRACO® SNUGRIDE® CLICK CONNECT™ CAR SEAT.
READY2GROW™ 2.0 Use Positions
WARNING
This model may not include some features shown below.
CHECK that you have all the parts for this model BEFORE assembling your product. If any parts are missing, call Customer Service.
1-800-345-4109
NO TOOLS REQUIRED
All models
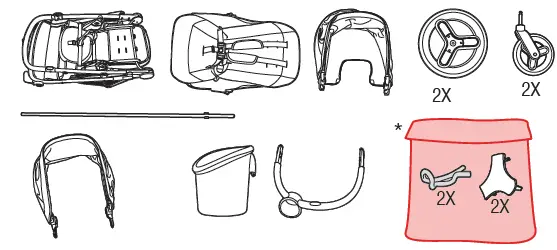 Red bag contains hardware, do not discard.
WARNING: Remove and IMMEDIATELY discard the zip tie.
On certain models

To Open Stroller
Be sure to place stroller on top of a piece of cardboard or some other protective cover to prevent any damage to floor.
- Open stroller lock.
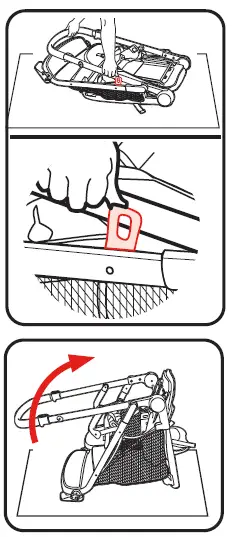
- Lift handle of stroller up.
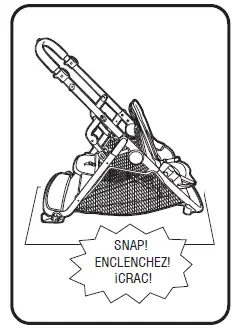
- CHECK that the stroller is completely latched open every time you open the stroller and before continuing with the rest of the assembly steps.
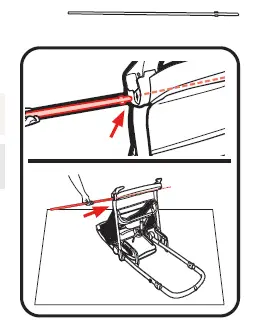
Rear Wheels
- Insert axle rod through axle opening.
- Place wheel on axle.
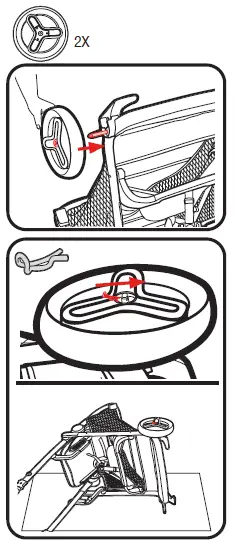
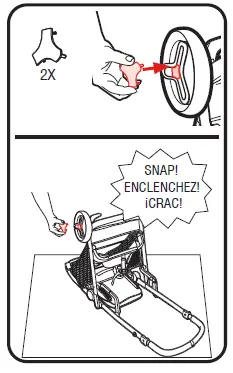
- Locate the red bag and remove its cotter pins and hardware. Push straight side of pin through axle hole. Pin will separate around the axle. Curved end of pin MUST face up as shown. CHECK that wheel is secure by pulling on it. Repeat steps 2-3 on other side
- Snap hubcap over pin as shown. Repeat with other hubcap.
Front Wheels
- Attach front wheels to front leg tubes as shown.
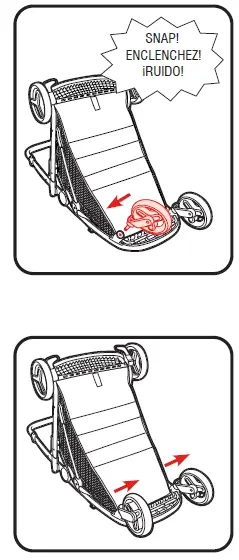
- CHECK that wheels are securely attached by pulling on wheel assembly.
Parent’s Cupholder
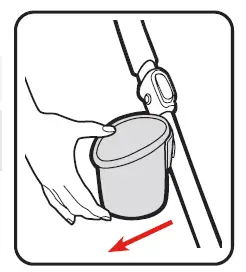
- Line up opening in cupholder with mount on stroller and press onto stroller tube.
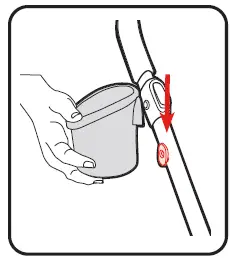
- MAKE SURE cupholder is snapped securely into mount.
Canopy
Front Seat Canopy
- Insert front canopy into the canopy mounts on each side of the stroller.
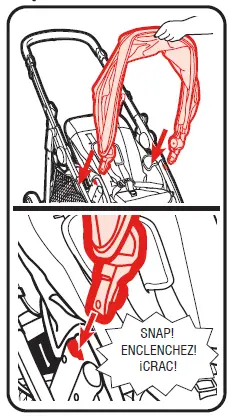
- To remove front canopy, press buttons on bottom on both ends and lift off.
 Rear Seat Canopy
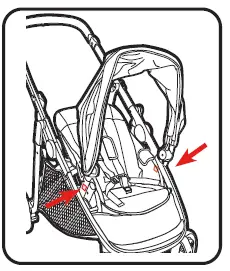
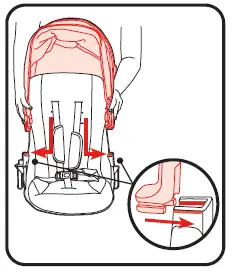
- Attach canopy into the canopy mounts on each side of the rear seat as shown. MAKE SURE canopy is behind the rear seat back.
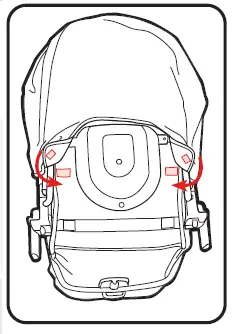
- Wrap canopy around seat back and fasten hook and loop tape on the rear of canopy as shown. MAKE SURE canopy is always fastened with the hook and loop tape when seat is in use.
- Pull forward to open canopy.
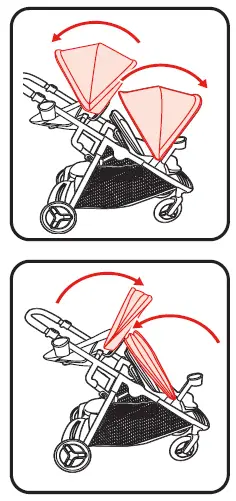
- Push backwards to close canopy.
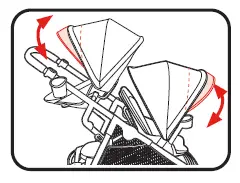
- To open or close canopy visor. (On certain models)
Child’s Arm Bar
WARNING
Always secure your child with the seat belt. The arm bar is not a restraint device. DO NOT lift the stroller by the child’s arm bar. Use care when installing the arm bar on the stroller with a child in the stroller.
- Attach child’s arm bar onto arm bar mounts.
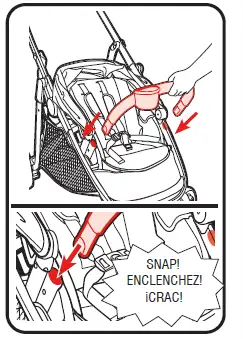
- Pull on child’s arm bar to ensure it is secure.
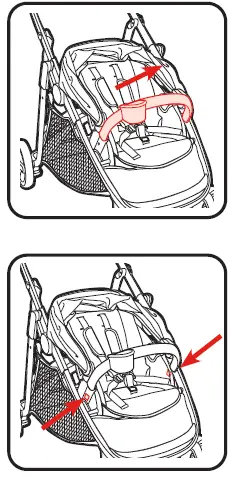
- To remove child’s arm bar, press buttons on bottom on both ends and lift off.
Elevated Rear Seat
WARNING
- Do not allow child to stand on seat.
- ONLY USE rear seat on the stroller and do not remove or carry the rear seat while child is in it.
- Never use seat in vehicle or in any other product.
- Attach seat as shown.
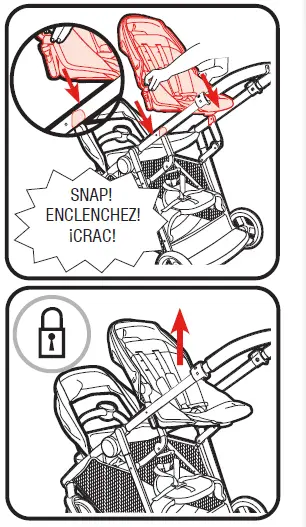
- CHECK that elevated rear seat is securely attached to the stroller by pulling up on seat.
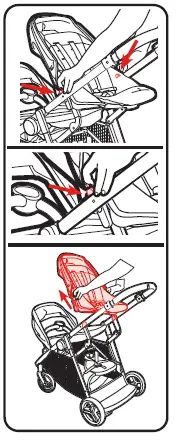
To Remove Elevated Rear Seat
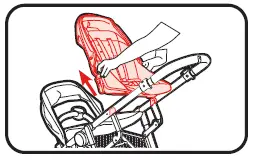
- Push buttons on both sides of the seat and pull up as shown.
To Secure Child
WARNING Falling Hazard: Always use the seat belt.
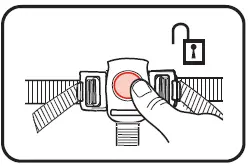
- To open, press button on buckle to release the waist straps.
- To close, slide shoulder strap connectors onto waist straps and insert into buckle.
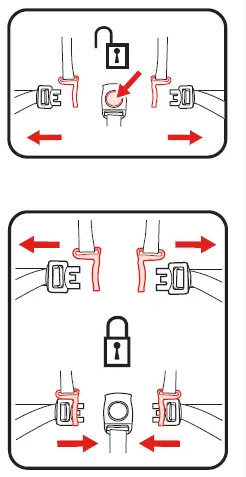
- Use slide adjuster at shoulder and waist for tighter adjustment. To change shoulder harness slots, see page 29.
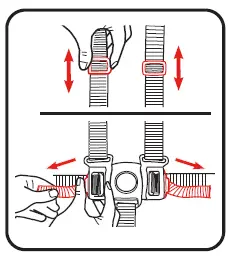
3 Point Harness (Front and Elevated Rear Seats Only)
- To open, press button on buckle to release the waist straps.
- Slide shoulder strap connectors off of waist straps.
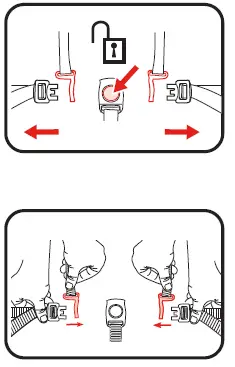
- Remove shoulder straps from stroller.
- Attach waist straps to harness buckle as shown.
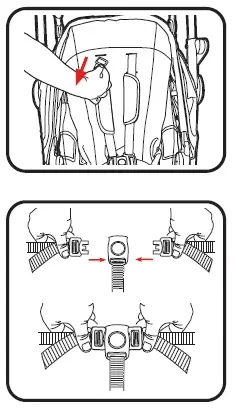
- Use slide adjuster at waist for tighter adjustment.
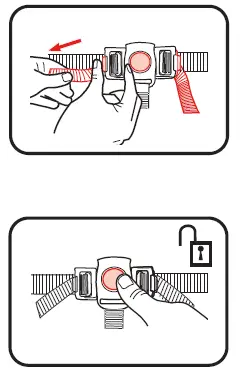
- To open, press button on buckle to release the waist straps.
Adjusting Shoulder Harness position

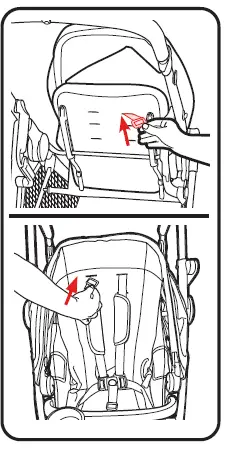
- Shoulder harness anchor
- Slide adjuster
- Push harness anchor through the front of the seat then re-insert through desired slots at the same height level. Use either shoulder harness anchor in the slots that are closest to child’s shoulder height. Use slide adjuster for further adjustment.
To Recline
WARNING
When making adjustments to the stroller seat, make sure child’s head, arms, and legs are clear of moving seat parts and stroller frame.
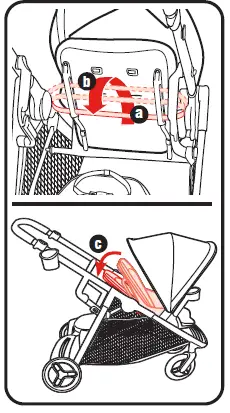
- To recline: (a) Pull up on recline bar, (b) rotate recline bar around, away from seat, and down until seat back is in reclined position (c).
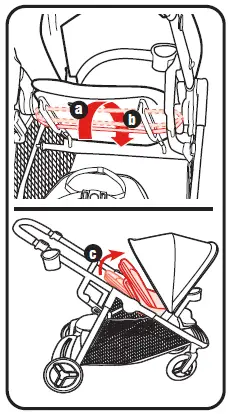
- To raise: (a) Pull up on recline bar, (b) rotate recline bar upward toward the seat and down until seat back is in upright position (c).
Brakes
WARNING
CHECK that brakes are on by trying to push stroller.
-
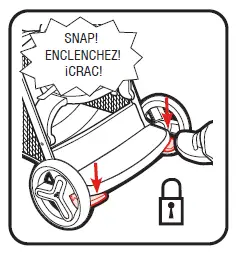
- Push down on both brake pedals to lock brakes.
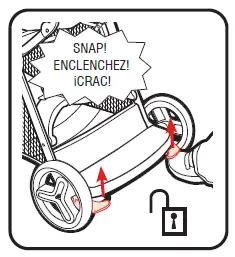
- Push up on both brake pedals to unlock brakes.
- Push down on both brake pedals to lock brakes.
Easy Access Storage Basket
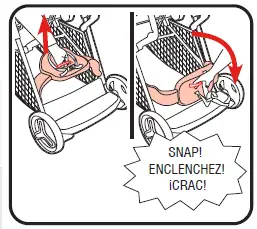
Child seat rotates out of way for better access to storage basket.
- For easy access to storage basket: Pull up on strap in center of seat and rotate bench seat down.
Removing Front Wheels
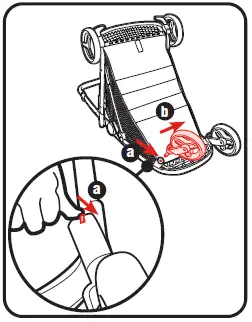
- To remove front wheels: (a) Push button as shown, (b) pull wheel off.
Bench Seat
WARNING
Do not allow child to stand on seat.
- Remove the elevated rear seat to use the bench seat. Push buttons on both sides of the seat and pull up as shown.
- Raise seat back to highest position.
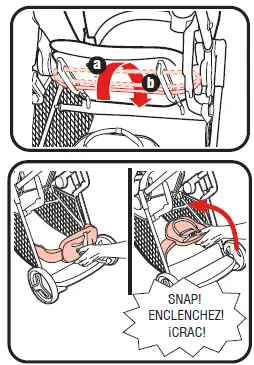
- To use bench seat: Close easy access basket by lifting up and rotating the bench seat.
- Press button on buckle to release the waist straps.
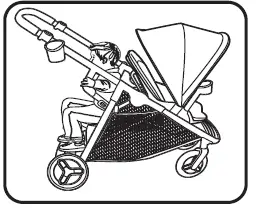
- Have child sit in seat and hold onto handles.
- Attach waist straps to harness buckle as shown.
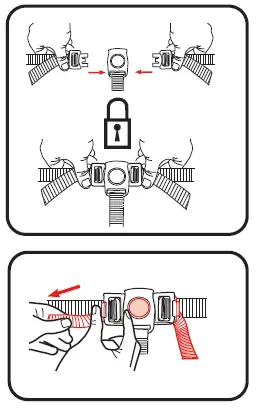
- Use slide adjuster at waist for tighter adjustment.
Platform
WARNING
- DO NOT allow child to stand on platform, facing backwards.
- To avoid falling, child must hold onto stroller frame.
- Remove the elevated rear seat to use the platform.
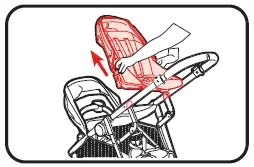
- To use platform: Close easy access basket by lifting up and rotating the bench seat.
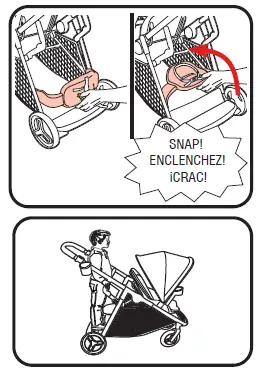
- Have child stand on platform and hold onto handles.
To Attach Graco® Infant Car Seat to Rear Position
For models that do not come with an infant car seat one may be purchased separately
WARNING
Use only a Graco® SnugRide® Click Connect™ car seat with this stroller. This stroller is only compatible with Graco® SnugRide® infant car seats with Click Connect™. Only use with Graco® infant car seats that have the Click Connect™ logo. Improper use of this product with a car seat may result in serious injury or death. Read the manual provided with your Graco car seat before using it with your product.
- Always secure your child with infant car seat harness when using the car seat in the product. If your child is already in the car seat, check that the child is secured with the harness.
Infant car seat can be inserted in stroller frame rear facing.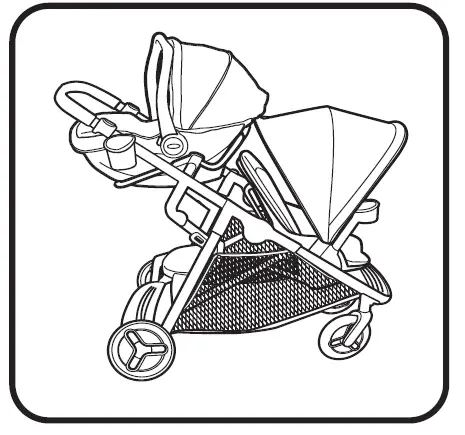
Remove Pad from Elevated Seat Frame to Attach Infant Car Seat
- To remove canopy: Disconnect hook and loop patches from back of canopy. Push in on canopy mounts and lift canopy off elevated rear seat.
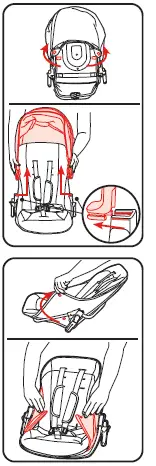
- Disconnect snaps on both sides of seat.
- At the head end, press button on rear of seat in and disconnect from seat tube.
- At the foot end, press the button

- MAKE SURE front seat canopy is folded forward. Attach rear seat frame to stroller frame as shown.
- Insert infant car seat into rear seat frame and push down on car seat until the latches snap into the seat attachment mounts.

- Check that infant car seat is securely attached by pulling up on it.
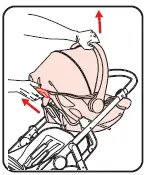
- To remove car seat: squeeze release handle at back of car seat, and lift car seat out of the stroller.
Attach Pad Onto Elevated Seat Frame
- Place seat pad onto frame aligning button on head end of pad with opening in frame. Press button in opening in frame.
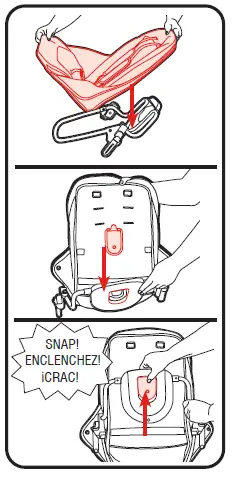
- Attach hook on foot end of seat pad to other end of frame.
- Wrap seat pad around frame and attach snaps on both sides of seat.

- Attach canopy mounts to sides of frame and hook and loop patches to rear of seat.
To Attach Graco® Infant Car Seat to Front Position
- Infant car seat can be inserted in seat rear facing.
- Remove body support (on certain models) if installed.
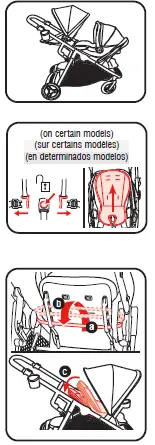
- Recline seat back to lowest position.
- Rotate front canopy forward or backwards, and close front canopy. If moving canopy backward, first remove the rear seat frame, move canopy, there attach rear seat frame if using.
ALWAYS keep front canopy attached when car seat is installed.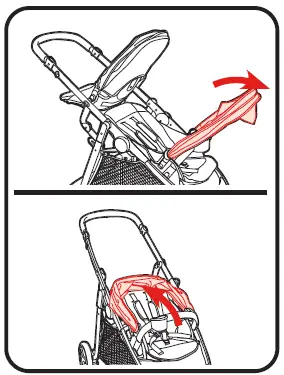
- Locate the 2 Click Connect™ mounts.
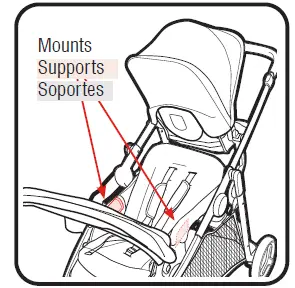
- Insert car seat into stroller and push down on car seat until the latches snap into the seat attachment mounts.

- Check that infant car seat is securely attached by pulling up on it.
- To remove car seat: squeeze release handle at back of car seat, and lift car seat out of the stroller.
To Fold Stroller Frame
NOTE: Stroller can be folded with or without elevated rear seat installed.
DO NOT fold stroller with a car seat in front or rear position.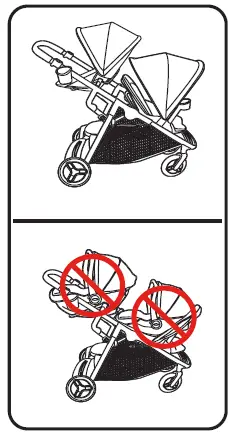
- Before folding stroller:
- Remove infant car seats
- Lock brakes
- Close canopies and rotate front canopy forward.
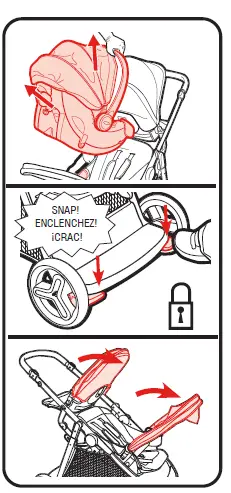
- To fold, press buttons on handle (a) and pull up on the folding latch (b).
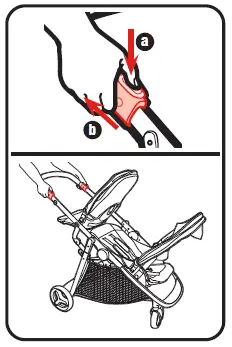
- Push handle down.
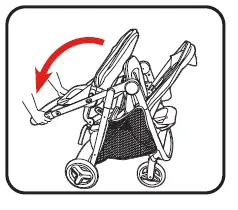
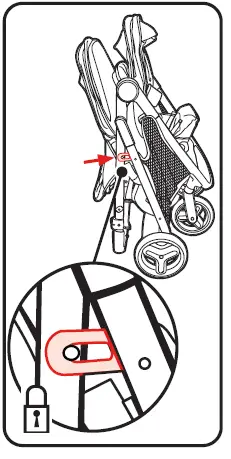
- Storage latch will engage, and stroller will rest on the rear wheels and handle.
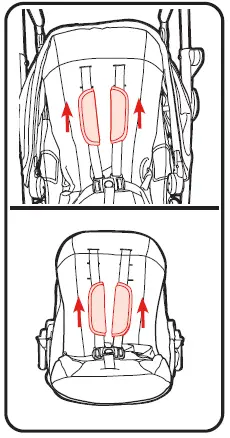
Harness Covers
- To attach harness covers, slide onto harness straps.
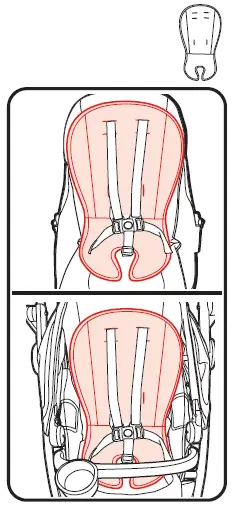
Body Support (on certain models)
WARNING: ONLY USE body support when harness is in lowest 2 harness positions.
- Insert harness straps through openings in body support corresponding with the slots the stroller harness straps are in.
Care and Maintenance
- TO CLEAN SEAT COVER, refer to your care tag on the seat pad for washing instructions. NO BLEACH.
- TO CLEAN STROLLER FRAME, use only household soap and warm water. NO BLEACH or detergent.
- FROM TIME TO TIME, CHECK YOUR STROLLER for loose screws, worn parts, torn material or stitching. Replace or repair the parts as needed. Use only Graco replacement parts.
- EXCESSIVE EXPOSURE TO SUN OR HEAT could cause fading or warping of parts.
- IF STROLLER BECOMES WET, open canopy and allow to dry thoroughly before storing.
- IF WHEEL SQUEAKS, use a light oil (e.g., WD-40, 3-in-1, or sewing machine oil). It is important to get the oil into the axle and wheel assembly as illustrated.
- WHEN USING YOUR STROLLER AT THE BEACH, completely clean your stroller afterward to remove sand and salt from mechanisms and wheel assemblies.
Replacement Parts
- Warranty Information (USA)
To purchase parts or accessories or for warranty information in the United States, please contact us at the following:
www.gracobaby.com
or/o
1-800-345-4109
To purchase parts or accessories or for warranty information in Canada, please contact us at the following:
www.gracobaby.ca
or/ou
1-800-345-4109
Product Registration (USA)
To register your Graco product from within the U.S.A. visit us online at www.gracobaby.com/productregistration or return registration card provided with your product. We currently do not accept product registrations from those living outside the United States of America.
