![]()
hama Universal Remote Control 4in1 / 8in1 Instruction Manual


4in1


Art.Nr.: 179779
8in1


Art.Nr.: 179780
Operating instruction
Universal remote control
Thank you for choosing a Hama product.
Take your time and read the following instructions and information in full.
Please keep these instructions in a safe place for later reference.
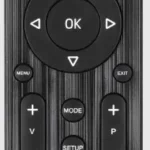
Function keys (4 in 1, 8 in 1 models)
- Mute switch
- Buttons for device selection
- Text ON: Switch on Teletext
- Hold: Hold current Teletext page
- ◄◄Rewind/red
►Play/yellow
►►Fast forward/blue
● Start recording
■ Stop/green
ll Pause/magenta - Shift key
- Menu: Open the device menu
- Mode key for selecting the secondary device group (only 8 in 1 model:
AUX,DVBT,CBL,AMP) - Vol+/Vol-: Volume control
- Setup: Remote control settings
- Number keys 0-9
- Smart TV: Open the Smart TV menu (if supported by the device)
Shift+Smart TV: Select external AV source - APPS: Open the App menu (if supported by the device)
Shift+APPS: Switch to two-digit channel numbers - PROG+/PROG-: Programme selection, up / down
- EXIT: Exit the device menu
- OK: Confirm selection
- EPG: Electronic Programme Guide (if supported by the selected AV device)
- Info: On-screen information (if supported by the AV device)
- Text OFF: Exit Teletext
- Power: ON/OFF / LED
1. Explanation of warning symbols and notes

This symbol is used to indicate safety instructions or to draw your attention
to specific hazards and risks.

This symbol is used to indicate additional information or important notes.
2. Supplied package
- Universal remote control
- List of codes
- These operating instructions
3. Safety instructions
- Do not use the universal remote control in damp environments and avoid contact with splashing water.
- Keep the universal remote control away from heat sources and do not expose it to direct sunlight.
- As with all electrical products, the universal remote control should be kept out of the reach of children.
- This product is intended for private, non-commercial use only.
- Use the product only for the intended purpose.
- Protect the product from dirt, moisture and overheating and use it in dry rooms only.
- Do not use the product in areas in which electronic products are not permitted.
- Do not drop the product and do not expose it to any major shocks.
- Do not modify the product in any way. Doing so voids the warranty.
- Keep the packaging material out of the reach of children due to the risk of suffocation.
- Dispose of packaging material immediately in accordance with the locally applicable regulations.
- Do not operate the product outside the power limits specified in the technical data.
- Do not open the device or continue to operate it if it becomes damaged.
- Do not attempt to service or repair the product yourself. Leave any and all service work to qualified experts.
- Only use the article under moderate climatic conditions.
- When inserting batteries, note the correct polarity (+ and – markings) and insert the batteries accordingly. Failure to do so could result in the batteries leaking or exploding.
- Only use batteries (or rechargeable batteries) that match the specified type.
- Before you insert the batteries, clean the battery contacts and the polarity contacts.
- Do not allow children to change batteries without supervision.
- Do not mix old and new batteries, or batteries of different types or from different manufacturers.
- Remove the batteries from products that are not being used for an extended period (unless these are being kept ready for an emergency).
- Do not short-circuit batteries.
- Do not charge batteries.
- Do not burn batteries.
- Keep batteries out of the reach of children.
- Never open, damage or swallow batteries or allow them to enter the environment. They can contain toxic, environmentally harmful heavy metals.
- Remove spent batteries from the product and dispose of them without delay.
- Avoid storing, charging and using in extreme temperatures and at extremely low atmospheric pressures (such as at high altitudes).
4. First steps – Inserting the batteries
- Alkaline batteries are recommended. Use two batteries of the type “AAA” (LR 03/Micro).
- Remove the battery cover on the back of the universal remote control (A).
- Insert the batteries, observing the “+/-” marks for polarity (B).
- Close the battery compartment (C).
- When replacing the batteries, all the codes you have programmed remain stored for up to 10 minutes. Make sure that you do not press any buttons until the new batteries are inserted in the remote control. If you press a button and there are no batteries in the remote control, all codes will be deleted.
- The remote control switches itself off automatically if a button is pressed for longer than 15 seconds. This prolongs the life of the batteries if the remote control is stuck in a place where the buttons are pressed permanently, e.g. between sofa cushions.
5. Setup
- For proper infra-red transmission, always hold the remote control in the approximate direction of the device to be operated.
- Press the “MODE” button to select the secondary device group: AUX, AMP,DVB-T, CBL (8 in 1 model only).
- Press the “SHIFT” key to control the blue function keys. The shift function is deactivated by pressing the “SHIFT” key again or automatically after 30 seconds if no key is pressed.
- If no entry is made within 30 seconds, SETUP mode is automatically terminated. The LED flashes six times and then goes out.
- Each type of device can be programmed under any device key, e.g. a TV can be programmed under DVD, AUX, etc.
- You cannot operate a device with the universal remote control while it is in Setup mode. Exit Setup mode and select the device to be operated using the device selection buttons.
- Please note that the remote control emits infra-red signals. These are not visible to the human eye.
5.1 Direct code entry
You can see the code list for this universal remote control under the next heading. The code list contains four-digit codes for setting the remote control to work with most AV equipment manufacturers.
For easy orientation, the codes are sorted first by type of device (TV, DVD, etc.) and within the type of device alphabetically by brand name.
- Switch the device you wish to operate on.
- Press the “SETUP” button until the LED lights up continuously.
- Use the device button to select the device to be operated (e.g. TV). If the selection is successful, the LED flashes once and then lights up permanently.
- Search the code list for the brand and type of the device to be operated.
- Enter the corresponding four-digit code using the number keys 0-9. The LED confirms the entry of each digit with a short flash and goes out after the fourth digit.
- Then test the remote control and check whether the desired functions can be controlled. It is possible that the first code is not the most suitable, and possibly not all functions are available. In this case, try the next code mentioned for the selected device type/brand from the list.
- Avalid code is automatically saved.
- If the code is invalid, the LED flashes six times and then goes out. Repeat steps 5.1.1 to 5.1.5, or use another method to enter the code.
Codes List
To view all of the programmable codes for this universal remote control you can download and view the PDF here. That PDF contains hundreds of codes sorted by manufacturer, making it easy to find your make of TV.
5.2 Manual code search
The universal remote control has an internal memory that already contains up to 350 codes per device type for the most common AV devices. You can go through these codes until the device to be operated shows a response. For example, the device to be operated switches off (“POWER” key) or changes channel (“PROG+/PROG-” key).
- Switch the device you wish to operate on.
- Press the SETUP button until the LED lights up permanently.
- Use the device button to select the device to be operated (e.g. TV). If the selection is successful, the LED flashes once and then lights up permanently.
- Press the “POWER” or “PROG+/PROG-” key to scroll through the preset codes until the device to be operated shows a response.
- Press “OK” to save the code and exit the code search. The LED goes out.
- Then test the remote control and check whether the desired functions can be controlled. It is possible that the first code found is not the most suitable, and possibly not all functions are available. In this case, repeat steps
- The code search starts with the next code following the last one saved.
- Amaximum of 350 codes of the most common devices can be stored in the internal memory. Due to the numerous AV devices available on the market, it may happen that only the most common main functions are available. If this is the case, repeat steps 5.2.1 to 5.2.5 to find a more compatible code. A code may not be available for some specific device models.
5.3 Automatic code search
The automatic code search uses the same preset codes as the manual code search (5.2). However, the universal remote control automatically searches the codes until the device to be operated shows a response. For example, the device to be operated switches off (“POWER” key) or changes channel (“PROG+/ PROG-” keys).
- Switch the device you wish to operate on.
- Press the “SETUP” button until the LED lights up continuously.
- Use the device button to select the device to be operated (e.g. TV). If the selection is successful, the LED flashes once and then lights up permanently.
- Press the “PROG+/PROG-” or “POWER” key to start the automatic code search. The LED flashes once and then lights up permanently. It takes 6 seconds for the universal remote control to start the first search.

Setting the search speed - The default setting for the search time per code is 1 second. If this does not suit you, you can change to a search time of 3 seconds per code. To switch between search times, press “PROG+” or “PROG-” within the 6 seconds before the automatic code search starts.
- The LED confirms the respective code searches with a single flash.
- As soon as the device to be operated shows a response, press the “OK” button to save the code and exit the code search. The LED goes out.
- Then test the remote control and check whether the desired functions can be controlled. It is possible that the first code found is not the most suitable, and possibly not all functions are available. In this case, repeat steps 5.3.1.–5.3.6.The code search starts with the next code following the last one saved.
- To cancel the automatic search during the search process, press the “EXIT” key.
- If all codes have been searched without success, the universal remote control exits the automatic code search and automatically returns to operating mode. The currently stored code remains unchanged.
5.4 Code recognition
Code recognition offers you the ability to determine a code you have already saved.
- Press the “SETUP” button until the LED lights up continuously.
- Use the device button to select the device to be operated (e.g. TV). If the selection is successful, the LED flashes once and then lights up permanently.
- Press the “SETUP” button. The LED flashes once and then lights up permanently.
- Press one of the number keys from 0 to 9 to search for the first digit. The LED flashes once for the first digit of the four-digit code number.
- Repeat step 5.4.4 for the second, third and fourth digits respectively.
- You can then enter the determined code in the table below if you need it again at a later time (e.g. after accidentally deleting the remote control settings).

6. Special functions
6.1 Station punch-through
With the station punch-through function, the PROG+ or PROG- commands can bypass the currently controlled device and change the stations of a second device. All other commands are unaffected.
To activate the station punch-through function:
- Press the desired device key (e.g. TV).
- Press and hold the “PROG+” button.
- Press the desired device key (e.g. SAT).
- Release the “PROG+” key again (the LED flashes once when the setting is activated).
To deactivate the station punch-through function:
- Press the desired device key (e.g. TV).
- Press and hold the “PROG-” button.
- Press the desired device key (e.g. SAT).
- Release the “PROG-” key again (the LED flashes twice when the setting is deactivated).
6.2 Volume punch-through
With the volume punch-through function, the VOL+ or VOL- commands can bypass the device currently being controlled and adjust the volume of a second device. All other commands are unaffected.
To activate the volume punch-through function:
- Press the desired device key (e.g. TV).
- Press and hold the “VOL+” button.
- Press the desired device key (e.g. SAT).
- Release the “VOL+” key again (the LED flashes once when the setting is activated).
To deactivate the station punch-through function:
- Press the desired device key (e.g. TV).
- Press and hold the “VOL-” button.
- Press the desired device key (e.g. SAT).
- Release the “VOL-” key again (the LED flashes twice when the setting is deactivated).
6.3 Macro Power
Macro Power allows you to switch two AV devices on/off simultaneously.
To activate the Macro Power function:
- Press the desired device key (e.g. TV).
- Press and hold the “POWER” button.
- Press the desired device key (e.g. SAT).
- Release the “POWER” button again (the LED flashes once when the setting is activated).
To deactivate the Macro Power function:
- Press the desired device key (e.g. TV).
- Press and hold the “POWER” button.
- Press the desired device key (e.g. SAT).
- Release the “POWER” button again (the LED flashes twice when the setting is deactivated)
7. Maintenance
- Never use old and new batteries in the universal remote control at the same time, as old batteries tend to leak and can lead to a loss of performance.
- Never clean the universal remote control with scouring agents or harsh cleaning agents.
- Keep the universal remote control free of dust by cleaning it with a dry soft cloth.
8. Troubleshooting
Q. My universal remote control does not work!
A. Check the AV device. If the main switch on the device is off, the universal remote control cannot operate the device.
A. Check that the batteries are inserted correctly and that the polarity has been observed.
A. Check that you have pressed the appropriate device button for the device.
A. Replace the batteries if the battery level is low.
Q. If there are multiple device codes listed for the brand of my AV device, how do I select the correct device code?
A. To determine the correct device code for the AV device, test the codes one after the other until most of the buttons work properly.
Q. My AV device only responds to some key commands.
A. Try other codes until most of the buttons work properly.
Q. The brand of my AV device is not mentioned in the code list.
A. In this case, use the manual code search (Section 5.2) or the automatic code search (Section 5.3). During the code search, all codes for a device type are tested across manufacturers, e.g. all codes for SAT receivers regardless of the manufacturer.
Q. I have tried all the available codes for the brand of my AV device from the code list, but none of the codes mentioned work.
A. In this case, use the manual code search (Section 5.2) or the automatic code search (Section 5.3). During the code search, all codes for a device type are tested across manufacturers, e.g. all codes for SAT receivers regardless of the manufacturer.
9. Warranty disclaimer
Hama GmbH & Co KG assumes no liability and provides no warranty for damage resulting from improper installation/mounting, improper use of the product or from failure to observe the operating instructions and/or safety notes.
10. Recycling information
Note on environmental protection:
![]()
![]()
Hama GmbH & Co KG
86652 Monheim/Germany
www.hama.com
Service & Support
Web: www.hama.com
Call: +49 9091 502-0

All listed brands are trademarks of the corresponding companies. Errors and omissions excepted, and subject to technical changes. Our general terms of delivery and payment are applied.