The Honeywell Vista is an alarm system that communicates wirelessly with the central monitoring station. The system consists of motion detectors, door and window contacts, smoke and heat sensors, glass breakage detectors and more to detect intruders or fire. This Honeywell user manual provides instructions for the installation and use of this powerful security system in your home or business.
Sections in this Manual
For VISTA-20P / VISTA-20PSIA & VISTA-15P / VISTA-15PSIA
ADEMCO VISTA SERIES SECURITY SYSTEMS
Full User Guide Available Online: This Quick Guide describes the most frequently used features and functions of your system.
Congratulations on your ownership of a Honeywell Security System. This system provides:
- Three forms of detection: burglary, fire and emergency (see your installer for which forms of detection are installed)
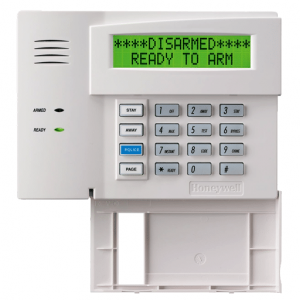
- At least one keypad which provides control of system and displays system status
- Various sensors for perimeter and interior burglary detection
- Optional smoke or combustion detectors designed to provide early warning in case of fire.
Your system may also be programmed to automatically send alarm and status messages to a Central Monitoring Station.
SYSTEM BASICS
The following is a list of some of the most common features and functions of your system:
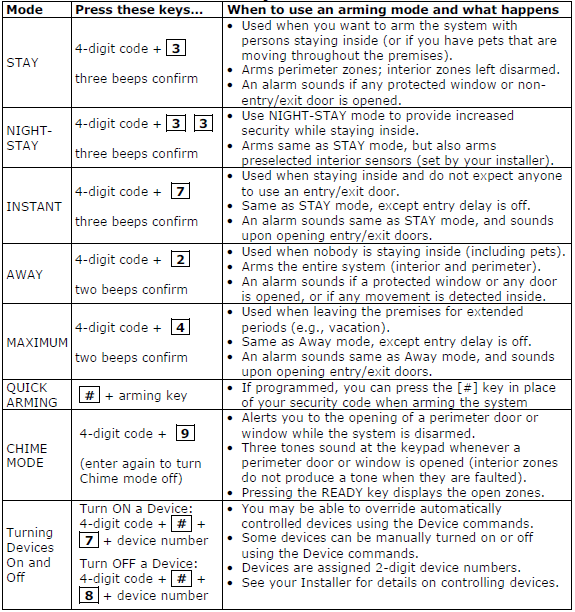
- Several modes of burglary detection: Stay, Night-Stay, Away, Instant, Maximum.
- Bypass feature lets you bypass selected zones while leaving the rest of the system armed.
- Chime mode alerts you to the opening of protected doors and windows while the system is disarmed.
- Fire and carbon monoxide detection are always active (if installed) and an alarm sounds if a fire or carbon monoxide condition is detected.
- Panic keys (if programmed) let you manually initiate a fire and personal alarms using the keypad.
- 4-digit security codes are used in conjunction with keypad command to perform system functions.
- Each user can be assigned a different security code, each with different authority levels.
- The system sensing devices have been assigned to various “zones,” which are specific areas of detection (e.g., front door, kitchen window, etc.).
- Zone numbers (points of detection) are displayed at the keypad when an alarm or trouble condition occurs.
- Partitions (VISTA-20P Series) provide two independent areas of detection plus an optional common zone area, with each partition containing a group of zones that can be armed and disarmed without affecting other zones or users.
- Function keys may have been programmed to perform various functions. Ask your installer if these keys are active.
- A Scheduling feature can be programmed to automatically perform certain functions (e.g., arm the system) at a predetermined time each day. See the full User Guide for details.
ENTRY/EXIT DELAYS
- Entry Delays give you time to disarm the system when you enter through the designated entrance door.
- You must disarm the system before the entry delay period ends, or an alarm will occur (keypad beeps during the entry delay period, reminding you to disarm the system).
- Exit delay gives you time after arming the system to leave through the designated exit door(s) without setting off an alarm. If programmed, a slow beeping will sound during the exit delay period until the last 10 seconds, which then changes to fast beeping (alerting you to the end of exit delay). If you cannot leave within this delay time period, you should stop, disarm the system, and start over to avoid a false alarm.
- See your installer for your delay times. See the full User Guide for details on Exit Error alarms.
NOTES on BURGLARY DETECTION
- The system must be armed before the burglary detection can sense intrusions.
- To arm your system, enter your security code followed by the desired arming key.
- To disarm the system, enter your security code then press the OFF key.
- When an alarm occurs, the keypad sounds and displays the zone(s) causing the alarm. The external sounder may also sound.
- If your system is connected to a Central Monitoring Station, an alarm message is also sent (delayed 30 seconds by default to reduce false alarms).
- To stop the alarm sounding, simply disarm the system.
- Memory of Alarm: When an alarm condition occurs, the keypad displays the number(s) of the zone(s) that caused the problem, and displays the type of alarm. Clear the Memory of Alarm display by entering another “off” sequence.
IMPORTANT: If you return to the premises and the main burglary sounder is on, or the keypad beeps rapidly upon entering the premises, it indicates that an alarm has occurred during your absence and an intruder may still be on the premises. LEAVE IMMEDIATELY and CONTACT THE POLICE from a nearby safe location.
CHECKING OPEN ZONES
Checking Zones: Before arming your system, all protected doors, windows and other detection zones must be closed or bypassed; otherwise the keypad displays “Not Ready.” GOTO: If the user is authorized, a keypad in one partition can be used to perform system functions in the other partition by using the GOTO command. Must use an Alpha keypad.

ARMING THE SYSTEM, CHIME MODE, and CONTROLLING DEVICES
Before arming, close all perimeter doors and windows and make sure the Ready to Arm message is shown. After arming, leave the premises through an entry/exit door during the exit delay period and be sure the door is reclosed to avoid causing an alarm.

DISARMING THE SYSTEM and SILENCING ALARMS
The 1 OFF key is used to disarm the system, silence alarm and trouble sounds, and clear memory of alarm displays.


