Sections in this Manual
TESTING THE SYSTEM
Using the Test mode allows each detection point to be checked for proper operation. Testing should be conducted weekly to ensure proper operation.
- The keypad sounds a single beep about every 30 seconds as a reminder that the system is in the Test mode.
- Alarm messages are not sent to your Central Station while Test mode is on.
If a problem is experienced with any detection point (no confirming sounds, no display), call for service immediately.
- Disarm the system and close all protected windows, doors, etc. The READY indicator light should come on if all zones are intact
- Enter your 4-digit Master code + 5 + 0 (walk)
- Listen. The external sounder should sound for about 1 second then turn off. If the sounder does not sound, CALL FOR SERVICE. The “Test in Progress” display appears only on the keypad that started the test.
- Fault zones. Open each protected door and window in turn and listen for three beeps from the keypad. Each faulted detection point should appear on the display. The display clears when the door or window is closed.
- Walk in front of any interior motion detectors (if used) and listen for three beeps. Each detector should appear on the display when it is activated. The display clears when no motion is detected. Note that if wireless motion detectors are used, there is a 3-minute delay between activations to conserve battery life.
- Test all smoke detectors, following the manufacturer’s instructions.
- When all detection points have been checked and are intact (closed), there should be no zone numbers displayed.
- Exit test mode: 4-digit code + 1
TROUBLE CONDITIONS
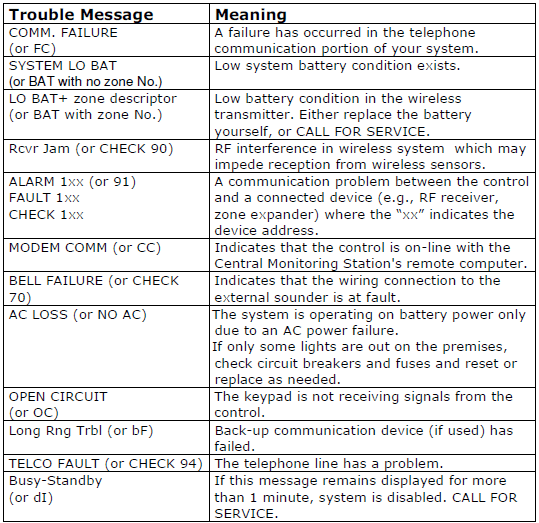
The word CHECK on the keypad’s display, accompanied by a “beeping” at the keypad, indicates a trouble condition in the system at the displayed zone number sensor and requires your attention.
Determine if the zone(s) displayed are intact and make them so if they are not. If the display persists, CALL FOR SERVICE.
To silence the beeping for these conditions, press any key.
Typical Trouble conditions include the following:

SETTING THE DATE AND TIME
NOTE: All partitions must be disarmed before date/time can be set.
You can set the time and date by doing the following:
- [ ] [ ] [ ] +[#] + [6] [3] (Master Code)
- Press [ * ] when the time/date is displayed. A cursor appears under the first digit of the hour. To move cursor ahead, press [ * ]. To go back, press [#].
- Enter the 2-digit hour setting.
- Enter the 2-digit minute setting.
- Press [1] for PM or [2] for AM.
- Enter the last two digits of the current year.
- Enter the 2-digit month setting.
- Enter the 2-digit day setting.
3. To exit, press [*] when cursor is at the last digit, or wait 30
seconds.
NOTES
SERVICING INFORMATION
Your local Honeywell dealer is the person best qualified to service your alarm system. Arranging some kind of regular service program with him is advisable. Your local Honeywell dealer is:
Name:______________________________
Address:____________________________
Phone:_____________________________
Honeywell Contact Info
2 Corporate Center Drive, Suite 100
P.O. Box 9040, Melville, NY 11747
Copyright © 2011 Honeywell International Inc.
www.honeywell.com/security

