Hand-free Area-Imaging Scanner
HF680
Hand-free Area-Imaging Scanner
User’s Guide
Disclaimer
Honeywell International Inc. (“HII”) reserves the right to makes changes in specifications and other information contained in this document without prior notice, and the reader should in all cases consult HII to determine whether any such changes have been made. The information in this publication does not represent a commitment on the part of HII. HII HII HII HII shall not be liable for technical or editorial errors or omissions contained herein; nor for incidental or consequential damages resulting from the furnishing, performance, or use of this material. HII
This document contains proprietary information that is protected by copyright. All rights are reserved. No part of this document may be photocopied, reproduced, or translated into another language without the prior written consent of HII. HII Copyright 2015-6 Honeywell International Inc. All rights reserved. 2015-6 Honeywell International Inc. Web Address: www.honeywellaidc.com Microsoft® Windows® and the Windows logo are trademarks or registered trademarks of Microsoft Corporation. Microsoft® Windows® Windows
Other product names or marks mentioned in this document may be trademarks or registered trademarks of other companies and are the property of their respective owners. For patent information, refer to www.hsmpats.com
www.hsmpats.com
Customer Support
Technical Assistance
If you need assistance installing or troubleshooting your device, please contacts us by using one of the methods below: Knowledge Base: www.hasknowledgebase.com www.hsmknowledgebase.com
Our knowledge Base provides thousands of immediate solutions. If the knowledge Base cannot help, our Technical Support Portal (see below) provides an easy way to report your problem or ask your question. Technical Support Portal: www.hsmsupportportal.com www.hsmsupportportal.com
The technical Support Portal not only allows you to report your problem, but it also provides immediate solutions to your technical issues by searching our Knowledge Base. With the Portal, you can submit and track your questions online and send and receive attachments. Web form: www.hsmcontactsupport.com www.hsmcontactsupport.com You can contact our technical support team directly by filling out our online support. Enter your contact details and the description of the question/problem. Telephone: www.honeywellaidc.com/locations For our latest contact information, please check our website at the link above. www.honeywellaidc.com/locations
Product Service and Repair
Honeywell International Inc. provides service for all of its products through service centers throughout the world. To obtain warranty or non-warranty service, please visit www.honeywellaidc.com and select Support>Contact Service and Repair to see your region’s instructions on who to obtain a Return Material Authorization (RMA#). You should do this prior to returning the product. www.honeywellaidc.comChinese > > RMAReturn Material
Authorization
Refer to www.honeywellaidc.com/warranty_information for your product’s warranty information. www.honeywellaidc.com/warranty information
Send Feedback
Your feedback is crucial to the continual improvement of documentation. To provide feedback about this manual, contact the Honeywell Technical Communications department at [email protected]. [email protected]
Getting Started
This User’s Guide provides installation and programming instructions for the HF510 corded area-imaging scanner. Product specifications, dimensions, warranty, and customer support information are also included. HF680 Honeywell barcode scanners are factory programmed for the most common terminal and communications settings. If you need to change these settings, programming is accomplished by scanning the bar codes in this guide. An asterisk (*) next to an option indicates the default setting. (*)
Unpacking Your Device
After you open the shipping carton containing the product, take the following steps: · Check for damage during shipment. Report damage immediately to the carrier who delivered the carton. · Make sure the items in the carton match yourorder. · Save the shipping container for later storage or shipping. · · ·
Connecting the Device
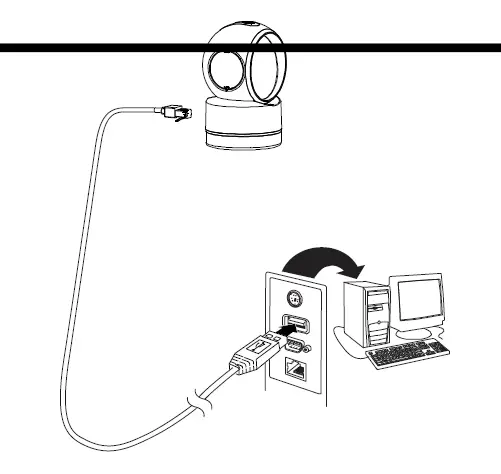
Connecting with USB USB
A scanner can be connected to the USB port of a computer. USB
- Connect the appropriate interface cable to the device first, then to the computer. 1. HF680 USB Connection: HF680 USB
- The scanner beeps.
- Verify the scanner operation by scanning a barcode from the Sample Symbols in the back of this manual. The unit defaults to a USB PC Keyboard. 2. 3. Sample Symbols USB PC
Connecting with RS232 Serial Port RS232
- Turn off power to the terminal/computer.
- Connect the appropriate interface cable to the device. 1. / 2. Note: For the scanner to work properly, you must have the correct cable for your type of terminal/computer. / HF680 RS232 Serial Port Connection: HF680 RS232 Power Adapter (if included)
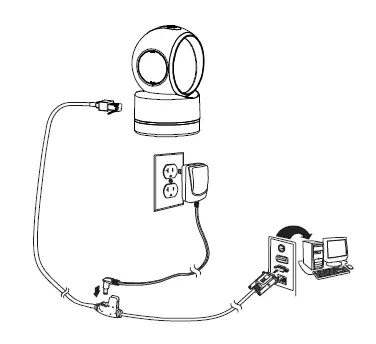
Note: The power supply must be ordered separately, if needed. - Plug the serial connector into the serial port on your computer. Tighten the two screws to secure the connector to the port.
- Once the scanner has been fully connected, power up the computer. 3. 4. This interface programs 115,200 baud, 8 data bits, no parity, and 1 stop bit. 115,200 8 1
Barcode Configuration Guide
Your new scanner has been configured at the factory with a set of default communication protocol. Since many host systems have unique formats and protocol requirements, Honeywell provides a wide range of configurable features that may be selected with the use of this barcode configuration guide.
Once the configuration is completed, the scanner stores the settings into the Flash and the settings won’t lose when the power is turned off.
Symbol Key
* (asterisk) * Default Feature
~ (tilde) ~Feature requires the Multi-Code Configuration Method, See section “Barcode Configuration Method”.
Barcode Configuration Methods
This scanner can be barcode configured in two ways: the Single-Code Method and the Multi-Code Method.
Single-Code Method
Most features can be enabled or disabled using the Single-Code Method.
- Power up the scanner.
- Scan the barcode(s) for the desired feature(s).
- Observe a multi-tones, “save setting” beep that indicates the configuration has been saved. 1. 2. 3. “”
Multi-Code Method
All features can be enabled or disabled using the Multi-Code Method. A features marked with a “~” requires the Multi-Code Method. “~”
- Power up the scanner.
- Scan the Enter/Exit Configuration Mode barcode. [3 beeps]
- Scan the barcode(s) for the desired feature(s). [1 beep]
- Scan the Enter/Exit Configuration Mode barcode [3 beeps] and save new configuration. 1. 2. /[3 ] 3. [1 ] 4. / [3 ] Enter/Exit Configuration Mode /
Note: To abort a configuration change, power off the scanner before scanning the Enter/Exit Configuration Mode barcode. /

Factory Default Settings
This selection erases all your settings and resets the scanner to the original factory defaults. Scan the Recall Default barcode. This will erase all previous settings and return to the scanner’s factory default settings.
Recall Default
Get Firmware Revision Number
Scan the following barcode, scanner will output the software revision number.
Firmware Revision
Get Product Serial Number
Scan the following barcode, scanner will output the product serial number. It’s a unique number to each unit.
Product Serial Number
Operating Modes Settings
*IR Trigger Mode

*Presentation Mode
Note: In this mode, the unit work with IR Trigger to detect object. When IR is trigger on, it will start to scan and decode bar code symbols. After 5 Seconds, IR trigger is trigger off, the unit will enter a power save mode and stop decoding. the Bar code data will be output in a format determined by the selected terminal interface. 5
Streaming Presentation
Note: In this mode, the unit work with optical trigger & IR Trigger to detect barcode symbol. When optical trigger is trigger on, it will start to scan and decode bar code symbols. After 5 Seconds, optical trigger will trigger off, the unit will enter a power save mode and stop decoding. the Bar code data will be output in a format determined by the selected terminal interface.
Note: In this mode, the unit will keep to scan and decode bar code symbols all the time. Bar code data will be output in a format determined by the selected terminal interface. In the case where a menu bar code symbol is decoded, the scanner will switch operation to the respective mode.
Programming the Interface
Introduction
This chapter describes how to program your system for the desired interface. Currently the scanner support three kinds of communication interface, RS232, USB HID and USB Serial. You can scan the following barcodes to switch the scanner into specific interface. You should also change the cable after that. RS232 USB HID USB
(1)
RS232 Interface RS232
(2) USB HID
USB HID Interface USB HID
(3) USB Serial USB
USB Serial Interface USB
3 4
Note: No extra configuration (e.g., baud rate) is necessary.
RS232 Settings RS232
Factory default settings of RS232 interface are in the below table. RS232
Option Baud Rate Data Format
Setting 115,200 bps
8 data bits, no parity bit, 1 stop bit 8 1
1. Baud Rates 1. A “Baud” or “Baud Rate” is the speed at which data is transmitted. Select a Baud for the scanner that matched the host device. “”””
*115200 57600
38400
4 – 1
19200 4800
9600 2400
1200
600
300
2. Parity Features A parity bit is an extra data bit used for help catch data transmission errors. The scanner’s parity must match the host’s parity.
*No Parity *
Odd Parity
3. Data/Stop Bits / Choose the number of bits transmitted for each character.
Even Parity
3 4
7 Data Bits
7
*8 Data Bits
*8
*1 Stop Bits *1
2 Stop Bits 2
4. Hardware Handshaking
When enable this feature, scanner will output a Request to Send (RTS) signal and wait for a Clear to Send(CTS) signal before transmitting data.
RTSCTS
Enable RTS/CTS Handshaking RTS/CTS
*Character RTS/CTS Activate/Deactivate RTS signal for each character. * RTS/CTS / RTS
Invert RTS Polarity RTS
*Disable RTS/CTS Handshaking * RTS/CTS
Message RTS/CTS Activate RTS before sending the first character and leave it
active until after the last character has been transmitted. RTS/CTS RTS
*Standard RTS Polarity * RTS
4 – 1
Invert CTS Polarity CTS
*Standard CTS Polarity * CTS
Activate RTS, Do not wait for CTS. RTS CTS
5. Software Handshaking
*Activate RTS,wait for CTS * RTS CTS
Enable XON/XOFF Handshaking XON/XOFF
*Disable XON/XOFF Handshaking * XON/XOFF
The scanner will stop transmission whenever an XOFF(ASCII 13H) is received. Transmission will resume after an XON(ASCII 11H) is received. XOFFASCII 13H XON ASCII 11H
ACK/NAK Feature ACK/NAK
Note: When Disabled this feature, please do not transfer XOFF(ASCII 13H) to the scanner. The may cause the scanner abnormal. If sent, transfer DC2(ASCII 12H) can recover the scanner.
XOFFASCII 13H
DC2ASCII 12H
If enable this feature, after transmitting data, wait for an ACK(06H) or a NAK(15H) response from the host. If ACK is received, the scanner will beep 1 time and complete the communications cycle and looks for more barcodes. If NAK is received, retransmit the last set of barcode data and waits for ACK/NAK again. ACK06H NAK15H ACK 1 NAK ACK/NAK
Enable ACK/NAK ACK/NAK
*Disable ACK/NAK * ACK/NAK
3 4
Support BEL/CAN in ACK/NAK ACK/NAK BEL/CAN
*Ignore BEL/CAN in ACK/NAK * ACK/NAK BEL/CAN
If enable this feature, when BEL(07H) is received, the scanner beeps 3 times and exits the communications loop. If a CAN(18H) is received, then the scanner will exit the communications loop silently. BEL07H 3 CAN18H
Enable 5 Retries on ACK/NAK Time Out ACK/NAK 5
Allow up to 5 NAK Retransmissions of the data Before dropping out of the Communications loop. 5 NAK
Note: The ACK/NAK Time Out value equals to the communication time outs value. Please refer to the section “Communication Time Out Options”. ACK/NAK “”
*Disable 5 Retries on ACK/NAK Time Out * ACK/NAK 5
Do not limit retransmission To 5 NAK cycles. 5 NAK
4 – 1
Input/output Settings /
Illumination LED Setup LED
Use these codes to control illumination LED ON/OFF. LED /
*Illumination LED ON * LED
Illumination LED OFF LED
Illumination LED Level LED
Use these codes to control illumination level LED
Low level
Mid-level
3 4
*High level *
Illumination LED Mode LED
Use these codes to control illumination mode LED
paper illumination
*paper & Cellphone *
Pure cellphone
4 – 1
Illumination wakeup in Presentation
Use these codes to wakeup illumination to fast detect object, only work for presentation mode
*Enable *
Disable
Indicate LED Mode LED
Use these codes to control indicate LED mode LED
*Led always on *
BEEPER
Use these codes to control beeper ON/OFF /
Led always off
3 4
* Beep enable (2700HZ) *2700HZ
IR SWITCH
Use these codes to control IR ON/OFF /
Beeper disable
*IR on *
IR off
IR interval time Outs
Use these codes to control IR interval time Out
Interval time out 50 ms 50 ms
*Interval time out 250 ms * 250 ms
4 – 1
Same Symbol Time Outs
These numbers determine the length of time before a barcode can be rescanned after it is removed from the scan field. Single code fixed settings in msecs of No, 50,100,200,750,1200(1.2 sec),2000(2.0 sec) and infinite are available. User configurable values can be set in user-configurable increments of 50 msecs to 6350 msecs (6.35 sec).
050100200750 12001.2 20002.0 50 6350 6.35
Note: This feature only take effect in Streaming Presentation Mode.
No Same Symbol Time Out
Same Symbol Time Out 100 msecs 100
Same Symbol Time Out 200 msecs 200
Same Symbol Time Out 500 msecs 500
* Same Symbol Time Out 750 msecs * 750
Same Symbol Time Out 1200 msecs 1200
Same Symbol Time Out 2000 msec 2000
3 4
Infinite Same Symbol Time Out
The scanner will not repetitively Scan the same barcode.
~ Variable Same Symbol Time Out ~ Using the Multi-Code Method, scan this barcode and a code byte sequence from section “Code Byte Usage” to set the same symbol time-out duration. Values range from 001 to 127(50 to 6350 msecs). “”
001 127 50 6350
4 – 1
Inter-Character Data Transmission Delays
Use these codes to select the amount of delay between sending data characters and “Bar Code” records from the scanner to the host. This helps prevent the scanner from overflowing host input buffers. “”
*1 msec Inter-Character Delay * 1
10 msec Inter-Character Delay 10
25 msec Inter-Character Delay 25
Note: This feature only applies for RS232 Interface. RS232
~ Variable msec Inter-Character Delay ~
Scan this barcode and sequence of code bytes in Section “Code Byte Usage” to set the delay. Delay range can be set from 1 to 255 msecs. Refer to the Multi-Code Configuration Method. “”
1 255
3 4
Communication Time Out Options
Enable Communications Time Outs
*Disable Communications Time Outs *
~ Variable Communications Time Out Unit: 50 ms. ~ 50
* Default Communications Time Out (2 secs) *2
Short Communications Time Out (1 sec ) 1
Three Beeps on Time Out
Long Communications Time Out (4 secs) 4
* No Beeps on Time Out *
4 – 1
Razzberry Tone on Time Out Razzberry
* No Razzberry Tone on Time Out * Razzberry
3 4
Data Editing
CR/LF Suffix Settings CR/LF
1, CR Suffix Setting CR
*Enable CR Suffix * CR
2, LF Suffix Settings LF
*Enable LF Suffix
* LF
3, ignore http/https http/https
Disable CR Suffix CR
Disable LF Suffix
LF
Enable ignore http
*Disable ignore http
4 – 1
http
* http
5 3
Symbologies
In this section, contains all the configuration barcodes to switch each symbology on/off. /
1, UPC/EAN
1D Barcode Type Settings 1D
*Enable UPC/EAN * UPC/EAN
Disable UPC/EAN UPC/EAN
*Enable UPC-A * UPC-A
*Enable UPC-E * UPC-E
*Enable EAN-13 * EAN-13
*Enable EAN-8 * EAN-8
Disable UPC-A UPC-A
Disable UPC-E UPC-E
Disable EAN-13 EAN-13
Disable EAN-8 EAN-8
Enable EAN-UCC Composite Codes EAN-UCC
*Disable EAN-UCC Composite Codes
* EAN-UCC
5 – 2
Note: Enable this feature may cause normal EAN or UCC barcode decode fail. EAN UCC
2, Code128
*Enable *
3, Coupon Code 128
Enable
4, EAN99 Coupon
Enable
5, Number System 4 Coupon Code 128
Enable
Note: To enable this feature, you should enable coupon code 128 first. coupon code 128
6, Code39
Disable
*Disable *
*Disable *
*Disable *
*Enable *
Disable
Enable MOD 43 Check on Code 39 Code 39 MOD 43
*Disable MOD 43 Check on Code 39 * Code 39 MOD 43
5 3
Transmit Mode 43 Check Digit on Code 39 Code 39 MOD 43
*Do Not Transmit Mode 43Check Digit on Code 39
* Code 39 MOD 43
Enable Full ASCII Code 39 ASCII Code 39
*Disable Full ASCII Code 39 * ASCII Code 39
Enable PARAF Support (Italian Pharmaceutical Codes) PARAF
*Disable PARAP Support * PARAP
*Allow PARAF Codes Only * PARAF
Allow Non-PARAF Codes PARAF
Note: To configure this feature, you should enable code39 and enable PARAF support first. code39 PARAF
7, Trioptic Code
Enable
8, Interleaved 2 of 5(ITF) 25 ITF
*Disable *
*Enable *
Disable
5 – 2
9, Standard 2 of 5 25
*Enable *
10, Matrix 2 of 5 25
*Enable *
*Disable checksum checking *
Disable
Disable
Enable checksum checking
Enable checksum checking and strip the checksum from the result string
11, Airline 2 of 5 25
Enable
12, Codabar
*Disable *
*Enable *
Disable
5 – 5
13, Code 93
*Enable *
14, Code 11
*Enable *
15, Telepen
Enable
16, MSI Plessey
Enable
17, RSS 14
Enable
*Transmit RSS 14 Check Digit * RSS 14
*Transmit RSS 14 Application ID * RSS 14 ID
Disable
Disable
*Disable *
*Disable *
*Disable *
Do Not Transmit RSS 14
Check Digit RSS 14
Do Not Transmit RSS 14
Application ID RSS 14 ID
5 6
Transmit RSS 14 Symbology ID RSS 14 ID
18, RSS Limited
Enable
*Do Not Transmit RSS 14 Symbology ID * RSS 14 ID
*Disable *
*Transmit RSS Limited Check Digit * RSS Limited
Do Not Transmit RSS Limited Check Digit RSS Limited
*Transmit RSS Limited Application ID * RSS Limited ID
Do Not Transmit RSS Limited Application ID RSS Limited ID
Transmit RSS Limited Symbology ID RSS Limited ID
*Do Not Transmit RSS Limited Symbology ID * RSS Limited ID
19, GS1 DataBar Expanded GS1 Databar
Enable
*Disable *
Transmit RSS Expanded Symbology ID RSS Expanded ID
Do Not Transmit RSS Expanded Symbology ID RSS Expanded ID
5 5
Postal Codes Settings
Note: Only one Postal Code selection can be active at one time.
1, Hong Kong 2 of 5 25
Enable
2, Australian Post
*Disable *
Enable
3, British Post
*Disable *
Enable
4, Canadian Post
*Disable *
Enable
5, Japanese Post
Enable
6, Korean Post
Enable Koread Post Reverse Koread Post
*Disable *
*Disable *
*Disable *
5 – 8
*Enable *
7, Netherlands Post
Enable
8, Postnet Code Postnet
Enable
9, Planet Code
Enable
Disable
*Disable *
*Disable *
*Disable *
5 – 7
1, PDF417
2D Barcodes Type Settings 2D
Enable
2, Micro-PDF417
*Disable *
Enable
3, Codablock A
*Disable *
Enable
4, Codablock F
*Disable *
Enable
5, Data Matrix
*Disable *
Enable
6, Aztec Code
*Disable *
Enable
7, MaxiCode
Enable
*Disable *
*Disable *
5 – 10
8, QR Code
*Enable
9, Micro QR Code
Enable
10, DPM Code DPM
Dot peen DPM Enable DPM
Reflective DPM Enable DPM
Disable *
*Disable *
*Disable *
5 – 9
6
Product Specifications
MECHANICAL
Dimensions (L x W x H): 85 mm x 88mm x 139 mm x x 85 mm x 88mm x 139 mm Weight: 278 +/-10g 278 +/-10g
ELECTRICAL
Input Voltage: 5 VDC ±0.5V 5 VDC ±0.5V Operating Power: 2.0 W (400 mA @ 5V) 2.0 W (400 mA @ 5V) Standby Power: 0.85 W (170 mA @ 5V) 0.85 W (170 mA @ 5V) Host System Interfaces: USB, RS-232 USBRS-232
ENVIRONMENTAL
Operating Temperature: -10°C to 40°C (14°F to 104°F) -10°C 40°C (14°F 104°F) Storage Temperature: -40°C to 60°C (-40°F to 140°F) -40°C 60°C (-40°F 140°F) Humidity: 0% to 95% relative humidity, non-condensing 0% 95% Drop: Designed to withstand 1 m drops 1 Light Levels: 100,000 Lux 100,000 Lux
SCAN PERFORMANCE
Scan Pattern: Area Image (1280 x 800 pixel array)
1280 x 800
Motion Tolerance: 2.5 m/s for 13 mil UPC at optimal focus
2.5 m/s 13 mil UPC
Scan Angle: Horizontal: 47°; Vertical: 30°
47°30°
Print Contrast: 20% minimum reflectance difference
20%
Pitch, Skew: 60°, 70°
60°, 70°
Decode Capability: Reads standard 1D, PDF, 2D Symbologie (Decode capabilities dependent on kit configuration).
1DPDF2D
Warranty: 3-year factory warranty
3
TYPICAL PERFORMANCE* *
NARROW WIDTH
DEPTH OF FIELD
5.0 mil Code 39
0 mm 100 mm
6.7 mil PDF
0 mm 110 mm
10 mil DM
0 mm 90 mm
13 mil UPC-A
0 mm 210 mm
20 mil Code 39
0 mm 300 mm
20mil QR
0 mm 210 mm
GUARANTEED PERFORMANCE*
*
6 – 2
6
NARROW WIDTH
DEPTH OF FIELD
5.0 mil Code 39
10 mm 70 mm
6.7 mil PDF
0 mm 80 mm
10 mil DM
5 mm 80 mm
13 mil UPC-A
0 mm 165 mm
20 mil Code 39
0 mm 220 mm
20mil QR
0 mm 180 mm
* Resolution: 1D: 3 mil
2D: 6.7 mil
* Performance may be impacted by barcode quality and environmental conditions
* 1D: 3 mil
2D: 6.7 mil
*
6 3
6
Standard Cable Pinouts
Note: The following pin assignments are not compatible with Youjie legacy products. Use of a cable with improperpin assignments may lead to damage to the unit. Use of any cables not provided by the manufacturer may result in damage not covered by your warranty.
Youjie
Serial Output
10 Pin RJ41 Modular Plug 10 RJ41
1 Cable shield 2 Cable select 3 Supply ground 4 Transmit data 5 Receive data – serial data to scanner – 6 CTS 7 +5V power +5V 8 RTS 9 10
USB
10 Pin Modular Plug 10
1 Cable shield
2 Cable select 3 Supply ground
4 5
6 7 +5V
power 8 9 Data + 10 Data –
6 – 2
7
Maintenance and Troubleshooting
Repairs
Repairs and/or upgrades are not to be performed on this product. These services are to be performed only by an authorized service center (see Technical Assistance on page Customer Support). / Technical Assistance
Maintenance
Your device provides reliable and efficient operation with a minimum of care. Although specific maintenance is not required, the following periodic checks ensure dependable operation:
Cleaning the Device
Reading performance may degrade if the scanner’s window is not clean. If the window is visibly dirty, or if the scanner isn’t operating well, clean the window with a soft cloth or lens tissue dampened with water (or a mild detergent- water solution). If a detergent solution is used, rinse with a clean lens tissue dampened with water only. The scanner housing may also be cleaned the same way.
7 – 1
7
Caution:
Do not submerge the scanner in water. The scanner’s housing is not watertight.
Do not use abrasive wipes or tissues on the scanner’s window abrasive wipes may scratch the window. Never use solvents (e.g., alcohol or acetone) on the housing or window solvents may damage
the finish or the window.
Inspecting Cords and Connectors
Inspect the interface cable and connector for wear or other signs of damage. A badly worn cable or damaged connector may interfere with scanner operation. Contact your distributor for information about cable replacement. Cable replacement instructions are on page Customer Support. Customer Support
Replacing Cable in the Scanner
The standard interface cable is attached to the scanner with a 10-pin modular connector. When properly seated, the connector is held in the scanner by a flexible retention tab. The interface cable is designed to be fieldreplaceable.
10 · Order replacement cables from Honeywell or from an authorized distributor. · When ordering a replacement cable, specify the cable part number of the original interface cable. · ·
Troubleshooting the Scanner
The scanner automatically performs self-tests whenever you turn it on. If your scanner is not functioning properly, review the following Troubleshooting Guide to try to isolate the problem.
Is the power on? If the white LED isn’t illuminated, checkthat: LED · The cable is connected properly. · The host system power is on (if external power isn’t used). · ·
7 – 1
8
Code Byte Usage
Is the scanner having trouble reading your symbols?
If the scanner isn’t reading symbols well, check that the scanner window is clean and that the symbols:
· Aren’t smeared, rough, scratched, or exhibiting voids. · Aren’t coated with frost or water droplets on the surface. · Are enabled in the scanner or in the decoder to which the scanner connects. · · · Is the bar code displayed but not entered?
The bar code is displayed on the host device correctly, but you still have to press a key to enter it (the Enter/Return key or the Tab key, for example). / Tab · You need to program a suffix. Programming a suffix enables the scanner to output the bar code data plus the key you need
(such as “CR”) to enter the data into your application. Refer to CR/LF Suffix Setting beginning on page 4-1 for further information. · “CR” 4-1 CR/LF Suffix SettingCR/LF Does the scanner read the bar codeincorrectly?
If the scanner reads a bar code, but the data is not displayed correctly on the host screen:
· The scanner may not be programmed for the appropriate terminal interface. For example, you scan “12345” and the host displays “@es%.”
· “12345” “@es%.”
Reprogram the scanner with the correct Plug and Play bar code. See Programming the Interface beginning on page 2-1. 2-1 Programming the Interface · The scanner may not be programmed to output your bar code data properly.
For example, you scan “12345” and the host displays “A12345B.” · “12345”
“A12345B.” Reprogram the scanner with the proper symbology selections. See Chapter 5. Chapter 5 5 The scanner won’t read your bar code at all.
1. Scan the sample bar codes in the back of this manual. If the scanner reads the sample bar codes, check that your bar code is readable. Verify that your bar code symbology is enabled (see Chapter 5).
1. Chapter 5 5
7 – 2
If the scanner still can’t read the sample bar codes, scan All Symbologies (see Chapter 5).
All Symbologies Chapter 5. 5
If you aren’t sure what programming options have been set in the scanner, or if you want the factory default settings restored, refer to Factory Default Settings on page 1-5.
1-5 Factory Default Settings
User configurable prefixes, symbol length and other features that use these code bytes for configuration, require that the scanner be in configuration mode. Scan the Enter/Exit Configuration Mode barcode before starting the configuration cycle. Single code configuration mode does not work for these multi-code sequences. /
Enter/Exit Configuration Mode
/
Example
Use configurable inter-character delays in section “Inter-Character Data Transmission Delays” can be saved into the scanner by scanning the 3 digit decimal equivalent of the ASCII character into the appropriate character location with the code byte barcodes. ASCII “”
To set the inter-character delay to 15ms scan the following barcodes in order: 15
1. Enter/Exit Configuration Mode 2. Configurable “~ Variable msec Inter-Character Delay” 3. Code Byte 0 4. Code Byte 1 5. Code Byte 5 6. Enter/Exit Configuration Mode 1. / 2. “~ ” 3. 0 4. 1 5. 5 6. /
(3 beeps) (1 beep) (1 beep) (2 beep) (3 beeps) (3 beeps) 3 1 1 2 3 3
7 3
Code Byte 0 0
Code Byte 2 2
Code Byte 4 4
Code Byte 6 6
Code Byte 8 8
Code Byte 1 1
Code Byte 3 3
Code Byte 5 5
Code Byte 7 7
Code Byte 9 9
8 – 1
Reference Charts
Symbology Charts
Note: “m” represents the AIM modifier character. Refer to International Technical Specification, Symbology Identifiers, for AIM modifier character details.
“m” AIM AIM Prefix/Suffix entries for specific symbologies override the universal (All Symbologies, 99) entry. /99
Linear Symbologies
Symbology
AIM
ID
Possible modifiers (m)
(m)
All Symbologies Codabar Code 11 Code 128 Code 32 Pharmaceutical (PARAF) Code 39 (supports Full ASCII mode) Code 39 ASCII
TCIF Linked Code 39 (TLC39) Code 93 and 93i Code 93 93i EAN
EAN-13 (including Bookland EAN) EAN-13 Bookland EAN
EAN-13 with Add-On EAN-13
EAN-13 with Extended Coupon Code EAN-13 EAN-8 EAN-8 with Add-On EAN-8
GS1 GS1 DataBar
]Fm
0-1
]H3
]Cm
0, 1, 2, 4
]X0
]Am
0, 1, 3, 4, 5, 7
]L2
]Gm
0-9, A-Z,
a-m
]Em
0, 1, 3, 4
]E0
]E3
]E3
]E4 ]E3
]em
0
A – 7
GS1 DataBar Limited
GS1 DataBar Expanded
GS1-128
2 of 5 25
China Post (Hong Kong 2 of 5) 25
Interleaved 2 of 5 25
Matrix 2 of 5 25
NEC 2 of 5 NEC25
Straight 2 of 5 IATA IATA 25
Straight 2 of 5 Industrial 25
MSI
UPC
UPC-A
]em ]em ]C1
]X0 ]Im ]X0 ]X0 ]Rm ]S0 ]Mm ]E0
0, 1, 3
0, 1, 3 0, 1 0, 1, 2, 3, 8, 9, A, B, C
Symbology
UPC-A with Add-On UPC-A UPC-A with Extended Coupon Code UPC-A UPC-E UPC-E with Add-On UPC-E
UPC-E1
2D Symbologies
Symbology
All Symbologies Aztec Code Chinese Sensible Code (Han Xin Code) Codablock A Codablock F Code 49 Data Matrix GS1
GS1 Composite GS1 DataBar Omnidirectional MaxiCode PDF417 MicroPDF417 QR Code Micro QR Code
Postal Symbologies
Symbology
AIM
ID
Possible modifiers (m)
(m)
]E3
]E3
]E0 ]E3
]X0
AIM
ID
Possible modifiers (m)
(m)
]zm
0-9, A-C
]X0
]O6
0, 1, 4, 5, 6
]Om
0, 1, 4, 5, 6
]Tm
0, 1, 2, 4
]dm
0-6
]em
0-3
]em
0-3
]em
0-3
]Um
0-3
]Lm
0-2
]Lm
0-5
]Qm
0-6
]Qm
AIM
A – 7
All Symbologies Australian Post British Post
ID
Possible modifiers (m)
(m)
]X0 ]X0
AIM
Symbology
ID
Possible modifiers (m)
(m)
Canadian Post
]X0
China Post
]X0
InfoMail
]X0
Intelligent Mail Bar Code
]X0
Japanese Post
]X0
KIX (Netherlands) Post
]X0
Korea Post
]X0
Planet Code
]X0
Postal-4i
]X0
Postnet
]X0
ASCII Conversion Chart (Code Page 1252) ASCII 1252
In keyboard applications, ASCII Control Characters can be represented in 3 different ways, as shown below. The CTRL+X func- tion is OS and application dependent. The following table lists some commonly used Microsoft functionality. This table applies to U.S. style keyboards. Certain characters may differ depending on your Country Code/PC regional settings. ASCII 3 CTRL+X Microsoft /
Non-printable
ASCII control
characters
ASCII
Keyboard Control + ASCII (CTRL+X)Mode +ASCIICTRL+X
DEC 0 1 2 3 4 5 6 7 8 9 10 11
HEX 00
01
Char NUL
SOH
02
STX
03
ETX
04
EOT
05
ENQ
06
ACK
07
BEL
08
BS
09
HT
0A
LF
0B
VT
Control + X Mode Off (KBDCAS0) +X KBDCAS0
Reserved NP Enter NP Caps Lock ALT Make ALT ALT Break ALT CTRL Make CTRL CTRL Break CTRL Enter / Ret / (Apple Make)
Tab (Apple Break)
Tab
Windows Mode Control + X Mode On (KBDCAS2)
Windows +X KBDCAS2
CTRL + X
CTRL + X function CTRL + X
CTRL+ @
CTRL+ A CTRL+ B CTRL+ C CTRL+ D CTRL+ E CTRL+ F CTRL+ G
Select all Bold Copy Bookmark Center Find
CTRL+ H CTRL+ I CTRL+ J
CTRL+ K
History Italic Justify
hyperlink
A – 7
12
0C
13
0D
14
0E
15
0F
16
10
17
11
18
12
19
13
20
14
21
15
22
16
23
17
FF
CR SO SI DLE DC1 DC2 DC3 DC4 NAK SYN ETB
Delete
Enter / Ret / Insert ESC F11
Home PrtScn Backspace Back Tab F12 F1
F2
CTRL+ L
CTRL+ M CTRL+ N CTRL+ O CTRL+ P CTRL+ Q CTRL+ R CTRL+ S CTRL+ T CTRL+ U CTRL+ V CTRL+ W
list, left align
New Open Print Quit
Save
Paste
Non-printable
ASCII control
characters
ASCII
DEC 24 25 26 27 28 29 30 31 127
HEX 18 19 1A 1B 1C 1D 1E 1F 7F
Char CAN EM SUB ESC FS GS RS US
Keyboard Control + ASCII (CTRL+X)Mode +ASCIICTRL+X
Control + X Mode Off (KBDCAS0)
+X KBDCAS0
F3 F4 F5 F6 F7 F8 F9 F10 NP Enter NP
Windows Mode Control + X Mode On (KBDCAS2)
Windows +X KBDCAS2
CTRL + X
CTRL + X function CTRL + X
CTRL+ X
CTRL+ Y
CTRL+ Z
CTRL+ [
CTRL+
CTRL+ ]
CTRL+ ^
CTRL+ –
Lower ASCII Reference Table ASCII
Note: Windows Code page 1252 and lower ASCII use the same characters. Windows 1252 ASCII
DEC
32 33 34 35 36 37 38 39 40 41 42 43 44 45 46 47 48 49 50 51 52 53 54 55 56 57
HEX
Character
20
<SPACE>
21
!
22
”
23
#
24
$
25
%
26
&
27
‘
28
(
29
)
2A
*
2B
+
2C
,
2D
–
2E
.
2F
/
30
0
31
1
32
2
33
3
34
4
35
5
36
6
37
7
38
8
39
9
DEC
64 65 66 67 68 69 70 71 72 73 74 75 76 77 78 79 80 81 82 83 84 85 86 87 88 89
Printable Characters
HEX
Character
40
@
41
A
42
B
43
C
44
D
45
E
46
F
47
G
48
H
49
I
4A
J
4B
K
4C
L
4D
M
4E
N
4F
O
50
P
51
Q
52
R
53
S
54
T
55
U
56
V
57
W
58
X
59
Y
DEC
96 97 98 99 100 101 102 103 104 105 106 107 108 109 110 111 112 113 114 115 116 117 118 119 120 121
HEX
Character
60
`
61
a
62
b
63
c
64
d
65
e
66
f
67
g
68
h
69
i
6A
j
6B
k
6C
l
6D
m
6E
n
6F
o
70
p
71
q
72
r
73
s
74
t
75
u
76
v
77
w
78
x
79
y
A – 7
58
3A
:
59
3B
;
60
3C
<
61
3D
=
62
3E
>
63
3F
?
90
5A
Z
91
5B
[
92
5C
93
5D
]
94
5E
^
95
5F
_
122
7A
z
123
7B
{
124
7C
|
125
7D
}
126
7E
~
127
7F
DEC 128
HEX
CP 1252
80
129
81
130
82
,
131
83
132
84
,,
133
85
…
134
86
135
87
136
88
^
137
89
138
8A
S
139
8B
<
140
8C
OE
141
8D
142
8E
Z
143
8F
144
90
145
91
`
146
92
‘
147
93
”
148
94
”
149
95
·
150
96
151
97
—
152
98
~
153
99
TM
154
9A
s
155
9B
>
156
9C
oe
157
9D
158
9E
z
159
9F
Y
160
A0
ASCII
Ç
ü
é
â
ä
à
å
ç
ê
ë
è ï
î ì
Ä
Å É æ Æ ô ö ò û ù ÿ Ö Ü ¢ £
¥
á
Extended ASCII Characters ASCII Alternate Extended
up arrow
down arrow
right arrow
left arrow
Insert
Delete
Home
End
Page Up
Page Down
Right ALT ALT Right CTRL CTRL Reserved Reserved
Numeric Keypad Enter
Numeric Keypad / / F1 F2 F3 F4 F5 F6 F7 F8 F9 F10 F11 F12 Numeric Keypad + + Numeric Keypad Numeric Keypad * * Caps Lock Num Lock
PS2 Scan Code PS2 0x48
0x50
0x4B
0x4D
0x52
0x53
0x47
0x4F
0x49
0x51
0x38
0x1D
n/a
n/a
0x1C
0x35
0x3B 0x3C 0x3D 0x3E 0x3F 0x40 0x41 0x42 0x43 0x44 0x57 0x58 0x4E
0x4A
0x37
0x3A
0x45
A – 7
161
A1
¡
162
A2
¢
163
A3
£
164
A4
¤
165
A5
¥
166
A6
¦
167
A7
§
168
A8
¨
169
A9
©
170
AA
ª
171
AB
«
172
AC
¬
173
AD
174
AE
®
175
AF
¯
176
B0
°
177
B1
±
178
B2
²
í
Left Alt
Alt
ó
Left Ctrl
Ctrl
ú
Left Shift
Shift
ñ
Right Shift
Shift
Ñ
Print Screen
ª
Tab
º
Shift Tab Shift+
¿
Enter
Esc
¬
Alt Make
Alt
½
Alt Break
Alt
¼
Control Make
Ctrl
¡
Control Break
Ctrl
«
Alt Sequence with 1 Character
Alt
»
Ctrl Sequence with 1 Character
Ctrl
0x38 0x1D 0x2A 0x36 n/a 0x0F 0x8F 0x1C 0x01 0x36 0xB6 0x1D 0x9D 0x36 0x1D
DEC
179 180 181 182 183 184 185 186 187 188 189 190 191 192 193 194 195 196 197 198 199 200 201 202 203 204 205 206 207 208 209 210 211 212 213 214 215 216 217 218 219 220 221 222 223 224 225 226 227 228 229 230
HEX
CP 1252
B3
³
B4
´
B5
µ
B6
¶
B7
·
B8
¸
B9
¹
BA
º
BB
»
BC
¼
BD
½
BE
¾
BF
¿
C0
À
C1
Á
C2
Â
C3
Ã
C4
Ä
C5
Å
C6
Æ
C7
Ç
C8
È
C9
É
CA
Ê
CB
Ë
CC
Ì
CD
Í
CE
Î
CF
Ï
D0
Ð
D1
Ñ
D2
Ò
D3
Ó
D4
Ô
D5
Õ
D6
Ö
D7
×
D8
Ø
D9
Ù
DA
Ú
DB
Û
DC
Ü
DD
Ý
DE
Þ
DF
ß
E0
à
E1
á
E2
â
E3
ã
E4
ä
E5
å
E6
æ
Extended ASCII Characters(Continued) ASCII
ASCII
Alternate Extended
í ß µ
PS2 Scan Code PS2
A – 7
DEC
231 232 233 234 235 236 237 238 239 240 241 242 243 244 245 246 247 248 249 250 251 252 253 254 255
HEX
CP 1252
E7
ç
E8
è
E9
é
EA
ê
EB
ë
EC
ì
ED
í
EE
î
EF
ï
F0
ð
F1
ñ
F2
ò
F3
ó
F4
ô
F5
õ
F6
ö
F7
÷
F8
ø
F9
ù
FA
ú
FB
û
FC
ü
FD
ý
FE
þ
FF
ÿ
Extended ASCII Characters(Continued) ASCII
ASCII
± ÷ ° · · ²
Alternate Extended
PS2 Scan Code PS2
ISO 2022/ISO 646 Character Replacements ISO 2022/ISO 646
Code pages define the mapping of character codes to characters. If the data received does not display with the proper charac- ters, it may be because the bar code being scanned was created using a code page that is different from the one the host pro- gram is expecting. If this is the case, select the code page with which the bar codes were created. The data characters should then appear properly.
Code Page SelectionMethod/Country /
United States (standard ASCII) ASCII Automatic National Character Replacement Binary Code page
Standard ISO/IEC 646-IRV
ISO/IEC 2022
n/a
Keyboard Country
n/a
Honeywell CodePage Option
1
n/a
2 (default)
2
n/a
3
Default “Automatic National Character replacement” will select the below Honeywell Code Page options for Code128, Code 39 and Code 93. “” Code 128Code 39 Code 93
United States Canada Canada
Japan
China
Great Britain (UK) France
ISO/IEC 646-06
0
1
ISO /IEC 646-121
54
95
ISO /IEC 646-122
18
96
ISO/IEC 646-14
28
98
ISO/IEC 646-57
92
99
ISO /IEC 646-04
7
87
ISO /IEC 646-69
3
83
A – 7
Code Page SelectionMethod/Country
/
Germany
Switzerland Sweden / Finland (extended Annex C) / C Ireland Denmark
Norway Italy Portugal Spain Spain
Standard ISO/IEC646-21 ISO /IEC 646-CH ISO/IEC 646-11 ISO /IEC 646-207 ISO/IEC 646-08
ISO/IEC 646-60 ISO/IEC 646-15 ISO/IEC 646-16 ISO/IEC 646-17 ISO/IEC 646-85
Keyboard Country 4
6
2 73
8
Honeywell CodePage Option 84
86
82
97
88
9
94
5
85
13
92
10
90
51
91
Dec
Hex
US
0
1
CA
54
95
CA
18
96
JP
28
98
CN
92
99
GB
7
87
FR
3
83
DE
4
84
CH
6
86
SE/FI
2
82
DK
8
88
NO
9
94
IE
73
97
IT
5
85
PT
13
92
ES
10
90
35
36
64
91
92
93
94
96
123
124
125
126
23
24
40
5B
5C
5D
5E
60
7B
7C
7D
7E
#
$ @
[
]
^
`
{
|
}
~
#
$
à
â
ç
ê
î
ô
é
ù
è
û
#
$
à
â
ç
ê É ô
é
ù
è
û
#
$ @
[
¥
]
^
`
{
|
}
#
¥ @
[
]
^
`
{
|
}
£
$ @
[
]
^
`
{
|
}
~
£
$
à
°
ç
§
^
µ
é
ù
è
¨
#
$
§
Ä Ö Ü
^
`
ä
ö
ü
ß
ù
$
à
é
ç
ê
î
ô
ä
ö
ü
û
#
¤
É ÄÖÅ Ü
é
ä
ö
å
ü
#
$ @ÆØÅ
^
`
æ
ø
å
~
#
$ @ÆØÅ
^
`
æ
ø
å
¯
£
$
Ó
É
Í
Ú
Á
ó
é
í
ú
á
£
$
§
°
ç
é
^
ù
à
ò
è
ì
#
$
§
Ã Ç Õ
^
`
ã
ç
õ
°
# $
§
¡
Ñ ¿
^
`
°
ñ
ç
~
COUNTRY Country Keyboard Honeywell CodePag e
ES 51
91
# $
·
¡
Ñ Ç
¿
`
´
ñ
ç
¨
ISO / IEC 646 National CharacterReplacements ISO / IEC 646
Sample Symbols
UPC-A
012345678905
Code 128
Code 128
Code 93
A-11
EAN-13
9 780330 290951
Code 39
BC321
Interleaved 2 of 5
1234567890
Codabar
A13579B
A – 11
123456-9$
Straight 2 of 5 Industrial
123456
Matrix 2 of 5 25
01234567890
PDF417
Car Registration
QR Code
Numbers
MaxiCode
Test Message
A-11
Data Matrix
Test Symbol
Postnet
Zip Code
GS1 DataBar
(01)00123456789012
Aztec
Package Label
Micro PDF417
Test Message
A – 11
4-CB (4-State Customer Bar Code) 4-CB (4-State Customer ) 01,234,567094,987654321,01234567891
ID-tag (UPU 4-State) J18CUSA8E6N062315014880T
HF680-ENUS-UG Rev A 7/1/2019


