RTH8560D1002/E
Quick Installation Guide[pdf]: RTH8500 Series Programmable Thermostat
Quick Install Guide[pdf]: T5+ Smart Thermostat Programmable Thermostat
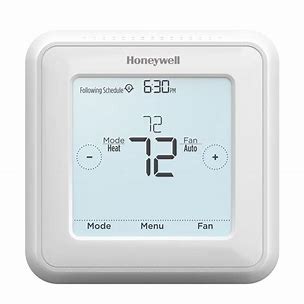
What are the features on my T5, T5+, or T6 Pro WiFi thermostat?
Additional Features are provided via the Honeywell Home mobile app.
Circulate:
Available under the Fan setting, the Circulate feature turns on the fan for 30% of the time every hour in order to circulate the air in your home.
Hold:
When using a schedule or geofencing, the thermostat enables the Hold feature. 2 types of Holds are available, Temporary and Permanent. (When Geofencing is enabled, Permanent Hold is disabled.)
Temporary Hold – Adjust the temperature setting on your thermostat display. A “HOLD UNTIL” message will appear, followed by the time of the next schedule change. Touch the time again and use the +/- icons to adjust the time the hold will end. The thermostat will keep the desired setting until it is changed, or until the HOLD UNTIL time is reached, at which point it will resume following the schedule.
Permanent Hold – Adjust the temperature setting on your thermostat display. A “HOLD UNTIL” message will appear, followed by the time of the next schedule change. Touch the HOLD UNTIL message and 2 new messages will appear, PERMANENT HOLD and RUN SCHEDULE. Touch PERMANENT HOLD to keep the new setting permanently.
Scheduling:
Additional scheduling options, such as Geofencing, are available within the Honeywell Homes mobile app. Look at the T5/T5+ – Honeywell Home App section for more details The thermostat is capable of scheduling 4 periods per day for each day of the week. Time-based schedules can be programmed daily, or on a 5-2 schedule (same for all days of the week, but different schedules on the weekends.
To setup a schedule:
Touch MENU on the thermostat display, select SCHEDULE
Each Day / Period will be displayed. Touch SELECT to edit each period.
Touch the TIME displayed and use the +/ – icons to adjust the start time for the desired period (adjustable in 15-minute increments). Touch the TEMPERATURE displayed to adjust the desired heating or cooling temperature (Touch the TEMPERATURE display again to alternate between the cooling and heating temperature setting) Press SELECT when complete.
After adjusting the TEMPERATURE and TIME for each schedule day and period, DONE will be displayed on the screen. Touch SELECT to save your new schedule
To Modify your schedule:
Touch MENU on the thermostat display, select SCHEDULE
Each Day / Period will be displayed. Touch < or > to locate the desired period you wish to edit.
Touch SELECT to edit each period.
Touch the TIME displayed and use the +/ – icons to adjust the start time for the desired period (adjustable in 15-minute increments). Touch the TEMPERATURE displayed to adjust the desired heating or cooling temperature (Touch the TEMPERATURE display again to alternate between the cooling and heating temperature setting) Touch SELECT when complete.
Touch the > icon until DONE is displayed. Touch SELECT to save your settings.
Screen Lock:
The thermostat has 3 settings for the screen lock: Unlocked, Partial Lock, and Full Lock
-Unlocked: All settings are adjustable
-Partial: Setpoint changes are allowed. All other settings are locked
-Full: No changes are allowed
When SCREEN LOCK is active, a “lock” icon will be displayed on the thermostat display
Locking the thermostat:
Touch MENU. Touch the > arrow until SCREEN LOCK appears. Touch SELECT.
Touch the < and > arrows until the desired lock setting is displayed. Touch SELECT
A pin will be displayed. Record this 4-digit code for your records. Press SELECT
Confirm or dismiss the change by touching YES or NO
Unlocking the thermostat:
Touch the “lock” icon.
Enter the pin by touching the +/- icons. Touch SELECT after each digit is entered to advance to the next digit.
After touching SELECT once the last digit is entered, the thermostat will return to the main screen in the Unlocked state.
Locating my pin:
The screen lock pin is not adjustable on any Honeywell thermostat. To obtain the pin, remove the thermostat faceplate by pulling it gently away from the wall plate. On the label on the back of the thermostat face-plate, locate the DATE CODE. (4-digit number located on the right side of the label)
The pin is calculated by adding 1234 to the date code. (For example: A date code of 1644 would have a pin of 2878)
Screen Brightness:
The thermostat has an adjustable inactive screen brightness. This allows the user to dim the screen to their desired preference. (When actively using the thermostat display [i.e. – touching buttons / making changes] the thermostat screen defaults to full brightness. This feature is not adjustable.)
Adjusting Screen Brightness:
Touch MENU. Touch the > arrow until BRIGHTNESS appears. Touch SELECT.
Use the +/- icons to increase or decrease the brightness (1-5). Press DONE when complete.
Recovery: (also referred to as Smart Recovery, Smart Start, and Adaptive Intelligent Recovery)
The thermostat has the option to begin your schedule setting changes early in order to reach your desired temperature at the start of the schedule period. When active, the thermostat “learns” how long it takes to reach setpoint within your home, and starts heating or cooling early. (ex. My home is 65° at night, but set to 70° at 7:00a.m. Rather than waiting until 7:00a.m. to start warming up, Recovery begins Heating the home early [based on its algorithm and learned behavior] and starts heating the home at 6:00a.m., reaching the 70° setting by 7:00a.m.) When active, RECOVERY is displayed on the thermostat screen in the top right corner.
Turning Recovery On / Off:
Touch MENU. Touch the > arrow until RECOVERY appears. Touch SELECT.
Touch the < or > icons to enable or disable RECOVERY. Press DONE when complete
Clock:
When connected to Wi-Fi, the thermostat displays the local time based on the account creators Zip Code (as related to Time Zone). When not connected to Wi-Fi, the clock can be configured on the thermostat display. 12hr or 24hr time displays are optional, as is Daylight savings time (DST)
Clean Screen:
The Clean Screen feature disables the thermostat screen for 30 seconds. Wipe your thermostat with a clean, damp cloth. After the timer runs out, the thermostat screen is reactivated and returns to the main display.
Temp Scale:
You can adjust the temperature display settings at any time. Display temperatures are available in Fahrenheit or Celsius
Changeover:
The changeover feature (also referred to as Auto changeover) allows your thermostat to automatically switch from heating to cooling, or vice versa, depending on the temperature in your home. Resideo requires that a 1.5 degree difference be enforced between the heating and cooling setpoints when this feature is enabledto prevent short-cycling (repeatedly turning your system on/off too quickly) You may notice that your home naturally warms or cools up to 1.5 degrees past your setpoint before the appropriate heating or cooling system begins operation. This is normal.
Reset:
The thermostat has 4 reset options: Factory, Schedule, Wi-Fi, and Homekit.
Factory Reset: clears all of the thermostats programming and resets it to factory defaults
*Prior to performing a Factory Reset, we recommend recording your current ISU configuration (see Setup and Configuration)
Schedule reset: clears the schedule and resets it to the daily default schedule listed below:
Wake 6:00a.m. Cool 78 Heat 70
Away 8:00a.m. Cool 85 Heat 62
Home 6:00p.m. Cool 78 Heat 70
Sleep 10:00p.m. Cool 82 Heat 62
Wi-Fi Reset: clears the current Wi-Fi connection and begins the Wi-Fi pairing process. The mobile app is required to complete the connection process. Go to the App Support section for more information.
HomeKit Reset: disables the current pairing with your Icloud account and the T5/T5+
Equipment Status:
This option displays what is currently being controlled by your system and its operational status. (ex.- If your fan is on, it will display your heating and cooling stages as OFF, but will show your fan as ON)
Device Info:
Displays the T5 /T5+’s MAC ID, IP address (if connected to Wi-Fi), Date Code, Model Number, Build date, Firmware Version, Thermostat Application Version, Thermostat Application Boot Version, Wi-Fi Radio Application Version, Wi-Fi Radio Boot Application Version
How are multiple users set up with the Honeywell Home T5 Wi-Fi thermostat?
Access can be given to any or all Honeywell Home thermostat locations through the Honeywell Home App.
- Start by touching the three-line menu icon in the upper left-hand corner of the home screen.
- Select Manage Users and touch Add User located at the bottom of the screen.
- Type in the email address of the person to be invited. If they have a Honeywell Home account set up, the location will be automatically added to their account. If they don’t have an account, they will receive an email invitation prompting them to download the app and create their own account.
Note: All individuals with access to a thermostat share the same user privileges. Users added will be able to change the thermostat’s settings, as well as add or delete other users.
Why is my Honeywell Home T5 Wi-Fi thermostat not finding the in-home Wi-Fi network?
This article can help you if you have a T5 or a T6 thermostat. For other Wi-Fi thermostat models, please check our full list of Honeywell Wi-Fi thermostats.
There are several reasons why your thermostat cannot “see” the Wi-Fi home network. First, verify the following:
- Your router is powered and broadcasting. You can check this on your mobile device by accessing an Internet browser. If you are not sure if you are using your mobile data or your Wi-Fi connection, put the mobile device in Airplane Mode, then switch on the Wi-Fi signal. If you can browse the Internet in this mode, this means that you have an active Wi-Fi Connection.
- Check that your router is broadcasting the Wi-Fi signal in the 2.4GHz range. This step is required for the following reason: most routers broadcast the signal on a dual frequency, 2.4 GHz and 5 GHz and most of the more recent smartphones and tablets can “see” both these frequencies. However, Honeywell Home thermostats only operate in the 2.4GHz range. Check your router manual to see how you can make sure it’s broadcasting on a 2.4 GHz range.
Please note that if you live in an area with many Wi-Fi networks broadcasting in the same space, it’s possible that your thermostat did not find your network on the first scan. You will need to refresh the network list by pressing the “Refresh” button on your Honeywell Home app screen and try connecting again.
Also, if you have chosen to use a non-broadcasting SSID (network name) on your router, your network name will not appear on the Honeywell Home Wi-Fi list. You will need to manually add your router using the “+” button at the bottom of your Lyric app screen.
If the steps above don’t provide a solution, you can try and reset your thermostat. You can reset your credentials just for your Wi-Fi connection, HomeKit, or Program Schedule, or you can bring your thermostat back to its factory settings.
Please follow the instructions below to reset your thermostat:
What comes in the T5 7-Day Programmable Thermostat package?
T5 Thermostat, UWP mounting system and quick installation guide.
What is Honeywell’s warranty on the T5 7-Day Programmable thermostat?
The warranty is one year.
How do I set the time on my T5 7-Day Programmable Thermostat?
- Press the Menu button. Press the “+” button until “TIME” appears. Press SELECT.
- You will see “12HR” appear. Here you will be able to choose 12 or 24 hour clock options. You may choose between the two options by pressing the + or – . Then Press “Select button.
- This will then bring you to the option to edit the time. You will see the HOUR flashing in the digital clock. Press + or – to adjust the hour. Press SELECT.
- Press + or – to adjust the minutes. Press SELEC
How do I set the date on my T5 7-Day Programmable Thermostat?
- Press the Menu button. Press the “+” button until “Date” appears. Press SELECT.
- Press + button to advance to the “DATE” to be displayed on the screen. Press SELECT. You will see the Year flashing.
- Press + or – to change the year.
- Press SELECT to advance to change the month.
- Press + or – to advance to the desired month.
- Press SELECT to advance to the date.
- Press + or – to change the date, then press SELECT to save and exit.
How do I enter the Setup menu for my T5 7-Day Programmable Thermostat?
- Press and hold MENU and + buttons for approximately 5 seconds to enter advanced menu.
- Press SELECT to enter system setup (ISU) menu.
- Press SELECT to cycle through ISU numbers. NOTE: See “System Setup Options” on page 9 of the quick install guide for a full list of ISU numbers and options.
- Press + or – to change values or select from available options.
- Press SELECT to save changes and advance to the next ISU number.
- Once you have cycled through all of the ISU numbers, “Done” is displayed. Press SELECT to save and exit. To save and exit early, press HOME to return to the Home screen.
White T5 Touchscreen Thermostat
| Thermostat Type | Programmable |
| Color | White |
| Includes | Thermostat, Quick installation guide, Screws, Anchors, UWP mounting system |
| Program Modes | 7-Day Programmable |
| Display Type | Touch Screen |
| Product Height | 4.09 in |
| Product Length | 4.09 in |
| Product Width | 1.06 in |
| Control Functions | Heating, Cooling |
| Alerts and Reminders | Filter Change 1, Battery Replacement |


