
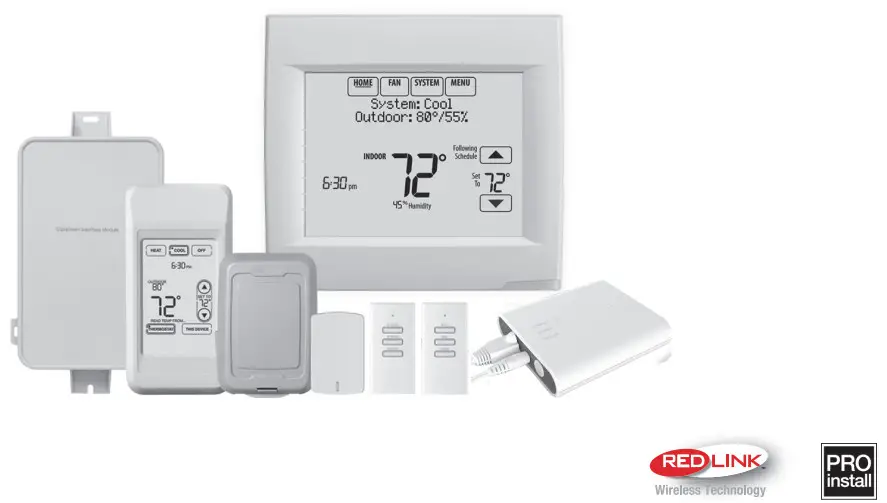
Honeywell TH8110R1008 Vision PRO 8000 Touch Screen Single Stage Thermostat User Guide
 Search for local rebates: HoneywellHome.com/Rebates
TH8110R1008- 1H/1C thermostat
TH8320R1003- Up to 2H/2C Conv. or 3H/2C heat pump thermostat
TH8321R1001- Up to 2H/2C Conv. or 3H/2C heat pump thermostat + IAQ control
YTH8321R1002- Kit with TH8321R1001 Thermostat + Gateway
Welcome
Congratulations on your purchase of a Honeywell Home touch screen programmable thermostat. When used with the optional RedLINK Internet Gateway, you can remotely monitor and control the heating and cooling system in your home or business—you can stay connected to your comfort system wherever you go.
The Total Connect Comfort app is the perfect solution if you travel frequently, own a vacation home, a business or manage an investment property or if you are simply looking for peace of mind.

Features of your VisionPRO thermostat
With your new thermostat, you can:
- Connect to the internet to monitor and control your heating/cooling system and receive alerts by email (requires optional RedLINK Internet Gateway)
- View outdoor temperature and humidity (requires optional Wireless Outdoor Sensor)
- Control humidification, dehumidification, or ventilation (TH8321 model)
Your new thermostat also provides:
- Adaptive Intelligent Recovery—over time, the VisionPRO thermostat “learns” how long it takes your system to reach the temperature you want. It turns on the heating or cooling system earlier to make sure you’re comfortable at the time you expect.
- Dealer information on the screen—making it easy for you to contact your dealer for service.
- Vacation and holiday schedule—allowing you to program a setback temperature to save energy while you are away.
- Keypad lockout to prevent unauthorized changes.
- Equipment status—provides on/off status of all equipment controlled by the thermostat.
- Preferences—allowing you to customize the thermostat to your desired settings.
Quick reference: residential use
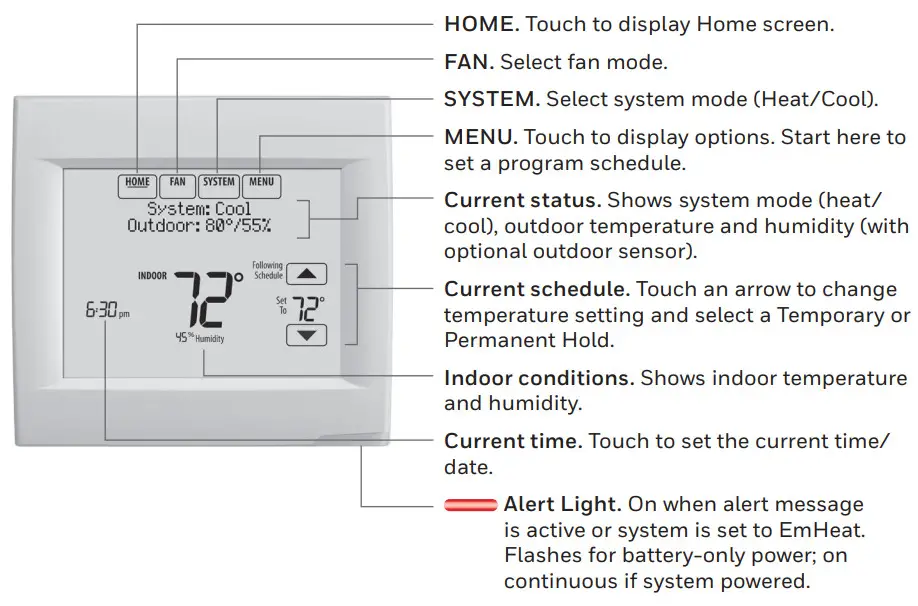
The screen lights when you press any button. It stays lit for 16 seconds if the thermostat is battery powered (45 seconds if the thermostat is powered with a C-wire). Depending on how your thermostat was installed, the screen light may always be on.
Quick reference: commercial use
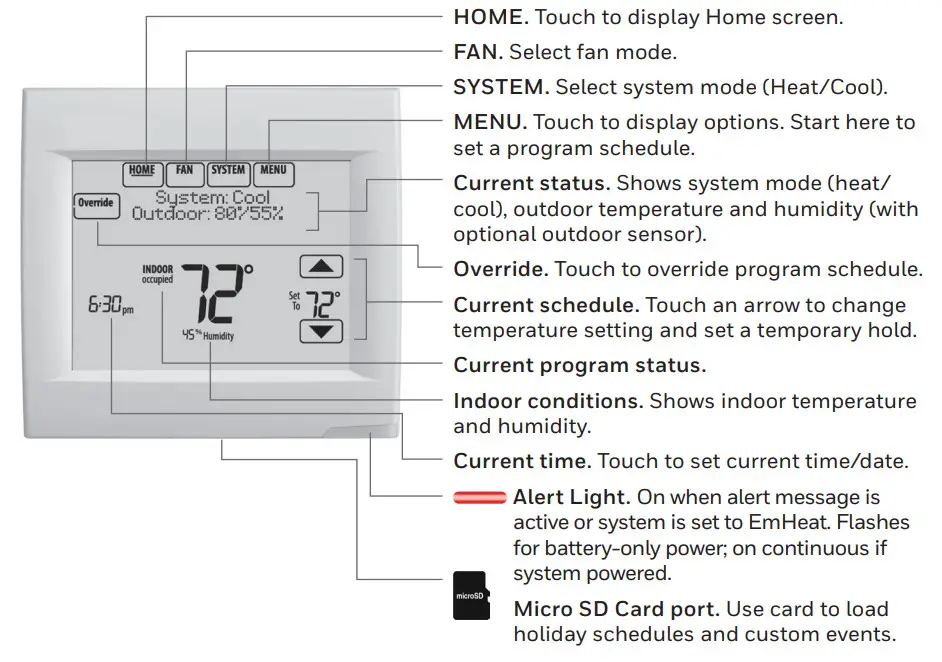
The screen lights when you press any button. It stays lit for 16 seconds if the thermostat is battery powered (45 seconds if the thermostat is powered with a C-wire). Depending on how your thermostat was installed, the screen light may always be on.
Setting the time/date
- Touch the current time. The screen displays Select Option.
- Touch Time or Date, then touch Select.
- Touch
 or
or  until the proper time/date is displayed.
 - Touch Done to save or Cancel to ignore changes.
- Touch Home to redisplay the Home screen.
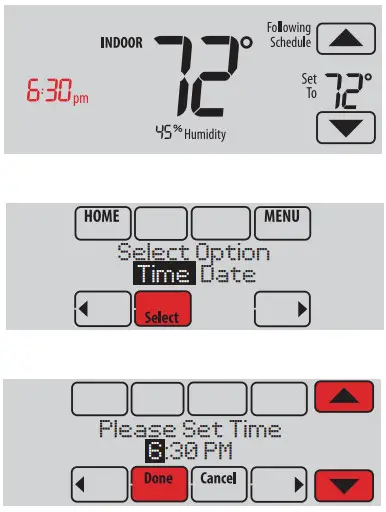
 NOTE: The date is not shown on the home screen; however, it should be set to allow the thermostat to adjust time automatically for daylight saving time and for other features such as vacation hold.
 NOTE: When used with a RedLINK Gateway, the thermostat gets time information from the Internet based on the location address of the TCC account.
Setting the fan
- Touch FAN to display fan settings.
- Touch On, Auto, Circ, or Follow Schedule.
- Touch Done to save and exit.
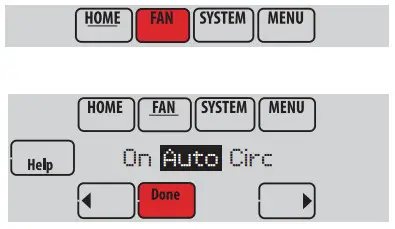
On: Fan is always on.
Auto: Fan runs only when the heating or cooling system is on.
Circ: Fan runs randomly about 35% of the time (residential use only).
Follow Schedule: Fan controlled by the program (see pages 4–6).
 NOTE: In commercial use, touch Auto or On to temporarily override the programmed fan schedule.
Setting system mode
- Touch SYSTEM to display system settings.
- Touch desired option:
Heat: Controls only the heating system.
Cool: Controls only the cooling system.
Off: Heating/cooling systems are off.
Auto: Selects heating or cooling depending on the indoor temperature.
Em Heat (heat pumps with aux.
heat): Controls auxiliary/emergency heat. A compressor is locked out. - Touch Done to save and exit.
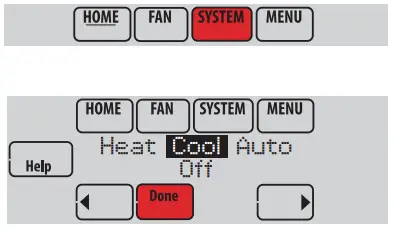
 NOTE: The Auto and Em Heat system settings may not appear, depending on how your thermostat was installed.
Preset energy-saving schedules
This thermostat uses default Energy Saver settings that can reduce your heating/cooling expenses. To customize settings, see the next page.
Residential Use
| Period | Start time | Heat (Mon-Fri) |
Cool (Mon-Fri) |
Heat (Sat-Sun) |
Cool (Sat-Sun) |
| Wake | 6:00 am | 700 | 78° | 70° | 78° |
| Leave | 8:00 am | 62° | 85° | 62° | 85° |
| Return | 6:00 pm | 70° | 78° | 70° | 78° |
| Steep | 10:00 pm | 62° | 82° | 62° | 82° |
* Commercial Use
| Period | Start time | Heat | Cool | Fan |
| Occupied 1 | 8:00 am | 70° | 75° | On |
| Unoccupied 1 | 10:00 pm | 55° | 85° | Auto |
| Occupied 2* | 12:00 am | 70° | 75° | On |
| Unoccupied 2* | 12:00 am | 55° | 85° | Auto |
* Period 2 is canceled by default. If you activate it, the values shown above are default settings.
Adjusting program schedules
- Touch MENU.
- Select Edit Schedule to display Use
Scheduling Assistant?
• Touch Yes to create a schedule by answering simple questions.
• Touch No to manually create a program schedule. See below.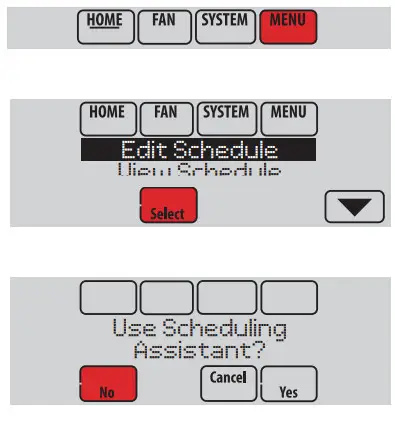
 NOTE: To reduce costs, use the pre-set Energy Saver settings described on page 4.
 - Select the days to schedule, touch Next.
- Touch s or t to set your Wake time for the selected day(s).
- Touch s or t to set Heat and Cool temperatures for the Wake period.*
- Touch other time periods (Leave, Return, Sleep) to set time and temperatures for each.*
- Touch Done to save and exit (Touch Cancel to exit without saving changes).
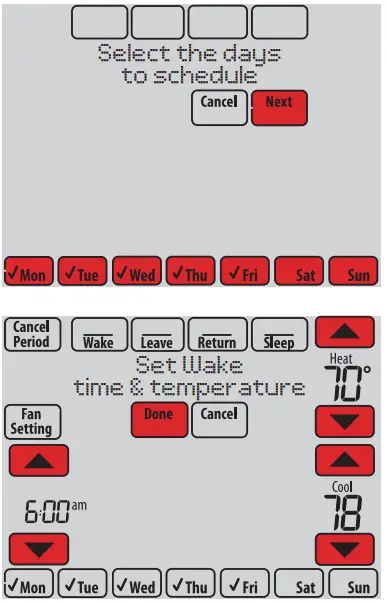
 NOTE: Touch Cancel Period to eliminate any unwanted time period.
 NOTE: Touch Fan Setting to customize fan settings for any time period.
* If the thermostat is configured for light commercial, the schedule periods will be Occupied and Unoccupied rather than Wake, Leave, Return, and Sleep
Overriding schedules: residential use
- Touch
 or
or  adjust the temperature (right side of the screen) and the Hold Until time (left side).
The schedule will resume when the Hold Until time expires. - Select Permanent Hold to keep the same temperature until you change it or resume the program schedule.
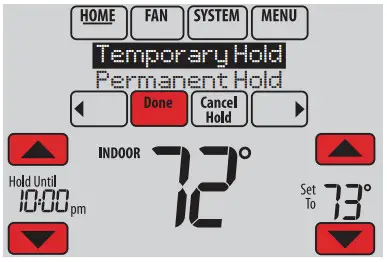
Touch Cancel Hold at any time to resume the program schedule.
Overriding schedules: commercial use
Touch s or t to adjust the temperature. It will be maintained until the hold time you set.
- To change the hold time, touch the Hold Until arrow buttons. This time can be adjusted up to the maximum time set by the installer.
- Touch Override to use a preset occupied temperature if a person uses the room during an unoccupied period. The new temperature will be maintained for 1 hour and can be adjusted up to the maximum time set by the installer.
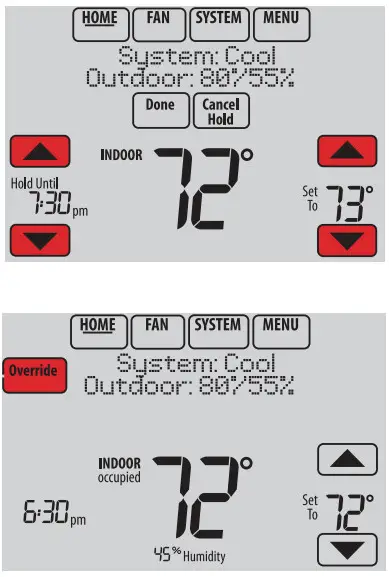
The programmed schedule will resume when the override timer expires. Touch Cancel Hold at any time to resume the program schedule.
Viewing equipment status
1. Touch MENU.
2. Select Equipment Status.
3. Touch  or
or  to view the status of all the equipment your thermostat is controlling. Depending on how your thermostat was installed, the Equipment Status screen can report
data about the following systems:
- Heating and cooling
- Fan
- Humidification
- Dehumidification
- Ventilation
- Maintenance reminders
- Thermostat information.
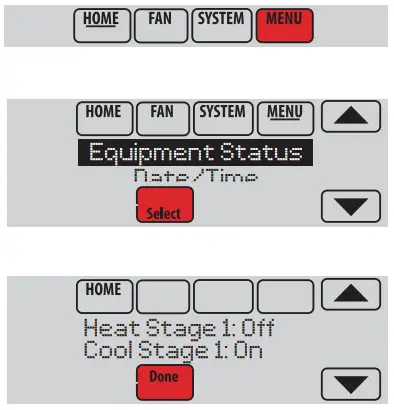
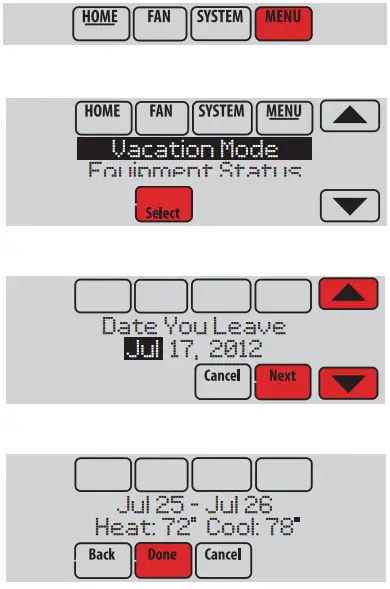
Setting vacation hold: residential use
This feature helps you save energy while you are away, and restores comfortable settings just before you return home.
- Touch MENU.
- Select Vacation Mode.
- Touch
 or
or  select the date you leave, then touch Next for further scheduling details, including times of day, temperature settings, return date, and return settings.
 - Review your selections on the last display and touch Done to save your settings. Touch Cancel to ignore the changes.
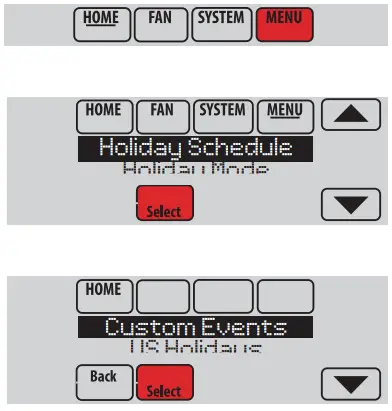
Setting holiday/event schedules: commercial use
This feature helps you conserve energy when the workplace is unoccupied for special events and holidays.
- Touch MENU.
- Select Holiday Schedule.
- Select the item you want to schedule and touch Next for further scheduling details.
•Custom Events lets you set up other days for special schedules.
•US and Canadian Holiday options let you select from a list of holidays commonly observed in each country. - Make selections as prompted on each screen. For more information, see the next page.
- Touch Done to save your settings.
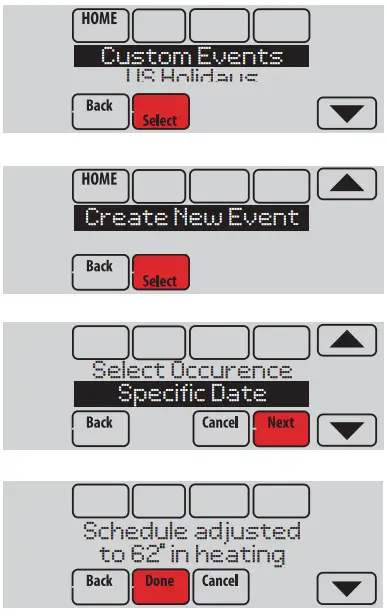
Setting custom events: commercial use
This feature lets you customize temperature settings to be maintained during a specific event. You can set up an event for a specific date or day in a month. The thermostat resumes normal scheduling after the event.
- Select Custom Events from the Holiday Schedule menu.
- Select Create New Event.
- Select Specific Date or Month/Weekday.
• For a Specific Date, you are prompted to select the event’s start date, settings, end date, and frequency.
• For Month/Weekday, you are prompted to select the month, day of the week, week of the month, settings, length of the event, and frequency for the event. - Review the settings and touch Done to save them. Touch Cancel to ignore the changes.
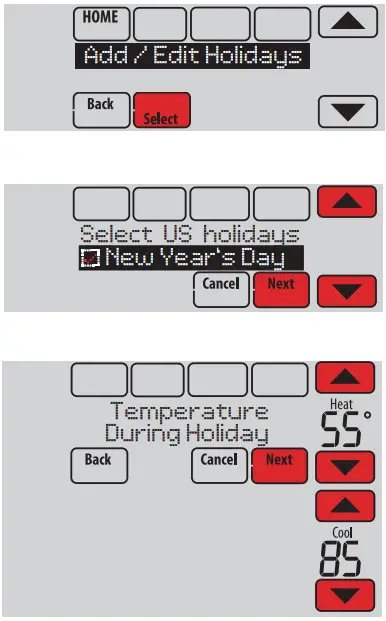
Setting holiday schedule: commercial use
This feature lets you customize temperature settings to be maintained on specified national holidays. The thermostat resumes normal scheduling between selected holidays.
- Select US Holidays or Canadian Holidays from the Holiday Schedule menu.
- Select Add/Edit Holidays. A list of national holidays is displayed.
- Touch the check box next to each holiday for which you want to maintain specific settings, (Touch
 or
or to scroll through the holiday list.) then touch Next.
Set the holiday schedule for Occupied or Unoccupied temperatures, depending on whether the building will be in use. - Touch
 or
or  to select the Heat and Cool temperatures.
 - Review the settings and touch Done to save them. Touch Cancel to ignore changes.
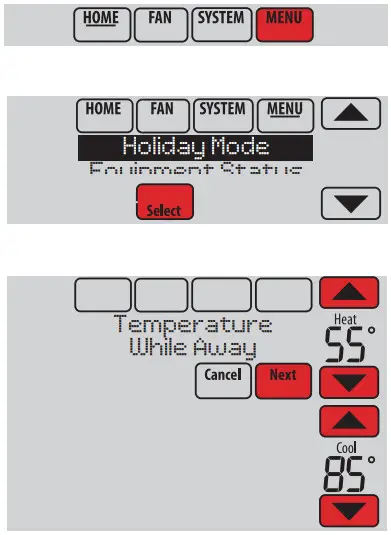
Setting holiday override: commercial use
This feature lets you customize temperature settings to be maintained from now until a specified date. The thermostat resumes normal scheduling on the date you select.
- Touch MENU.
- Select Holiday Mode to display Temperature While Away.
- Touch
 or
or  to select the Heat and Cool temperatures, then touch Next to select return date.
 - Review the settings and touch Done to save them. Touch Cancel to ignore the changes.
 NOTE: The cool temperature can only be set higher than the unoccupied program setting and the heat temperature can only be set lower than the unoccupied program setting.
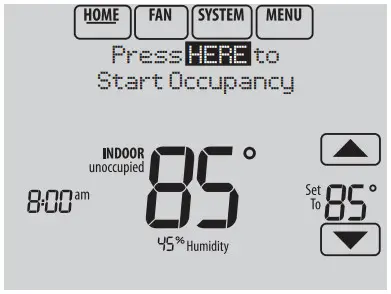
Initiating occupancy mode: commercial use
This feature keeps the temperature at an energy-saving level until you touch Press
HERE to Start Occupancy. When you arrive, touch the message to maintain a comfortable temperature while the room is occupied.
Touch the  or
or  buttons to set the temperature or the Hold Until time. The temperature is maintained until the time you set it. Temperature returns to an energy-saving level after the timer expires, or the “Occupied” period ends.
 NOTE: This feature is available only when programmed by the installer.
Remote setback (commercial use)
During Occupied program periods, an occupancy sensor directs the thermostat to go to REMOTE SETBACK settings when the room is empty. If someone is in the room, it uses the Occupied program period settings. The thermostat ignores the occupancy sensor during Unoccupied program periods.
If the thermostat is set up to be non-programmable, the sensor directs the thermostat to go to REMOTE SETBACK settings when the room is empty. If someone is in the room, then it follows the settings set by the user.
Depending on how your thermostat was installed, it may delay for up to 30 minutes before switching to REMOTE SETBACK settings. This delay allows the room to stay comfortable if the room is unoccupied for only a short time.
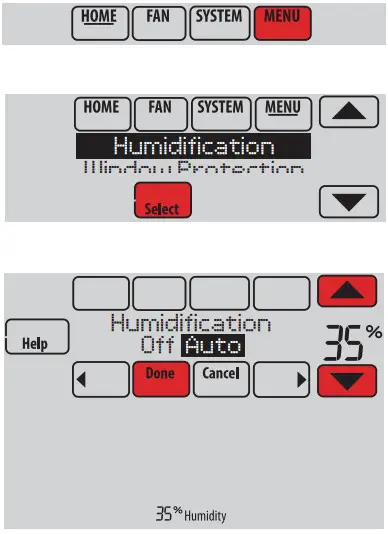
Adjusting humidification settings
- Touch MENU and select Humidification.
- Select Auto.
- Touch
 or
or  select humidity level.
 - Touch Done to save your settings. Touch Cancel to ignore changes.
- If frost or condensation appears on the windows, touch MENU, then select Window Protection. (Use a lower number to prevent frost or condensation. Use a higher number if the indoor air is too dry.)
 NOTE: Window Protection is available only if an outdoor air sensor is installed.
 NOTE: The thermostat controls humidification and dehumidification as needed to maintain the desired humidity level. Depending on how your thermostat was installed, the thermostat may maintain a 15% separation between humidification and dehumidification settings.
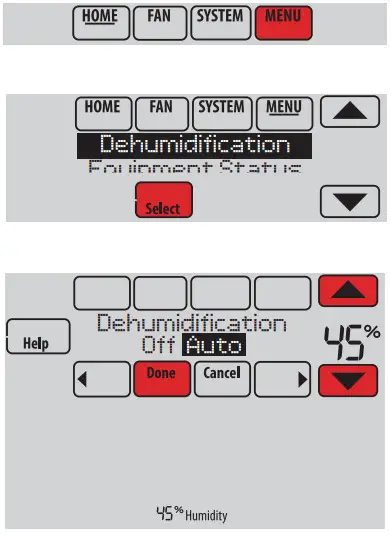
Adjusting dehumidification settings: residential use
This feature can control a dehumidifier or use your air conditioner to reduce humidity.
- Touch MENU and select Dehumidification.
- Select Auto.
- Touch
 or
or  select humidity level.
 - Touch Done to save your settings. Touch Cancel to ignore changes.
 NOTE: If your air conditioner is used to control humidity, the temperature may drop up to 3° F below your temperature setting until the humidity reaches the desired level.
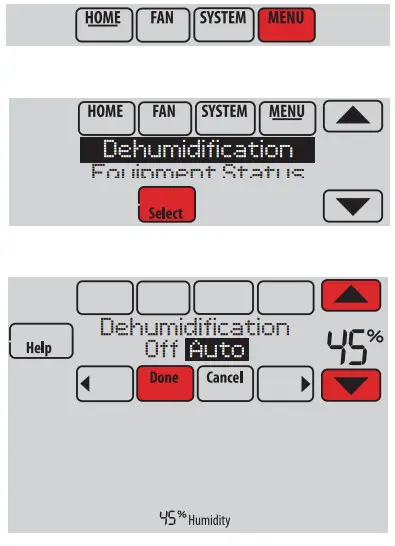
Adjusting dehumidification settings: commercial use
This feature can control a dehumidifier or use your air conditioner to reduce humidity.
- Touch MENU and select Dehumidification.
- Select Auto.
- Touch
 or
or  to select humidity level.
 - Touch Done to save your settings. Touch Cancel to ignore changes.
If your air conditioner is used to control humidity, the thermostat may use the following methods to maintain humidity:
- Cool from 1° to 5° F lower than your temperature setting.
- Run cooling for the minimum “on” time to reduce humidity.
- Run cooling and heating at the same time to reduce humidity without lowering the temperature.
Adjusting ventilation settings
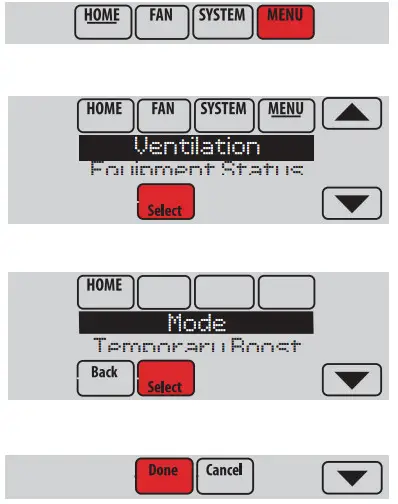
- Touch MENU, and select Ventilation.
- Select Mode, Temporary Boost, or Lockout, then select appropriate options. (For options, see next page.)
- Touch Done to save your settings. Touch Cancel to ignore changes.
Ventilation options
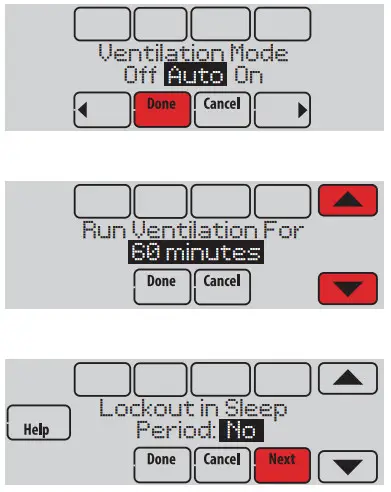
Mode:
Auto: Ventilation runs as programmed by the installer.
Off: Ventilation remains off unless turned on using the timer.
On: Ventilation is always on.
Temporary Boost: Touch or
or to select how long to run ventilation temporarily. To turn it off, set it to zero.
Lockout: Touch or
or to select Yes or No, then touch Next. Select Yes to prevent ventilation from running during the Sleep or Unoccupied (commercial) program periods or when outdoor conditions exceed values set by the installer.
Setting preferences
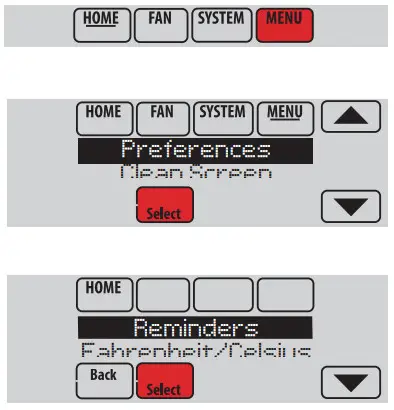
Preference menu options let you select how the thermostat displays information or responds to certain situations.
- Touch MENU and select Preferences.
- Select an option and follow prompts:
• Reminders to change filters
• Fahrenheit/Celsius display
• 12/24-hour clock display
• Screen backlighting
• Alert light options
• Scheduling options
• Adaptive recovery
• Default schedule
• Daylight saving time - Touch Done to save your settings. Touch Cancel to ignore changes.
Cleaning the thermostat screen
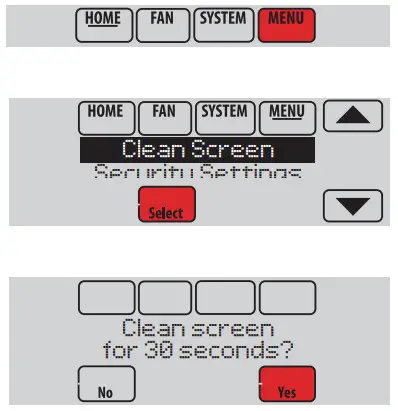
When you select the Clean Screen option, the screen is locked so you don’t accidentally change settings while you clean.
- Touch MENU.
- Select Clean Screen. A prompt asks if you want to clean the screen for 30 seconds.
- Touch Yes. A countdown timer displays elapsed time until the screen is reactivated.
 NOTE: Do NOT spray any liquid directly on the thermostat. Spray liquids onto the cloth, then use the damp cloth to clean the screen. Use water or household glass cleaner. Avoid abrasive cleansers.
Adjusting security settings
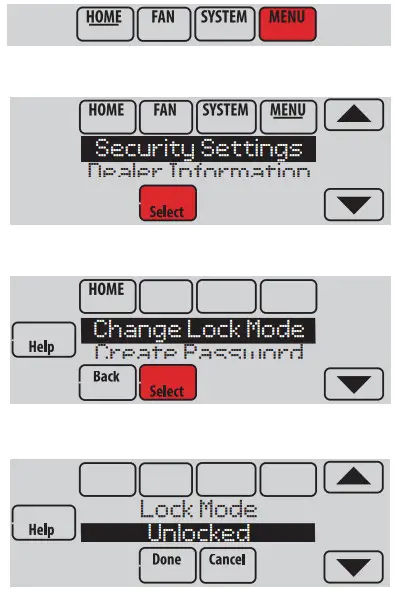
You can adjust security options to prevent unauthorized changes to system settings.
- Touch MENU and select Security Settings.
- Select an option and follow prompts:
Unlocked: Full access allowed.
Partially locked: Only temperature can be changed.
Fully locked: No access allowed.
 NOTE: If you choose to use a password for additional security, write it here for reference:
Viewing dealer information
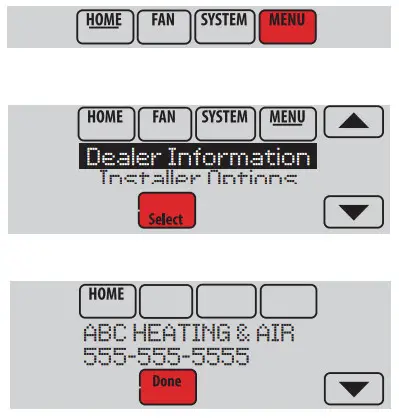
Check dealer information if you need to contact your installer for maintenance, repairs, or upgrades.
- Touch MENU.
- Select Dealer Information.
- Scroll through the displayed information.
- Touch Done to return to the menu.
Advanced features
Adaptive Intelligent Recovery (residential use only)—Over time, the VisionPRO® thermostat “learns” how long it takes your system to reach the temperature you want. It turns on the heating or cooling system earlier to make sure you’re comfortable at the time you expect. The thermostat displays “In Recovery” when it turns the system on early.
Dehumidification Away Mode—Your system can be set to control indoor climate while your home is vacant during the humid season. Before you leave, touch MENU, then select Dehum Away Mode. Temperature and humidity will be kept at levels that protect your home and possessions. When you return, touch Cancel to resume normal operation.
Compressor Protection—The thermostat keeps the compressor off for a few minutes before restarting, to prevent equipment damage. During this “off” time, the message “Wait” is displayed on the screen.
Pre-occupancy Purge (commercial use only)—This feature turns on the fan 1 to 3 hours before each “occupied” time period, to provide a comfortable work environment when you arrive.
Installer options
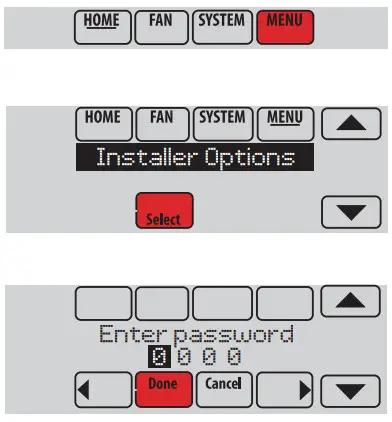
Installer options require a password and should only be changed by a qualified technician.
To prevent unintended changes or damage to your equipment, do not change these options yourself.
Replacing thermostat batteries
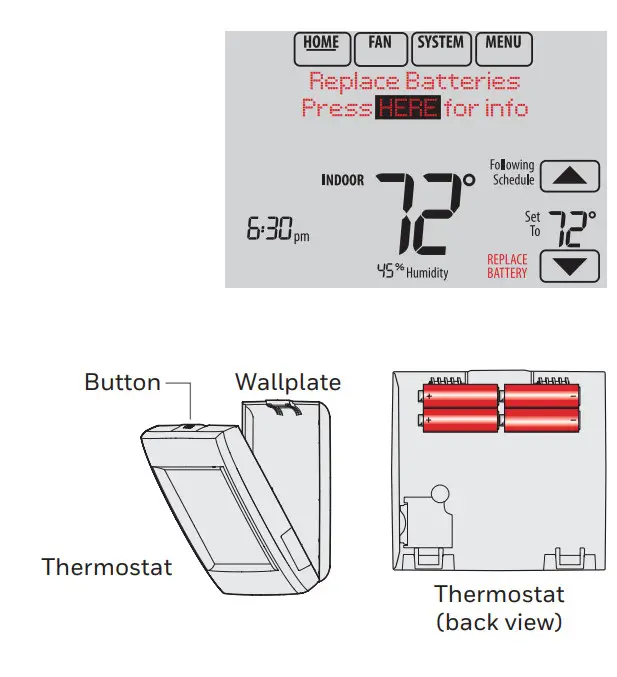
Install fresh batteries when the REPLACE BATTERIES warning begins flashing. The warning flashes about 60 days before batteries are depleted.
Even if the warning does not appear, it is recommended to replace batteries once a year, or before leaving home for more than a month.
Press the release button on top of the thermostat to remove it from the wall plate.
Some versions of this thermostat don’t have a button on the top.
In that case, grip the thermostat along the top and bottom and pull it straight off the wallplate.
There is also a CR2032 coin cell battery located on the back of the thermostat.
Replacing outdoor sensor batteries
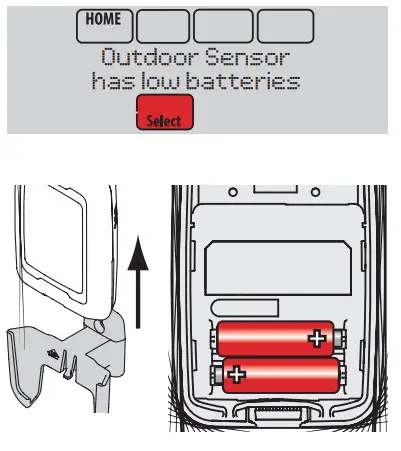
Replace batteries in your outdoor sensor when a warning appears on the thermostat screen, about 60 days before batteries are depleted.
To replace the batteries:
- Remove the sensor from the bracket.
- Detach cover.
- Install 2 fresh AA lithium batteries.
- Replace the cover and set the sensor back into the bracket.
The outdoor sensor will restore communication with the thermostat a few seconds after new batteries are installed.
Replacing indoor sensor batteries
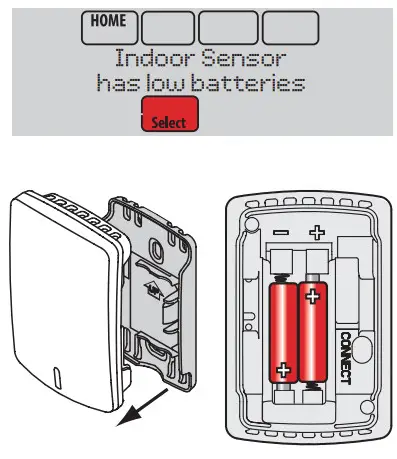
Replace batteries in your indoor sensor when a warning appears on the thermostat screen, about 60 days before batteries are depleted. When the sensor status light begins flashing red, battery power is critically low and will be depleted within 2–3 weeks. During normal operation, the status light remains off.
To replace the batteries:
- Remove the sensor from the wallplate.
- Install 2 fresh AAA alkaline batteries. If the status light flashes green, batteries are good; if it flashes red, you must use fresh batteries.
- Attach sensor to wallplate.
The sensor will restore communication with the thermostat a few seconds after new batteries are installed.
Using the temperature display
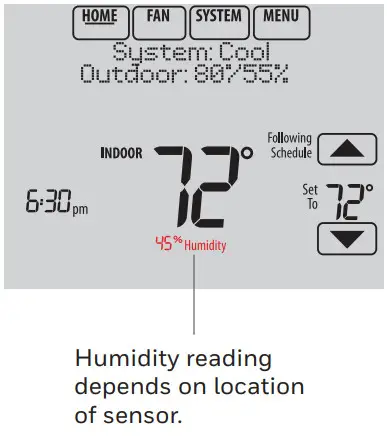
In some circumstances, the temperature displayed on the Home screen may not match the temperature near the thermostat. If your system is set up to use remote indoor ensors, it may be reading a sensor in another location.
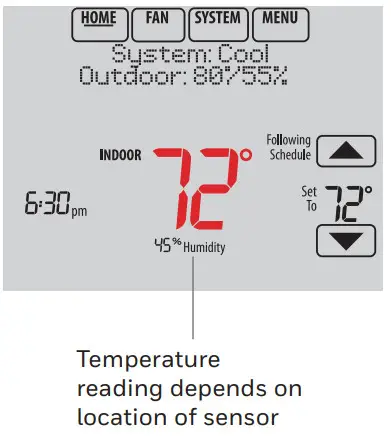
Using the humidity display*
In some circumstances, the humidity displayed on the Home screen may not match humidity near the thermostat.
Some systems are set up to use two sensors, one to control humidification, the other for dehumidification. These sensors are often installed in different locations.
Depending on how your thermostat was installed, the thermostat Home screen will display humidity readings from only one sensor.
* Indoor humidity is not displayed on TH8110R and TH8320R models that are not used with a wireless indoor sensor
Optional accessories
Portable Comfort Control REM5000R1001
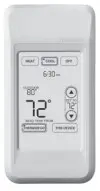 If you have only one thermostat, you move this remote control from room to room (like a portable thermostat), to make sure the temperature is comfortable in the room you’re using. If you have multiple thermostats, you can view and adjust the temperature in each room from your armchair.
Wireless Outdoor Sensor C7089R1013
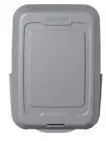 With a wireless outdoor sensor, your VisionPRO® thermostat can display outside temperature and humidity. This information can also be displayed on your handheld Portable
Comfort Control.
Wireless Indoor Sensor C7189R1004
 If an indoor sensor is installed, your VisionPRO thermostat will respond to temperature and humidity readings at the sensor location—providing comfort where the sensor is located. With multiple sensors, the thermostat can average temperature readings from each, to optimize comfort throughout your home.
RedLINK™ Internet Gateway THM6000R7001
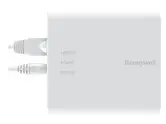 The RedLINK Internet Gateway gives you remote access to your VisionPRO® thermostat from the web, smartphone, or tablet. You can view or adjust the indoor temperature, system mode, and other settings. The Gateway can also send alerts to as many as 6 email addresses to notify you if a problem occurs.
Wireless Entry/Exit Remote REM1000R1003
 This device mounts beside your door for one-touch control. Press AWAY to control an energy-saving temperature when you leave home. Press HOME to control to a comfortable temperature when you return. To change pre-set temperatures, go to MENU > Entry/Exit Remote.
Wireless Vent and Filter Boost Remote HVC20A1000
 This device mounts anywhere in your home (typically bathroom or kitchen) for convenient, on-demand ventilation. For increased ventilation, select 20, 40, or 60 minutes.
Troubleshooting
If you have difficulty with your thermostat, try these suggestions. Most problems can be corrected quickly and easily.
| Screen is blank | • Check the circuit breaker and reset if necessary. • Make sure the power switch at the heating and cooling system is on. • Make sure the furnace door is closed securely. • If the thermostat is battery powered, make sure fresh AA alkaline batteries are installed correctly (see page 16). |
| The screen is difficult to read | • Change screen brightness using the Preferences menu (see page 13). |
| The red light is on | • If the thermostat is in Emergency Heat mode, the red light is normal. It shows that the thermostat is in Emergency Heat mode. • If the thermostat is not in Emergency Heat mode, an alert is active. Check the message on the thermostat screen. |
| The heating or cooling system does not respond |
• Touch SYSTEM to set the system to Heat. Make sure the temperature is set higher than the Inside temperature. • Touch SYSTEM to set the system to Cool. Make sure the temperature is set lower than the Inside temperature. • Check the circuit breaker and reset if necessary. • Make sure the power switch at the heating & cooling system is on. • Make sure the furnace door is closed securely. • If “Wait” is displayed, the compressor protection timer is on. Wait 5 minutes for the system to restart safely, without damaging the compressor. |
| Cannot change time or date | • See page 3. If the thermostat doesn’t allow you to adjust time/date and is used with a RedLINK Internet Gateway, the thermostat is getting the time/date information from the address entered under the location that the thermostat is registered to in the Total Connect Comfort account. If the thermostat is newly installed without a gateway, there can be a 72-hour delay before the thermostat will allow you to set a time and date. To bypass the delay, remove the thermostat from the wall plate (see page 16) and remove the coin cell battery for at least one minute. Then put the battery back in and re-attach the thermostat to the wall plate. |
Warranty information
Resideo warrants this product, excluding battery, to be free from defects in workmanship or materials, under normal use and service, for a period of five (5) years from the date of first purchase by the original purchaser. If at any time during the warranty period the product is determined to be defective due to workmanship or materials, Resideo shall repair or replace it (at Resideo’s option).
If the product is defective,
(i) return it, with a bill of sale or other dated proof of purchase, to the place from which you purchased it; or (ii) call Resideo Customer Care at 1-800-468-1502. Customer Care will make the determination whether the product should be returned to the following address: Resideo Return Goods, 1985 Douglas Dr. N., Golden Valley, MN 55422, or
whether a replacement product can be sent to you.
This warranty does not cover removal or reinstallation costs. This warranty shall not apply if it is shown by Resideo that the defect was caused by damage that occurred while the product was in the possession of a consumer.
Resideo’s sole responsibility shall be to repair or replace the product within the terms stated above. RESIDEO SHALL NOT BE LIABLE FOR ANY LOSS OR DAMAGE OF ANY KIND, INCLUDING ANY INCIDENTAL OR CONSEQUENTIAL DAMAGES RESULTING, DIRECTLY OR INDIRECTLY, FROM ANY BREACH OF ANY WARRANTY, EXPRESS OR IMPLIED, OR ANY OTHER FAILURE OF THIS PRODUCT.
Some states do not allow the exclusion or limitation of incidental or consequential damages, so this limitation may not apply to you.
THIS WARRANTY IS THE ONLY EXPRESS WARRANTY RESIDE MAKES ON THIS PRODUCT. THE DURATION OF ANY IMPLIED WARRANTIES, INCLUDING THE WARRANTIES OF MERCHANTABILITY AND FITNESS FOR A PARTICULAR PURPOSE, IS HEREBY LIMITED TO THE FIVE-YEAR DURATION OF THIS WARRANTY. Some states do not allow limitations on how long an implied warranty lasts, so the above limitation may not apply to you.
This warranty gives you specific legal rights, and you may have other rights which vary from state to state. If you have any questions concerning this warranty, please write Resideo Customer Care, 1985 Douglas Dr, Golden Valley, MN 55422 or call 1-800-468-1502.
Regulatory information
FCC Compliance Statement (Part 15.19) (the USA only)
This device complies with Part 15 of the FCC Rules. Operation is subject to the following two conditions:
- This device may not cause harmful interference, and
- This device must accept any interference received, including interference that may cause undesired operation.
FCC Warning (Part 15.21) (the USA only)
Changes or modifications not expressly approved by the party responsible for compliance could void the user’s authority to operate the equipment.
FCC Interference Statement (Part 15.105 (b)) (USA only)
This equipment has been tested and found to comply with the limits for a Class B digital device, pursuant to Part 15 of the FCC Rules. These limits are designed to provide reasonable protection against harmful interference in a residential installation. This equipment generates uses and can radiate radio frequency energy and, if not installed and used in accordance with the instructions, may cause harmful interference to radio communications. However, there is no guarantee that interference will not occur in a particular installation. If this equipment does cause harmful interference to radio or television reception, which can be determined by turning the equipment off and on, the user is encouraged to try to correct the interference by one of the following measures:
- Reorient or relocate the receiving antenna.
- Increase the separation between the equipment and receiver.
- Connect the equipment into an outlet on a circuit different from that to which the receiver is connected.
- Consult the dealer or an experienced radio/TV technician for help.
Equipment interface module, thermostats, and outdoor sensor
To comply with FCC and Industry Canada RF exposure limits for general population/ uncontrolled exposure, the antenna(s) used for these transmitters must be installed to provide a separation distance of at least 20 cm from all persons and must not be co-located or operating in conjunction with any other antenna.
Portable Comfort Control
This portable transmitter with its antenna complies with FCC and Industry Canada RF exposure limits for general population/ uncontrolled exposure. This device must not be co-located or operating in conjunction with any other antenna or transmitter.
Section 7.1.2 of RSS-GEN
Under Industry Canada regulations, this radio transmitter may only operate using an antenna of type and maximum (or lesser) gain approved for the transmitter by Industry Canada. To reduce potential radio interference to other users, the antenna type and its gain should be so chosen that the equivalent isotropically radiated power (e.i.r.p.) is not more than that necessary for successful communication.
Section 7.1.3 of RSS-GEN
Operation is subject to the following two conditions:
- This device may not cause interference, and
- This device must accept any interference, including interference that may cause undesired operation of the device.
 This thermostat contains a Lithium battery which may contain Perchlorate material. Perchlorate Material—special handling may apply.
See www.dtsc.ca.gov/hazardouswaste/perchlorate
 CAUTION: ELECTRONIC WASTE NOTICE
The product should not be disposed of with other household waste. Check for the nearest authorized collection centers or authorized recyclers. The correct disposal of end-of-life equipment will help prevent negative consequences for the environment and human health.
Need Help?
For assistance please visit honeywellhome.com/support, or call toll-free:
1-800-468-1502

 Resideo Technologies, Inc.
1985 Douglas Drive North, Golden Valley, MN 55422
https://www.honeywellhome.com/support
69-2761EFS—11 M.S. Rev. 12-20 | Printed in the United States
www.resideo.com
© 2020 Resideo Technologies, Inc. All rights reserved.
The Honeywell Home trademark is used under license from Honeywell International, Inc.
This product is manufactured by Resideo Technologies, Inc. and its affiliates.

FAQS
How do I set up my thermostat?
You can install your thermostat yourself or have a professional do it. For instructions, see the installation guide included with your thermostat. If you need additional information, visit HoneywellHome.com/support.
How do I program my thermostat?
Use the Quick Set-Up Guide included with your thermostat to get started. If you need additional information, visit HoneywellHome.com/support.
How do I wire my thermostat?
See the wiring diagram included with your thermostat. If you need additional information, visit HoneywellHome.com/support.
What are the advantages of using a RedLINK Internet Gateway?
The RedLINK Internet Gateway allows you to access and control your heating and cooling system from anywhere in the world using a computer, tablet or smartphone connected to the internet (Internet service required). For more information, visit HoneywellHome.com/redlinkgateway.
What is Adaptive Intelligent Recovery and how does it work?
Adaptive Intelligent Recovery is an energy-saving feature that automatically adjusts heating or cooling settings during periods when no one is home to help reduce energy use and save money on utility bills (when used with a compatible thermostat). For more information on this feature, visit HoneywellHome.com/adaptiveintelligentrecovery.
Can I use my VisionPRO 8000 with other Honeywell products?
Yes! Your new VisionPRO 8000 can be used with other Honeywell products such as wireless indoor and outdoor temperature sensors, wireless humidity sensors and wireless ventilation controls (sold separately). For more information on these products, visit HoneywellHome.com/products or call 1-800-331-3732 for assistance.
What’s in the box?
Smart Color Thermostat
Mounting Hardware
Quick Start Guide
does this thermostat requires “C” wire?
In an HVAC system there is a step-down transformer that takes the 240VAC or 120VAC and steps it down to 24VAC. The primary side of the 24VAC is what has always been connected the R terminal of a thermostat. The secondary side of the 24VAC transformer was not. It is this secondary side of the 24VAC that is needed by newer thermostats. In fact the newer thermostats are powered by the 24VAC. That secondary side is what is connected to the C terminal. If your cable has a spare unconnected wire. It could be connected to the secondary of the transformer and then to the C terminal. To see if it is there but but not connected, us a VOM and set for AC Voltage, put one lead on the R terminal, and the second lead to each unconnected wire(s), one at a time. if it shows 24VAC +/- 4VAC, you found the secondary side. All other wires will show OC or open. That secondary side wire is the C wire
How does this sense the outside temp and humidity?
It does show the inside humidity and you can look at the app side and see the outside temp based on internet lookup of temp but there are no sensors for exterior temp or humidity. Just some additional clarification if it helps.
Will adding a fossil fuel kit allow me to use this thermostat in a dual-fuel (heat-pump/gas furnace) system?
Yes; by adding a fossil fuel kit you can use this thermostat in a dual-fuel system.
Is this a T10 thermostat?
The RTH9585WF is not a T10 thermostat. Just in case you need it, the T10 thermostat product number is THX321WFS2001W/U.
Where do you install batteries?
this thermostat doesn’t work on batteries. This model requires a C wire for power.
Does this require any special wiring or equipment to install?
This thermostat requires a C wire for power.
Will this work in UAE?
If you have US type HVAC air conditioning system with remote thermostat(s) in the UAE – perhaps this will work. It is not usable with typical split and multi-split AC units that are most common in middle east and across Asia (but increasingly across the southern USA).
The remote used with splits sold by Daikin, York, Gree, Samsung, LG, Panasonic, etc is used to adjust the the temperature of the internal thermostat within the split indoor “evaporator” head.
Will this work on a dual fuel system?
No it will not.
how do you release the wires from the terminal strip?
to remove the wires from the thermostat wall plate you have to press and hold the circle cleft on the terminal tab next to the terminal letter while pulling out the wire.

