HOW TO USE
CAUTION ! Do not use this carpet washer and accessories on hard floors. Using this machine on hard floors may scratch or damage your floor.
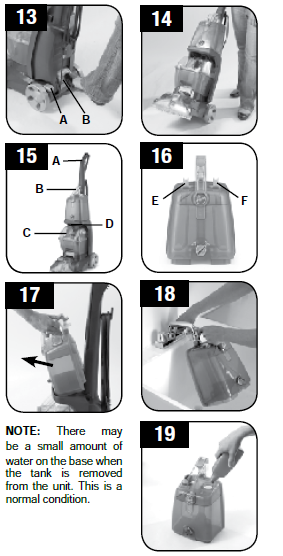
ON-OFF PEDAL (Fig. 13, A)
- To turn cleaner ON, step on pedal.
- To turn cleaner OFF, step on pedal again
HANDLE RELEASE PEDAL (Fig 13, B)
- Grasp handle.
- Step on Handle Release Pedal to release lower handle to operating position.
- Do not release the grip on the handle
TRANSPORTING
- To move your cleaner from room to room, put the handle in the upright and locked position.
- Tilt cleaner back on wheels and push forward (Fig. 14).
CARRY HANDLES
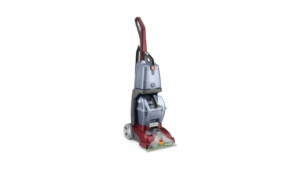
The carpet washer may also be lifted by any of several carry handles as shown. Be sure tanks are properly latched in place before attempting to lift (Fig 15).
A. Upper Handle
B. Solution Tank Handle
C. Dirty Water Tank Handle
D. Solution Tank Shelf
CLEAN WATER/SOLUTION TANK
The Clean Water / Solution Tank (Fig. 16) is divided into two sections. The Clean Water Tank (E) is for water only and the Solution Tank (F) is for cleaning solutions only.
NOTE: Tanks are labeled above tank caps.
How to Fill
- Turn off and unplug cleaner from the electrical outlet.
- To remove tank, press down on Solution Tank Latch and pull forward. (Fig. 17).
- Fill Clean Water Tank (Fig. 18) with hot tap water. The use of hot water as opposed to cold, significantly improves cleaning performance.
- Fill Solution Tank (Fig. 19) with Hoover® Clean Plus 2X Solution or any other Hoover solution (see “Cleaning Solutions” page 19 for details). Replace container caps and tighten.
- Place Solution/Water Tank back on to the unit using the method described on page 6
CAUTION ! Detergents contain Anionic and Nonionic Surfactants. Avoid contact with eyes and skin. In case of contact with eyes, flush with cold water for 15 minutes. In case of contact with skin, wash with water. If irritation persists, call a physician.
CAUTION ! Use only HOOVER® cleaning products intended for use with this machine. (See the “Cleaning Solutions” section in this manual for details) They are specially formulated for use with your cleaner. Non-Hoover cleaning solutions may harm the machine and void the warranty.
DIRTY WATER TANK
The Dirty Water Tank holds the dirty water that is picked up from the surface being cleaned. When the Dirty Water Tank is full, the automatic shut-off will engage, suction will stop and the tank must be emptied (see Automatic Shut-Off section).
How to Empty
1. Turn cleaner off and unplug from electrical outlet.
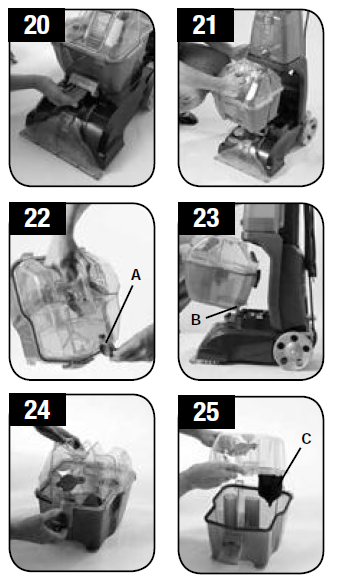
2. Release Dirty Water Tank Latch (Fig. 20).
3. Grab the Dirty Water Tank Handle and remove from carpet washer (Fig. 21).
4. Unplug the Quick Spout Pour Cap (A), rotate it away from drain hole and empty the Tank (Fig. 22).
5. Place Recovery Tank back on to cleaner making sure to do so with the retaining features (B, Fig. 23) pointing down to ensure proper sealing.
6. Latch the Recovery Tank back in to place.
IMPORTANT For full suction, it is important that the Dirty Water Tank is properly secured before cleaning.
How to Clean
- Empty Dirty Water Tank.
- Place on flat surface and unlatch Dirty Water Tank lid latch located below the Quick Spout Pour Cap (Fig. 24).
- Pivot and lift off Dirty Water Tank Lid (Fig. 25).
- Remove lint from the filter screen located on the bottom of the Dirty Water Tank Lid (C, Fig. 25).
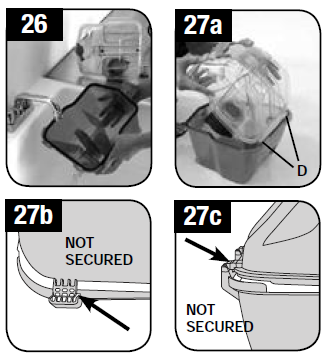
- Rinse debris from Dirty Water Tank Lid and Dirty Water Tank bottom (Fig. 26).
- Insert tabs on Dirty Water Tank lid and reattach lid to Dirty Water Tank bottom (D, Fig. 27a).
- Reattach Recovery Tank Lid Latch.
AUTOMATIC SHUT OFF
When the Dirty Water Tank is full the yellow float disk will rise and shut off the carpet washer’s suction. The carpet washer will no longer pick up dirty water and the motor sound will become noticeably higher in pitch.
When this happens, turn carpet washer off and empty Dirty Water Tank before continuing use. Check Clean Water/Solution Tank also; it may need to be refilled.
Do not use without float and float retainer in place. If broken or dislodged, take to an Authorized Dealer for repair.
HOW TO CLEAN
BEFORE YOU BEGIN CLEANING
- Vacuum thoroughly – For carpet, use a HOOVER® vacuum cleaner with an agitator for best results. Vacuum upholstery with a vacuum cleaner with cleaning tool attachments. Use a crevice tool to reach into tufts and folds. Do not use the carpet cleaner as a dry vacuum cleaner.
- For upholstery, check cleaning code – Use your HOOVER® carpet washer only if the upholstery fabric is marked with a “W” (for “wet” clean) or “S/W” (for “solvent/dry” or “wet” clean). Do not clean fabric marked “S” (“solvent/dry” clean only). If your upholstery does not have a code, seek professional assistance.
- Test for colorfastness – Wet a white absorbent cloth with the solution. In a small, hidden area, gently rub the surface with the dampened cloth. Wait ten minutes and check for color removal or bleed with a white paper towel or cloth. If the surface has more than one color, check all colors.
- When cleaning entire floor, move furniture out of area to be cleaned (may not be necessary if only high traffic areas are to be cleaned). For furniture too heavy to move, place aluminum foil or wax paper under legs. This will prevent wood finishes from staining carpet. Pin up furniture skirts and draperies.
- Pretreat spots and heavy traffic areas with appropriate Hoover Cleaning Solutions, see“Cleaning Solutions” section. Follow Directions onbottle.
*Available at additional cost if not included with your model. - To prevent staining, use plastic or aluminum foil to protect wood or metal surfaces from possible water spray.
- To avoid wetting and possible damage to wood floors underneath area rugs/carpet, either move area rugs/ carpet to a non-wood hard floor surface or place waterproof material (e.g. plastic) underneath them before cleaning.
ATTENTION
Some Berber, Natural Fiber, and Soft Fiber carpets can fuzz with wear. Some vacuums & carpet cleaners can worsen this carpet wear. Test a hidden area before using on a full room & consult with your carpet manufacturer on cleaning recommendations.
