Klarstein 900-1000W Coffee Machine

TECHNICAL DATA
| Artikelnummer | 10035564, 10035565 |
| Stromversorgung | 220-240 V ~ 50/60 Hz |
| Leistung | 1350 W |
| Wassertankkapazität | 1,5 L |
SAFETY INSTRUCTIONS
- Read this manual carefully to avoid any risk of physical damage, fi re, electric shock, personal injury or property damage.
- This machine is intended for making coffee by means of a pressure fi lter („espresso“) and for domestic use indoors.
- Do not use the machine for any purpose other than its intended use.
- Children from the age of 8 years and persons with mental, sensory and physical disabilities may only use the appliance if they have been thoroughly familiarised with the functions and safety precautions by a responsible supervisor and understand the risks involved.
- Repairs may only be carried out by qualifi ed personnel and are necessary if the appliance has been damaged, the power cable or plug has been damaged, liquids have spilled on it or objects have fallen on it, if the appliance has been exposed to moisture or dampness or has been dropped or does not work properly.
- Please use only the accessories recommended by the manufacturer of this unit to ensure the operation of the unit.
- Before using the appliance, ensure that the water tank of the appliance is always fi lled with the amount of water required for the intended application to prevent damage to the appliance.
- Keep away from hot steam escaping from the appliance. Only use the handles or levers attached to the appliance or its components when moving hot components of the appliance, such as the frother or fi lter.
- To avoid electrical damage to the unit, do not immerse the unit in water for cleaning.
- Do not touch the plug of the unit with wet or damp hands. The moisture from your hands may drip onto the plug and cause a dangerous electric shock when it comes into contact with the power outlet.
- Supervise the unit during operation.
- Keep the unit and its components dry, clean and out of the reach of unauthorised persons.
- Supervise children while they are playing near the machine to protect them from damage.
- Unplug the machine from the power outlet when not in use.
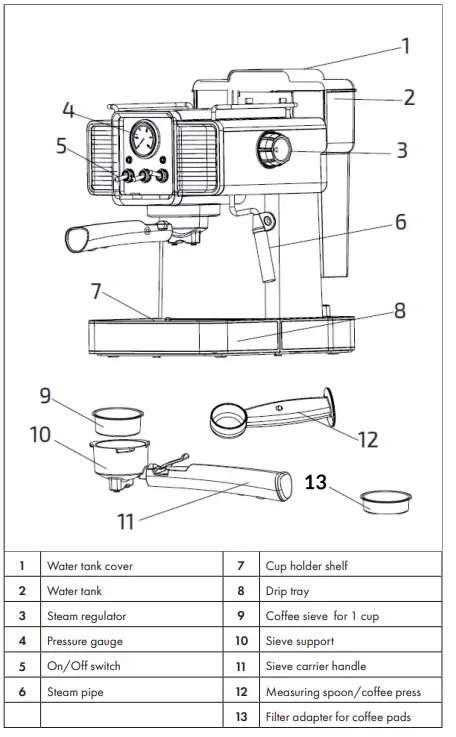
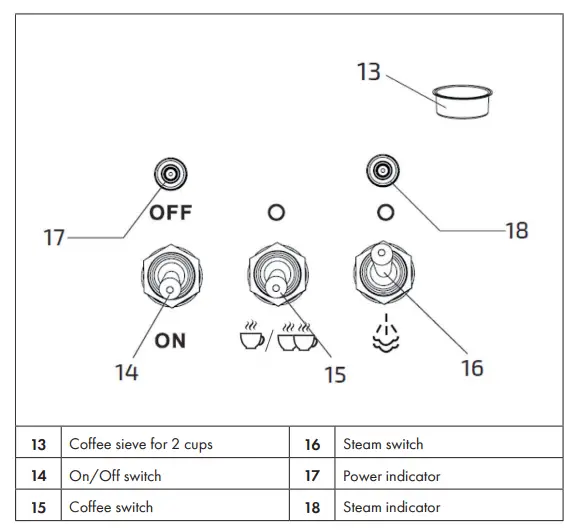
PRODUCT OVERVIEW
- Remove the appliance from the packaging and check that all parts are complete and undamaged.
- Clean all removable parts and dry them carefully.
COMMISSIONING
- Place the unit on a stable and level surface near a power outlet.
- Install the drip tray and place the cup holder tray on it.
- Remove the water tank, fill it with water and replace it.
Note: The water must be filled in between the MIN and MAX marks. - Place a cup or mug on the cup holder tray. Make sure that the steam switch and the coffee switch are in the off position.
- Insert the coffee sieve in the sieve holder, but do not yet fill in any coffee. Make sure that the coffee sieve is properly engaged.
- Place the cup or mug under the coffee outlet nozzles.
- Connect the machine‘s power cord to a power source.
- Set the On/Off switch to the ON position and scrape the machine The power indicator starts flashing red and the machine starts to heat up. When the heating phase is complete, the red light is steady on.
- Press the coffee switch upwards and the machine starts dispensing hot water. Slide the coffee switch down to stop the water output.
- When no more water is dispensed, remove the water tank, rinse it and clean the cup or mug used. The coffee machine is now ready for use.
OPERATION
Filling the coffee sieve with coffee
- Insert the coffee sieve into the sieve holder.
- Fill the coffee sieve with freshly ground coffee.
- Make sure that the coffee does not exceed the edge of the filter.
- Press down the coffee with the measuring spoon and coffee press, add coffee if necessary and press down again
- Remove excess coffee from the edge of the filter to ensure easy installation of the filter holder in the machine and good operation.
Note: Pressing down the coffee is a very important part of coffee preparation.
Installation of the sieve holder
- Turn the sieve holder to the left to remove it
- Select the desired sieve for 1 coffee or 2 coffees The 2 coffee sieve requires a larger quantity of coffee.
- Follow the steps in the section above to fill the sieve with coffee. Use freshly ground coffee for best results.
- Put the sieve holder back into the machine by turning it to the right until it fits into the locking position.
Brewing coffee
- Fill the appropriate coffee sieve with coffee.
- Attach the sieve holder
- Switch on the machine by setting the power switch to ON. The red indicator light starts to blink and the unit starts to heat up.
- As soon as the heating phase is complete, the red light is constantly lit.
- Press the coffee switch downwards and the machine starts to brew coffee. To stop dispensing coffee, move the switch to the off position.
Frothing milk
When the coffee is brewed, you can start frothing the milk.
- Press the steam switch downwards, the blue light indicator starts to flash.
- As soon as the machine has heated up, the blue indicator light stops flashing.
- Fill a cup or mug with milk. We recommend using whole milk at room temperature for better results.
- Insert the steam pipe into the cup or container at a depth of 1-2 cm. When frothing milk, move the cup or container up and down. Slowly turn the steam regulator counter-clockwise to allow steam to escape. The steam pipe can release a few water droplets before steam is generated.
- Once the required amount of milk foam has been produced, turn the steam control knob clockwise and set the steam switch to the off position.
Boiling water
- Turn on the machine by setting the power switch to ON. The red indicator light starts to blink and the unit starts to heat up.
- As soon as the heating phase is complete, the red light is constantly lit.
- Press the coffee switch downwards and the machine starts dispensing water. To stop the water output, move the switch to the off position.
- Wait until the machine has heated up again and repeat these steps to dispense hot water.
After use
After steam/water dispensing or coffee brewing, the temperature of all machine components rises because the machine has been working under high pressure. If the machine overheats, the two light indicators will start to fl ash rapidly, indicating that the temperature of the machine needs to be lowered.
- Turn the steam control knob anti-clockwise and press the coffee switch to the on position. Water is released through the steam pipe.
- When the red light stops flashing, set the coffee switch to the off position and turn the steam control knob clockwise.
- The machine is now ready to brew coffee again.
CLEANING AND CARE
To ensure a pure taste, carry out cleaning after each use. Descaling and maintenance should be carried out every 2-3 months.
Cleaning the coffee sieve and sieve holder
- Remove the sieve holder and remove the coffee sieve. Tap the sieve holder lightly against the sieve to remove the coffee grounds.
- Then clean the sieve holder and the coffee sieve with clean water and dry them before putting them back together.
Water outlet, steam pipe and steam attachment
After milk frothing, turn the steam control knob completely open so that the steam outlet releases steam for a few seconds and cleans the steam pipe and steam attachment. Allow the steam pipe and steam attachment to cool down after milk frothing. Then clean the steam tube and steam attachment immediately with a damp cloth. This prevents milk residues from accumulating.
Removable parts and housing
Clean the water tank, the surface of the appliance, the drip tray and the drip tray cover with a damp cloth.
Descaling
Descale the machine every two months using a standard descaler or a vinegar-water solution in a ratio of 1:4. Fill the water tank with the mixture and run the mixture through the machine once. Then fill the tank with fresh, clean water up to the MAX mark and let the water run through again.
FREQUENTLY ASKED QUESTIONS
Which powder is right for the espresso machine?
The right powder can be identified by the shape of the powder after it has been compressed in the sieve:
- If the powder is mushy, it is too fine.
- If the powder crumbles, it is too coarse.
- If the powder holds firmly together, it is suitable.
What is the right amount of powder?
- If you are preparing 1 espresso, put a spoon (about 8 g) of espresso powder in the small sieve.
- If you are preparing 2 espressos, put two spoons (about 16 g) of espresso powder in the large sieve.
What is the function of the small hook on the screen holder?
The hook prevents the sieve from falling out of the sieve holder when the powder is emptied.
What is the function of the steam cap on the steam tube?
It ensures that the milk is swirled by the steam. This makes the milk foam firmer and finer.
Why can‘t the milk be frothed?
- Make sure that the milk used is cold.
- Do not froth the milk for too long. If it gets too hot, no milk foam can form.
What can you do if the bubbles in the milk foam are unevenly large?
Knock on the milk cup to remove large bubbles. Then shake the milk cup horizontally to completely mix the milk and milk foam.
Which milk is suitable for frothing?
Low-fat milk is easy to foam, but the bubbles and foam are slightly larger and looser. Whole milk is more difficult to foam, but the milk foam becomes thick and tough.
What to do if no steam comes out of the steam attachment?
- This is usually because the steam pipe and the steam cap have not been cleaned after milk frothing and milk residues block the steam pipe.
- Try cleaning the pipe with a small cleaning brush.
- If this does not help, add vinegar and water to the water tank at a ratio of 1:1. Then start the steam function to clean the hose. Then top up with fresh water and restart the steam function.
- If the problem persists, contact your service representative.
TROUBLESHOOTING
| Problem | Possible cause | Suggested solution |
| Liquid runs out of the top of the fastened strainer carrier. | Residues on the seal. | Remove the residue. |
| The powder is too fine. | Use coarser powder. | |
| The powder has been compressed too much. | Do not press the powder
too hard into the sieve. |
|
| The seal is old. | Contact a specialist company. | |
| The strainer support cannot be properly locked and liquid will run out of the top of the fastened strainer support. | Too much powder in the
sieve. |
Adjust the amount of powder (see: Frequently Asked Questions). |
| Residues on the seal. | Remove the residues. | |
| The powder is too fine. | Use coarser powder. | |
| Cold espresso. | The unit has not been
preheated. |
Wait for the appliance to heat up before starting the preparation. |
| Problem | Possible cause | Suggested solution |
| The pump makes unusual
noises. |
No water in the tank. | Fill the tank with water. |
| The tank does not sit
properly. |
Insert the tank correctly. | |
| The espresso is too light. | The powder in the sieve has not been flattened. | Press the powder firmly
next time. |
| Too little powder. | Adjust the amount of powder (see Frequently Asked Questions). | |
| The powder is too coarse. | Use finer powder. | |
| The espresso is too dark. | The powder in the sieve was pressed too hard. | Next time don’t squeeze the powder so hard. |
| Too much powder. | Adjust the amount of powder (see Frequently Asked Questions). | |
| The sieve is dirty. | Clean the sieve. | |
| The powder is too fine. | Use coarser powder. | |
| The device is calcified. | Descale the machine (see: Cleaning and Care). | |
| The sieve holder cannot be locked properly even though there is no powder in the sieve. | The holder is defective. | Contact a specialist company. |
DISPOSAL CONSIDERATIONS
If there is a legal regulation for the disposal of electrical and electronic devices in your country, this symbol on the product or on the packaging indicates that this product must not be disposed of with household waste. Instead, it must be taken to a collection point for the recycling of electrical and electronic equipment. By disposing of it in accordance with the rules, you are protecting the environment and the health of your fellow human beings from negative consequences. For information about the recycling and disposal of this product, please contact your local authority or your household waste disposal service.
MANUFACTURER & IMPORTER (UK)
- Manufacturer:
- Chal-Tec GmbH, Wallstrasse 16, 10179 Berlin, Germany.
- Importer for Great Britain:
- Chal-Tec UK limited
- Unit 6 Riverside Business Centre
- Brighton Road
- Shoreham-by-Sea
- BN43 6RE
- United Kingdom