Instruction Manual
Keycode: 43069910
Multifunction Sewing machine
※ Please read the instruction book carefully before operating the sewing machine.
※ Please save this manual in a safe place.
※ This sewing machine is for Household Use.
Please read all instructions before using this appliance and keep the instructions for future reference.
IMPORTANT SAFETY INSTRUCTIONS
※ This sewing machine is for domestic use only.
※ Do not use outdoors
※ Powered by an AC/DC adaptor
※ The sewing machine must be switched off with the adaptor unplugged when :
– Threading the needle
– Changing the needle
– Changing bottom bobbin
– Changing parts
– Cleaning the machine
– After each use
CAUTIONS
– Never leave the sewing machine unattended in the presence of children.
– When operating the sewing machine, keep your hands away from the needle, hand wheel, upper thread tension dial, and pattern selection dial.
– To clean the sewing machine, simply wipe it with a soft cloth and never use any harsh chemical solutions.
ACCESSORIES
| Foot pedal ×1 |  |
| Thread spool ×2 |  |
| Bobbin ×2 |  |
| Needle threader ×1 |  |
| Needle (#14) ×1 |  |
| Adaptor ×1 |
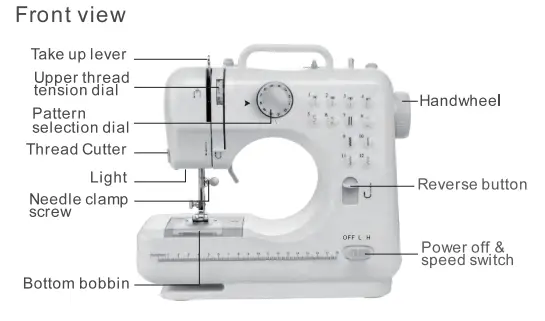
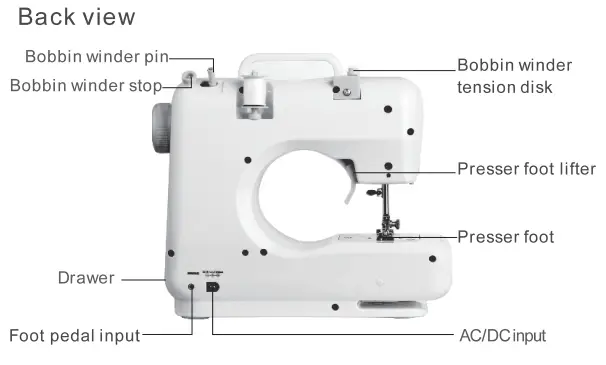
NAME OF PARTS
 |
 |
CONNECTING THE SEWING MACHINE TO THE MAINS POWER SUPPLY
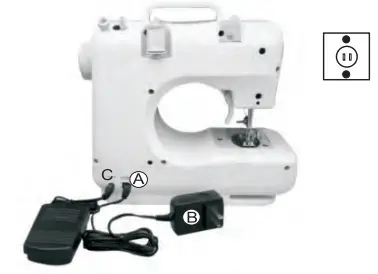
- Make sure the “power OFF/ L & H speed switch” is on the “OFF” position.
- Connect the jack position A to the DC input socket on the back of the sewing machine, and connect the three-pin plug position B into the main power supply.
- Connect the foot pedal position C to the sewing machine by inserting the jack into the foot pedal input socket on the back of the sewing machine.
- You can either use the foot pedal (please keep the power/speed switch on the off position) or the power/speed switch (H setting for high sewing speed whilst the L stands for low sewing speed) to operate the sewing machine.
CAUTION:
Whenever the sewing machine is not in use, make sure it is switched off and unplugged from the main power supply.
INSTALLING THE BATTERIES
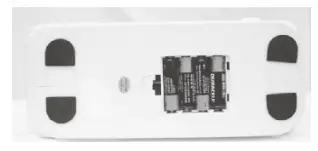
- Make sure the “power OFF/ L & H speed switch” is on the “OFF” position.
- Turn the sewing machine over on a flat surface and remove the battery compartment cover.
- Insert 4xAA batteries into the compartment and replace the battery cover.
CAUTION 1:
To prevent accidental start-up of the sewing machine, always make sure that the “power OFF/ L & H speed switch” is on the “OFF” position when inserting, or changing the batteries.
CAUTION 2:
The adaptor and batteries cannot be used at the same time, otherwise will cause damage to the machine.
Please take out the batteries when using an adaptor.
THREADING THE SEWING MACHINE
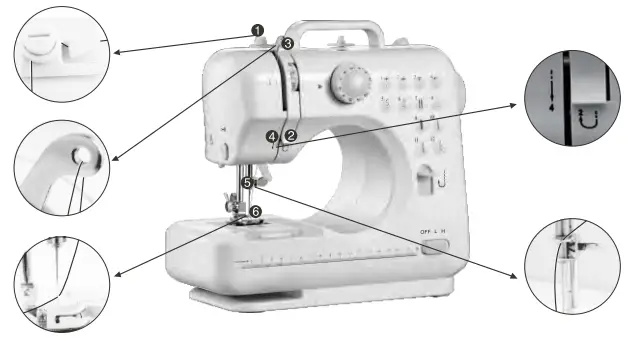
Threading upper thread
CAUTION: When threading the sewing machine make sure that the “power OFF/ L & H speed switch” is on the “OFF” position and follow steps 1-6 below.
Turn the handwheel counterclockwise until the needle is in the highest position.
NEEDLE REPLACEMENT
CAUTION: Remove the batteries and/or disconnect the AC/DC adaptor before starting to replace the needle.
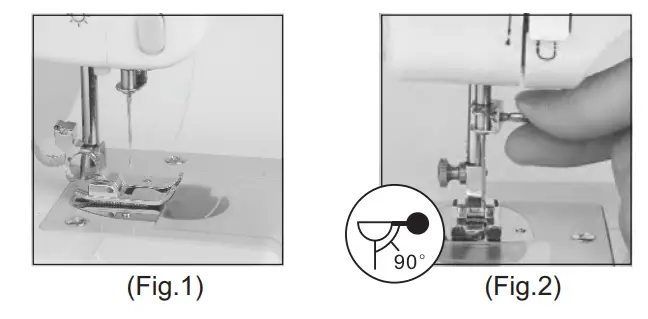
- Turn the handwheel to raise the needle to its highest position.
- Hold the old needles and loosen the needle clamp screw. Remove the old needle and discard it responsibly.
- Insert the new needle into the clamp with the flat side toward the back. Be sure to push the needle clamp before tightening the needle clamp screw.
- Tighten the needle clamp screw.
REPLACING THE BOBBIN
- Turn the handwheel counterclockwise until the needle is in the highest position. Raise presser foot lifter.
- Slide the bobbin cover button to the right and remove the bobbin cover (Fig.3).
- Put the new bobbin in the holder, with the thread going clockwise. leave 10 cm of thread hanging out (Fig.4).
- Hold the end of the upper thread with one hand, and turn the handwheel counterclockwise with the other hand. the needle thread will pick up the bobbin thread and pull it up through the hole under the needle (Fig.5).
- Replace the bobbin cover and separate the two threads and pull them to the back of the machine under the presser foot, leaving about 15 cm hanging there. Replace the bobbin cover (Fig.6).
 CAUTION:
- Always switch off the appliance, disconnect from the power supply and remove the foot pedal when replacing the bottom bobbin.
- Please use metal bobbins, otherwise, the magnetic holder cannot tense the bobbin thread and work rightly.
- Removing the presser foot :
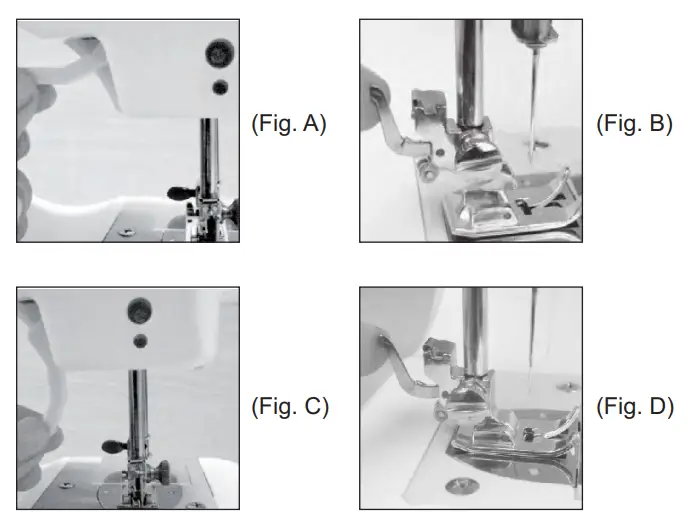
Turn the handwheel counterclockwise to raise the needle to its highest position (Fig. A). Raise the presser foot lifter, and press the presser foot locking lever. The presser foot will drop off automatically from the locking device (Fig. B). - Installing the presser foot :
Put the presser foot under the presser foot locking device, and lower the presser foot lifter(Fig. C), press the presser foot locking lever to reinstall the foot. Raise the presser foot lifter (Fig. D).
 CAUTION:
- Please always switch power off, disconnect the machine from the power adaptor and remove the foot pedal before replacing the presser foot.
- When replacing the presser foot, please the machine on a stable platform.
- When you put down the presser, please keep your hand or fingers away from the bottom side of the presser foot to avoid injuring your fingers. power adaptor and remove the foot pedal before replacing the presser foot.
SEWING
- Turn the handwheel counterclockwise to raise the needle to its highest position.
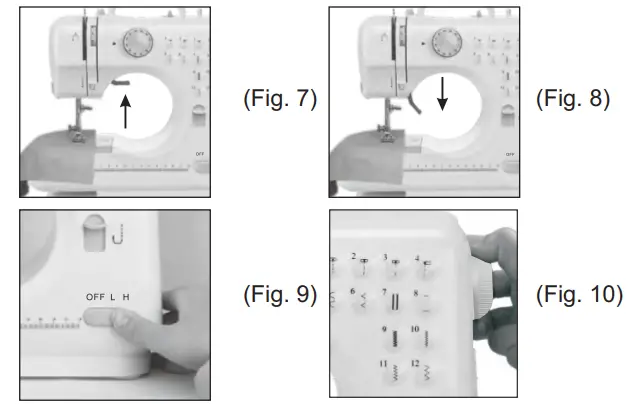
- Raise the presser foot lifter and place the fabric you want to sew under the presser foot (Fig. 7).
- Lower the presser foot (Fig. 8).
- Rotate the pattern selection dial to select the stitch pattern you wanted.
 CAUTION :
※ Before you change the stitch pattern, please turn off the switch and turn the handwheel to raise the needle all the way up so it doesn’t get stuck and bent.
※ Changing the stitch pattern is not allowed when the machine is running; otherwise, the needle and/or machine may damage. - Turn the handwheel counterclockwise several times to make sure there is no jamming in the stitches.
- Slide the power switch to the Low or High-speed position, and the machine will automatically start sewing. We recommend the low speed for beginners (Fig. 9).
- When you finished the sewing, turn off the switch, unplug the adaptor, turn the handwheel to raise the needle all the way up, lift the presser foot, and then gently remove the fabric from the sewing machine, and cut the thread with the thread cutter (Fig. 10).
USAGE TIPS :
please turn the handwheel if it is difficult to remove the fabric, and then pull out the fabric gently.
if the thread had tangled or jammed, please turn the handwheel and simultaneously pull the thread slightly to release the thread. The bottom bobbin mechanism is a more precise part, inappropriate actions may damage it, please do not push or pull it by finger or any tools.
FEATURES
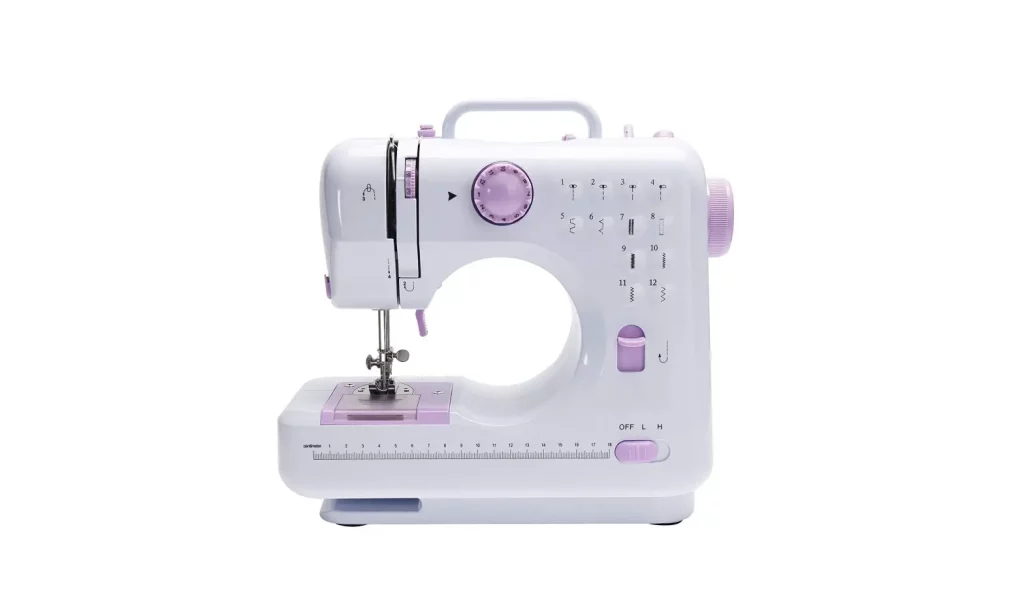
12 STITCH PATTERNS
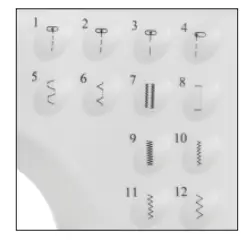
- The sewing machine has a choice of 12 different stitch patterns. To select the stitch you require, look at the diagrams numbered 1-12 on the front of the sewing machine, choose the corresponding number on the dial which is lined up with the arrow. For example, to select zigzag stitch (diagram number 6), simply turn the selector dial until the number 6 on the dial is lined up with the arrow.) When you wish to change a stitch pattern turn the handwheel on the side of the sewing machine to raise the needle to the highest point and set the pattern selection dial to the desired stitch type in the same way as above.
REVERSE STITCH BUTTON
Reverse sewing (backstitching) is useful for reinforcing the beginning and end of seams. To use this function proceed as follows:
- Sew forwards as normal, and then press and hold down the reverse stitch button on the front of the sewing machine to sew backward.
- To sew forwards again simply release the reverse stitch button.
SETTING THE SEWING SPEED
This sewing machine has two sewing speeds.
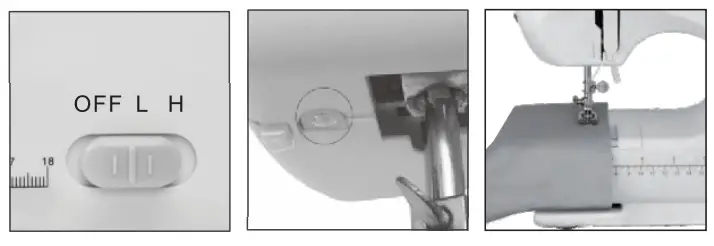
Push the ‘ OFF ’ button, to the right, to the ‘H’ position and the sewing speed will be increased, while the ‘ L ’ position will reduce the speed.
WORK LIGHT
If additional light is needed, press the light switch to turn the light ‘ On ’. Press the switch again to turn it ‘ Off ’.
THREAD CUTTER
It has a thread cutter on the central left side of the machine, it can cut off the thread after sewing or winding thread.
SEWING SLEEVES
This sewing machine has been designed to sew sleeves or any narrow openings in the garment.
- Lift the presser foot.
- Position the garment over the sewing arm.
- Lower the presser foot and follow the regular sewing instructions.
DRAWER
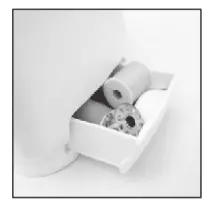
on the side, if the sewing machine(towards the rear)is a drawer for the handy storage of accessories.
WINDING THE BOBBIN
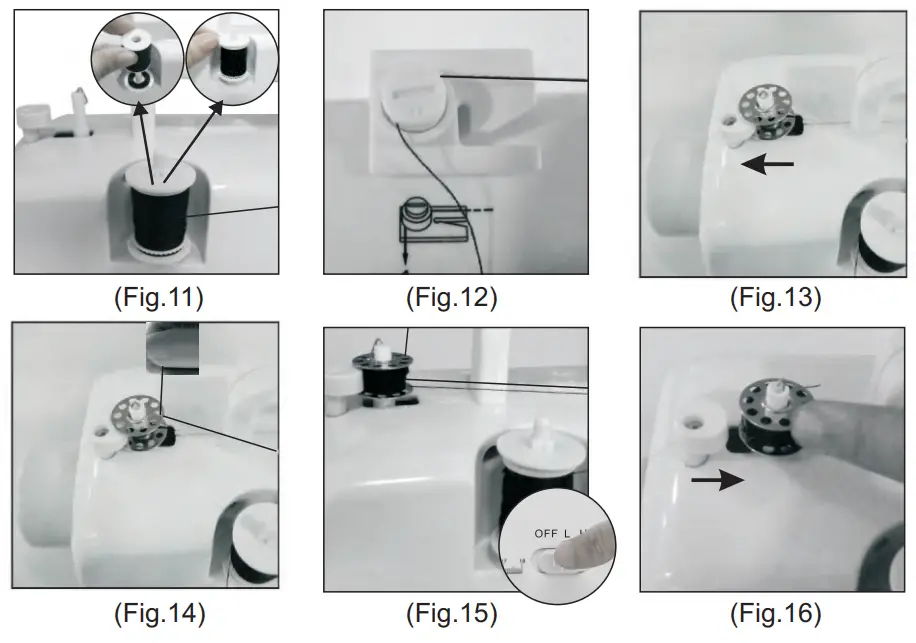
- Put a spool of thread on the spool pin (Fig.11).
- Guide the thread through the bobbin winder tension disk on the upper side of the machine (Fig.12)
- Put the bobbin on the bobbin winder pin, wind thread clockwise around bobbin several times (Fig.13).
- Push bobbin to the left (Fig.14).
- Switch on the machine to start winding (Fig.15).
- Switch off the machine to stop winding after the appropriate volume off thread you wanted to be had winded on the bobbin.
- Push bobbin away from bobbin winder stop, take bobbin off the pin, and cut the thread (Fig.16).
NOTE: please make sure there is no thread in the needle position while winding the bobbin.
FEATURE
ADJUSTING STITCHING
- As shown in the picture (Fig. A), normal stitching shall have top and bottom threading evenly, neither over tight nor loose.

- If the bottom thread looks like a straight line, which indicates the top thread is too loose, please turn the tension dial neither too tight nor too loose counterclockwise (to higher numbers) to increase the pressure until the stitch returns to normal. (Fig. B)
 3. However, when the top thread looks like a straight line indicating an over-tight top thread, slowly turn the upper thread tension dial clockwise (to lower numbers) to reduce pressure until the stitch is back to normal. (Fig. C)

SEWING A BUTTONHOLE MANUALLY
- Put the cloth under the presser foot and lower the presser foot on the cloth where you need to sew the buttonhole, then choose stitch pattern #8.
- Turn on the switch and sew 5-6 stitches at low speed, then turn off the switch (Fig. 17).
- Choose stitch pattern #7, turn on the switch, and sew on the cloth in a suitable length, then turn off the switch. Note that try to keep sewed stitch in a straight line (Fig. 18).
- Choose stitch pattern #8, then turn on the switch and sew 5-6 stitches at low speed, then turn off the switch (Fig. 19).
- Raise the presser foot, rotating the cloth for 180° (Fig. 20).
- Choose stitch pattern #7, then turn on the switch and sew till the buttonhole is fully sewed (Fig. 21).

Warning:
- This appliance is not intended for use by persons (including children) with reduced physical, sensory or mental capabilities, or lack of experience and knowledge,
unless they have been given supervision or instruction concerning the use of the appliance by a person responsible for their safety. - Children should be supervised to ensure that they do not play with the appliance.
- The appliance is only to be used with the power supply unit provided with the appliance.
 detachable power supply adapter (Model: LY075-060-1200A) included on the product and the product must use this power adapter.
- The product can operate with 4 X AA size batteries.
- Detail regarding safe disposal of used batteries.
- In the event of battery leakage, please remove the battery immediately and dispose of it properly. Do not allow the liquid to come into contact with skin or eyes. If contact has been made, wash the affected area with a copious amount of water immediately and seek medical advice.
- Do not expose the appliance or battery to excessive temperature.
- Be aware of the risk of the terminal of the battery-operated or battery being short circuit by metal objects.
Remark:
The above statement shall appear together before any other instructions supplied with the appliance.
APPLICABLE CLOTH FOR SEWING
| Cloth | Cotton/Linen | Silk/Wool | Polyester | Elastic |
| Sewing Presentation | ||||
| Fabric Specification | ||||
| Regular |  |
 |
 |
 |
| Thick |  |
 |
 |
 |
| Thin |  |
 |
 |
 |
| Hard |  |
 |
 |
 |
| Soft |  |
 |
 |
 |
Sewing effective:
- √ : means easy to sew
- ×: means difficult to sew
- △ : means not smooth to sew
Note:
- The definition of the fabric thickness:
Thin fabric: silk, muslin
Thick fabric: fleece
Regular fabric: regular clothes - The definition of elastic cloth-knitting shirt
- Hard fabric: jeans, fine canvas.
- Soft fabric: sweater, scarf.
