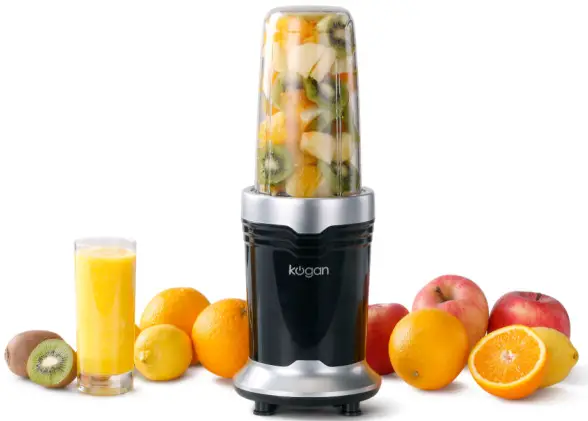

kogan Rocket Blender Pro

Please handle this product with care and inspect it regularly to ensure it is in good working order. If the product, power supply cord, or plug shows any signs of damage: stop use, unplug, and contact Kogan.com support.
Important Safeguards
When using electrical appliances, in order to reduce the risk of electric shock and/or injury to persons, basic safety precautions should always be followed.
For your safety
- Read all instructions, even if you are familiar with the appliance.
- To protect against the risk of electric shock, DO NOT immerse the appliance, power cord set, or plug in water or any other liquid.
- This appliance is not intended by use by persons (including children) with reduced physical, sensory or mental capabilities, or lack of experience or knowledge unless they have been given supervision or instruction regarding the use of the appliance by a person who is responsible for their safety.
- Children should be supervised to ensure that they do not play with the appliance.
- Switch off the power outlet and remove the plug before cleaning the appliance, or when the appliance is not in use.
- Do not operate any appliance with a damaged power cord or plug; if the appliance malfunctions; or is dropped or damaged in any manner.
- Do not allow the power cord to hang over the edge of a table or counter, or to touch hot surfaces.
- Do not operate or place any part of this appliance on or near a hot gas or electric burner, or in a heated oven.
- The use of attachments or accessories not recommended or sold by Kogan.com can cause electric shock, damage or injury.
- Operate on a dry, level surface.
- Do not use any appliance for anything other than its intended use. This product is intended for household use only.
- This appliance is intended to be plugged into a standard domestic power outlet only.
- Do not use outdoors.
- Never let the unit operate unattended.
- Make sure the blade is securely fastened to the accessories before you assemble them into the motor unit.
- Make sure all parts are correctly mounted before you switch on the appliance.
- Do not remove accessories from the motor base when the blender is working.
- Do not exceed the quantities and processing times indicated in the instruction manual.
- Unplug the blender immediately after use.
- Do not misuse the power cord. Never carry the appliance by the power cord or pull it to disconnect it from the power supply. Instead, grasp the plug and pull it to disconnect.
- Do not carry the appliance by the power cord.
- Do not attempt to repair or disassemble the appliance. There are no user-serviceable parts inside.
- Extreme caution is necessary when moving any appliances containing hot liquids.
- Wait until the appliance has been switched off before moving the blender.
- Never microwave with the blades still attached. Remove the blade and twist on a shaker/steam top.
- When microwaving, beware of steam. Use an oven mitt to remove hot cups from the microwave.
- Do not use party mugs in the microwave.
- Never keep the motor running for longer than 1 minute.
- This appliance is not intended to be operated by means of an external timer or separate remote-control system.
- Be careful if hot liquid is poured into the blender, as it can be ejected out of the appliance due to sudden steaming.
- Switch the appliance off and disconnect it from the power supply before changing accessories or approaching moving parts.
Failure to observe these cautions may result in damage to the appliance.
Warnings
If the supply power cord is damaged, the power cord must be replaced by Kogan.com service technicians.
Caution – BLADES ARE SHARP. HANDLE CAREFULLY. Avoid contacting moving parts. Keep hands, spatulas, and other utensils away from blades during operation to reduce the risk of injury to persons, and/or damage to the blender.
Warning – INJURY HAZARD. Unplug the blender and ensure the blade is stopped completely before moving the cup or touching the blades. Failure to do so can result in broken bones, cuts, or bruises.
Warning – CUPS ARE NOT MICROWAVE SAFE. Please do not use the cups to heat drinks in the microwave as they may melt.
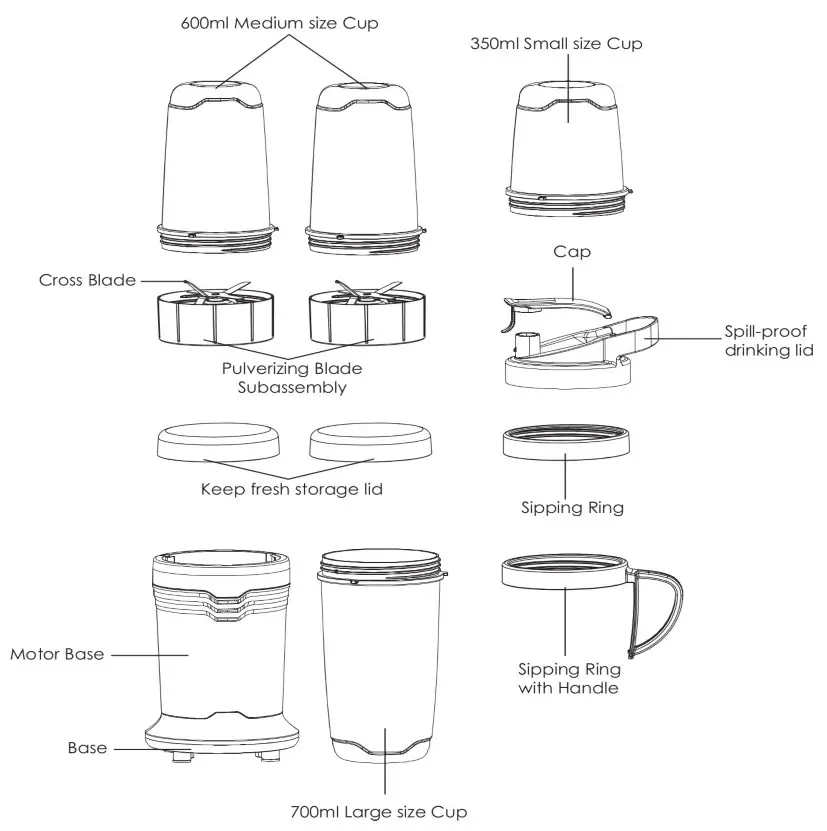
Parts

Congratulations on the purchase of your Rocket Blender Pro!
This blender is the ideal multi-purpose blender for chopping, grating, whipping and grinding. The unit is so versatile for it’s size; it can stay on the benchtop all year round.
Before First Use
Before using the blender for the first time, it is important that you at least read and follow the instructions in this quick start guide, even if you feel that you are familiar with this type of appliance. It is highly recommended that you read the full user manual, available at Kogan.com Your attention is drawn in particular to the section dealing with IMPORTANT SAFEGUARDS. Find a safe and convenient place to keep this booklet handy for future reference. This appliance has been designed to operate from a standard domestic power outlet. It is not intended for industrial or commercial use. Carefully unpack the Nutrient Blender. Remove all packaging materials and either discard or retain for future use. Ensure that the voltage of your electricity supply is the same as that indicated on the rating label on the appliance (220-240V). Remove the plastic accessories and wash in warm soapy water. Dry thoroughly and replace. Wipe over the exterior of the motor base with a damp sponge or cloth. Do not use abrasive cleaners.
Usage Guide
Choosing the right blade
Care is needed when handling the cutting blades, especially when removing the blade from the cup, emptying the cup and during cleaning. The blender comes with two pulverizing blades.
Pulverizing Blade Subassembly

- Chopping – foods like onions, garlic and carrots. Great for making dips such as salsa or bean dip.
- Blending – Pulverises ice for smoothies, frozen cocktails and milkshakes.
- Mixing – Pancake batters, muffins and quick breads are mixed in seconds.
- Grating – Hard and soft cheeses and chocolate are grated in seconds.
- Pureeing – Dishes such as hummus, all-natural soups and baby food are creamy smooth in seconds.
- Shaving Ice and Frozen Fruits – For tasty treats such as snowcones or fruit sorbets.
- Grinding Meats – Delicious chicken and ham salads or pates are ground in seconds. (Do not exceed 150g when grinding).
Grinding and milling harder, single-ingredient items
• Coffee beans
• Nuts
• Cinnamon sticks
• Dried fruit
Notes:
• Do not use the MAX level marking on the short cup for dry grinding/milling option, as the volume contained will not give the desired result.
• For dry grinding/milling, do not fill the ingredients to more than 150g.
Operation
Notes:
• Never overfill the cups above the MAX level indicators.
• Do not mash or grind-heavy foods (eg potatoes) or stir thick mixtures (eg dough) in this product.
• Do not operate the blender while empty.
• Never blend ingredients for longer than 30 seconds without turning the unit off and allowing it to cool down.
Blending
1. Place the motor base on a flat, level, stable surface. Ensure the power cord is unplugged.
2. Clean and cut all solid ingredients into pieces small enough to fit, then place them into either the large or medium cup, then pour in any liquid ingredients.
3. Ensure the seal ring is seated properly in the pulverizing blade subassembly, then tighten the blade subassembly clockwise on top of the cup.
4. Position the cup assembly onto the motor base and turn anti-clockwise to align the cup tabs with the corresponding slots on the motor base. (Turning anti-clockwise will ensure that the drive cog on the cup assembly will always align properly with the drive gear on the motor base). At this stage,
DO NOT push the cup down or lock it into position. Doing so will start the unit up automatically if it is plugged into a power supply.
5. Plug the power cord in. The appliance is now ready to operate. While the unit is blending, please hold the unit steady with one hand to avoid abnormal wobbling.
Note: Once the appliance is connected to a power supply, it can only be operated by pushing the cup down (for short pulsing) or pushing down and turning clockwise to lock (for continuous running). There is no ON/OFF switch on this device.
Note: Never blend ingredients for longer than 1 minute at a time. Allow the motor to cool for a few minutes after each minute of operating. Overheating the unit can cause permanent damage to the unit. If the motor does stop working, unplug the motor base and let it cool for a few minutes before attempting to use it again.
Note: if the blade is not running smoothly, stop the unit and add some more liquid, or reduce the number of solid ingredients in the cup.
6. On completion of the blending process, turn the cup anti-clockwise (if locked in) and/or release the downward pressure on the cup to turn off. Remove the cap from the motor base and if the appliance is not being used any further, switch off at the power outlet and unplug the cord.
7. After removing the cap from the motor base, place the cup upside down and unscrew the blade assembly from the cup in an anti-clockwise direction. Pour the mixed contents into another container, or simply screw a sipping ring onto the cup if consuming the contents directly. For later consumption, you can alternatively screw a storage lid onto the cup and place it into a refrigerator.
For Grinding/Milling
Note: the large and medium cup sizes are for blending and storage use. The small cup should only be used for grinding/milling functions.
- Place the motor base on a flat, level, stable surface. Ensure the power cord is unplugged.
- Fill the small cup with the ingredients that you wish to grind, such as coffee beans, nuts, cinnamon sticks, dried fruits etc..
- Screw the pulverizing blade assembly onto the small size cup in a clockwise direction and tighten the seal. Note: Always make sure that the seal is properly seated in the rim before tightening.
Note: The maximum grinding/milling volume should not exceed 150g. - Position the cup assembly onto the motor base and turn anti-clockwise to align the cup tabs with the corresponding slots on the motor base. (Turning anti-clockwise will ensure that the drive cog on the cup assembly will always align properly with the drive gear on the motor base). At this stage, DO NOT push the cup down or lock it into position. Doing so will start the unit up automatically if it is plugged into a power supply.
- Plug the power cord in. The appliance is now ready to operate. While the unit is blending, please hold the unit steady with one hand to avoid abnormal wobbling.
Note: Once the appliance is connected to a power supply, it can only be operated by pushing the cup down (for short pulsing) or pushing down and turning clockwise to lock (for continuous running). There is no ON/OFF switch on this device.
Note: to prevent the unit from overheating, dry ingredients must not be processed for longer than 25 seconds at a time. Turn the unit off and let it cool down to room temperature before you continue processing. - On completion of the grinding process, turn the cup anti-clockwise (if locked in) and/or release the downward pressure on the cup to turn off. Remove the cap from the motor base and if the appliance is not being used any further, switch off at the power outlet and unplug the cord.
- After removing the cap from the motor base, place the cup upside down and unscrew the blade assembly from the cup in an anti-clockwise direction.
- Tip the ground ingredients into a separate container, or alternatively (if not immediately using), simply place the storage lid onto the small cup to keep the contents fresh for later use.
- If the appliance is not being used to process more batches, switch the power supply off and unplug the unit.
Care and Cleaning
Caution: always ensure the product is unplugged from the electrical outlet before relocating, assembling, disassembling or cleaning it, and wait until it has cooled down sufficiently before cleaning. This product contains NO user-serviceable parts.
Notes:
• Unplug the blender before you start cleaning it.
• Wait until the blender has cooled down before cleaning it.
• All detachable parts can be cleaned with water.
• Clean the motor base with a slightly damp cloth.
• Do not immerse the motor base in any liquids.
• Do not use scouring pads or abrasive cleaning liquids to clean the blender.
- Always wash immediately after use for easier cleaning. Do not let food dry in the cup as this will make the cleaning more difficult.
- After you unplug the blender, detach the used accessories and parts, then clean them in warm soapy water. Rinse all accessories and parts under a tap, then dry thoroughly. 3. Wipe the motor base clean with a slightly damp cloth to remove any residue, then dry thoroughly. Never submerge the motor base in water or other liquids, or place in a dishwasher.
Tips
• Use a small brush (not included) to remove food particles lodged under the blades.
• If some leftover particles dry onto the inside of the cup, fill the cup about 2/3 full of warm soapy water, then attach the milling blade subassembly. Place the cup and blade subassembly onto the motor base and plug the power cord into a wall outlet. Run the appliance for about 20-30 seconds to help clean the stuck ingredients. Pour the water out, then repeat the above steps with clean water. Empty the blender then dry thoroughly.
Caution: the nutrient blender attachments (short cup, tall cup, lid and ring) are all able to be washed in the top rack of the dishwasher, or alternatively they can be hand washed with warm soapy water and then rinsed.
Caution: always make sure that the seal ring is still inside after cleaning. The heat from some dishwashers may cause them to become loose and pop out.
CAUTION: Handle the blade carefully!
• Do not immerse the motor base in liquids.
• Do not use harsh chemicals on any part of the appliance.
• Do not use scouring pads or abrasive cleaning agents.
• Do not touch the blades as they are extremely SHARP and may cause injury. Do not attempt to remove blades from the blade subassembly for cleaning.
Product Specifications
Power Supply: 220-240V ~ 50Hz
Power Consumption: 900W
Recipes
Body Bliss
2 handfuls kale
1/2 cup strawberries
1 banana
5 almonds
3 tbs raw cacao
Fill to the MAX indication with spring water. Juice away!
Nirvana
1/2 raw beet
8 green grapes
2 small brocolli florets
8 raspberries
1 tbsp goji berries
1/2 inch ginger root
dash of coconut milk
Fill to the MAX indication with spring or coconut water. Juice away!
Fountain of Youth
1 handful spinach
1/2 avocado (pitted and peeled)
1/2 peach
1 cup strawberries
6 almonds
1 kiwi fruit (peeled)
Fill to the MAX indication with spring water or almond milk. Juice away!
De-Stressor
1 handful kale
1/2 banana
1/2 cup blueberries
1/2 cup blackberries
1 tbs pumpkin seeds
1 tbs sunflower seeds
1 tbs chia seeds
Fill to the MAX indication with spring water or almond milk. Juice away!
Beauty from Within
1 handful swiss chard
1/2 cup pineapple
1/2 cup blueberries
1 tbs goji berries
6 almonds
Fill to the MAX indication with spring water or almond milk. Juice away!
Accelerator
3 to 4 kale leaves
1 banana
1/8 cup pumpkin seeds
1 grapefruit (peeled)
1 stick of celery
Fill to the MAX indication with spring water or almond milk. Juice away!
If you have any further questions, please contact the Kogan.com customer support team.


