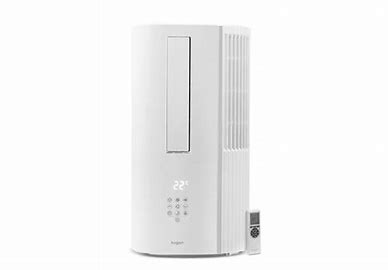

Window/Wall Air Conditioner
KAHCWDAC35A
USER MANUAL
Attention
Please handle this product with care and inspect it regularly to ensure it is in good working order.
If the product, power supply cord or plug shows any signs of damage: stop use, unplug and contact Kogan.com support.
Safety and Warnings
- Read all instructions before using the appliance and retain for reference.
- This appliance is not intended for use by persons (including children) with reduced physical, sensory or mental capabilities, or lack of experience and knowledge, unless they have been given supervision or instruction concerning use of the appliance by a person responsible for their safety.
- Do not use outside of indoor household use as described in this manual.
- Do not allow the product or its power cord to be exposed to water, heat, direct sunlight or overhang where it can be pulled or otherwise be damaged or pose a hazard.
- Keep the product far away from insecticides, paints or other flammable spraying agents.
- Do not insert sticks or other hard objects into the air inlet or outlet.
- Do not allow heavy objects to sit on the outdoor unit and always ensure the supports are properly fixed and firm.
- This appliance contains no user-serviceable parts. If it suffers any failure or damage, cease usage and contact Kogan Support after consulting the Troubleshooting section of this manual.
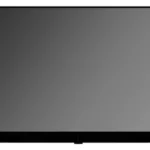
Overview and Operation
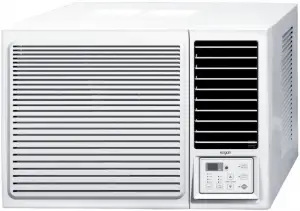
Note: Product may differ slightly from image above.
1
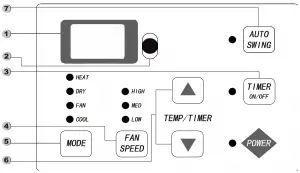
Control Panel Diagram

Digital Display (1)
While in Fan mode, the display will indicate room temperature. In Cool or Dry mode, it will indicate the set temperature. In timer operation when the timer button is pressed, it will indicate the set timer. If the time has not been adjusted after 5 seconds, it will revert to temperature display. If the room temperature sensor fails, it will display 25°C.
Remote Controller Signal Receiver (2)
Timer Button (3)
This button sets the timer along with the up and down buttons. If the unit is running, it will set a shutdown timer. If it is in standby mode, it will set a power-on timer.
Fan Speed Button (4)
This button sets the fan speed: HIGH, MED, LOW.
Mode Button (5)
This button advances the operation mode as follows: COOL, DRY, FAN (HEAT for cooling and heating model) and AUTO. The selected operation mode will be indicated on the display.
Temp / Timer Button (6)
This button sets the temperature within a range of 16-32°C in regular operation or timer mode (within 1-24 hours).
Auto Swing Button (7)
This button adjusts the air swing direction or sets a fixed direction.
Note: The control panel may differ slightly from above, but will not affect proper operation.
The heating mode is only for dual-temperature.
The air conditioner is able to operate at 52 degrees.
2
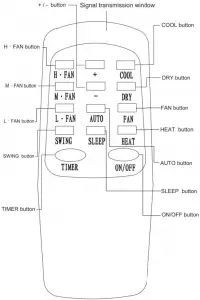
Remote controller
Signal transmission window
+ / – button
This button is for the increase or decrease of the timing settings and temperature settings, with a range of 1-24 hours for timing setting and 16-32°C (61-90°F)for temperature setting.
H • FAN button
Press this button to make the fans run in high speed. The HIGH indication light will be on.
M • FAN button
Press this button to make the fans run in middle speed. The MED indication light will be on.
L • FAN button
Press this button to make the fans run in low speed. The LOW indication light will be on.
SWING button
Press this button to make the fans run in swing speed. The LOW indication light will be on.
TIMER button
Press this button to set the time for timed switch-on, switch-off or to delete the timing.
COOL button
Press this button to operate the machine in the cooling mode.
DRY button
Press this button to operate the machine in the dehumidifying mode.
FAN button
Press this button to operate the machine in the ventilation mode.(or heating mode for the cooling-heating models)
HEAT button
Press this button to operate the machine in the heating mode.
AUTO button
Press this button,air-conditioning to maintain the original mode of operation, the temperature set to the default value of 25″C.
SLEEP button
Press this button,the air flow sound from the unit is decreased.
ON/OFF button
Press this button to activate or stop the operation of the unit.
3
Installation
- Installation should only be carried out by a licensed installer.
- Ensure there are no objects in front of the air conditioner which might obstruct its operation.
- Do not install where inflammable cases or oil may come into contact with the air conditioner, or where the unit will be continuously directly exposed to sunlight, strong wind or dust.
- Ensure that the supporting stand is strong enough to withstand the load and that the installation will not cause much noise or vibration.
- Confirm that the installation and operation of the device will not trouble your neighbours.
- The air inlet and outlet should be unobstructed, with airflow available to every corner of the room.
- Sufficient space should be left in order to facilitate maintenance and repairs.
4
1. General installation instructions
Figure 1-1
The thickness of the wall is smaller than C.
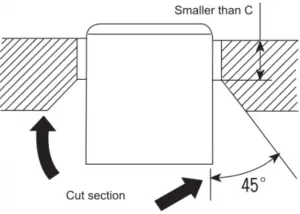
Figure 1-2
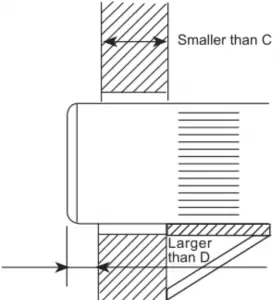
If the wall thickness is larger than C, cutting of the wall should be done as shown.
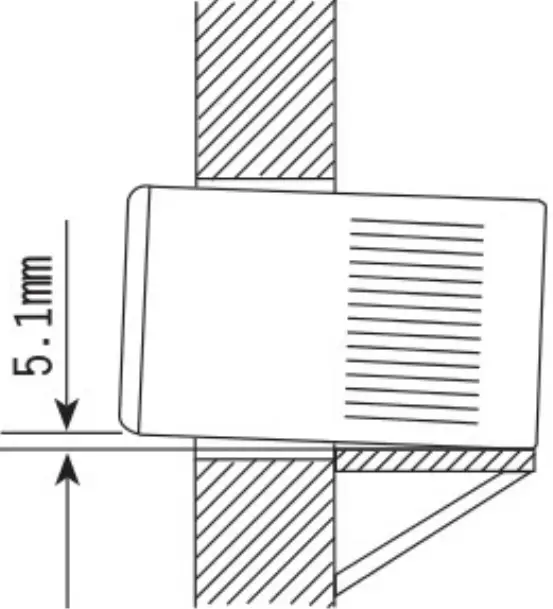
Figure 1-3
In order to allow smooth drainage, the rear of the unit should be a little lower when installing.
Figure 1-4
The recommended recommended margins to be left during installation are below:
| Dimension | A | B | C | D |
| Distance in mm | 400 | 500 | 210 | 50 |
2. Installation steps
Before commencing installation, ensure the installation accessories are complete.
| Name | Manual | Water outlet pipe | Rubber stopper | Sealing ring | Water containment plate | Screws |
| Appearance | 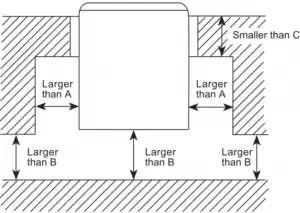 |
 |
 |
 |
 |
 |
| Quantity | 1 | 1 | 1 | 1 | 1 | 4 |
5
| Pull out the air-return grids and remove three screws on the front panel in order to remove the front panel. |  |
| Remove the base fixing plate if required. | 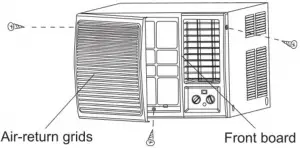 |
| Remove the two screws at the bottom or on both sides of the unit. | 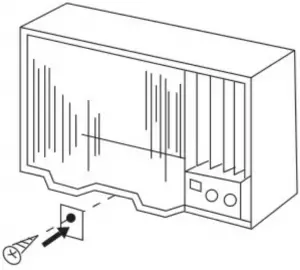 |
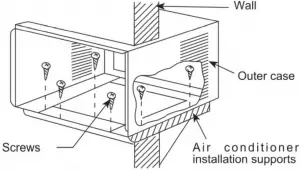
| Fix the outer case of the air conditioner to the installation supports with screws (not included, usually arranged by installer). | 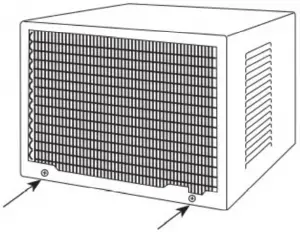 |
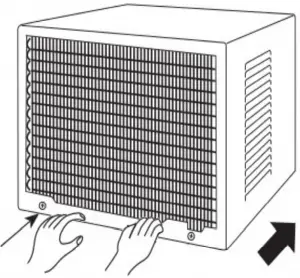
| Install the base fixing plate if required, and tighten the two screws at the bottom/sides of the outer case. Install the front board. Install the air-return grids. Test running by connecting to power source, evaluating function and temperature controls and water drainage and confirm there are no abnormal sounds in operation. |
 |
Cleaning and Care
- Before performing maintenance, ensure the air conditioner is turned off and the power plug has been removed from the socket.
- The air filter must be cleaned regularly to avoid dust buildup, which results in increased operational noise, lower overall efficiency and increased power consumption.
Before operational seasons
- Check to see if there are any objects blocking the air inlet and outlet of the indoor and outdoor units.
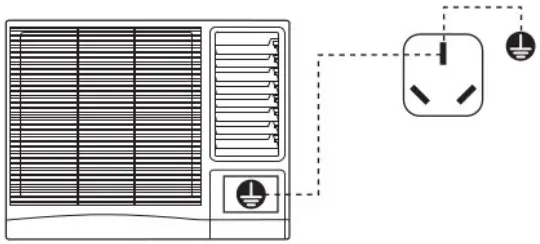
- Check to see if the installation base is corroded or rusty.
- Check the condition and function of the power point.
- Confirm the air filter screen.
- Connect to the power source.
- Load batteries into the remote control.
6
After operational seasons
- Set the temperature to 30°C and let the machine run for half a day in cooling mode to dry,
- Power off and unplug.
- Clean the air filter and reinstall.
- Clean both indoor and outdoor units.
- Remove batteries from remote controller.
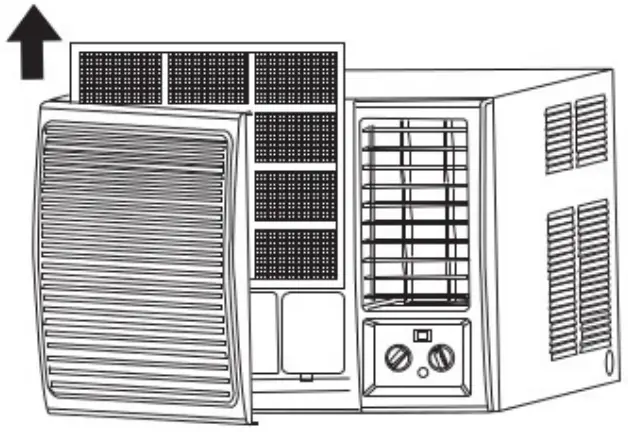
During operational seasons
- Remove air filter screen by lifting gently, see image:
- Clean air filter screen in lukewarm water: do not use boiling water, dry with heat or pull with excessive force to avoid damaging it.
- Reinstall: DO NOT use air conditioner without air filter installed or performance degradation or failure may result
- Clean the air conditioner: use a soft, dry cloth or use a vacuum cleaner. A cloth soaked in gentle household detergent may be used if quite dirty.
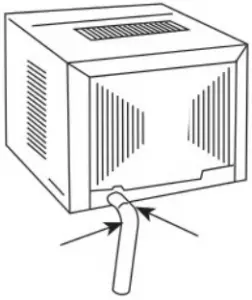
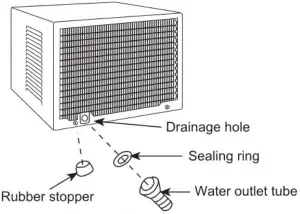
Treatment of condensed water
| Method 1
Block the drainage hole on one side of the unit base with a rubber stopper to allow the condensed water to flow out of the rear drainage hole as per the image: • With this method, the water cannot be drained completely. The remaining water may improve the heat dispersion of the unit, but with some increased noise. • To install the drainage tube, install the sealing ring to the drainage tube and align the tube with the rear drainage hole of then unit. Then, turn the water outlet connecting tube 90° and clamp firmly. |
  |
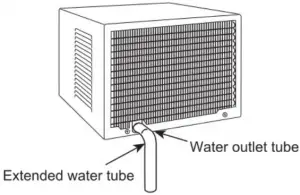
| Method 2
The condensed water flows out the drainage hole on the base. • With this method, drainage is complete, which helps to prevent rust and avoids noise from water splashing. However, this requires installation at a sufficient height to allow the water containing plate to be placed between the base of the unit and supporting platform. • To install the plate, use a rubber stopper as per the image: |
 |
7
Troubleshooting
| Issue | Troubleshooting steps |
| Not turning on | Check power plug inserted properly |
| Check for power failure or blown fuse | |
| Is timer set for “Timer On” mode? | |
| Is the ambient temperature lower than 16°C? If so, it will not turn on. | |
| Insufficient cooling | Check room temperature set |
| Clean the air filter screen | |
| Ensure doors/windows are not open | |
| Check room does not have sunlight exposure | |
| Remove any heating sources from within the room | |
| Cooling will be less efficient with many people in the room | |
| Fuse blows or breaker trips repeatedly | Contact the Kogan Support team |
| Electrical noises when machine is operating | Contact the Kogan Support team |
The following issues are examples of regular operation and do not indicate a fault with your air conditioner:
| Issue | Notes |
| Air conditioner cannot be started after it is turned off | This is a safety feature: try again after 3 minutes |
| Fog is produced during cooling | Depending on indoor temperature and humidity, this can occur and is no cause for concern |
| Air has an unusual smell | Cigarette smoke or other materials in the environment can cause this |
| Sound of pumping or compression | Refrigerant can cause this while cycling |
| Clanking sounds | Heat expansion and contraction can cause this |
| Moisture at air outlet grid | This can occur, especially after operation in high humidity |
User manual is subject to change without notice. For the latest version of your user manual, please visit httbs.//www.kogan.com/usermanuals/
8