
![]()
kogan 32″ Ultra HD 4K FreeSync IPS Monitor User Guide
Safety and Warnings
Handle with care and inspect regularly to ensure product is in good working order.
If this product, power supply cord or plug shows any signs of damage: stop use, unplug the product and contact Kogan.com support.
- Read all instructions before using the appliance and retain for reference.
- This appliance is not intended for use by persons (including children) with reduced physical, sensory or mental capabilities, or lack of experience and knowledge, unless they have been given supervision or instruction concerning use of the appliance by a person responsible for their safety.
- This appliance is designed for consumer use: follow directions and use only as described.
- Do not use with an extension cord unless necessary, and if so, ensure it is suitably rated and it is handled safely as is the product’s own power cord:
- Do not allow the power cord to be exposed to water, heat, direct sunlight or overhang where it can be pulled or otherwise be damaged or pose a hazard.
- Unplug the monitor before cleaning it with a slightly damp, soft cloth.
- Wiping the screen with a dry cloth is recommended, only once the screen has been turned of.
- Do not use cleaning alcohol or ammonia-based liquids.
- This monitor is designed with ventilation holes on the back of the cabinet. Do not cover them or block them.
- Avoid placing the monitor near heaters, stoves, freplaces or other sources of heat, as well as in rooms lacking in adequate ventilation.
- Do not insert any objects or spray liquids into the vents.
- Please do not position the monitor in unsafe locations. If the monitor falls, it
may be damaged and may hurt nearby people. - Unplug the monitor if it is not going to be in use for an extended period of time.
- Please do not put heavy items on the monitor or on its cord.
- Do not open the monitor back panel, as the monitor contains high voltage
current, even when not plugged into a power source. - This appliance contains no user-serviceable parts. If it sufers any failure or damage, cease usage and contact Kogan Support after consulting the Troubleshooting section of this manual.
Overview
Setup
- Insert a DisplayPort cable or HDMI cable into the output on your PC.
- Connect the power cable to AC power supply and the monitor power input.
- Turn on the power source supply.
- Press the power button to turn on the monitor.
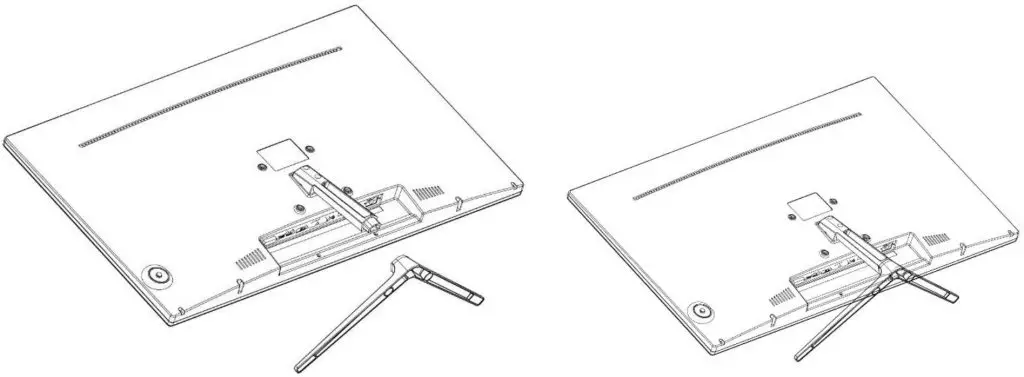
Stand Installation

- Place the monitor face down on a soft cloth or cushioned surface.
- Install the stand base to the monitor.
- Use only recommended screw size for wall or desktop mounts to avoid damaging the screen.
Control Buttons
The right side of the monitor has five keys that will adjust the monitor settings with aid of the On-Screen Display (OSD).
OSD Menu
Press ![]() and the main OSD (On-Screen Display) menu will appear as below.
and the main OSD (On-Screen Display) menu will appear as below.
Press ![]() /
/ ![]() to select PICTURE in the main menu, then press
to select PICTURE in the main menu, then press ![]() to enter.
to enter.
Picture Settings
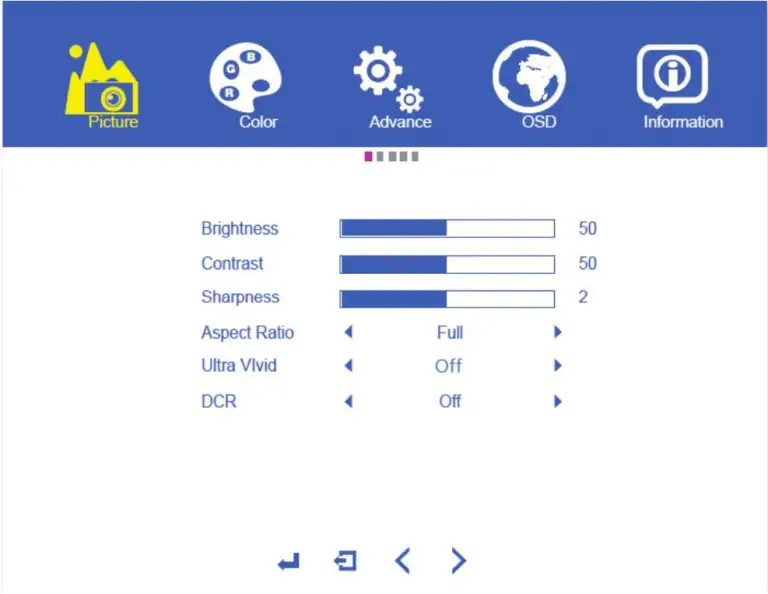
Brightness
Press ![]() /
/ ![]() to select and to confirm. Then press
to select and to confirm. Then press ![]() /
/ ![]() to adjust and
to adjust and ![]() to accept.
to accept.
Contrast
Press ![]() /
/ ![]() to select and to confirm. Then press
to select and to confirm. Then press ![]() /
/ ![]() to adjust and
to adjust and ![]() to accept.
to accept.
Sharpness
Press ![]() /
/ ![]() to select and to confirm. Then press
to select and to confirm. Then press ![]() /
/ ![]() to adjust and
to adjust and ![]() to accept.
to accept.
Aspect Ratio
Press ![]() /
/ ![]() to select and to confirm. Then press
to select and to confirm. Then press ![]() /
/ ![]() to select the desired aspect ratio and
to select the desired aspect ratio and ![]() to accept.
to accept.
Ultra Vivid
Press ![]() /
/ ![]() to select and to confirm. Then press
to select and to confirm. Then press ![]() /
/ ![]() to select Off, High, Low or Middle and
to select Off, High, Low or Middle and ![]() to accept.
to accept.
DCR
Press ![]() /
/ ![]() to select and to confirm. Then press
to select and to confirm. Then press ![]() /
/ ![]() to select ON or OFF and
to select ON or OFF and ![]() to accept.
to accept.
Colour Menu

Colour Effect
Press ![]() /
/ ![]() to select and to confirm. Then press
to select and to confirm. Then press ![]() /
/ ![]() to select Standard, Game,
to select Standard, Game,
Movie, Photo or Vivid and ![]() to accept.
to accept.
Saturation
Press ![]() /
/ ![]() to select and to confirm. Then press
to select and to confirm. Then press ![]() /
/ ![]() to adjust and
to adjust and ![]() to accept.
to accept.
Gamma
Press ![]() /
/ ![]() to select and to confirm. Then press
to select and to confirm. Then press ![]() /
/ ![]() to adjust and
to adjust and ![]() to accept.
to accept.
Temperature
Press ![]() /
/ ![]() to select and to confirm. Then press
to select and to confirm. Then press ![]() /
/ ![]() to adjust and
to adjust and ![]() to accept.
to accept.
R / G / B
Press ![]() /
/ ![]() to select and to confirm. Then press
to select and to confirm. Then press ![]() /
/ ![]() to select adjust individual Red, Green and Blue colour values and
to select adjust individual Red, Green and Blue colour values and ![]() to accept.
to accept.
Advanced Menus

Volume
Press ![]() /
/ ![]() to select and to confirm. Then press
to select and to confirm. Then press ![]() /
/ ![]() to adjust and
to adjust and ![]() to accept.
to accept.
Mute
Press ![]() /
/ ![]() to select and to confirm. Then press
to select and to confirm. Then press ![]() /
/ ![]() to set on/off and
to set on/off and ![]() to accept.
to accept.
Over Drive
Press ![]() /
/ ![]() to select and to confirm. Then press
to select and to confirm. Then press ![]() /
/ ![]() to set on/off and
to set on/off and ![]() to accept.
to accept.
Adaptive Sync
Press ![]() /
/ ![]() to select and to confirm. Then press
to select and to confirm. Then press ![]() /
/ ![]() to set on/off and
to set on/off and ![]() to accept.
to accept.
Low Blue Ray
Press ![]() /
/ ![]() to select and to confirm. Then press
to select and to confirm. Then press ![]() /
/ ![]() to set Low, Middle or High and
to set Low, Middle or High and ![]() to accept.
to accept.
OSD Settings
- Language
- Time
- H+V position
- Transparency
- Reset
User manual is subject to change without notice. For the latest version of your user manual, please visit https://www.kogan.com/usermanuals/