

49″ Smart HDR 4K LED TV
(Series 8 MU8O1O)
KALED49MU8O1OSZA
USER MANUAL
Attention
Please handle this product with care and inspect it regularly to ensure it is in good working order. If the product, power supply cord, or plug shows any signs of damage: stop use, unplug, and contact Kogan.com/support.
Safety Instructions
General Safety Instructions
Risk of electric shock. DO NOT OPEN!
Do not attempt to service the television yourself, as opening or removing the covers may expose you to dangerous voltage or other hazards. Refer all servicing to the Kogan customer support team.

To reduce the risk of fire or electric shock, do not expose this product to rain or moisture. The television should not be exposed to dripping or splashing, and no liquid-filled objects such as vases should be placed on the case.
In the event of smoke, strange noises or a strange smell from the unit, you should follow these steps:
- Turn off the unit immediately.
- Disconnect the power plug from the power outlet.
- Contact the Kogan customer support team. Never attempt to make repairs Yourself.

Never push objects of any kind into the set through the cabinet slots as they may touch dangerous voltage points or short-circuit parts that could result in a fire or electric shock. Never spill any liquids onto the set. Use special caution in households where children are present. The television is not suitable for children under 4 years old to operate.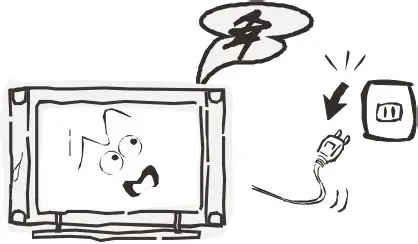
Power supply cords should be routed safely to prevent dangers due to damaged cords. The mains plug is the main disconnect method, so it should be easily accessible and not be obstructed during use.
To avoid fires, no naked flame sources such as lit candles or burning incense should be placed onto the casing of the television.
Do not pull the plug out of a power outlet by pulling on the power cable. Always grasp the plug and pull.
Never touch the plug with wet hands.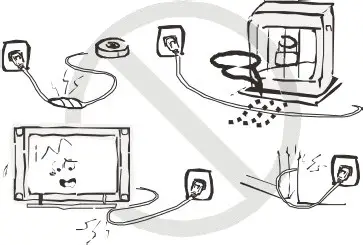
An outside antenna system should not be located in the vicinity of overhead power lines or other electric light or power circuits.
When installing an outside antenna system, extreme care should be taken to keep from touching such power lines or circuits, as contact with them may be fatal.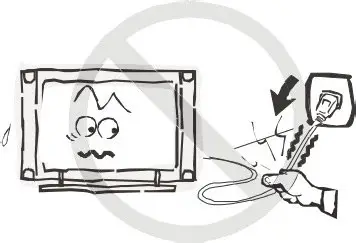
Always turn the set off when it is not being used. Unplug the television from the power outlet when it will not be used for a long time or when there is an electrical storm.
Never touch the antenna cable during a lightning storm.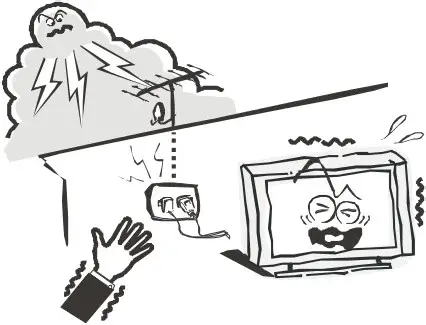
Excessive volume from earphones and headphones can cause permanent hearing loss. Always monitor the volume of noise from these devices, especially when children are using them.
Installation
Ventilation should not be impeded or limited by covering the ventilation slots with items such as newspapers, tablecloths, curtains, etc.
At least 1Ocm of space should be left around the apparatus for sufficient ventilation.
The television should be situated away from heat sources such as radiators, heaters, stoves, or other products that produce heat.
Place the television in a position where the screen is not exposed to direct sunlight. It is best to have soft indirect lighting while watching, and you should avoid a completely dark viewing environment and reflections to avoid eye fatigue.
Keep the product away from high magnetic fields (such as near an amplifier speaker) to avoid affecting the tint.

Do not place the television on an unstable table, stand or shelf. The set may fall, causing serious injury as well as damage to the television itself.
If moving the television on a cart, move the unit with care as sudden stops and starts may cause the television to overturn.
Do not place this television near water, for example near a bathtub, washbowl, kitchen sink, laundry tub, swimming pool or in a damp basement etc.

When moving the television to a warm location from a cold location, allow some time for any dew or condensation inside the television to evaporate fully before you turn the unit on.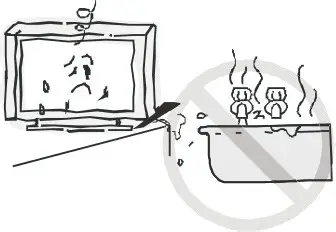
To prevent injury, the television must be securely attached to the floor/wall in accordance to the supplied installation instructions.
Cleaning
Unplug the television from the power supply before cleaning. Do not use any liquid cleaners or harsh chemicals. Use a soft, damp cloth.
General Description
Zero X radiation complies to green environmental protection requirements.
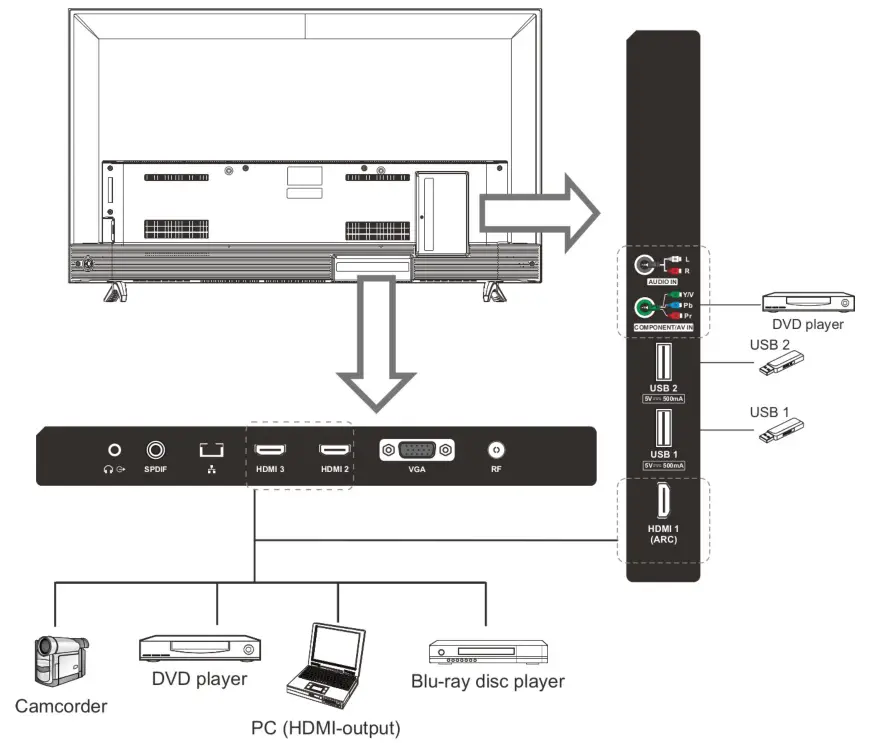
HDMI input
- AV/Component input
USB input
Headphone support
Programmable sleep timer
Specifications 8 Accessories
Specifications
| Model | KALED49MU8010SZA |
| Display Screen Size | 49″ Diagonal (16:9 aspect ratio) |
| Maximum Resolution | 3840 x 2160 |
| Power Supply | AC 110-240V – 50/60Hz |
| TV Receive System | PAL/SECAM: BG, DK, I DVB-T |
| Frequency Range | DTV:VHF(174MHz-230MHz) UHF(474MHz-862MHz) |
| Video In | PAL/NTSC |
| Antenna Input Impedance | 75ohm |
| Sound Output | 2 x lOW |
| Remote Power Input | DC 3V (Two AAA batteries) |
| Power Consumption | 110W (average) |
| Operating Temperatures | 0°C – 40°C |
Accessories
Remote Control
Overview
The joystick controls your TV’s basic features: arrow buttons (1-4) to navigate, center button (5) to confirm). To use the more advanced features, you must use the remote control.
(6) is the power indicator light and IR sensor for remote control,

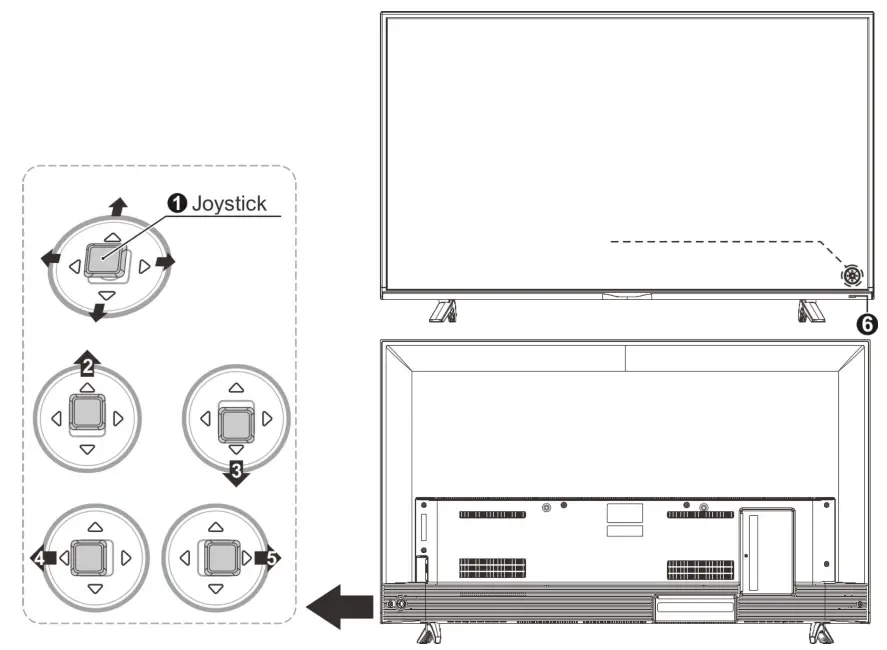
NOTE: The above illustrations are for reference only and may vary.
Remote Control
- POWER: Turn the TV on and off.
- INPUT: This button is used to switch among different sources, Select a source and press ENTER button to confirm.
- Digital Buttons(0-9): Directly select channels with digital buttons.
- RECALL: Switch to the previous
- SUBTITLE: In DTV source, the button is used for subtitle language. In the USB source, the button is used to set subtitles.
- INFO: Display the program information.
- YouTube: If the network connects, press this key to view YouTube directly.
- HOME: Press it to go to the App home page.
- NETFLIX: If the network connects, press this key to view NETFLIX directly.
- MUTE: Press this button to cut off the sound of the TV set temporarily, press again to resume.
- MENU: Display the main menu or exit the current menu.
- ENTER/LIST: Press to show channel list and favorite list on Screen.
- Arrow buttons
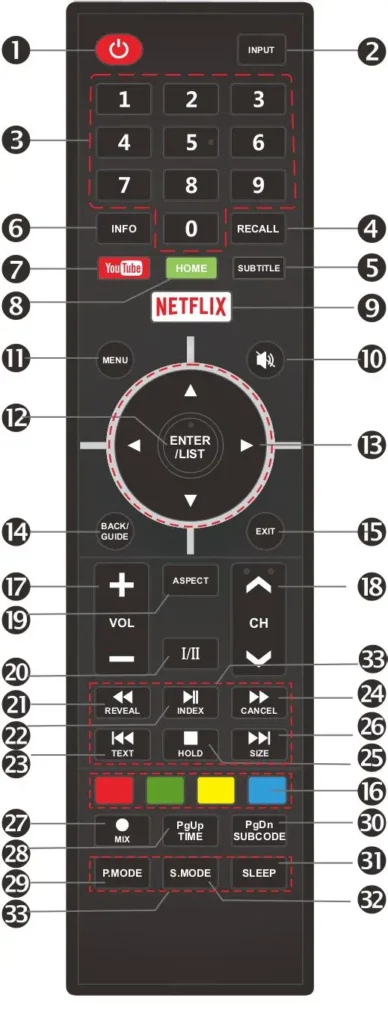 : Use to select on-screen menu items and change menu values.
 - BACK/GUIDE: Display menu GUIDE in DTV mode. Return function in-app.
- EXIT: Exit the menu.
- COLOR BUTTONS: It’s used as it shows the EPG or Program Edit menu.
- VOL+/-: Press these buttons to adjust the volume.
- CHP/v: Press these buttons to change the channel upward or downward.
- ASPECT: Press this button to switch the screen mode.
- l/ll button: In the ATV source, the button is used to set NICAM sound system. In DTV source, the button is used to set the audio language.
- REVEAL: Pressing this button will reveal any hidden data (answers to quizzes for example). Press the REVEAL button again to return to the normal screen.
- INDEX: Press the INDEX button, then the index page displays.
- TEXT: Press the TEXT button to enter or exit Teletext mode.
- CANCEL: The CANCEL button will exit from any Teletext on the Press CANCEL button again to exit Teletext and return to live TV broadcast.
- HOLD: Press the HOLD button to toggle the Hold function on or off. When Hold is switched on, the page acquisition is stopped. When Hold is switched off, the page acquisition is started.
- SIZE: Press the SIZE button one time to display the upper half of the screen in double-height, press the SIZE button two times to display the lower half of the screen in double-height, press three times to display the full screen in normal size.
- MIX ( ): Teletext buttons for mix function, please refer to TTX description page. It is also used for recording functions when TV is on DTV mode, please refer to PVR page.
- TIME: This button is used to show the time of the Teletext.
- MODE: Press this key to go to the picture menu.
- SUBCODE: Subcode mode gives the possibility to select certain subcode pages of a Teletext page. Entry of digits within the range 0…9 for current subcode entry. If the digit completes the entry, a page request is started. Press CH and CH V buttons to change the subcode pages.
- SLEEP: TV will be turned off automatically at preset sleep time if you have set a sleep timer. Press this button to select sleep time among 10min, 20min, 30min, 60min, 90min, 120min, 180min, 240min and
- S.MODE: Press this key to go to the sound menu.
- DIGITAL MEDIA PLAYER CONTROL BUTTON: Include play/pause, stop, previous, next, backward, forward is used in USB mode.
Please refer to relevant instructions in the section of multimedia player.
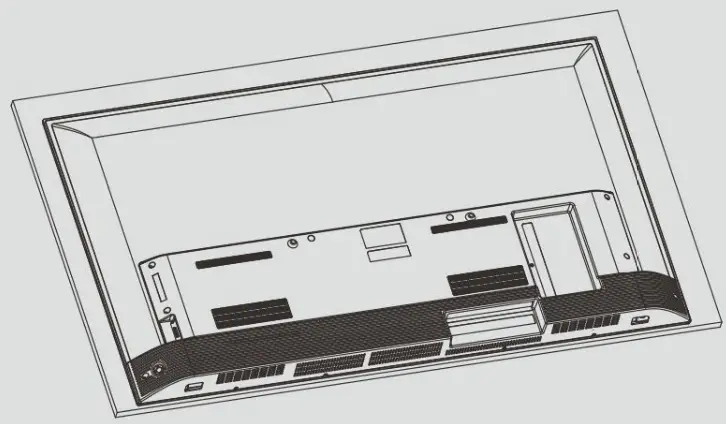
Installation
Included Stand
Before assembly, turn off the TV and spread cushioning flat to lay the TV on and prevent damage.
Step1: Take out two stands from the package, and insert them into the bottom of the TV;

Step2: Take out four screws provided with the TV set and tighten them into screw holes;
Screws (4 x M6*20)
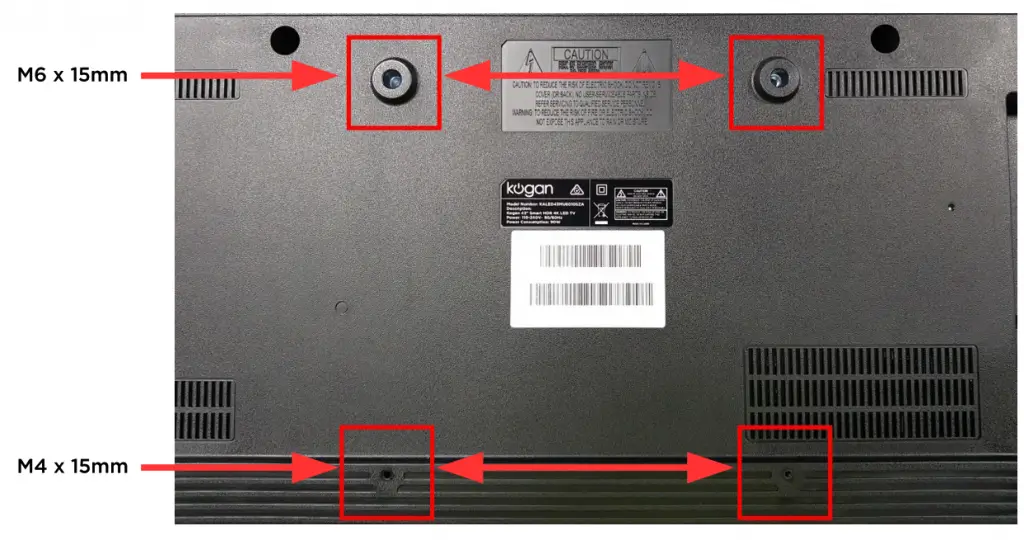
Wall Mounting
Note: The top two screw threads are M6 x 15mm and the bottom two are f14 x 15 mm.
Model pictured below is for illustration purposes only.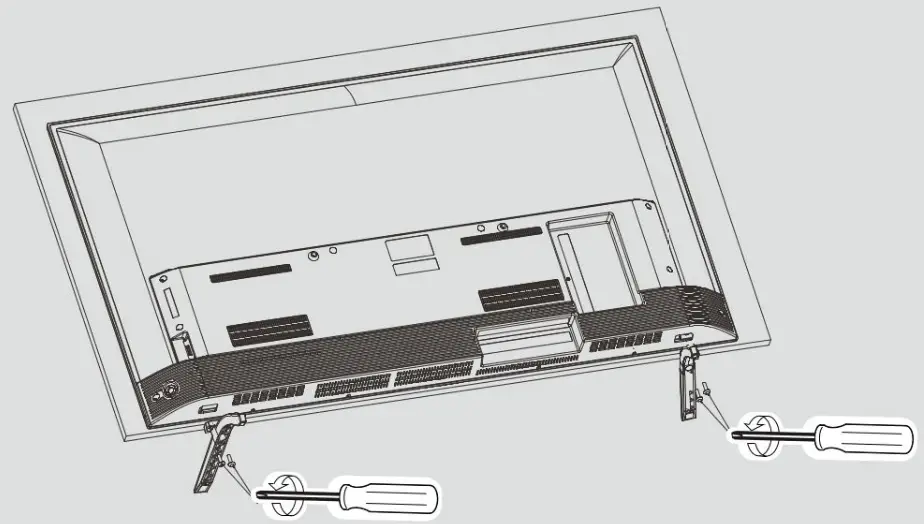
Wall-mounting instruction:
- Please ensure the distance of wall-mounting holes on the back cabinet before you mounting your TV on the wall.
- Mark the horizontal distance screw holes A and B with pencil on the wall by using long wall-mounting bracket as ruler (There are “0” engraved in the middle of long wall-mounting and “200” engraved at the end of the long wall-mounting bracket, as figure 1 shown).
- Align the upper holes on the short wall-mounting bracket (5) to A and B, then mark the vertical distance screw holes C and D with pencil on the wall, as figure 2 shown.
- Drill the holes at A, B, C, and D position on the wall.
- Drive Nylon sleeves(6) into the screw holes on the wall.
- Fasten short wall-mounting bracket (5) on the Nylon sleeves with self-tapping screws (4) on the wall.
- Fasten long wall-mounting bracket (2) with screws (3) into the two screw holes on the rear cabinet (Place the long wall-mounting end with hook upper as figure 3 shown);
- Left the TV and hang it on the wall by two people.
NOTES:
- Please mount your TV on the strength of the wall for withstanding the TV’s
- Be careful not to scratch panel and TV cabinet when you fasten the screws on the
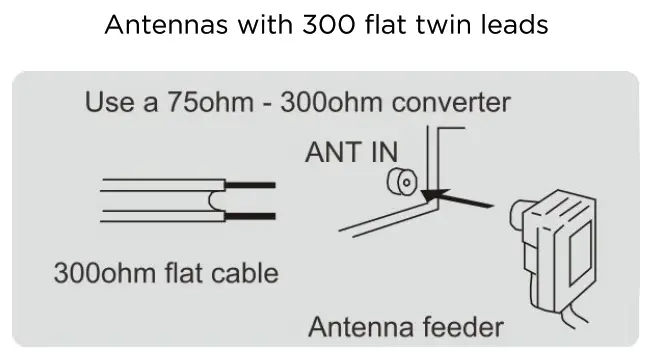
Antenna Connection
Antenna input impedance of this unit is 75ohm. VHF/UHF 75ohm coaxial cable can be connected to the antenna jack directly. If the antenna cable is a 3OOohm parallel flat feeder cable, you will need to use the 3OOohm/75ohm converter to connect the antenna cable to the antenna jack.
For details, please refer to the following images.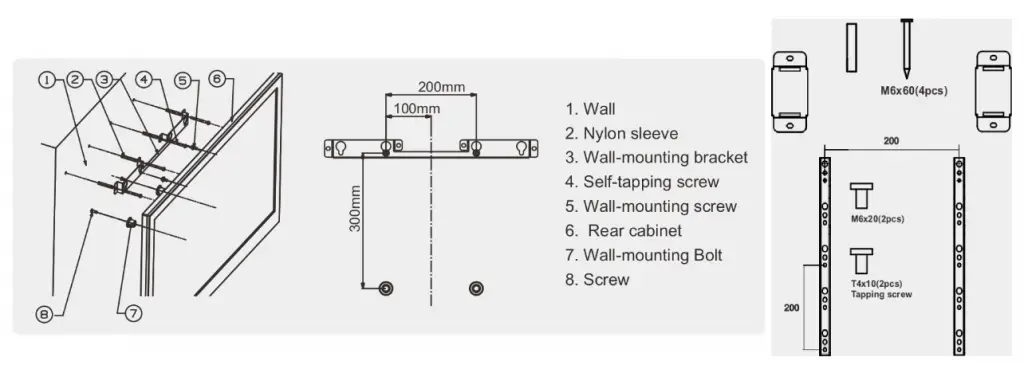
Operation
Input Source
Press INPUT to select the input source.
Press A T’ to cycle through the input sources, and press ENTER to confirm your selection.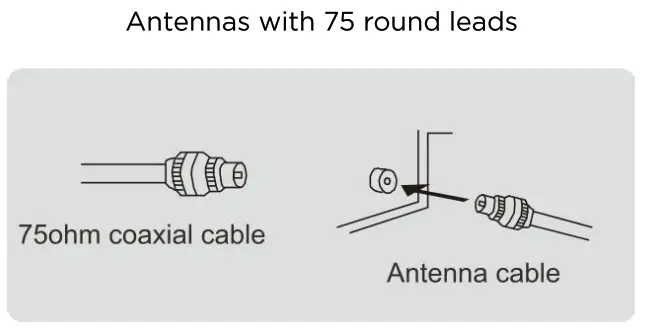
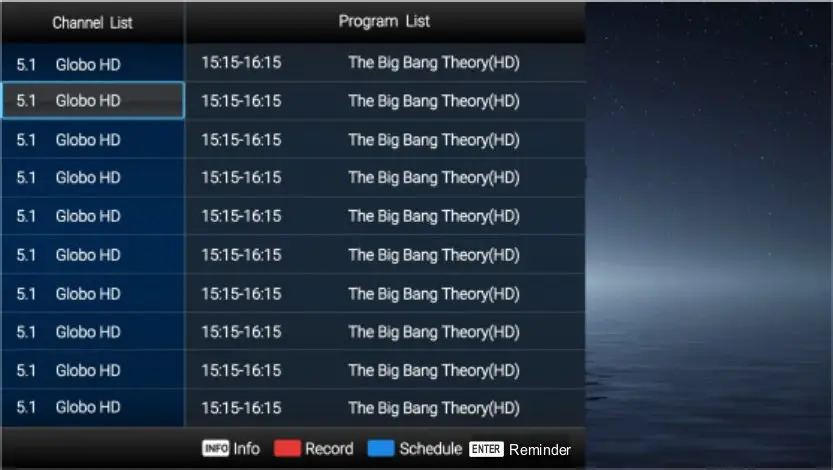
Channel Selection
To set a channel:
- Use the number keys, e.g. 9 > 0 > Enter to select channel
- Use the Ch A / T’ buttons on the
- Press the RECALL button to revisit last
- Select from the Channel List or Favourite
Press INFO to view current channel information.
Press BACK/GUIDE to enter the EPG menu. Highlight a program and press ENTER to set a reminder: your TV will automatically switch to that channel at the scheduled time.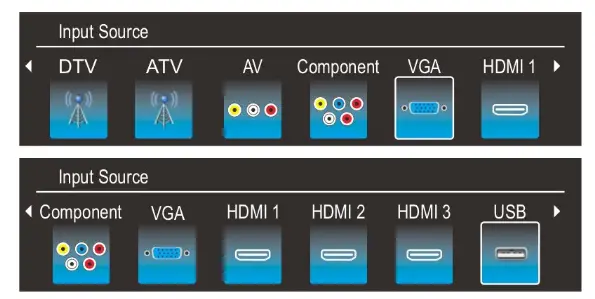
Freeview
Freeview is a live streaming and TV catchup service built directly into the TV’s DTV service.
When first navigating to a channel, the Freeview prompt will appear (usually within 5-10 seconds, but allow up to a minute). Follow the direction on the screen to access the Freeview Electronic Program Guide guide (green button), channel-specific catchup TV services (red button), and promoted programs (blue).
NOTE: Freeview services require Internet access to work. An Ethernet connection is recommended for the highest quality and stab/ity. See Network (p24) for more detai/s.
Screencast.
With the use of a screen mirroring app, the TV can mirror your phone screen for a quick casting of content.
NOTE: Your TV and phone must be connected to the same network in order to use the Screencast feature.
Netflic and YouTube Apps.
Either press the button on the remote or press the Home button and select the app from the home ribbon.
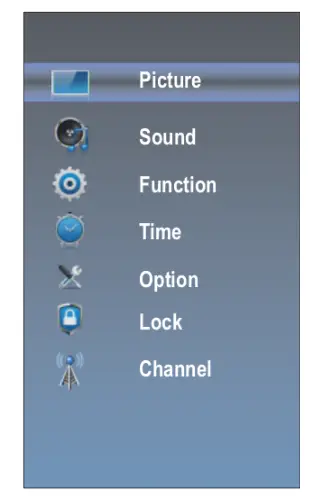
Picture
- Press the MENU key to display the main menu on the
- Press
 key to select “Picture”
 - Press
 key to enter “Picture”
Picture Mode
Your TV has four picture settings (Sports, Normal, Mild, Save, User) that are preset at the factory. Only “User” mode can be set to your preference by adjusting particular items such as Contrast, Brightness, Color, Sharpness.
- Press
 key to select “Picture Mode”
 - Press key to select one picture
User settings for PICTURE
(Contrast, Brightness, Color, Sharpness, Tint)
Your set has several settings which allow you to control picture quality.
- Press key to select a particular item.
- Press
 key to decrease or increase the value of a particular item.
Note: The adjusted values are stored according to the selected particular item.
Contrast: Adjusts the lightness and darkness between objects and the background. Brightness: Adjusts the brightness of the picture.
Color: Adjusts the colors, making them lighter or darker.
Sharpness: Adjusts the outline of objects to either sharpen them or make them duller.
Tint: Adjusts the Tint of the picture.

Backlight
You can change the brightness of the entire screen according to your preference.
- Press the key to select the “Backlight” option.
- Pressthe key to increase or decrease the backlight value.
Backlight: Adjusts the brightness of the whole screen.
Color 7emperafore
You can change the color of the entire screen according to your preference.
- Press key to select “Color Temperature”
- Press key to select one color
Cool: Makes whites bluish.
Standard: Makes whites nature
Warn: Makes whites reddish.
Sound
- Press the MENU key to display the main menu on the
- Press key to select “Sound”
- Press
 key to enter “Sound”
Sound Mode
You can select the type of special sound effect to be used when watching a given broadcast.
Your TV has five sound settings (“Standard”, “Music”, “Movie”, “Sports”, “User”) that are preset at the factory.
- Press key to select “Sound Mode”
- Press key to select one sound mode.
- Standard: Selects the normal sound
- Music: Provides clear and live sound for music.
- Movie: Provides live and full sound for movies.
- Sports: Emphasizes bass over other sounds.
- User: Selects your custom sound settings.

Equalizer
Set sound equalizer mode.
Balance
If the volumes of the left speaker and the right speaker are not the same, you can adjust the “Balance” to suit your personal preference.
- Press key to select “Balance”
- Press key to decrease or increase the value of the item.
AVL
Each broadcasting station has its own signal conditions, and it is inconvenient to adjust the volume every time the channel is changed. “AVL” automatically adjusts the volume of the desired channel by lowering the sound output when the modulation signal is high or by raising the sound output when the modulation signal is low.
- Press key to select “AVL” option.
- Press key to select “On” or “Off”.
Surround Sound
This is used to turn on surround sound to gain better sound effects.
- Press key to select the “Surround sound” option.
- Press key to select “Surround” or “Off”.
AD Switch
Press ![]() button to select AD Switch, then press Enter or
button to select AD Switch, then press Enter or ![]() button to enter the sub-menu. In it you can turn the AD Switch on or off and set the volume ratio in DTV mode.
button to enter the sub-menu. In it you can turn the AD Switch on or off and set the volume ratio in DTV mode.
Digital Audio Output
This is used to set digital audio output.
- Press key to select “Digital Audio Output”
- Press key to select “Auto” or “PCM” in DTV or HDMI
Audio Language
You can set the first and secondary language for audio in DTV mode.
Sound
HDMI ARC
Turn on or turn off the HDMI ARC function.
This is used to set DAP.
- Press key to select “DAP”
- Press key to enter “DAP”
Audio type
This used to set audio type
- Press key to select the “Audio Type” option.
- Press key to select the audio type.
Function
- Press the MENU key to display the main menu on the
- Press key to select “Function”
- Press ¥• key to enter “Function”
Noise Reduction
Press![]() key to select the Noise Reduction mode. You can select the right model to match the pictures.
key to select the Noise Reduction mode. You can select the right model to match the pictures.
MPEG Noise Reduction
Press ![]() key to select the mode: off / low/middle/high. The picture will be better when it is in “high” mode.
key to select the mode: off / low/middle/high. The picture will be better when it is in “high” mode.
Aspect Ratio
- Press key to select “Aspect Ratio”
- Press key to change the size of the picture on the picture on the screen.
PVR File System
- Press key to select “PVR File System”
- Press ENTER or key to enter submenu in DTV
Connect the USB disk to the standard USB port before use PVR.
Select Disk: Press the “ENTER” button to enter the submenu and press ![]() to choose the disk for PVR.
to choose the disk for PVR.
Function
PVR File System: Press the “ENTER” button to check if the disk is adapt to PVR. USB: Display if the USB Disk is adapt to PVR.
Format Start: Press “ENTER” button to enter the Format submenu.
Speed Check: Display the disk writing/reading speed. Time Shift Size: Display the buffer used for PVR.
It’s suggested to use the disk that speed is up to 4500KB/S. Warning:
- The disk must be formatted when first used for PVR, so backup the original data in the disk. It’s suggested use a special disk for PVR. Don’t modify the PVR file on PC.
- All the time is not precise, just for reference.
PVR Menu
When the DTV channel has a signal, press the “•” key to go to the PVR main menu.

- .Press key to select “Start Record”. If the storage device is ready, press “ENTER” key to start the record.


The recording menus will disappear in 5 seconds, press “EXIT key to recall them out. When recording, press “•” key again, then you can choose to stop recording or continue: - Press key to select “Recorded Files”. If the storage device is ready, press “ENTER” key to check the record list.
1) Presskey to select record file.
2) Press “ENTER” or key to play the selected record file.
3) Press “Red” key to delete the selected file.
4) When recorded files are playing, press the button to fast backward or forward.
Function
3.Press ![]() key to select “Schedule Recording”.
key to select “Schedule Recording”.
In the Schedule Recording menu, you can see the record task list menu. Press “ENTER” key to select one test.
- Press “Red” key to delete the test.
- Press “Yellow” key to Edit the task.
- Press “Blue”key to add a new task.

When the Scheduled record, TV remains silent and black screen, then press the power button to turn on the TV.
Note: The recording time can not overlap, otherwise the previous record programs will be overwritten.
4. In the DTV channel, press “![]() ” key to pause, press it again to resume playback.
” key to pause, press it again to resume playback.
This is the “Time Shift”. During the suspension the image is temporarily stored in the disk, so programs will not miss the suspension period, the length of time may be suspended by the size of the disk buffer space constraints.
 This feature supports fast forward and rewinds functions. Press “
![]() ” key to go backward or forward.
” key to go backward or forward.

Function
5.In EPG menu, press “Red” key to go to manual record mode. Press Left/Right key to choose the manual record mode, press ![]() ”key to select the Start/End time of the manual
”key to select the Start/End time of the manual

HDMI CEC
- Press key to select “HDMI CEC” option.
- Press “ENTER” or key to enter “HDMI CEC” submenu. Enable Link: Press to turn on/off the link.
Auto Power On: When this option is “On” and the TV is in standby mode. To turn on the DVD can also turn the TV at the same time.
Auto Standby: When this Option is “On” and the TV is on, to turn off TV can also turn the DVD into standby mode.
HDMI EDID
This function is only used in HDMI mode.
- Press key to select “ HDMI EDID” Option.
- Press key to select “ 4K” or “ 2K”.
Netflix Deactivate
- Press key to select “Netflix Deactivate”
- Press or “ENTER” key to confirm.
- Press “Yes” to confirm again, the Netflix will be activated.
Netflix ESN
Display the Netflix Esn information.
Netflix Version
Display the Netflix version.
Time
- Press MENU key to display the main menu on the screen.
- Press key to select the “Time”option.
- Press key to enter “Time” submenu.
Off Time ‘
In “Off Time” item, press ![]() button or ENTER button to enter the submenu,set the day & time to turn off the TV set. ,
button or ENTER button to enter the submenu,set the day & time to turn off the TV set. ,
On time
In “On Time” item, press ![]() button or ENTER button to enter the submenu, set the time to turn on the TV set, when the TV set is in standby mode. You can also choose which day to control you TV set in a week.
button or ENTER button to enter the submenu, set the time to turn on the TV set, when the TV set is in standby mode. You can also choose which day to control you TV set in a week.

Sleep Timer
1. Press ![]() key to select “Sleep Timer” option.
key to select “Sleep Timer” option.
2. Press ![]() key repeatedly until the desired time appears (Off, 10mins, 20mins, 30mins, 60mins, 90mins, 120mins, 180mins, 240mins). Notes: The sleep timer you have set will be canceled when the TV turns off or if a power failure occurs.
key repeatedly until the desired time appears (Off, 10mins, 20mins, 30mins, 60mins, 90mins, 120mins, 180mins, 240mins). Notes: The sleep timer you have set will be canceled when the TV turns off or if a power failure occurs.
Notes: When the time is less than 60 seconds, reminder information will be displayed on the screen. Press any key button to cancel the timer function.
Auto Sleep
Press ![]() key to select whether to open the No signal Power off features. If this function is opened, the TV will power off when there is no signal.
key to select whether to open the No signal Power off features. If this function is opened, the TV will power off when there is no signal.
Auto Sync
You can modify the time of your TV set in Manual mode. In Auto Mode, the “clock” is decided by the DTV signal.
Clock –:— When Auto Sync is on, the clock is got from DTV streams; Set the clock when Auto Sync is off.
Time Zone
You can choose it to modify your time zone in the TV set. 1. Press ![]() key to select “Time Zone” option. 2. Press
key to select “Time Zone” option. 2. Press ![]() key to select time zone.
key to select time zone.
Option
- Press the MENU key to display the main menu on the screen.
- Press key to select the “Option” option.
- Press ► key to enter “Option” submenu.
OSD Language
- Press key to select “OSD Language” option.
- Press ENTER or ► key to select a proper language for OSD
OSD Time
Set the preferred amount of time for the OSD to be displayed on the screen.
PC Adjust
This option is only used in VGA.
- Press key to select “PC Adjust” option.
- Press ENTER key to enter the”PC Adjust”submenu.

Reset
- Press key to select “Reset” option.
- Press “10” or “ENTER” key to confirm.
- Press “Yes” to confirm again, the TV will turn off auto mastic and change all settings to factory settings.
Network configuration
Please refer to “Network setting” behind.
Software Update
When the TV needs to be updated, please copy the new software to a USB storage and inset the USB storage to the TV, then operating by following steps.
- Press key to select the “Software Update” option.
- Press the”►” or “ENTER” key to confirm.
- Press “Yes” to confirm again, the TV will update by USB, Please wait a few minutes and don’t turn off the power, it will turn off auto magically when updating is finished.
Internet Update Check
This can update TV through the internet.
Info
Display the software information and Ian mac address.
View End-User License
View End-User license information.
Network Update information
- Press key to select “Network Update information”.
- Press ► key to confirm
- Press “YES” to confirm again, the tv will start to update by the network, please wait a few minutes and don’t turn off the power, it will turn off automatically when updating finishes.
Option
Subtitle
This used to set Subtitle Turn on or turn off the subtitle function.
HBBTV
This used to set HBBTV
Turn on or turn off the HBBTV function.
Standby Scan
This used to set standby scan Turn on or turn off the standby scan function in DTV mode.
Lock
The “Lock” feature automatically locks out programming that is deemed inappropriate for children. The user must first enter a Password before any of the lock restrictions can be set up or changed.
1. Press![]() key to select “Lock” option.
key to select “Lock” option.
2. Press OK or ► key to enter “Lock” submenu, “Enter Password” menu will appear, enter your 4-digit password to enter “Lock” submenu (the default and universal password is 1980).
Lock System
Set the Lock function on or off.
- Press key to select “Lock System” option.
- Press key to select “On” or “Off’.

Set Password
1. Press ![]() key to select “Set Password” option.
key to select “Set Password” option.
2. Enter your 4-digit password to enter “Set Password” submenu. Choose any 4-digits for your new password and enter them. As soon as the 4 digits are entered, the cursor skipped to the “Confirm Password” item, re-enter the same 4 digits, and your new password has been memorized.
When the program is locked, you can also press the menu key, Info key, and so on. Then you can press![]() key to call back the input-password window.
key to call back the input-password window.
Parental Guidance
This option only used in DTV mode.
- Press key to select “Parental Guidance” option.
- Press key to select the lock level of the Parental Rate.
Channel
Before your television can begin memorizing the available channels, you must specify the type of signal source that is connected to the TV (i.e. an antenna or a cable system).
- Press MENU key to display the main menu on the screen.
- Press key to select “Channel” option.
- Press OK or ► key to enter the “Channel” submenu.
Auto-Search
- Press key to select “Auto Search” option.
- Press ► or ENTER key to confirm. then a notification window will be displayed on the screen. Select “Start” to start search or “Cancel” to cancel it. When searching, press the EXIT key to exit tuning at any moment. Press the MENU key to skip DTV tuning when searching DTV, skip AN tuning when searching AN. 3. After all the available channels are stored, the searching menu will exit.

Program Edit
After the program is searched, select “Program Edit” in the “Channel” menu, press “ENTER” button, program can be edited such as delete or skip according to the user’s habit.
Skip (Blue) Button
This function can help shield certain programs. The program skips when selecting program by the ![]() button on the N or remote control.
button on the N or remote control.
- Select the program to be shielded in the”Program Edit”.
- Press the “Skip” (Blue) button, the skip mark is displayed at the left side of the program and this program is shielded.
- To cancel the Skip function, enter the channel edit menu, select the shielded program, and press “Skip” (Blue) button, the skip mark at the left side of the program disappears then the program is recovered.

Delete (Red) Button This function can help delete a program.
- Select the program to be deleted in the “Program Edit”.
- Press “Delete”(Red) button, the program will be deleted.
Favorite(Yellow) button
This function can help store the favorite program then these programs can be quickly selected.
- 1. Select the program which is your favorite.
- Press “Fav” (Yellow) Button, the favorite mark is displayed at the left side of the program and this program is store into the Favorites.
- To cancel the Favorite function, enter the program edit menu, select the program, and press the “Fav” (Yellow) button, the favorite mark at the left side of the program disappears.
Block (green) Button
This function can help Lock on unlock the program.
- Select the program to be Locked in the “Program Edit”.
- Press the “Block”(Green) button and input the right password, the lock mark is displayed on the left side of the program.
- Press “Block “(green) button again, the program will be unlocked.
Move (Info)
Button This function can move the channel.
Channel
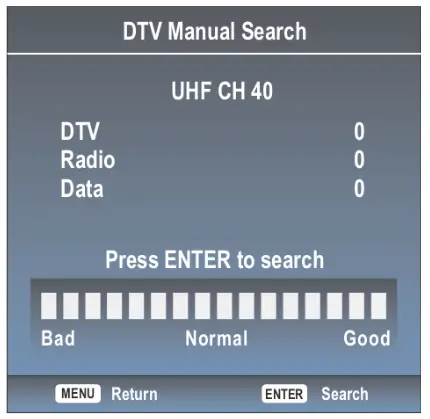
DTV Manual Search
Enter a digital number and press “ENTER” to select DTV Channel.
ATV Manual Search
- Press key to select the “AN Manual Search” option.
- Press ► or ENTER key to enter submenu.

Current CH
- Press key to select the second item.
- Press key to select a current channel.

Color System
Select ATV video system type function.
System
Select ATV audio system type function.
Search You can use ► button to search channels from low frequency to high frequency and use ![]() button to search channels from high frequency to low frequency. When you have searched a channel, the searching will be paused and you can press it again for other channels after you store the channel.
button to search channels from high frequency to low frequency. When you have searched a channel, the searching will be paused and you can press it again for other channels after you store the channel.
Fine-Tune
1. Press ![]() key to select the third item.
key to select the third item.
2. Press ![]() key to select a better frequency for current channel.
key to select a better frequency for current channel.
Signal Information (Used only in DTV)
1. Press ![]() key to select the “Signal Information” option.
key to select the “Signal Information” option.
2. Press “ENTER” or ► key, you can see the information of the DTV channel.
NOTE:
Signal Quality/Signal Strength (DTV Only): Unlike analog channels, which can vary in reception quality, digital channels must have perfect reception quality or you will not receive them at all. So, unlike analog channels, you are not able to fine-tune a digital channel. If the signal strength indicates that the signal is weak, a possible solution is to adjust your antenna to increase the signal strength. Continue to adjust the antenna until you find the best position with the strongest signal.
Software Update (OAD)
Turn on or turn off the OAD software update function.
OAD SCAN
This option only used in OW mode.
- Press button to select “OAD Scan” option.
- Press ENTER button to search system software update file from DTV broadcast.
Network
- Press the “Menu” to enter, then pitch on the “Option”, and press “ENTER or click the right button to enter the submenu.

- Pitch on the “Network Configuration”, and press “ENTER” or click the right button to enter the “Network Configuration”.

- When the wired network is used, if select dynamic IP address setting, pitch on the “DHCP” in the “Network Configuration”, then click the “Setting”, and press the “ENTER” button to enter. If you select static IP address setting, pitch on the “Static” in the “Network configuration”, then setting up the IP, Netmask, Gateway, and DNS in sequence. When the setting is complete, pitch on the “Setting” and press the “ENTER”.
 Network
 - If shows “Success”, the “WLAN” on the bottom right corner will turn to green from red, and it means the network connect successfully; If shows “Fail”, it means the network can not connect, please check whether the net wire and router connect successfully or not.

- Select the “WIFI” in the Network Configuration before using WIFI connecting.
 Pitch on the “Setting”, press the “ENTER” to confirm. If shows “Success”, the “WIFI” on the bottom right corner will turn to green from red, and it means the network connects successfully; If shows “Fail”, it means the network can not connect, please check whether the wireless router connects successfully or not.

Digital Media Player
This TV is embedded with one USB port digital media player. It can find the devices support USB1.1/2.0,incIuding flash disk, USB hard disk and digital camera. It supports functions as: Display pictures. Play music files, Play video files.
Notice:
- In order to avoid affecting the user’s viewing experience, please use the better quality and shorter USB
- Play, preview some of the non-standard files may appear abnormal, please understand.
Explain: - Under the USB channel, you can use only the remote control.
- Play Control menu to enter the playing surface to press the menu button pop-up menu.
| Data Format | |
| Picture | JPG, JPEG, PNG, BMP |
| Music | Mp3 |
| Video | MPG, MPEG, Mp4, MKV, MOV |
Remote Control Button

Description of Buttons:
| Buttons | Function |
| AUDIO | Track switch (video) |
| SUBTITLE | Subtitle switch (video) |
| INFO | Show/Hide movie info (video) |
| YELLOW | AB Loop(Video) |
| RED | Goto Time(Video) |
| CH∧ | Page up |
| CH ∨ | Page down |
| Play/Pause | |
| Stop | |
| Previous file | |
| L Next file | |
| Backward | |
| Forward |
Troubleshooting
If you have any problems with your television, please check the suggested solutions below, as these issues may be caused by improper adjustment/setup rather than a malfunction with the unit. If the problem persists, please contact the Kogan customer support team.
| Problem | Possible Solution |
| Poor picture and sound quality |
|
| No picture or sound in TV status |
|
| No sound, or sound is too low at maximum volume |
|
| No colour, wrong colour or tints |
|
| Picture rolls vertically |
|
| Blurred or snowy picture, distorted sound |
|
| Remote control malfunctions |
|
| Image is not centered on the screen |
|
User manual is subject to change without notice. For the latest version of your user manual, please visit https://www.kogan.com/usermanuals/