![]()
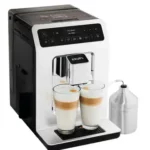
EA81 Series Espresseria Automatic Coffee Machine Instruction Manual

HOTLINE: UK: 0345 330 6460 – ROI: (01) 677 4003


CAUTION: Please read the safety instructions before using your appliance
| Lights | Meaning | ||||
| Cleaning accessories  |
Fill tank |
Clean | Cale | On / Off |
|
 |
The appliance is ready to be used. | ||||
 |
Slow flashing: a task is in progress | ||||
|
Double flash: a 2 coffee cycle is in process. | ||||
|
|
Empty the coffee grounds collector (a 2 coffee cycle is underway). | |||
|
|
Empty the coffee grounds collector+ and empty the drip tray. | |||
|
|
Check coffee grounds collector is not missing or incorrectly positioned. | |||
|
Fill the tank with water. Check water tank is not missing or incorrectly positioned. | ||||
|
|
The coffee cycle has stopped due to a lack of water. Fill the tank with water. | |||
|
|
The double coffee cycle has stopped due to lack of water. Fill the tank with water. |
|||
|
|
Cleaning program requested. | |||
|
|
Cleaning program: cycle in progress. | |||
|
|
|
Cleaning program: empty the coffee grounds collector. | ||
|
|
Descaling program requested. | |||
|
|
Descaling program: cycle in progress. | |||
|
|
|
Descaling program, rinsing cycles: in progress. to Request empty and to fill water tank. |
||
|
|
|
|
Empty the coffee grounds collector before the long rinse cycle. | |
|
|
|
Long rinse request. | ||
|
|
Long rinse in progress. | |||
|
|
|
|
Constant flashing: operating fault. | |
|
|
|
|
Alternate flashing: Switching off of the appliance under progress. | |
Sound signals:

SYMBOL INFORMATION
![]() Danger :
Danger :
Warning against the risk of serious or fatal injuries.
The lightning bolt symbol warns against electrical dangers.
![]() Attention :
Attention :
Warning against the risks of incorrect operation, damage or destruction of the appliance.
 Important :
General or important note on the operation of the appliance.
Warning signals
Fill water tank
CLEAN Proceed with cleaning
CALC Proceed with scale removal
CLEAN + CALC Carry out a long rinse


BEVERAGE PREPARATION
| TYPES OF COFFEE | Number of cups possible | Possible volume settings (ml) | Possible strength settings |
| RISTRETTO | 1 | 20 to 30 ml |  |
| 2 x 1 | 2 x2Oto30 ml in two cycles | ||
| ESPRESSO | 1 | 30 to 70 ml | |
| 2 x 1 | 2 x 30 to 70 ml in two cycles | ||
| COFFEE or LUNGO | 1 | 80 to 220 ml | |
| 2 x 1 | 2 x 80 to 220 ml in two cycles |
BEFORE FIRST USE
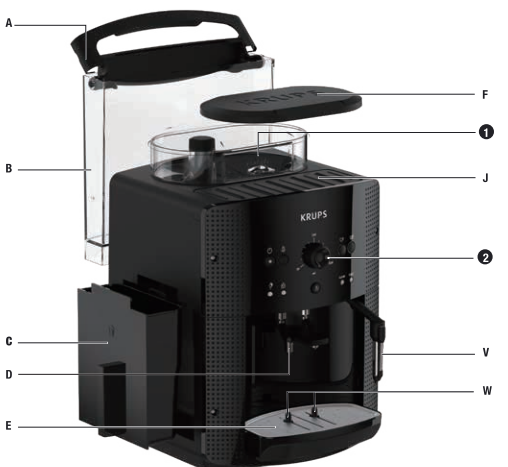
Preparing the appliance
Pull out and fill the water tank – Fig. 1 and 2.
Put it back in place by pressing firmly and closing the lid again – Fig. 3.
Open the coffee bean container lid. Add the coffee beans – Fig. 4.
Close the coffee bean container lid again.
Do not fill the water tank with hot water, milk or any other liquid. If you turn on the appliance when the water
tank is not in place or not correctly filled (under the “min.” level,), the
or a cup of coffee will be made impossible.
NEVER PUT GROUND COFFEE IN THE COFFEE CONTAINER.
It is recommended that you do not use oily, caramelised or flavoured coffee beans for this appliance. These kinds of beans may damage the appliance.
Check that the coffee beans do not contain any foreign particles such as grit, as any damage caused by the presence of foreign particles will invalidate the guarantee.
Do not put water into the coffee bean container.
Remember to fit the drip tray to avoid wastewater flowing onto the work surface and staining it or scalding you. Check that your water tank is clean.
Initialization cycle – total duration: around 3 minutes
Turn on the appliance by pressing the button
It is preferable to rinse the 2 circuits out at least once after the appliance has not been used for several days. Each time you plug your appliance in, it will carry out an initialization cycle.
Preparing the grinder
You can choose the strength of your coffee by setting the coffee bean grinding fineness. The finer the grinding setting, the stronger and creamier the coffee should be. Set the desired fineness for grinding by turning the ‘Grinding fineness setting’ knob. Turn to the left for a finer grind. Turn to the right for a coarser grind.
CHANGE THE SETTING DURING GRINDING.
Never force the grinding fineness setting button.
PREPARING ESPRESSO AND LONG COFFEES
YOUR APPLIANCE IS DESIGNED TO MAKE COFFEE FROM COFFEE BEANS ONLY.
When you first make coffee with the appliance or after a long period of absence or a cleaning or scale removal procedure, a little steam and hot water will come out of the steam nozzle (priming). Splashing or scalding may occur if the coffee outlets are set too high in relation to the size of the cups.
Note:
The amount of water needed to make espresso is between 30 and 70 ml.
The amount of water needed to make a coffee is between 80 and 220 ml.
Production of espresso or coffee
Plugin your appliance.
Press the button
The ground coffee is moistened with a little hot water after the grinding stage. A few moments later, percolation as such starts. Beyond a certain amount of coffee in the cup, we recommend – in order to obtain a stronger coffee – to divide your preparation into two separate cycles. Example 2 x 70 ml cycles for a cup of 140 ml.
2 cup function
You can prepare 2 cups of coffee or espresso with your appliance. Press the button
Place 2 cups under the coffee outlets. You can lower or raise the coffee outlets to suit the size of your cup – Fig. 10. Select the button
The appliance will automatically sequence 2 complete coffee-making cycles. Make sure that you don’t remove the cups after the first cycle.
If you press the
PREPARING STEAM
Steam froths up the milk to make a cappuccino or a caffe latte, for example and also heats up liquids. As you need a higher temperature to produce steam than to make an espresso, the appliance runs an additional pre-heating phase for steam.
Plugin your appliance.
Press the
The light
Press the button – Fig. 11.
The light
Once the preheating is finished, the light
The appliance goes back to its initial position if the steam control is not used after 2 mins.
![]() BE CAREFUL, BECAUSE THE CYCLE DOES NOT STOP IMMEDIATELY.
BE CAREFUL, BECAUSE THE CYCLE DOES NOT STOP IMMEDIATELY.
Frothing milk
We recommend that you use pasteurized or UHT milk that has been recently opened. Untreated milk does not give the best results.
Pour the milk into your milk jug. Immerse the nozzle in the milk – Fig. 12. Initiate the steam function as explained in the paragraph above. Once your milk is frothy enough – Fig. 13 – again press the
The steam nozzle can be removed for more intense cleaning. Wash it out with water and a little washing-up liquid and a small non-abrasive brush. Rinse and dry it – Fig. 14. Before putting it back, ensure that the air inlet holes are not blocked by any milk residues. If necessary, unblock them using the needle supplied – Fig. 15.
Do not wash the steam nozzle in a dishwasher. To interrupt the steam function, simply press any button. If the nozzle is obstructed, unblock it with the needle provided. Steam can be produced for a maximum of 2 minutes per cycle.
![]() After the steam function has been used, the nozzle can be hot, and we recommend that you wait for a few moments before handling it.
After the steam function has been used, the nozzle can be hot, and we recommend that you wait for a few moments before handling it.
Auto-cappuccino XS 6000 Set (sold separately)
This auto-cappuccino accessory enables you to make cappuccinos or lattes – Fig. 16. Connect the different parts to each other. Ensure that you do not pierce the pipe by keeping the button in the correct place. After removing the lid, fill the jug with milk – Fig. 17 and place a cup or glass under the auto-cappuccino nozzle – Fig. 18. Select the cappuccino or latte position on the special nozzle – Fig. 19. Start the steam, as indicated in the chapter ‘Making drinks with steam’. Once you have made the milk froth, place your cup under the coffee outlets and start a coffee cycle – Fig. 20.
To prevent the milk from drying on the auto-cappuccino accessory, ensure that you clean it thoroughly. You are advised to wash it immediately by running a steam cycle with the accessory jug filled with water in order to clean the inside of the nozzle. You can use the KRUPS liquid cleaner for this, available separately.
MAINTAINING YOUR APPLIANCE
Emptying the coffee grounds collector and the drip tray.
If the
Remove, empty, and clean the coffee ground collector – Fig. 21.
Replace the coffee grounds collector – Fig. 22
Remove, empty, and clean the drip tray – Fig. 23.
The drip tray is equipped with floats to indicate when it needs to be emptied.
Put all parts back in place.
As soon as you remove the coffee grounds collector, you will have to empty it completely to avoid any overflow.
Rinsing of circuits
These 2 functions are available anytime, except if the appliance requests a ‘CLEAN’ and/or ‘CALC’ cycle.
Rinsing out the coffee circuit:
Place a container under the coffee nozzles. Press the
Rinsing out the steam circuit:
Place a container under the steam nozzle and press the
Appliance cleaning program, 3 times a year (total duration: about 13 minutes)
For hygienic reasons and to preserve all the best coffee flavor we recommend you to clean the coffee system when the machine asks you to, about 3 times a year.
To perform this cleaning you will need:
– 1 KRUPS cleaning tablet
– 1 container of minimum 600ml several flows will follow one another
When to carry out this program?
When it is necessary to run a cleaning program, the appliance alerts you by flashing the CLEAN indicator light. This program can only be accessed when the appliance requests it (approximately every 300 brews of coffee or espresso). To comply with the warranty conditions, it is essential to perform the cleaning cycle when the appliance alerts you.
Follow the order of operations carefully Use only KRUPS cleaning tablets (available on our KRUPS.com store)
How to start the automatic cleaning program?
- Start the cleaning program by pressing


- Remove, empty, clean and replace the coffee grounds collector Fig 21-22 The indicator light
- Remove, empty, clean and replace the drip tray Fig 23.
- Fill and replace the water tank.
- Place the 600 ml container under the coffee nozzles Fig 24.
- Open the maintenance hatch Fig 25.
- Insert the KRUPS XS3000 cleaning tablet into the cleaning chute Fig 26.
- Press the button
- The cleaning phase (about 13 min) starts. Several waters flows follow one another in several phases without any necessary intervention. They allow the device to be rinsed and the cleaning residue to be removed.
- The cleaning cycle is finished when the light

Your device is ready to be used.
Important :
You do not have to run the cleaning program as soon as the appliance requests it, but you must do it reasonably soon after. If cleaning is postponed, the alert message will remain displayed as long as the operation has not been performed. if you unplug your machine or if you turn it off during cleaning or in the event of electrical failure, the cleaning program will resume the current step at the time of the incident. It will not be possible to postpone this operation: rinsing the water circuit is mandatory.
If there is not enough water in the water tank when you start the program, the light will come on to warn you. Add the appropriate amount of water to the container and cleaning will continue automatically.
If you unplug the appliance during cleaning, press the
The cleaning cycle is intermittent: do not put your hands under the water outlets ‘E’ and ‘W’ while the cycle is in progress.
Only use KRUPS (XS3000) cleaning tablets. We cannot be held responsible for any damage that may result from the use of tablets from other brands. You can obtain cleaning tablets from KRUPS Service Centres.
Scale removal program – total duration: about 20 minutes
The quantity of scale deposited depends on the hardness of the water used. The appliance will automatically warn you by the ‘CALC’ light coming on when you need to proceed with scale removal. This program is only accessible when the appliance requests it.
To benefit from the guarantee conditions, it is essential to perform the appliance’s scale removal cycle when informed to do so. Be sure to follow the procedure closely step by step. You can continue to use the appliance when the light is on, but you are advised to perform the program as soon as possible.
If your appliances fit with our Claris – Aqua Filter System F088 cartridge, please remove the cartridge during the descaling operation.
Only use KRUPS scale removal products. You can obtain scale removal products from KRUPS Service Centres. We cannot be held responsible for any damage that may result from the use of tablets from other brands.
![]() Make certain to protect your work surface during cleaning and scale removal cycles, especially if it is made of marble, stone or wood.
Make certain to protect your work surface during cleaning and scale removal cycles, especially if it is made of marble, stone or wood.
Start the descaling program by pressing the
Remove and clean the drip tray.
Place a container with a minimum capacity of 0.6 l under the coffee outlets as well as under the steam nozzle – Fig. 24. Empty the tank and refill it with warm water up to the line ‘CALC’ – Fig. 33. Dissolve a sachet of Krups (40 g) F054 descaler in the tank – Fig. 33. Replace the water tank. The indicator light
The first phase (approximately 8 min) begins.
The descaling cycle will start automatically.
At the end of this phase, the sound signal beeps every 10 seconds, and the indicator light
If there is not enough water in the water tank, you will be warned by the light. Add the appropriate amount of water to the tank and scale removal will continue automatically.
If you unplug the appliance during cleaning, press the
Long rinsing program – total duration: about 2 minutes
When it is necessary to make a long rinsing program, the appliance warns you of this by flashing the ‘CLEAN’ and ‘CALC’ lights.
Remove, fill and replace the water tank.
Place a container with a minimum capacity of 0.6 l under the coffee outlets and the steam nozzle. Start the long rinsing program by pressing the
Your appliance is ready for the next use.
The appliance can ask you to empty the coffee ground collector.
OTHER FUNCTIONS
To switch the appliance off
You can switch off your appliance at any time. As the appliance is switching off, a double beep is emitted and all of the red lights flashed, one after the other. The appliance has registered your request and will stop as soon as possible.
Installation of the filter cartridge – total duration: around 2 min
To get the best taste from your coffee and extend your appliance’s service life, we advise you to use only the Claris – Aqua Filter System cartridge sold as an accessory. Fig. 30: Mechanism to indicate the month the cartridge was fitted and when to replace it (after 2 months at most). Installing the cartridge in the appliance. On first use, screw the filter cartridge into the bottom of the water tank – Fig. 31. Place a 0.6 l container under the steam nozzle. Press the
The Claris cartridge needs to be replaced after about every 50 liters of water or every two months at least. If you are using the Claris – Aqua Filter System cartridge, set the water hardness to level 0.
Coffee temperature display
Appliances are pre-set in the factory to level 2.
Connect the appliance to the mains supply but do not switch it on. Press the
Water Hardness Setting
Appliances are pre-set in the factory to hardness level 4.
Before using the appliance for the first time or after a change to the water hardness, it is advisable to set the appliance to the correct water hardness. Contact your water supplier to find out the water hardness for your area.
| Degree of hardness |
0 Very soft |
1 soft |
2 moderately hard |
3 hard |
4 extremely hard |
|
| 0 f | < 5,4 | > 7.2 | > 12,6° | > 25,2° | > 37,8° | |
| °dH | <3° | >4° | >7` | >14° | >21° | |
| °e | < 3,75° | > 5° | > 8,75° | > 17,5° | > 26,25° | |
Connect the appliance to the mains supply but do not switch it on.
Press
Setting the electrical supply cut-off mechanismAppliances are pre-set in the factory to 1 hour.You can program your machine’s automatic shut-off following a pre-programmed number of hours. Connect the appliance to the mains supply but do not switch it on.Press
Information on cycle number
Connect the appliance to the mains supply but do not switch it on.
Press the
– Less than 3000: 1 LED lit.
– Greater than 3000: 2 LEDs lit.
– Greater than 6000: 3 LEDs lit.
To exit settings mode, press
At each of these steps, you can exit settings mode by pressing the
TROUBLESHOOTING, CORRECTIVE ACTIONS
| PROBLEM MALFUNCTION | CORRECTIVE ACTION |
| Switch off and disconnect the appliance, remove the filter cartridge, wait for a minute and restart the appliance. | |
| The appliance does not turn on when the 0 buttons is pressed. | Check your fuses and plug sockets. Check that the two power plugs are correctly pushed into the socket. |
| The coffee grinder makes a strange noise. | There is a foreign body in the grinder. Disconnect the appliance before investigating. See if you can extract the foreign body using your vacuum cleaner. |
| The steam nozzle makes a noise. | Check that the steam nozzle is correctly attached to its corresponding end piece. |
| The steam nozzle on your appliance seems partially or completely clogged. | Ensure that the opening in the end piece is not obstructed by milk residue or limescale. Unclog the holes with the needle supplied with your appliance. |
| The steam nozzle makes little or no milk froth. | For milk-based drinks, use very fresh, very cold pasteurized, or UHT milk. It is also advisable to use a cold container. If the results do not improve, try changing the brand of milk. |
| No steam comes out of the nozzle. | Empty the tank and temporarily remove the filter cartridge. Fill the water tank with mineral water that is high in calcium (> 100 mg/I) and run successive steam cycles. |
| The auto-cappuccino set makes little or no froth. The auto-cappuccino set does not take in milk. | Check that the accessory is correctly attached to the appliance, remove it then replace it. Check that the flexible tube is not obstructed or pierced and that it is correctly attached to the accessory so as to make it airtight. Rinse and clean the accessory (refer to the “Auto-cappuccino accessory” chapter). |
| PROBLEM MALFUNCTION | CORRECTIVE ACTION |
| There is water underneath the appliance. | Before removing the water tank, wait for 15 seconds after the coffee has finished flowing so that the appliance finishes its cycle properly. Check that the drip tray is correctly positioned on the appliance: it should always be in place, even when the appliance is not in use. Check that the drip tray is not full. The drip tray should not be removed during a cycle. Clean the tank and its correction regularly to avoid the build-up of scale, which can cause leaks. |
| After emptying the coffee grounds collector. the warning one’s-gm is still displayed on the screen. | Remove the coffee grounds collector and ensure it is empty and clean. Wait at least 6 seconds before replacing it, and ensure it is correctly installed. |
| The coffee dispenses too slowly. | Turn the coffee fineness dial to the right to make the grounds cotrser (this could also depend on the type of coffee used). Run one or several rinsing cycles. Change the Claris Aqua Filter System cartridge (see ‘Instating the filter). |
| The water/steam is not dispensed normal?), from the steam nozzle. | At the beginning or end of making a ink. the steam nozzle may drip slightly. |
| The coffee fineness dial is difficult to turn. | Only change the grinder setting when it is running. |
| The espresso or coffee is not hot enough. | Change the coffee temperature setting. Warm the cup by rinsing it with hot water before making the drink. |
| The coffee is too lightly coloured or too weak | Avoid using oily caramelized or flavored coffee. Check the bean has ii it that coffee container coffee and is dispensing correctly. Decrease the drink volume. increase the ink strength. Turn the coffee fineness dial to the left to make the grounds finer. Make the drink in two cycles by using the 2 cups function. |
| The appliance is not producing coffee. | A problem has been detected during the preparation of the drink. The appliance has restarted automatically and is ready for a new cycle. |
| Why can I not start the descaling or cleaning program? Why does my appliance not request to be descaled or cleaned? | The appliance only requests tocleanedionce it has made several types of requests a descaling cycle once it has made a certain number of drinks using steam. |
| A power failure occurs during a cycle. | The appliance is automatically restarted when the power is switched back on. |
| Coif Coffee flows behind the coffee nozzles. | Pour cold or room-temperature water into the tank. Re-duce the temperature level. |
| The appliance is working but no liquid comes out. | Check that the water tank is in the correct position and that the cord is not jammed between the appliance and the water tank. |
| Ground coffee is in the drip tray. | Yes, to stay clean the appliance clears ground coffee that has fallen out of the percolation tank. |
EN HOTLINE: UK: 0345 330 6460 – ROI: (01) 677 4003
8020003842 – version3 – 11-2019- Réalisation : Espace graphique