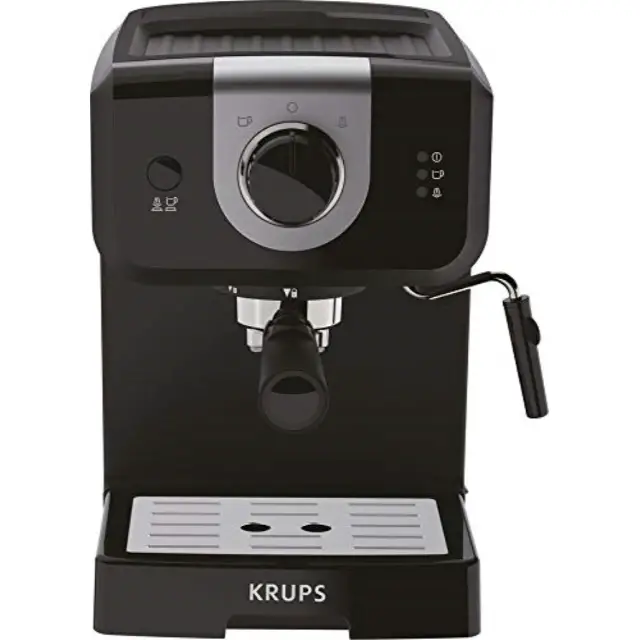
KRUPS XP3208 Pump Espresso And Cappuccino Coffee Maker
DESCRIPTION
- A Removable water tank
- B Cup holder tray
- C On/Off button
- D Control panel
- E Filter holder head
- F Filter head
- F1 Filter 1 cup
- F2 Filter 2 cups
- G Steam nozzle
- G1 Foam nozzle
- H Drip tray grill
- I Drip tray
- J Power cord
- K Spoon-tamper
- D. 1 Selection button
- D. 1.1 Select espresso
- D.1.2 Select steam
- D. 2 ‘On’ indicator light
- D. 2.1 Espresso preheat indicator light
- D.2.2 Steam preheat indicator light
- D.2.3 Too hot water temperature indicator light
- D. 3 Thumbwheel
- D. 3.1 Position O: preheat
- D.3.2 Espresso preparation
- D.3.3 Steam preparation
TECHNICAL SPECIFICATIONS
- Pump: 15 bar
- Manual start/stop
- Accessories: 1 and 2 cup filters, measuring spoon/tamper
- Steam function
- Selection button: espresso or steam
- Removable tank (1.2 L capacity)
- Power: 960 – 1140 W
- Voltage: 220 – 240 V
- Dimensions: 297 x 201 x 290 mm
- Automatic shut down after 25 minutes
IMPORTANT!
Operating voltage: this appliance is designed to operate at 230 V alternating current only.
Type of use: This appliance is designed for DOMESTIC USE ONLY
HELPFUL TIPS
Use of freshly roasted coffee is recommended. Contact your coffee roaster for advice. The freshness of the coffee only lasts several weeks after roasting. Good packaging can improve and prolong the flavour of the coffee. If you are unsure of the quality of the packaging, choose a recently roasted coffee. Coffee must always be ground just before it is prepared.
What coffee should you choose?
- For an aromatic coffee Choose pure Arabica coffees or those composed mostly of Arabica coffee. Artisan roasted coffees are preferred as they lend a better complexity and delicateness to the flavour. For a variety of flavours, try pure origin coffees.
- For an intense coffee Choose coffees blended with Robusta – not specifically 100% Arabica – or Italian-roasted coffees or specific Italian-flavoured coffees.
- Keep the ground coffee in the fridge as this will lock in the flavour for longer.
- Do not fill your filter holder to the brim; use the measuring spoon (1 spoon for a 50 ml cup, 2 spoons for 2 x 50 ml cups). Clean off any excess coffee from around the filter holder.
- If you have not used the appliance for more than 5 days, empty and rinse the water tank.
- Always make sure the appliance is switched off before removing the tank to fill it or empty it.
- Always ensure the appliance is positioned on a flat and stable surface.
FIRST USE OR IF THE MACHINE HAS NOT BEEN USED FOR A LONG PERIOD
IMPORTANT! do not place heating elements on the appliance.
IMPORTANT! Remove the red protective cap from under the water tank.
IMPORTANT! the safety instructions are part of the appliance. Please read them carefully before using your new appliance.
RINSING THE SYSTEMS BEFORE FIRST USE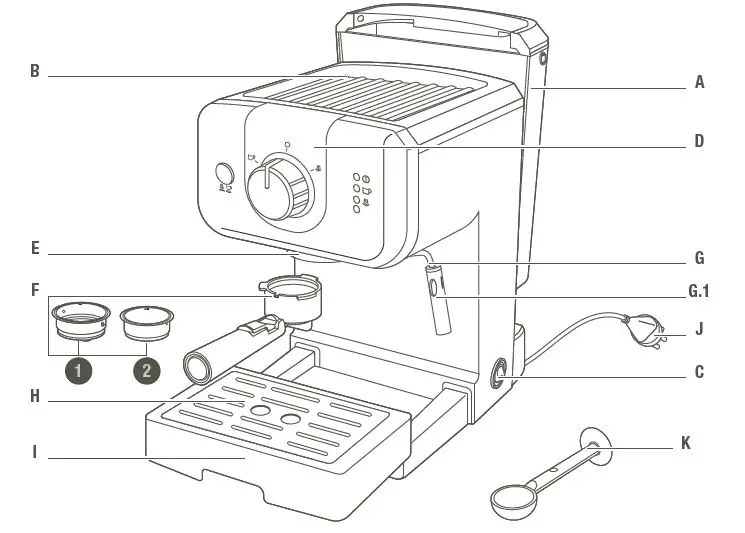
RINSING THE ESPRESSO SYSTEM
To ensure your first cup of coffee tastes great, we strongly recommend that you rinse the espresso machine with hot water, as instructed below:
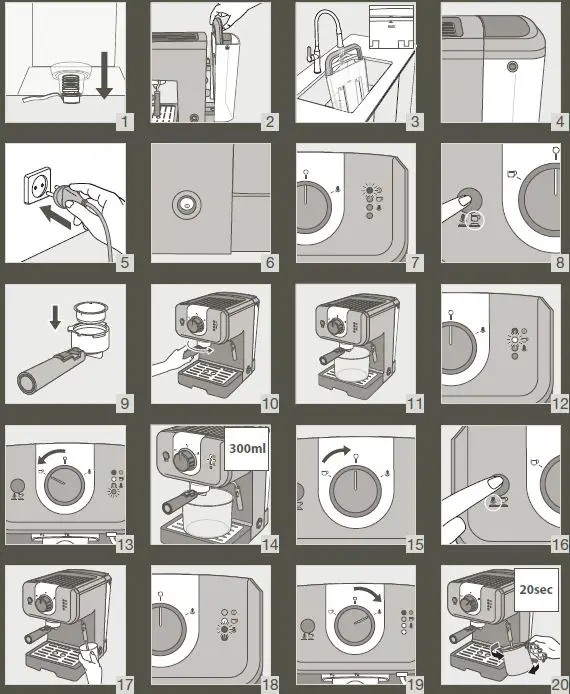
Ensure you have removed the red protective cap from under the water tank (1).
- Remove the water tank (A) and fill it. The water level should not exceed the “MAX” mark on the tank and should contain at least 300 ml (= equivalent to 2 large cups (2-3). Then replace the water tank, ensuring that the cover is closed. (4).
- Plug in your machine. (5).
- Press the On button (C)(6). On the control panel (D), the “On” indicator light switches on (D2) (7).
- The selection button (D.1) must be set to the espresso position – (button not depressed) (D.1.1) (8).
- Place a filter without coffee (F1) into the filter holder (F) (9). Slot the filter holder into place (E) and turn it to the right until it stops (10). Place a receptacle under the filter holder (11).
- When the espresso preheating indicator light (D2.1) stops flashing and stays on turn the thumb wheel (D.3) to the left, to espresso preparation (D.3.2) (12-13) – The flow will start after approximately ten seconds.
- Let approximately 300 ml of water trickle out (change the receptacle if necessary) (14), then turn the thumb wheel to position O (D.3.1) to stop preparation (15).
- IMPORTANT / After 25 minutes of disuse, your appliance will switch off automatically as a safeguard.
RINSING THE STEAM SYSTEM
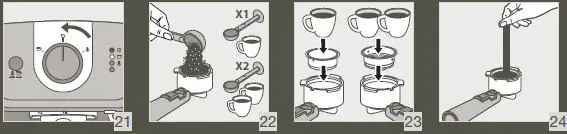
Remove the water tank and fill it. The water level should not exceed the “MAX” mark on the tank and should contain at least 300 ml (= equivalent to 2 large cups). Then replace the water tank, ensuring that the cover is closed. The selection button (D.1) must be set to the steam position (button depressed) (D.1.2) (16) Place the nozzle into a container filled with water (G.1) (17). When the steam preheating indicator light (D2.2) stops flashing and stays on (18), turn the thumb wheel (D.3) to the right, to the steam function (D.3.3) (19). Let the water heat for 20 seconds (20) then turn the thumb wheel to position O (D.3.1) to stop the steam (21). Return the selection button (D.1) to the espresso position (D.1.1) (26).
MAKING ESPRESSO
IMPORTANT!
If the espresso function is used for the first time, the appliance must be cleaned as described in the “FIRST USE” paragraph.
IMPORTANT! To prevent splashes of hot water, check that the filter holder has been tightened until it stops before preparing the coffee. Do not remove the filter holder while the water is flowing, as the appliance is still under pressure.
With ground coffee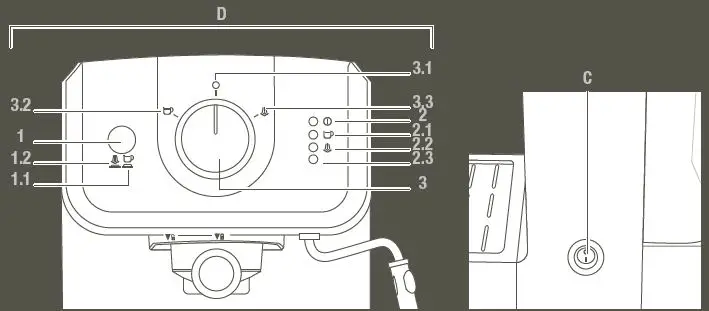
The type of coffee you choose will determine the strength and taste of your espresso: the finer your ground coffee, the more intense your espresso will be.
- Fill the water tank with tepid water and refit it on the appliance, making sure that it is correctly in place.
- Plugin your machine.
- For the best result, we recommend preheating the accessories beforehand (filter holder, filter and cups) by following the steps above, without adding coffee.
- Turn on the appliance by pressing the On/Off button.
- The “On” indicator light will switch on.
- Add the ground coffee to the 1 cup filter using the measuring spoon (K) (1 spoon = 1 measure = 1 espresso) (22-23) then pack it using the tamper, turning it using a circular motion (K) (24). Once packed, the coffee measure should not exceed the MAX level (25).
- For best quality, pack the coffee effectively.
- Clean off any excess coffee from around the filter holder.
- Ensure that the selection button is set to the espresso position (button not depressed) (26).
- Slot the filter holder into place then turn it to the right until it stops (27).
- The thumb wheel is set to function O. The espresso preheating indicator light flashes which indicates that preheating is in progress. Once preheating has finished, the espresso indicator light stays on (28).
- Place a cup under the filter holder and turn the thumb wheel to the left, to the espresso position, and the coffee will start to flow (29-30).
- When the cup is filled, turn the thumb wheel to position O to stop the flow (31).
- Remove the cup(s).
- Unlock the filter holder by turning it to the left (32) and remove it from the appliance. Do not touch the filter as it will be hot.
- To empty out the coffee, invert the filter holder while holding the filter with the flap so that only the coffee falls away (33).
- Wash the filter and filter holder under running water to remove the rest of the coffee (34).
- To make 2 espressos, take the 2 cup filter (F.2) and add 2 measures of ground coffee.
- To change the filter in the filter holder, ensure that the filter is positioned with the slot facing the lever of the handle.
- IMPORTANT / The coffee flow is stopped manually. Do not move away from the machine when it is in use.
STEAM FUNCTION
The steam will foam the coffee (for example, when making cappuccinos).
- Plug in your machine.
- Remove the water tank and fill it. The water level should not exceed the “MAX” mark on the tank and should contain at least 300 ml. Then replace the water tank, ensuring that the cover is closed.
- Press the “On” button; the indicator light switches on.
- Press the selection button to activate the steam function (button depressed) (35) .
- The thumb wheel is set to function O. The steam preheating indicator light flashes which indicates that preheating is in progress. Once preheating has finished, the steam indicator light stays on (36).
- Place an empty receptacle or cup underneath the nozzle (37).
- Open the nozzle system by turning the thumb wheel to the right, to the steam preparation function, to run the water through the system before the steam begins. (D.3.3) (38).
- Turn the thumb wheel to program O (39).
- To make a cappuccino, fill a container with approximately 60 to 100 ml of milk. For best results, use a narrow and relatively small container that can be slipped under the steam nozzle (G) (40). For best results, the milk and container should be very cold.’
- Place the nozzle into the container of milk and turn the thumb wheel to the right, to the steam position.
- For best results, foam the milk near the bottom of the container for approximately 10 seconds, taking care not to touch the bottom. Then slowly tilt the container and move thenozzle upwards until it is almost at the surface of the milk. Make sure that the nozzle does not leave the milk. To get a great foam, move the container in circular motions.
- To get the best foam, we recommend using pasteurised or UHT milk, and to avoid using non-pasteurised or skimmed milk.
- Once you have achieved the best foam, turn the thumb wheel to position O (41)
- To prevent overheating the milk, do not use the steamer for more than 45 seconds (for 100 ml of milk).
- You can start making an espresso by following the steps detailed above.
- To prevent milk from drying inside the nozzle, please clean it after each use. To do this, follow the steps for foaming the milk, replacing 100 ml of milk with 60 ml of water. To avoid burning yourself, remove the nozzle from the foam (G.1) and wash it in clean water (42). Clean the steam nozzle using a damp cloth (G) (43).
- Remove the drip tray, empty it and clean it using clean water (44-45).
- Refer to the next section for manual cleaning.
GOOD TO KNOW – PRACTISE AFTER USING STEAM
If you want to make espresso after using the steam function, you need to cool down your coffee machine because the water is too hot for optimum espresso preparation.
Follow the steps below:
- Make sure the knob is on position O.
- Selection button on espresso position (button not depressed).
- The red indicator light switches on indicating the coffee machine is too hot for espresso preparation.
- Immerse the steam nozzle completely in a container filled with water.
- Turn the knob to the right (steam position) to release the hot water and steam inside the boiler, to cool down the machine, until red light is off.
- After around 10 to 20sec, you will see the red light switches off and the espresso light switches on. That indicates the machine is cooled down to the right temperature for espresso preparation.
- Turn the knob to O position to stop the steam. If the red light is still on, repeat the above steps.
Your coffee machine is now cooled down, you can make and enjoy your espresso !
IMPORTANT! If you want to make a coffee after frothing milk, you should turn the knob to the espresso position and then set the selection button to the espresso position. After few seconds, the coffee indicator will turn off. Turn the thumb wheel to function O and wait until the coffee indicator lights up. During this operation, if the coffee and steam indicator lights are switched on at the same time, repeat the steps above.
IMPORTANT!
Warning! To prevent the milk from spattering, do not lift the nozzle out of the milk when using “steam” mode.
IMPORTANT!
Warning! The steam nozzle is still hot! Be careful you do not burn yourself!
IMPORTANT! After switching off the steam function, clean the nozzle immediately and carefully, as set out in the section:
CLEANING AND MAINTENANCE
The appliance
- Unplug (J) before each clean and let the appliance cool down first.
- Clean the outside of the appliance with a damp sponge when you think it necessary. Regularly clean the tank, drip tray and its grill then wipe them down.
- Rinse the inside of the tank regularly.
- When a fine white layer appears in the tank, descale the appliance (refer to the section on descaling)
- Do not use alcohol or solvent-based cleaning products.
- After unplugging the appliance, regularly clean the head of the filter holder and the seal (E) using a damp sponge.
- Clean with a damp cloth only. Do not use detergent or abrasive products.
The filter holder
- Using a damp cloth, regularly clean the filter holder housing in order to remove any residual coffee that may have collected in this area.
- Do not remove the seal. Do not remove the screws from the filter and filter holder. This may only be carried out by an approved servicing centre.
- To prolong the life of the filtering head seal, do not refit the filter holder if the coffee machine will not be used for an extended period of time.
The drip tray
- If necessary, clean the drip tray (I) and its grill (H) using water and a little mild detergent (44-45). Rinse and dry.
DESCALING
Descale your appliance regularly, as indicated in sections A and B for the coffee and steam functions, as this will help prolong its lifespan. The frequency of descaling depends on the hardness of your water. Consult your water supply authority for more information. While descaling, do not place your appliance on a marble worktop. The descaling agent could damage it.
- To help you, here is a table of reference for the frequency of descaling according to water hardness and how often your machine is used:
| DESCALING FREQUENCY | |||
| Average no. of coffees per week | Soft water (<19°th) | Hard water (19-30°th) | Very hard water (>30°th) |
| Less than 7 | Once per year | Every 8 months | Every 6 months |
| 7 – 20 | Every 4 months | Every 3 months | Every 2 months |
| More than 20 | Every 3 months | Every 2 months | Every month |
If in doubt, descaling once per month is advised.
The coffee maker will not be repaired if:
- descaling is not carried out,
- there are scale deposits,
- the accessories have been washed in a dishwasher, as this is not covered under the guarantee.
Descaling the coffee system
- Unplug the appliance.
- Insert the filter holder (without coffee) into the appliance and turn it to the right until it stops.
- Place a receptacle with a volume greater than ½ litre under the filter holder.
- Check that the thumb wheel is set to position O.
- Fill the tank with a mixture comprised of 3 parts water to 1 part vinegar or citric/sulphamic acid (total volume of mixture: 500 ml)
- Plug the appliance in. Turn on the appliance by pressing the On button.
- Set the selection button to the espresso position. When the espresso indicator light switches on, turn the thumb wheel to the left and allow the mixture to flow through (¼ of the volume).
- Stop the appliance by pressing the On/Off button and leaving the selection button set to Espresso.
- Wait 5 to 10 minutes, then repeat the process twice more.
- Make sure that the tank does not fully empty (if removing, refer to the paragraph: FIRST USE).
Rinsing
IMPORTANT!
After descaling, rinse 2-3 times using clean water (no coffee), as described in the “FIRST USE” paragraph.
Do not forget to rinse the nozzle. The appliance is now descaled and ready for use again.
GUARANTEE
Your appliance is under guarantee; however, any connection errors, handling mistakes or use of the machine for purposes other than set out in the instructions will void the guarantee. This appliance is under guarantee for domestic use. Any other type of use will void the guarantee. Repairs to the machine caused by a failure to descale it shall not be covered by the guarantee. For any After-Sales or spare parts issues, please consult your retailer or an approved servicing centre.
TROUBLESHOOTING
| PROBLEMS | POSSIBLE CAUSES | SOLUTIONS |
| The coffee is very moist. | You have not used enough coffee. | Add more coffee. |
| The espresso flows too slowly. | The coffee is too fine, too coarse or too mealy. | Choose slightly larger coffee grounds. |
| The filter holder is dirty. | Clean your filter holder using the instructions in the section: CLEANING AND MAINTENANCE – B. Filter
holder. Clean the coffee filter as well. |
|
| The head of the filter holder is clogged. | When the appliance has cooled, clean the grill through which the water flows using a damp sponge. | |
| Your machine is calcified. | Descale your machine following the user instructions provided. | |
| There is too much coffee. | Observe the maximum limits when filling the filter. | |
| A continuous flow of water pours from the filter holder after making an espresso. | Your machine is becoming calcified because the water is particularly hard. | Descale your machine immediately following the user instructions provided. |
| The red cap was not removed. | Remove the red cap. | |
| A continuous flow of water pours from the filter holder after making an espresso. | Your machine is becoming calcified because the water is particularly hard. | Descale your machine immediately following the user instructions provided. |
| Coffee grounds are present in the cup. | The filter holder is clogged. | Clean the filter holder using hot water. |
| The coffee grounds are too fine. | Use slightly larger coffee grounds. | |
| The seal on the head of the filter holder is clogged. | Clean the filter holder and the seal with a damp sponge. |
| PROBLEMS | POSSIBLE CAUSES | SOLUTIONS |
| The espresso is not frothy. | The coffee grounds are too old. | Use freshly ground coffee. |
| The ground coffee is not suitable for making espresso. | Use finer grounds. | |
| There is too little coffee in the filter holder. | Add more coffee. | |
| The water tank leaks when it is moved. | The valve at the bottom of the tank is dirty or defective. | Wash the water tank and operate the valve with your finger, which is beneath the tank. |
| The valve is blocked by the calcified deposits. | Descale your machine following the user instructions provided. | |
| Water leak beneath the appliance. | There is an internal leak. | Check that the tank is positioned correctly. If the problem persists, do
not use the appliance and consult an approved service centre. |
| The pump is abnormally noisy. | No water in the tank. | Fill the water tank and restart the pump (refer to the section: FIRST USE). Avoid emptying the tank completely. |
| The espresso leaks out the sides of the filter holder. | The filter holder is not positioned correctly. | Fit the filter holder in position and lock it (turn from left to right until it stops). |
| Remove any excess coffee that prevents you from fully locking the filter holder. | ||
| The edge of the filter holder is clogged by the coffee. | Remove the excess coffee and clean the grill through which the water flows using a damp sponge. | |
| Your espresso tastes bad. | After descaling, the rinsing cycle was not carried out correctly. | Rinse the appliance in line with the user instructions and check the quality of the coffee. |
| PROBLEMS | POSSIBLE CAUSES | SOLUTIONS |
| The appliance does not work. | The pump is disabled due to a lack of water. | Fill the water tank and restart the pump (refer to the section: FIRST USE). Avoid emptying the tank completely. |
| The removable water tank is incorrectly positioned. | Position the water tank correctly. | |
| The appliance is not connected. | Ensure that the appliance is switched on. | |
| The nozzle does not work or produces little foam. | The foam nozzle is not correctly installed. | Check that the accessory is correctly mounted on the appliance: remove then re-install it on the hinged arm using a firm upward movement. |
| The milk is too hot. | Use fresh, pasteurised or UHT milk that has been recently opened. | |
| The red light is on and espresso function does not work | The water boiler is too hot for espresso after steam function. | Cool down your machine following the instruction of “Good to Know” on page 5 |
If it is not possible to determine the cause of the fault, consult an approved retailer. Never disassemble the appliance! (if the appliance is disassembled, this will void the guarantee).
ELECTRICAL OR ELECTRONIC PRODUCT END OF LIFE
Help protect the environment!
Your product contains a number of recoverable or recyclable materials. Take these to a collection centre, or to an approved service centre for processing.