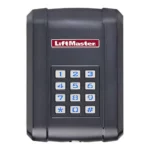
LiftMaster Wireless Keyless Entry 878MAX

LiftMaster Wireless Keyless Entry 878MAX
BEFORE YOU START Your wireless keyless entry is compatible with 315 MHz or 390 MHz garage door openers manufactured starting January 1, 1993, and have a LEARN button.
Read instructions thoroughly BEFORE beginning. If you are using this product with residential door openers, this product must be used only with door openers manufactured starting January 1, 1993, that use photoelectric sensors located near the bottom of the door track.
IMPORTANT: The keypad will activate your door or gate during programming. Be sure the door is clear of ALL obstructions. Start with the garage door closed. Make sure the garage door opener has a working light because it is a programming indicator.
Install the battery and program the wireless keyless entry prior to installation.


To prevent possible SERIOUS INJURY or DEATH from a moving gate or garage door:
- Install Wireless Keyless Entry within sight of the garage door, out of reach of children at a minimum height of 5feet (1.5 m), and away from ALL moving parts of the door.
- ALWAYS keep remote controls out of reach of children. NEVER permit children to operate, or play with remote controls.
- Activate gate or door ONLY when it can be seen clearly, is properly adjusted, and there are no obstructions to door travel.
ALWAYS keep gate or garage door in sight until completely closed. NEVER permit anyone to cross the path of the moving gate or door.
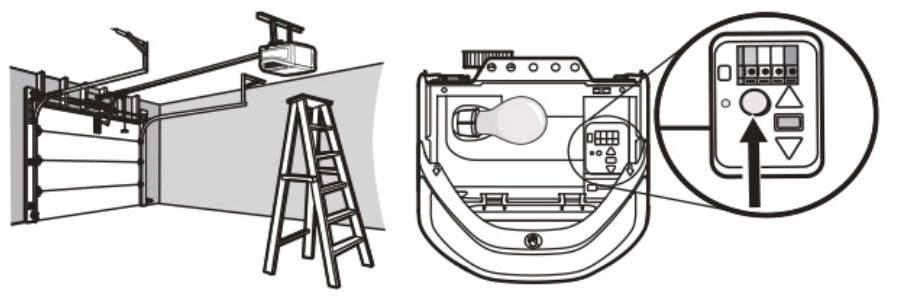
INSTALLATION
- Select a location to mount the wireless keyless entry at a minimum height of 5′ (1.5 m) out of the reach of children.
- Remove the battery cover and battery to show mounting
- Mark the top mounting hole and drill l/8′ (3.2mm) pilot
- Install the top screw, allowing 1/W (3.2mm) to protrude above the surface. Position the wireless keyless entry over the top screw.
- Mark the bottom hole and drill 1/W (3.2 mm) pilot hole. Install the bottom Do not overtighten to avoid cracking the plastic housing.
- Reinstall the battery and replace the cover.

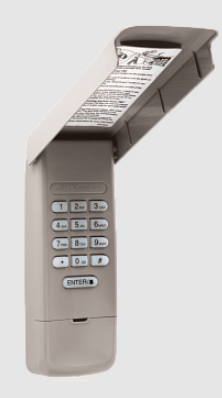
PROGRAM THE INITIAL PIN
The wireless keyless entry is pre-programmed to work with a LiftMaster garage door opener with a yellow LEARN button. Locate the LEARN button on the garage door opener. If the LEARN button is YELLOW, see Method A. Otherwise, see Method B for other colored LEARN buttons.
Method A – Yellow LEARN Button

- Press and release the LEARN button on the garage door opener. The learn LED will light.
- Enter a 4-digit personal identification number (PIN) of your choice.
- Press the ENTER button until the opener light bulb blinks or two clicks are heard.
- Test by pressing in the PIN you just programmed, and then press the ENTER The garage door opener will activate.
Method B – Yellow LEARN/Security+ 2.08 and Other LEARN Buttons
- Press and hold the * and # buttons until the lights on the keypad stop blinking.
- Enter a 4-digit personal identification number (PIN) of your choice. Then press the # button. You will use this PIN in step 6.
- Press and release the ENTER button the number of times that corresponds with the garage door opener type:
- Press and release the 0 buttons.
# of Presses Garage Door Opener Type 1 Yellow LEARN Button (Security+ 2.00) 2 Purple LEARN Button (315 MHz Security+0) 3 Red/Orange LEARN Button (390 MHz Security+0) 4 Green LEARN (390 MHz Billion Code) - Press and releas the LEARN button one time on the garage door opener. The Learn LED will light.
- Enter the 4-digit PIN from step 2, then press and release the ENTER button until the garage door opener lights flash or two clicks are heard.
- Test by pressing in the PIN you just programmed, and then press the ENTER button. The garage door opener will activate. Add more openers by repeating steps 1 through 7 using a new PIN for each.

HOW TO USE THE WIRELESS KEYLESS ENTRY
The garage door opener activates when you press the personal identification number (PIN) and ENTER button. The keypad will blink for 15 seconds. During that time the ENTER button can be used to stop, start or reverse the door.
If the wrong PIN number is accidentally pressed, press the correct PIN then ENTER button. The wireless keyless entry will transmit only the last four digits that were pressed before the ENTER button.
ONE BUTTON CLOSE FEATURE: This feature allows you to CLOSE your garage door by pressing just the ENTER button instead of your 4-digit PIN.
NOTE: This feature ONLY closes and is not available on garage door openers manufactured prior to 2006 or an external receiver.
To deactivate the one-button close feature:
- Press and hold the 1 and 9 buttons for 10 seconds. The keypad will blink four times when the one-button close feature is deactivated.
To activate the one button close feature:
- Press and hold the 1 and 9 buttons for 10 seconds. The keypad will blink twice when the one-button close feature is actuated.
PROGRAM A TEMPORARY PIN
NOTE: This feature is not available on garage door openers that have a green LEARN button or an external receiver.
A temporary 4-digit personal identification number (PIN) can be programmed to allow access to visitors. Each programmed PIN can program one temporary PIN. The temporary PIN can be set for a number of hours or a number of door openings. The temporary PIN cannot be the same as any previously programmed PIN.
- Press any programmed PIN, then press and hold the * button until the garage door opener light blinks three times.
- Press the temporary 4-digit PIN of your choice, then press the ENTER button. The light blinks 4 times.
- Enter the temporary PIN limit of use by:
| Number of Hours PIN Will Work | Number of Openings PIN Will Work | |
| Press the number of hours the temporary PIN will work (up to255), then press the * button. The opener light blinks once. | OR | Press the number of openings the temporary PIN will work ( up to 255), then press the # button. The opener light blinks once. |
- Test by pressing in the temporary P N you just programmed, and then press the ENTER button. The garage door opener activates. The test uses up one Clear the temporary PIN by repeating steps 1 through 4, and set the number of hours or openings to 0 at step 3.
CHANGE AN EXISTING PIN*
- Enter the programmed PIN you want to change.
- Press and hold the # button until the garage door opener light blinks twice.
- Enter the new 4-digit PIN of your choice and press the ENTER button. The opener light will blink once.
- Test by entering the PIN you just programmed, and then press the ENTER The garage door opener will activate.
*You cannot change an existing PIN for an opener with a green LEARN button or an external receiver. You MUST repeat ‘Program the Initial PIN’ to change the PIN number.
ERASE ALL REMOTE CONTROL AND KEYLESS ENTRY PROGRAMMING FROM THE OPENER
The following steps will erase ALL remote controls and any keyless entries from your opener.
- Press and hold the LEARN button on the garage door opener until the Learn LED turns off (approximately 6 seconds).
- Test by pressing the buttons on the remote control and keyless entry to ensure they no longer activate the opener.
- Follow programming steps to reprogram each remote control and keyless entry you wish to use.

For more information and support, go to: support.chamberlaingroup.com.
REPLACE THE BATTERY
To prevent possible SERIOUS INJURY or DEATH:
- NEVER allow small children near batteries.
- If the battery is swallowed, immediately notify the doctor.
Replace the battery when the keypad becomes dim or does not light after a button is pressed. Slide the cover-up, remove the battery cover, and replace the battery. Dispose of the old battery properly.
ONE YEAR LIMITED WARRANTY
The Chamberlain Group, Inc. warrants to the first consumer purchaser of this product that it is free from defects in materials and/or workmanship for a period of 1 year from the date of purchase.
NOTICE: This device complies With part 15 of the FCC rules and Innovation, Science and Economic Development Canada license-exempt RSS. Operation is subject to the following two conditions: (1) this device may not cause harmful interference, and (2) this device must accept any interference received, including interference that may cause undesired operation.
My changes or modifications not expressly approved by the party responsible for compliance could void the user’s authority to operate the equipment
This device must be installed to ensure a minimum 20 cm (8 in.) distance is maintained between users/bystander rs and the device.
This device has been tested and –found to comply with the limits for a Class B digital device, pursuant to part 15 of the FCC rules and Industry Canada ICES standard. These limits are designed to provide reasonable protection against harmful interference in a residential installation. This equipment generates, uses, and can radiate radio frequency energy and, it not installed and used in accordance with the instructions may cause harmful interference to radio communications. However, there is no guarantee that interference will not occur in a particular installation. If this equipment does cause harmful interference to radio or television reception, which can be determined by turning the equipment of and on, the user is encouraged to try to correct the interference by one or more of the following measures:
- Reorient or relocate the receiving antenna.
- Increase the separation between the equipment and receiver.
- Connect the equipment into an outlet on a circuit different from that to which the receiver is connected.
- Consult the dealer or an experienced radio/technician for help.
For more information, please visit www.devancocanada.com or call toll free at 855-931-3334
HOW TO ORDER REPAIR PARTS
DEVANCO CANADA
19192 HAY ROAD, UNIT Q SUMMERSTOWN, ON K0C 2E0
TOLL-FREE: 855-931-3334
www.devancocanada.com
WHEN ORDERING REPAIR PARTS PLEASE SUPPLY THE FOLLOWING INFORMATION:
√ PART NUMBER
√ DESCRIPTION
√ MODEL NUMBER
How do I program my LiftMaster Wireless Keyless Entry?
LiftMaster Wireless Keyless Entry is programmed by using the Learn Button on the garage door opener. Press and hold the Learn Button for 5 seconds. Release button. The LED will flash rapidly, indicating that it is ready to learn.
Can I use my LiftMaster Wireless Keyless Entry with a LiftMaster garage door opener?
Yes, as long as your garage door opener was manufactured after January 1, 1993.
How many codes can I program on my LiftMaster Wireless Keyless Entry?
You can program up to 4 codes on the LiftMaster Wireless Keyless Entry. Each code can be used to operate one garage door or gate opener.
How do I change the code on my LiftMaster Wireless Keyless Entry?
To change the code, press and hold the Learn Button for 5 seconds. Release button. The LED will flash rapidly, indicating that it is ready to learn. Press and release any button on the keypad to change the code. Repeat until you have entered a new code for each button you want to change. When finished, press and hold any button for 2 seconds to save new code(s). The LED will flash once per second, indicating that it has saved new code(s). If you want to erase all of your codes at once, press and hold any button for 5 seconds until the LED flashes twice per second (approximately 10 seconds). The keypad will then be in programming mode and all codes will be erased when a new code is programmed into any button(s).
Where is the Learn button on my LiftMaster?
Learn buttons that are red, orange, green or purple will be large, square buttons located under the light lens on the back panel of your garage door opener. To program a new garage door remote, press and quickly release your learn button to trigger the machine’s programming mode
How do you program a wireless garage door opener?
Hold the star and hash tag buttons until the lights on the keypad begin to flash. And then stop flashing do not pause longer than five seconds between keystrokes.
What if my garage door opener doesn’t have a Learn button?
If there is no learn button, examine the inside of the old remote by popping the back off of it. If there is a series of small switches, only big enough to be slid one way or another by the end of a pencil, you have a DIP switch unit. Make sure you purchase a universal remote with internal DIP switches
How do I reset my garage door keypad without learning button?
Remove the cover from the garage door opener remote control to reveal the switches within. What is this? Press the * and # pound button at the same time followed by red light blinking a couple of times. Once the blinking light stops the password has been reset
How do I connect to Liftmaster to WiFi?
Inside your garage your wi-fi password. And then you’ll want to enable bluetooth on your phone. And you’ll also need to enable location.
What is yellow button on LiftMaster?
Notes: Openers with a GREEN, RED, ORANGE or PURPLE learn/program button stay in accessory programming mode the 30 seconds, after 30 seconds the learn/program LED will turn off. Units with a YELLOW learn/program button stay in accessory programming mode for up to 3 minutes
Can I open my LiftMaster garage door with my phone?
You can, when you buy a brand new garage door opener from LiftMaster that has MyQ® technology. With a mere touch of your finger, you can open and close your garage door from anywhere in the world, using your Apple, Blackberry or Android phone.
How do I sync my garage door opener to my phone?
Connect with Android mobile device
Tap Garage Door Opener with Wi-Fi Ceiling Installed on the Device Setup screen. Review information on the What You Need screen and then tap Next. Note: Tap each checkbox after you review the information. You can then tap I’m Ready to continue.