User Manual
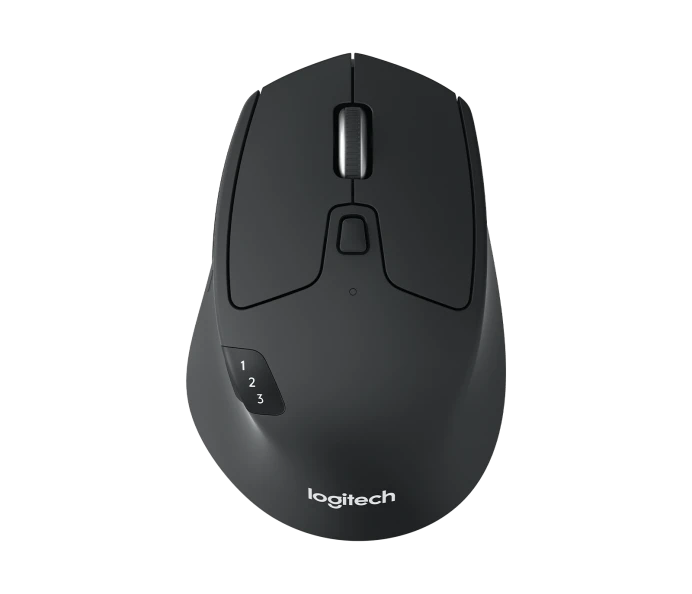
PRODUCT FEATURES
- Easy-switch
- Forward button
- Back button
- Toggle & connect button
- Hyper-fast scroll-wheel
- Battery LED
- Thumb button
- Dual Connectivity
- Battery & Receiver storage

GET STARTED
www.logitech.com/downloads
Logitech® Options
CONNECT WITH : Unifying
Requirements:
- USB port
- Unifying Software
- Windows 7, 8, 10 or later
- Mac OS X 10.10 or later
- Chrome OS

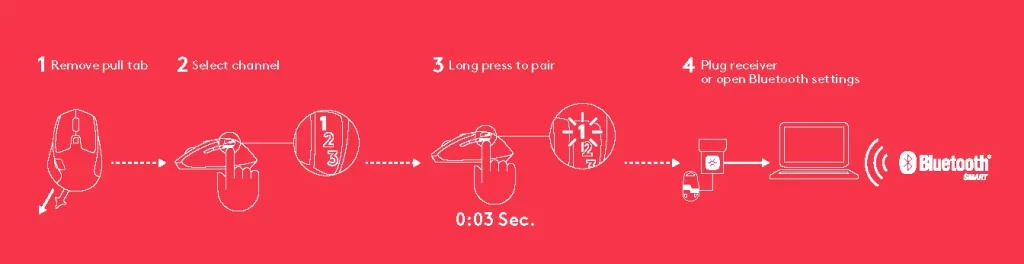
How to connect with Unifying:
- Download Unifying Software:
http://support.logitech.com/software/unifying - Make sure your M720 is turned on and a Unifying receiver is plugged in.
- Press and hold the toggle button below the display for 3 seconds (the LED on selected channel will start to blink fast).
- Open the Unifying software and follow the on-screen instructions.
Re-pair in Unifying!
Note! You need Unifying Software to pair with a second receiver or to pair the mouse to another channel on the same receiver.
All three Easy-Switch channels can be paired in either Bluetooth Smart or Unifying. One Unifying receiver included in the box.
CONNECT WITH : Bluetooth
Requirements:
Your device has to support Bluetooth Smart
- Windows 8 or later
- Mac OS X 10.10 or later
- Android 5.0 or later

How to pair a Bluetooth device:
- Make sure your M720 is turned on
- Press and hold the toggle button below the display for 3 seconds (the LED on selected channel will start to blink fast)
- pen Bluetooth settings or Bluetooth device manager on your device and pair with “M720 Triathlon Mouse”
LOGITECH OPTIONS
Unlock the full potential of your M720 by installing
Logitech Options software. In addition to optimizing the mouse for your operating system, the software lets you customize buttons and actions to fit your needs.
Logitech Options software also enable gestures for managing media,

Specs and Details
Dimensions
Mouse
- Height: 4.53 in (115 mm)
- Width: 2.91 in (74 mm)
- Depth: 1.77 in (45 mm)
- Weight (with batteries): 4.76 oz (135 g), with AA battery
Logitech Unifying receiver
- Height: 0.57 in (14.4 mm)
- Width: 0.74 in (18.7 mm)
- Depth: 0.24 in (6.1 mm)
- Weight: 0.06 oz (1.8 g)
Technical Specifications
Sensor Technology
- High Precision Optical Tracking
- DPI (Min/Max): 1000±
Buttons
- Number of Buttons: 8
Scrolling
- Hyper-Fast Scrolling Wheel
- Scroll Wheel: Yes, Rubber
- Tilt wheel: Yes, with middle click
Battery
- Battery: 18 months
- Batteries Details: 1 x AA (included)
Connectivity
- Connection Type: 2.4 GHz wireless connection and Bluetooth Low Energy Technology
- Wireless range: 10 m (33ft)
- Easy-Switch, 3 channels
Optional software
- Logi Options+
Warranty Information
1-Year Limited Hardware Warranty
Part Number
- 910-004790
FAQ – Frequently Asked Questions
What happens when you right-click in iPadOS?
A right-click is comparable to a long-press with your finger. Using the mouse, there’s no need to hold down to have the menu appear — it shows in an instant.
NOTE: This functionality is subject to support by the app maker.

Change the scrolling direction of mouse on iPadOS
You can change the scrolling direction of your mouse from Natural Scrolling to the other direction. Here’s how:
1. Go to Settings > General > Trackpad and Mouse.
2. Slide the toggle to the left to turn off Natural Scrolling. 
Pair Logitech mouse to iPad using Bluetooth
To pair your mouse to iPad, do the following:
1. Turn your mouse ON.
The LED should start blinking fast. If it doesn’t, perform a long press on the Easy-Switch button on the mouse.
2. Open the iPad Settings and tap Bluetooth settings.
3. Choose your mouse in the list of Devices.
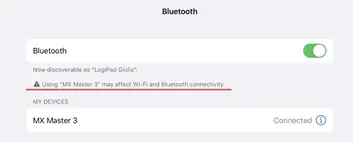
Warning message when Logitech device is connected to iPadOS
When you connect your Logitech device, you might see a warning message.
If this happens, make sure to connect only the devices you’ll be using. The more devices that are connected, the more interference you might have between them.
If you are having connectivity issues, disconnect any Bluetooth accessories that you’re not using. To disconnect a device:
– In Settings > Bluetooth, tap the information button next to the device name, then tap Disconnect.
Bluetooth mouse or keyboard not recognized after reboot on macOS (Intel-based Mac) – FileVault
If your Bluetooth mouse or keyboard does not reconnect after a reboot at the login screen and only reconnects after the login, this might be related to FileVault encryption.
When FileVault is enabled, Bluetooth mice and keyboards will only re-connect after login.
Potential solutions:
– If your Logitech device came with a USB receiver, using it will solve the issue.
– Use your MacBook keyboard and trackpad to login.
– Use a USB keyboard or mouse to login.
Note: This issue is fixed from macOS 12.3 or later on M1. Users with an older version might still experience it.
Logitech mouse AssistiveTouch pointer support on iPadOS
Moving a pointer on iPadOS
iPad OS 13.1 lets you use a mouse as a pointer with the AssistiveTouch feature. This feature is intended to help people who have difficulty using the touch screen, but it can also be useful for advanced users. For example:
– Getting things done on the go

A Logitech mobile mouse such as MX Anywhere 2S can be a good addition to the Logitech Slim Folio Pro Keyboard Case for productive sessions on the go. The mouse will be quite efficient for text editing, scrolling in spreadsheets and navigating between apps.
– Working with multiple devices at your desk
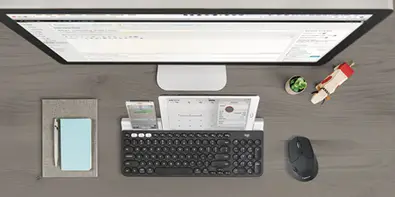
Logitech multi-device keyboards and mice allow you to work on multiple computers, and tablets, and switch between them with the press of a button. You can start a report on your computer, and then switch to your iPad to write a quick message.
– Presenting from your iPad
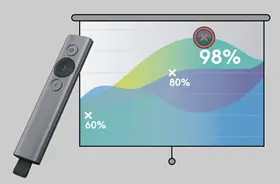
When presenting with your iPad connected to a large screen, Logitech Spotlight Presentation Remote lets you control your slides and point out precise areas of focus in your presentation by moving the iPadOS pointer. (Note: Logitech Presentation software cannot be installed on iPadOS. The Spotlight effect and other software-enabled features are not available on iPad).
How does it work?
The pointer looks like a circle, designed to simulate the touch of a finger. You can use the mouse as if you moved a finger on the screen. Clicking will be like tapping the screen with the finger.
The mouse can be connected using Bluetooth or the wireless USB dongle using a USB adapter. You will need to enable AssistiveTouch in the Accessibility settings. See more setup details below.
Which Logitech mice are supported?
Pointing, clicking, right-click and scrolling are supported on iPadOS 13.1 for most Logitech Bluetooth mice. The supported mice are MX Master 3, MX Master 2S, MX Anywhere 2S, MX Vertical, MX Ergo, M720 Triathlon Mouse, M585, and M350 Pebble Mouse.
NOTE: Logitech Options software and software-related features are not supported on iPadOS.
– Limitations
Enabling the pointer and the AssistiveTouch requires to go multiple levels into the iPad settings. See the setup instructions below.
– iPadOS is enabling pointer movement as an AssistiveTouch feature. This means that the behavior of the pointer will be like moving a finger on the screen, not like using a cursor on a computer.
– Scrolling direction is fixed to “natural scrolling” and cannot be changed. Scrolling doesn’t work in all applications.
Set up and use a Logitech mouse on iPad OS
Make sure you have iPadOS installed on your iPad iPadOS can be installed on the following devices:
– All iPad Pros
– iPad (5th and 6th generation)
– iPad mini (5th generation)
– iPad mini 4
– iPad Air (3rd generation)
– iPad Air 2
Bluetooth Pairing
1. Turn on your mouse and do a long-press on the Bluetooth Easy-Switch button.
2. The Bluetooth LED will start blinking quickly, indicating your mouse is in discoverable mode.
3. Complete the pairing in the Bluetooth settings on your iPad.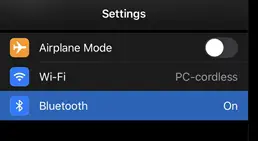
Enable the pointer
The pointer is enabled through the AssistiveTouch feature in iPadOS settings. To enable the pointer:
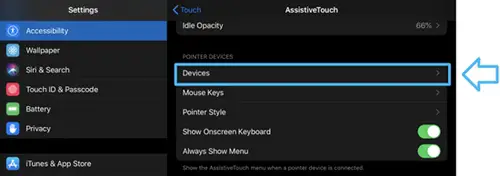
1. Go to Settings > Accessibility > Touch.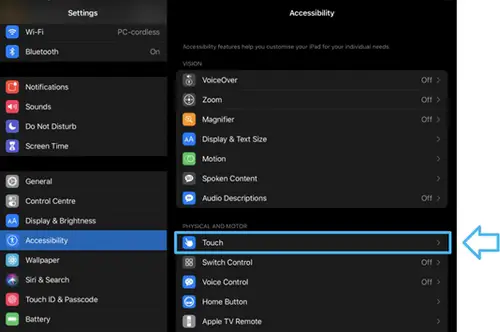
Enable AssistiveTouch.

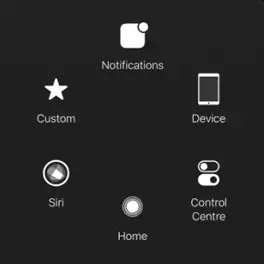
You should see the following appear on your screen:
Pointer circle

The pointer appears when the mouse is connected. You can move this pointer with your mouse. When you click, it will act as a finger doing a tap on the screen
AssistiveTouch button

This is a shortcut to the AssistiveTouch top-level menu and allows you to go to the home screen.
Get the most out of your mouse on iPadOS
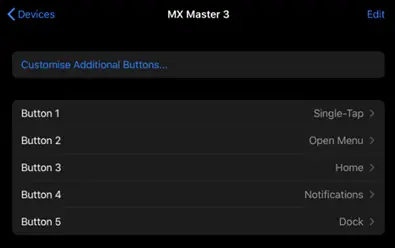
Mouse button mapping
By default, the mouse buttons are assigned to the following actions:
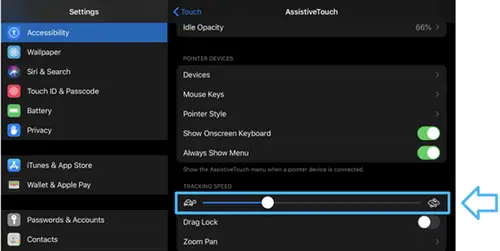
Pointer Settings
You can change the tracking speed of the pointer:
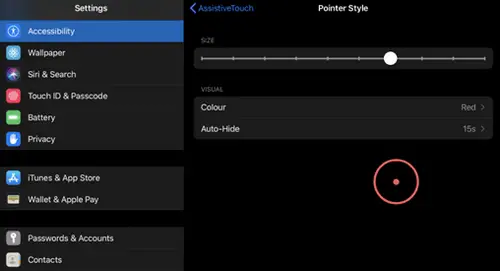
You can also customize the size and color of the pointer:
Customize the mouse buttons
You can customize the actions that will be associated with the different mouse buttons:
1. Go to Settings > Accessibility > Touch > Devices.
2. Select the connected device you want to customize.

4. You can also customize additional buttons to use the “Back” and “Forward” buttons of your Logitech Mouse to do things like showing Notifications or using the Dock.
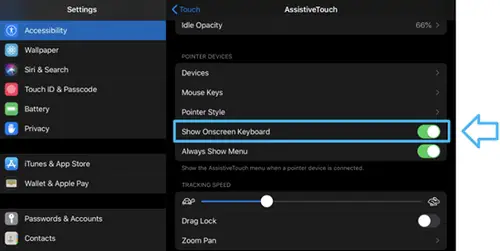
Using the on-screen keyboard
Most of our mice have advanced buttons that are recognized by the system as keyboard shortcuts. Due to this, when a mouse is connected, the system believes that an external keyboard is also connected and the on-screen keyboard will disappear.
If you don’t use an external keyboard and want to keep using the on-screen keyboard, make sure that Show Onscreen Keyboard is enabled.
Backup device settings to the cloud in Logitech Options+
INTRODUCTION
This feature on Logi Options+ allows you to backup the customization of your Options+ supported device automatically to the cloud after creating an account. If you are planning to use your device on a new computer or wish to go back to your old settings on the same computer, log into your Options+ account on that computer and fetch the settings you want from a backup to set up your device and get going.
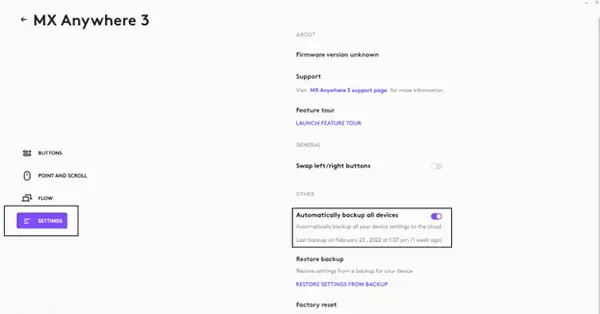
HOW IT WORKS
When you are logged into Logi Options+ with a verified account, your device settings are automatically backed up to the cloud by default. You can manage the settings and the backups from the Backups tab under More settings of your device (as shown):
Manage settings and backups by clicking on More > Backups:
AUTOMATIC BACKUP OF SETTINGS — if the Automatically create backups of settings for all devices checkbox is enabled, any settings you have or modify for all of your devices on that computer are backed up to the cloud automatically. The checkbox is enabled by default. You can disable it if you don’t want the settings of your devices to be backed up automatically.
CREATE A BACKUP NOW — this button allows you to backup your current device settings now, if you need to fetch them later.
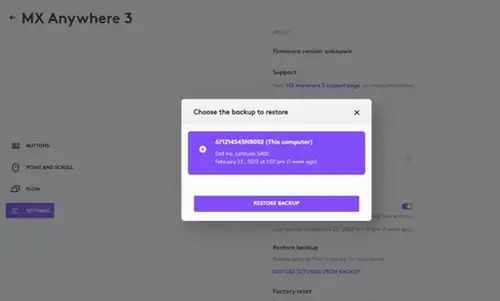
RESTORE SETTINGS FROM BACKUP — this button lets you view and restore all the available backups you have for that device that are compatible with that computer, as shown above.
The settings for a device are backed up for every computer that you have your device connected to and have Logi Options+ that you are logged into. Every time you make some modifications to your device settings, they get backed up with that computer name. The backups can be differentiated based on the following:
– Name of the computer. (Ex. John’s Work Laptop)
– Make and/or model of the computer. (Ex. Dell Inc., Macbook Pro (13-inch) and so on)
– The time when the backup was made
– The desired settings can then be selected and restored accordingly.
WHAT SETTINGS GET BACKED UP
– Configuration of all the buttons of your mouse
– Configuration of all the keys of your keyboard
– Point & Scroll settings of your mouse
– Any application-specific settings of your device
WHAT SETTINGS ARE NOT BACKED UP
– Flow settings
– Options+ app settings
Logitech Options permission prompts on macOS Monterey, macOS Big Sur, macOS Catalina, and macOS Mojave
– Logitech Options permission prompts on macOS Monterey and macOS Big Sur
– Logitech Options permission prompts on macOS Catalina
– Logitech Options permission prompts on macOS Mojave
– Download the latest version of Logitech Options software.
Logitech Options permission prompts on macOS Monterey and macOS Big Sur
For official macOS Monterey and macOS Big Sur support, please upgrade to the latest version of Logitech Options (9.40 or later).
Starting with macOS Catalina (10.15), Apple has a new policy that requires user permission for our Options software for the following features:
– Bluetooth Privacy prompt needs to be accepted to connect Bluetooth devices through Options.
– Accessibility access is needed for scrolling, gesture button, back/forward, zoom, and several other features.
– Input monitoring access is needed for all the features enabled by the software such as scrolling, gesture button, and back/forward among others for devices connected via Bluetooth.
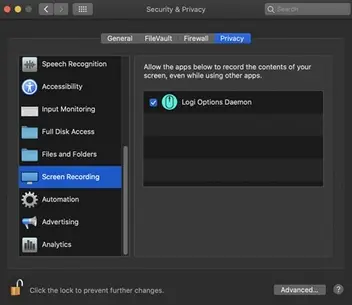
– Screen recording access is needed to capture screenshots using a keyboard or a mouse.
– System Events access is needed for the Notifications feature and Keystroke assignments under different applications.
– Finder access is needed for the Search feature.
– System Preferences access if needed for launching Logitech Control Center (LCC) from Options.
Bluetooth Privacy prompt
When an Options supported device is connected with Bluetooth/Bluetooth Low Energy, launching the software for the first time will show the below pop-up for Logi Options and Logi Options Daemon:
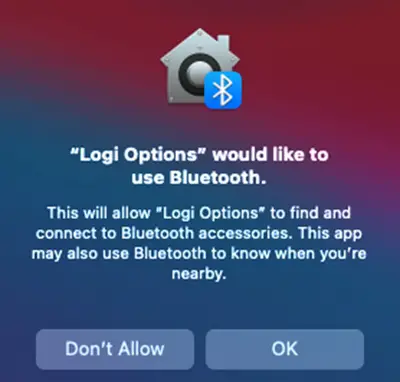
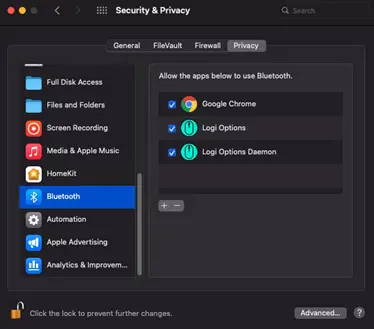
Once you click OK, you will be prompted to enable the checkbox for Logi Options in Security & Privacy > Bluetooth.
When you enable the checkbox, you will see a prompt to Quit & Reopen. Click on Quit & Reopen for the changes to take effect.

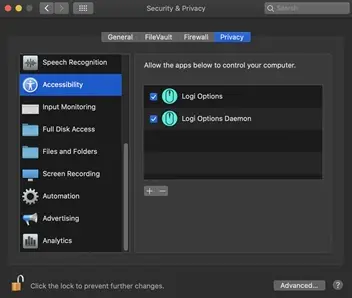
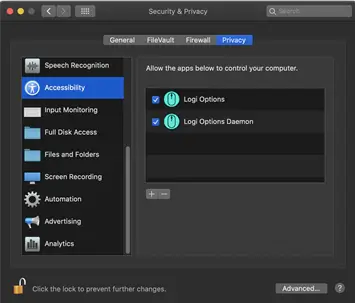
Once the Bluetooth Privacy settings are enabled for both Logi Options and Logi Options Daemon, the Security & Privacy tab will appear as shown:
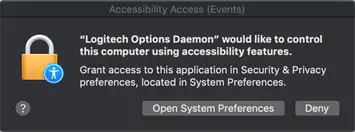
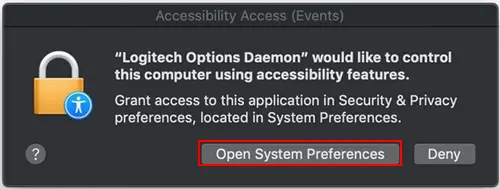
Accessibility Access
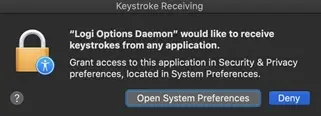
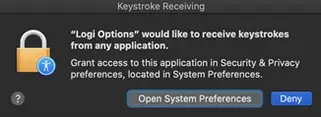
Accessibility access is needed for most of our basic features such as scrolling, gesture button functionality, volume, zoom, and so on. The first time you use any feature that requires accessibility permission, you’ll be presented with the following prompt:
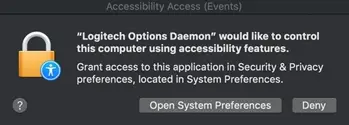
To provide access:
1. Click Open System Preferences.
2. In System Preferences, click the lock at the bottom left corner to unlock.
3. In the right panel, check the boxes for Logitech Options and Logitech Options Daemon.
If you already clicked Deny, follow these steps to manually allow access:
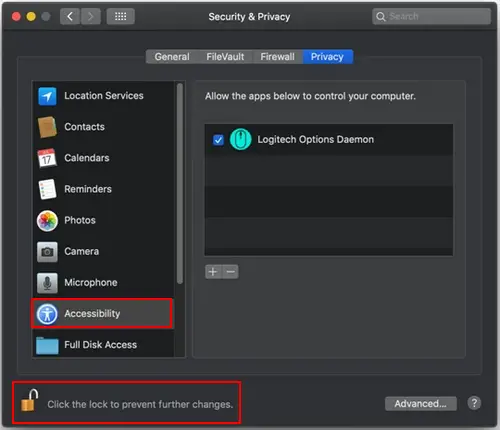
1. Launch System Preferences.
2. Click Security & Privacy, then click the Privacy tab.
3. In the left panel, click Accessibility and then follow steps 2-3 above.
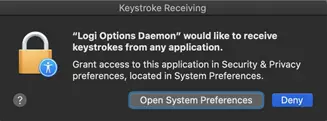
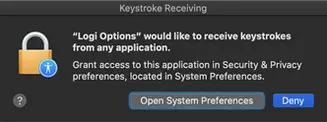
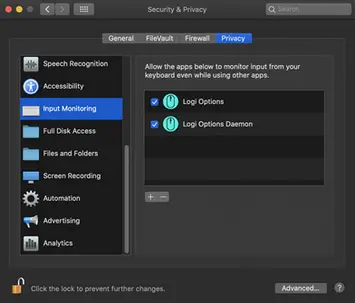
Input Monitoring Access
Input monitoring access is needed when devices are connected using Bluetooth for all features enabled by the software such as scrolling, gesture button, and back/forward to work. The following prompts will be displayed when access is needed:
1. Click Open System Preferences.
2. In System Preferences, click the lock at the bottom left corner to unlock.
3. In the right panel, check the boxes for Logitech Options and Logitech Options Daemon.

4. After you check the boxes, select Quit Now to restart the application and allow the changes to take effect.


If you already clicked Deny, please do the following to allow access manually:
1. Launch System Preferences.
2. Click Security & Privacy, and then click the Privacy tab.
3. In the left panel, click Input Monitoring and then follow steps 2-4 from above.
Screen Recording Access
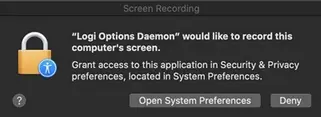
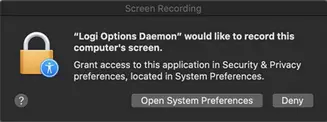
Screen recording access is needed to capture screenshots using any supported device. You’ll be presented with the prompt below when you first use the screen capture feature:
1. Click Open System Preferences.
2. In System Preferences, click the lock at the bottom left corner to unlock.
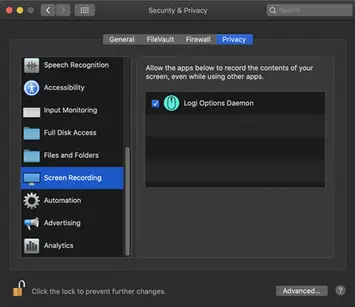
3. In the right panel, check the box for Logitech Options Daemon.
4. Once you check the box, select Quit Now to restart the application and allow the changes to take effect.

If you already clicked Deny, use the following steps to allow access manually:
1. Launch System Preferences.
2. Click Security & Privacy, then click the Privacy tab.
3. In the left panel, click on Screen Recording and follow steps 2-4 from above.
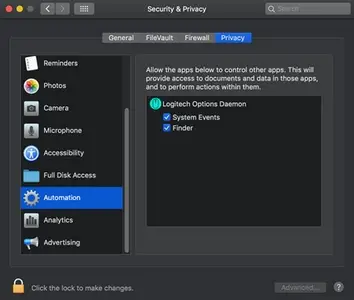
System Events prompts
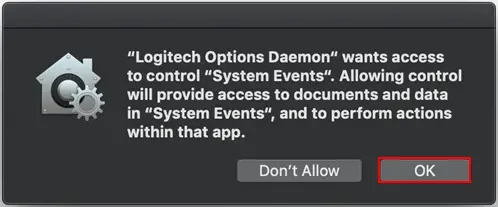
If a feature requires access to a specific item like System Events or Finder, you will see a prompt the first time you use this feature. Please note that this prompt appears only once to request access for a specific item. If you deny access, all the other features that need access to the same item will not work and another prompt will not be shown.
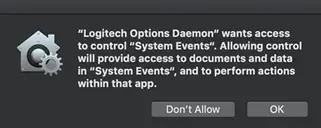
Please click OK to allow access for Logitech Options Daemon so that you can continue to use these features.
If you already clicked on Don’t Allow, use the following steps to allow access manually:
1. Launch System Preferences.
2. Click Security & Privacy.
3. Click the Privacy tab.
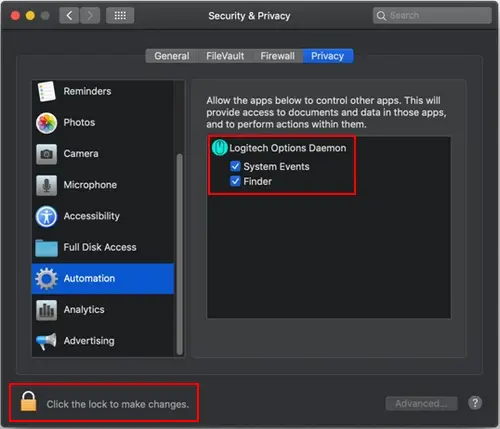
4. In the left panel, click Automation and then check the boxes under Logitech Options Daemon to provide access. If you are unable to interact with the checkboxes, please click the lock icon on the bottom left corner and then check the boxes.
NOTE: If a feature still doesn’t work after you grant access, please reboot the system.
Logitech Options permission prompts on macOS Catalina
For official macOS Catalina support, please upgrade to the latest version of Logitech Options (8.02 or later).
Starting with macOS Catalina (10.15), Apple has a new policy that requires user permission for our Options software for the following features:
– Accessibility access is needed for scrolling, gesture button, back/forward, zoom and several other features
– Input monitoring (new) access is needed for all the features enabled by the software such as scrolling, gesture button and back/forward among others for devices connected via Bluetooth
– Screen recording (new) access is needed to capture screenshots using a keyboard or a mouse
– System Events access is needed for Notifications feature and Keystroke assignments under different applications
– Finder access is needed for the Search feature
– System Preferences access if needed for launching Logitech Control Center (LCC) from Options
Accessibility Access
Accessibility access is needed for most of our basic features like scrolling, gesture button functionality, volume, zoom, and so on. The first time you use any feature that requires accessibility permission, you’ll be presented with the following prompt:
To provide access:
1. Click Open System Preferences.
2. In System Preferences, click the lock at the bottom left corner to unlock.
3. In the right panel, check the boxes for Logitech Options and Logitech Options Daemon.
If you already clicked ‘Deny’, do the following to allow access manually:
1. Launch System Preferences.
2. Click Security & Privacy, then click the Privacy tab.
3. In the left panel, click Accessibility and then follow steps 2-3 above.
Input Monitoring Access
Input monitoring access is needed when devices are connected using Bluetooth for all features enabled by the software such as scrolling, gesture button and back/forward to work. The following prompts will be displayed when access is needed:
1. Click Open System Preferences.
2. In System Preferences, click the lock at the bottom left corner to unlock.
3. In the right panel, check the boxes for Logitech Options and Logitech Options Daemon.
4. After you check the boxes, select Quit Now to restart the application and allow the changes to take effect.


If you already clicked ‘Deny’, please do the following to allow access manually:
1. Launch System Preferences.
2. Click Security & Privacy, and then click the Privacy tab.
3. In the left panel, click Input Monitoring and then follow steps 2-4 from above.
Screen Recording Access
Screen recording access is needed to capture screenshots using any supported device. You’ll be presented with the prompt below when you first use the screen capture feature.
1. Click Open System Preferences.
2. In System Preferences, click the lock at the bottom left corner to unlock.
3. In the right panel, check the box for Logitech Options Daemon.
4. Once you check the box, select Quit Now to restart the application and allow the changes to take effect.

If you already clicked ‘Deny’, use the following steps to allow access manually:
1. Launch System Preferences.
2. Click Security & Privacy, then click the Privacy tab.
3. In the left panel, click on Screen Recording and follow steps 2-4 from above.
System Events prompts
If a feature requires access to a specific item like System Events or Finder, you will see a prompt the first time you use this feature. Please note that this prompt appears only once to request access for a specific item. If you deny access, all the other features that need access to the same item will not work and another prompt will not be shown.
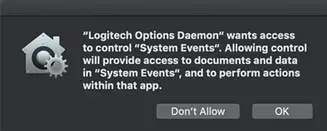
Please click on OK to allow access for Logitech Options Daemon so that you can continue to use these features.
If you already clicked on Don’t Allow, use the following steps to allow access manually:
1. Launch System Preferences.
2. Click Security & Privacy.
3. Click the Privacy tab.
4. In the left panel, click Automation and then check the boxes under Logitech Options Daemon to provide access. If you are unable to interact with the checkboxes, please click the lock icon on the bottom left corner and then check the boxes.

NOTE: If a feature still doesn’t work after you grant access, please reboot the system.
– Click here for information on macOS Catalina and macOS Mojave permissions on Logitech Control Center.
– Click here for information on macOS Catalina and macOS Mojave permissions on Logitech Presentation software
Logitech Options permission prompts on macOS Mojave
For official macOS Mojave support, please upgrade to the latest version of Logitech Options (6.94 or later).
Starting with macOS Mojave (10.14), Apple has a new policy that requires user permission for our Options software for the following features:
– Accessibility access is needed for scrolling, gesture button, back/forward, zoom and several other features
– Notifications feature and keystroke assignments under different applications need access to System Events
– Search feature needs access to Finder
– Launching Logitech Control Center (LCC) from Options requires access to System Preferences
– The following are the user permissions the software needs for you to get complete functionality for your Options-supported mouse and/or keyboard.
Accessibility Access
Accessibility access is needed for most of our basic features like scrolling, gesture button functionality, volume, zoom, and so on. The first time you use any feature that requires accessibility permission, you’ll see a prompt as shown below.
Click Open System Preferences and then turn on the checkbox for Logitech Options Daemon.
In case you clicked Deny, use the following steps to allow access manually:
1. Launch System Preferences.
2. Click on Security & Privacy.
3. Click the Privacy tab.
4. In the left panel, click on Accessibility and check the boxes under Logitech Options Daemon to provide access (as shown below). If you are unable to interact with the checkboxes, please click the lock icon on the bottom left corner and then check the boxes.
System Events prompts
If a feature requires access to any specific item such as System Events or Finder, you will see a prompt (similar to the screenshot below) the first time you use this feature. Please note that this prompt appears only once, requesting access for a specific item. If you deny access, all the other features that need access to the same item will not work and another prompt will not be shown.
Click OK to allow access for Logitech Options Daemon so that you can continue to use these features.
In case you clicked Don’t Allow, use the following steps to allow access manually:
1. Launch System Preferences.
2. Click Security & Privacy.
3. Click the Privacy tab.
4. In the left panel, click Automation and then check the boxes under Logitech Options Daemon to provide access (as shown below). If you are unable to interact with the checkboxes, please click the lock icon on the bottom left corner and then check the boxes.
NOTE: If a feature still doesn’t work after you grant access, please reboot the system.
Resolve Bluetooth Wireless issues on macOS
These troubleshooting steps go from easy to more advanced.
Please follow the steps in order and check if the device works after each step.
Make sure you have the latest version of macOS
Apple is regularly improving the way macOS handles Bluetooth devices.
Click here for instructions on how to update macOS.
Make sure you have the right Bluetooth parameters
1. Navigate to the Bluetooth preference pane in System Preferences:Go to Apple Menu > System Preferences > Bluetooth 
2. Make sure that Bluetooth is turned On. 
3. In the bottom-right corner of the Bluetooth Preference window, click Advanced. 
4. Make sure all three options are checked: Open Bluetooth Setup Assistant at startup if no keyboard is detected
– Open Bluetooth Setup Assistant at startup if no mouse or trackpad is detected
– Allow Bluetooth devices to wake this computer 
NOTE: These options ensure that Bluetooth-enabled devices can wake your Mac and that the OS Bluetooth Setup Assistant will launch if a Bluetooth keyboard, mouse or trackpad is not detected as connected to your Mac.
5. Click OK.
Restart the Mac Bluetooth Connection on your Mac
1. Navigate to the Bluetooth preference pane in System Preferences:
2. Go to Apple Menu > System Preferences > Bluetooth
3. Click Turn Bluetooth Off. 
4. Wait a few seconds, and then click Turn Bluetooth On. 
5. Check to see if the Logitech Bluetooth device is working. If not, go to the next steps.
Remove your Logitech device from the list of devices and try to pair again
1. Navigate to the Bluetooth preference pane in System Preferences:
– Go to Apple Menu > System Preferences > Bluetooth
2. Locate your device in the Devices list, and click on the “x” to remove it. 

3. Re-pair your device by following the procedure described here.
Disable the hand-off feature
In some cases, disabling the iCloud hand-off functionality can help.
1. Navigate to the General preference pane in System Preferences:
– Go to Apple Menu > System Preferences > General 
2. Make sure Handoff is unchecked. 
Reset the Mac’s Bluetooth settings
WARNING: This will reset your Mac, and cause it to forget all of the Bluetooth devices you have ever used. You will need to re-configure each device.
1. Make sure Bluetooth is enabled and that you can see the Bluetooth icon in the Mac Menu Bar at the top of the screen. (You’ll need to check the box Show Bluetooth in menu bar in the Bluetooth preferences).
2. Hold down the Shift and Option keys, and then click the Bluetooth icon in the Mac Menu Bar.

3. The Bluetooth menu will appear, and you will see additional hidden items in the drop-down menu. Select Debug and then Remove all devices. This clears the Bluetooth device table and you’ll then need to reset the Bluetooth system. 
4. Hold down the Shift and Option keys again, click on the Bluetooth menu and select Debug > Reset the Bluetooth Module. 
5. You will now need to repair all your Bluetooth devices following standard Bluetooth pairing procedures.
To re-pair your Logitech Bluetooth device:
NOTE: Make sure all your Bluetooth devices are on and have enough battery life before you re-pair them.
When the new Bluetooth Preference file is created, you’ll need to re-pair all your Bluetooth devices with your Mac. Here’s how:
1. If the Bluetooth Assistant starts up, follow the onscreen instructions and you should be ready to go. If the Assistant doesn’t appear, go to Step 3.
2. Click Apple > System Preferences, and select the Bluetooth Preference pane.
3. Your Bluetooth devices should be listed with a Pair button next to each unpaired device. Click Pair to associate each Bluetooth device with your Mac.
4. Check to see if the Logitech Bluetooth device is working. If not, go to the next steps.
Delete your Mac’s Bluetooth Preference List
The Mac’s Bluetooth Preference List may be corrupted. This preference list stores all the Bluetooth devices pairings and their current states. If the list is corrupted, you’ll need to remove your Mac’s Bluetooth Preference List and re-pair your device.
NOTE: This will delete all pairing for your Bluetooth devices from your computer, not just Logitech devices.
1. Click Apple > System Preferences, and select the Bluetooth Preference pane.
2. Click Turn Bluetooth Off. 
3. Open a Finder window and navigate to the /YourStartupDrive/Library/Preferences folder. Press Command-Shift-G on your keyboard and enter /Library/Preferences in the box.
4. Typically this will be in /Macintosh HD/Library/Preferences. If you changed the name of your startup drive, then the first part of the pathname above will be that [Name]; for example, [Name]/Library/Preferences.
With the Preferences folder open in the Finder, look for the file called com.apple.Bluetooth.plist. This is your Bluetooth Preference List. This file could be corrupted and cause problems with your Logitech Bluetooth device.
5. Select the com.apple.Bluetooth.plist file and drag it to the desktop.
NOTE: This will create a backup file on your desktop if you ever want to go back to the original setup. At any point, you can drag this file back to the Preferences folder.
6. In the Finder window that is open to the /YourStartupDrive/Library/Preferences folder, right-click the com.apple.Bluetooth.plist file and select Move to Trash from the pop-up menu. 
7. If you are asked for an administrator password to move the file to the trash, enter the password and click OK.
8. Close any open applications, then restart your Mac.
9. Re-pair your Logitech Bluetooth device.
Bluetooth troubleshooting for Logitech Bluetooth Mice, Keyboards and Presentation remotes
Bluetooth troubleshooting for Logitech Bluetooth Mice, Keyboards and Presentation remotes
Try these steps to fix issues with your Logitech Bluetooth device:
– My Logitech device doesn’t connect with my computer, tablet or phone
– My Logitech device has already been connected, but frequently gets disconnected or laggy
Logitech Bluetooth device doesn’t connect with computer, tablet or phone
Bluetooth allows you to connect your device wirelessly to your computer without using a USB receiver. Follow these steps to connect via Bluetooth.
Check if your computer is compatible with the latest Bluetooth technology
The latest generation of Bluetooth is called Bluetooth Low Energy and is not compatible with computers that have an older version of Bluetooth (called Bluetooth 3.0 or Bluetooth Classic).
NOTE: Computers with Windows 7 cannot connect with devices that use Bluetooth Low Energy.
1. Make sure that your computer has a recent operating system:
– Windows 8 or later
– macOS 10.10 or later
2. Check if your computer hardware supports Bluetooth Low Energy. If you don’t know, click here for more information.
Set your Logitech device in ‘pairing mode’
In order for the computer to see your Logitech device, you need to put your Logitech device in discoverable mode or pairing mode.
Most Logitech products are equipped with a Bluetooth button or Bluetooth key and have a Bluetooth status LED.
– Make sure your device is turned ON
– Hold down the Bluetooth button for three seconds, until the LED starts blinking rapidly. This indicates that the device is ready for pairing.
See the Support page for your product to find more information on how to pair your specific Logitech device.
Complete the pairing on your computer
You will need to complete the Bluetooth pairing on your computer, tablet or phone.
See Connect your Logitech Bluetooth device for more information on how to do this depending on your operating system (OS).
My Logitech Bluetooth device frequently gets disconnected or laggy
Follow these steps if you experience disconnections or lag with your Logitech Bluetooth device.
Troubleshooting checklist
1. Make sure that Bluetooth is ON or enabled on your computer.
2. Make sure your Logitech product is ON.
3. Make sure that your Logitech device and computer are within close proximity of each other.
4. Try moving away from metal and other sources of wireless signal. Try moving away from:
– Any device that could emit wireless waves: Microwave, cordless phone, baby monitor, wireless speaker, garage door opener, WiFi router
– Computer power supplies
– Strong WiFi signals (learn more)
– Metal or metal wiring in the wall
5. Check the battery of your Logitech Bluetooth product. Low battery power can adversely affect connectivity and overall functionality.
6. If your device has removable batteries, try removing and re-inserting the batteries in your device.
7. Make sure your operating system (OS) is up to date.
Advanced troubleshooting
If the problem still persists, you will need to follow specific steps based on your device OS:
Click on the link below to resolve Bluetooth wireless issues on:
– Windows
– Mac OS X
Send a feedback report to Logitech
Help us improve our products by submitting a bug report using our Logitech Options Software:
1. Open Logitech Options.
2. Click More.
3. Select the problem you see and then click Send feedback report.
System Extension Blocked message when installing Logitech Options or LCC
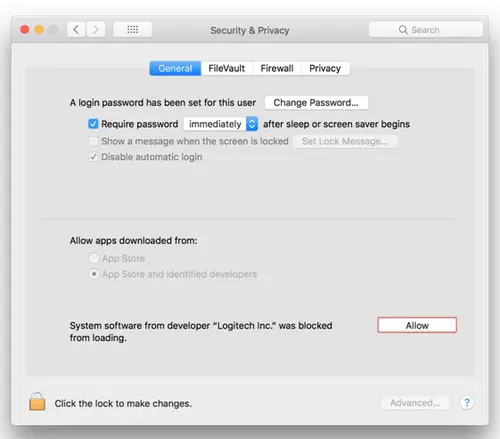
Starting with macOS High Sierra (10.13), Apple has a new policy that requires user approval for all KEXT (driver) loading. You may see a “System Extension Blocked” prompt (shown below) during the installation of Logitech Options or Logitech Control Center (LCC). 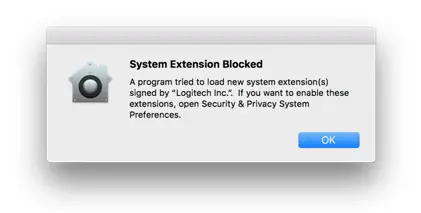
If you see this message, you’ll need to approve the loading of the KEXT manually so that your device drivers can be loaded and you can continue to use its functionality with our software. To allow KEXT loading, please open System Preferences and navigate to the Security & Privacy section. On the General tab, you should see a message and an Allow button, as shown below. In order to load the drivers, click Allow. You may need to reboot your system so the drivers are properly loaded and the functionality of your mouse is restored.
NOTE: As set by the system, the Allow button is only available for 30 minutes. If it has been longer than that since you installed LCC or Logitech Options, please restart your system to see the Allow button under the Security & Privacy section of System Preferences.
NOTE: If you don’t allow KEXT loading, all devices supported by LCC will not be detected by software. For Logitech Options, you need to perform this operation if you’re using following devices:
– T651 Rechargeable trackpad
– Solar Keyboard K760
– K811 Bluetooth keyboard
– T630/T631 Touch mouse
– Bluetooth Mouse M557/M558
Logitech Options issues when Secure Input is enabled
Ideally, Secure Input should only be enabled while the cursor is active in a sensitive information field, such as when you enter a password, and should be disabled right after you leave the password field. However, some applications may leave the Secure Input state enabled. In that case, you may experience the following issues with devices supported by Logitech Options:
– When the device is paired in Bluetooth mode, it’s either not detected by Logitech Options or none of the software-assigned features work (basic device functionality will continue to work, however).
– When the device is paired in Unifying mode, it’s not possible to perform keystroke assignments.
If you encounter these issues, check to see if Secure Input is enabled on your system. Do following:
1. Launch Terminal from /Applications/Utilities folder.
2. Type the following command in Terminal and press Enter:ioreg -l -d 1 -w 0 | grep SecureInput
– If the command returns back no information, then Secure Input is not enabled on the system.
– If the command returns back some information, then look for “kCGSSessionSecureInputPID”=xxxx. The number xxxx points to the Process ID (PID) of the application that has Secure Input enabled:
1. Launch Activity Monitor from /Applications/Utilities folder.
2. Search for PID which has secure input enabled.
Once you know which application has Secure Input enabled, close that application to resolve the issues with Logitech Options.
M720 wireless mouse loses connection after computer has gone to sleep
If you have paired your M720 Triathlon mouse with a Mac running OS X 10.10.2 or later using Bluetooth Smart, there is a chance your mouse will lose its connection to the computer after it has gone into sleep mode for about two hours.
To address this problem, turn off the Bluetooth connection and then restart it, using the Bluetooth icon in the Menu bar.


Logitech is aware of this potential connectivity issue and is working on an update
Customize M720 wireless mouse gestures with Logitech Options
You can use Logitech Options to customize the action that is triggered when you perform one of the four gestures available on the M720 Triathlon mouse.
To associate an action with a gesture:
1. Start Logitech Options:
Start > All Programs > Logitech > Logitech Options
2. Select the Mouse tab in the top left corner left of the Logitech Options window.
3. Select one of the buttons on the mouse by clicking on the blue circle next to the button. The options list for the button appears.
4. Select Gesture button.
NOTE: By default, the Windows management set of gestures is selected.
If you’d like to associate a different set of gestures with the button, select another option from the list:
– Media Controls
– Pan
– Zoom/Rotate
– Navigate windows
– Arrange windows
You can also assign individual actions to each of the four gestures. Here’s how:
1. In the Gesture button list, select Custom.
2. In the lower right pane, click on Customize.
3. Click on one of the four gesture arrows and then select an option from the list to assign to it. As soon as you make your selection, it is saved. Click on the “X” in the corner to close the window.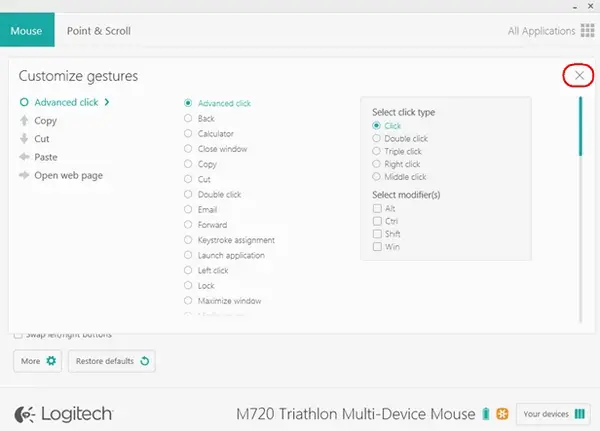
You can also associate an application or a keystroke to a gesture button.
To launch an application:
1. Select Launch Application from the list.
2. In the File name pane, enter the full path to the application, or locate it using the Browse button. 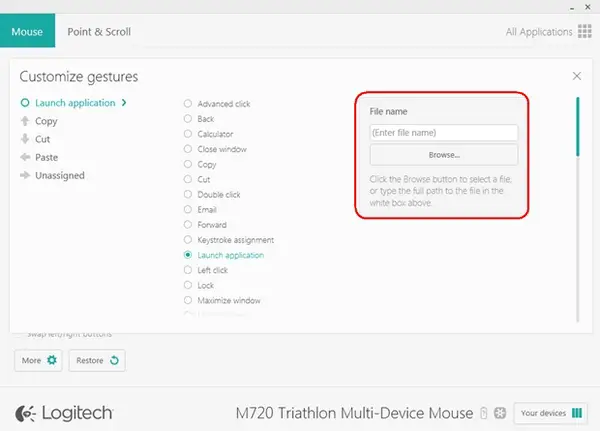
To assign a custom keystroke:
1. Select Keystroke assignment.
2. In the Enter keystroke pane, click in the white box and then enter a keystroke combination.

Swap left and right M720 wireless mouse buttons with Logitech Options
To swap the left click and right click buttons:
1. Open Logitech Options:
– Windows: Start > All Programs > Logitech > Logitech Options
– Mac: Macintosh HD / Applications / Logitech Options
2. On the Mouse tab, in the lower left of the window, check Swap left/right buttons.
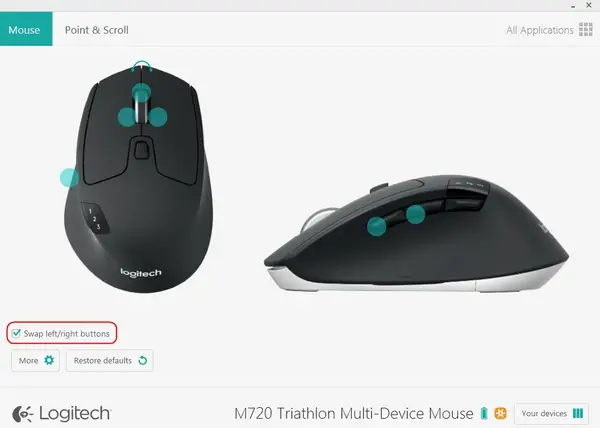
You’ll notice a new icon becomes visible to show you the buttons are swapped.
Customize M720 wireless mouse buttons with Logitech Options
You can use Logitech Options software for Mac or Windows to customize the actions that are performed when you use the buttons on your mouse. You can download Logitech Options from the M720 Triathlon Multi-Device Downloads page.
To customize the actions performed by each button click:
1. Start Logitech Options:
– Windows: Start > All Programs > Logitech > Logitech Options
– Mac: Macintosh HD / Applications / Logitech Options
2. Make sure you’ve selected the Mouse tab in the upper left corner of the window.
3. Click on the circle next to the button that you want to configure. A list of options appears.
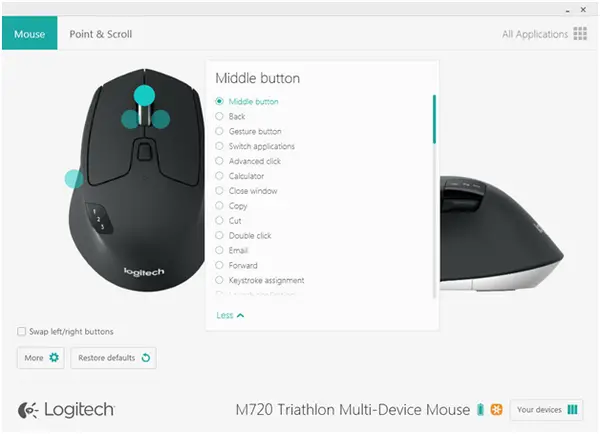
4. Select the action you want the button to perform. Your selection is automatically saved.
You can also assign one of two different actions to a button:
– Launch an application
– Perform a keystroke combination
To launch an application
1. Select Launch Application from the list.
2. Click on Browse to locate the executable application on your computer or enter the computer path and filename for the application in the box. 
To assign a custom keystroke
1. Select Keystroke assignment from the list.
2. Click inside the box on the right and type the key combination. It will be automatically saved.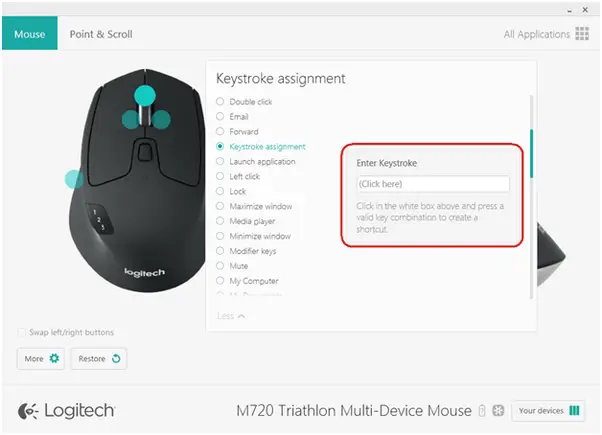
M720 wireless mouse Bluetooth connection does not work on Windows 7 computer
The M720 Triathlon wireless mouse uses Bluetooth Smart technology and is not compatible with Windows 7 computers that do not support Bluetooth Smart.
Your mouse is compatible with Windows 8 computers that support Bluetooth Smart.
If you are not sure if your computer supports Bluetooth Smart technology, please contact the computer manufacturer. You can always use your M720 Triathlon with the Logitech Unifying receiver that comes with the mouse.
M720 wireless mouse battery status LED
Your mouse has an LED on the top that indicates battery status. When you turn the mouse on, the LED lights up for about 10 seconds. It then turns off to save energy.
LED Status : Battery Status
White – solid : Battery level is good
Red – solid: Battery level is low* — replace the battery
*In normal usage conditions, when the LED turns red, it should last another month.
M720 wireless mouse battery life and replacement
Battery information
– Requires 1 AA alkaline battery
– Expected battery life is up to 24 months
Installing a new battery
Slide the battery compartment cover down and then lift it off. Insert the battery, making sure that it faces the correct direction and then replace the battery cover.

Unifying devices not detected after macOS 10.12.1 Sierra update
We are aware that after updating from macOS 10.12 Sierra to macOS Sierra 10.12.1, Logitech Options software does not detect supported Unifying devices on some systems.
To fix this issue, unplug the Unifying receiver and then plug it back into the USB port. If Logitech Options still doesn’t detect the device, you may also need to reboot your system.