Sections in this Manual
- CARBON MONOXIDE HAZARD
- GENERAL WARNINGS AND SAFETY INFO
- LET’S GET STARTED
- HOW TO CLEAN AND STORE SMOKER
- HARDWARE LIST
- ASSEMBLY
- HOW TO USE CONTROL PANEL
- WOOD SMOKING GUIDE FOR MEATS
- Cooking Times
- HOW TO USE WOOD CHIP LOADER
- HOW TO USE THE WATER BOWL
- IMPORTANT FACTS ABOUT USING SMOKER
- TROUBLESHOOTING GUIDE
- LIMITED WARRANTY INFORMATION
Manufactured by Masterbuilt
Cooking Times
PRE-SEASON SMOKER PRIOR TO FIRST USE.
Some smoke may appear during this time, this is normal.
- Make sure water pan is in place with NO WATER.
- Set temperature to 275°F (135°C) and run unit for 3 hours.
- To complete pre-seasoning, during last 45 minutes, add ½ cup of wood chips in wood chip loader and unload wood chips into the wood chip tray. This amount is equal to the contents of a filled wood chip loader.
- Shut down and allow to cool.
NOTE: Never add more than ½ cup (1 filled chip loader) at a time. Additional chips should not be added until any previously added chips have ceased generating smoke.
HOW TO USE WOOD CHIP LOADER
How to use wood chip loader:
- Before starting unit, place ½ cup of wood chips in chip loader.
- Never use more than ½ cup of wood chips at a time. Never use wood chunks or wood pellets.
- Insert wood chip loader into smoker. Wood chips should be level with top rim of wood chip loader.
- Turn handle clockwise in direction of arrow mark on smoker to unload wood. Wood will drop into wood chip tray. Turn handle counterclockwise, to upright position, and leave wood chip loader in place.
- Check wood chip tray periodically to see if wood has burned down by removing wood chip loader and looking into smoker through hole. Add more chips as needed.
- Wood chip loader must be pulled out completely from smoker when checking wood chip level.
Adding more wood during smoking process:
- Pull wood chip loader from smoker.
- Place wood chips in wood chip loader and insert into smoker.
- Turn handle clockwise in direction of arrow mark on smoker to unload wood. Wood will drop into wood chip tray.
- Temperature may spike briefly after wood is added. It will stabilize after a short time. Do not adjust temperature setting.
- Keep smoker door closed when adding wood chips.
- Wood chip loader will be HOT even if handle is not.
- Never use wood pellets or wood chunks.
CAUTION
When the door has opened a flare-up may occur. Should wood chips flare up, immediately close door and vent, wait for wood chips to burn down, then open door again. Do not spray with water.
HOW TO USE THE WATER BOWL
How to use water bowl:
- Wait until smoker comes up to desired temperature.
- Fill water bowl to fill line with water or liquids like apple or pineapple juice instead of water.
- You can also add slices of fruit, onions or fresh dried herbs into the water to blend different subtle flavors into your smoked food.
Tip: For chicken or other foods high in moisture, little or no liquid is needed.
IMPORTANT FACTS ABOUT USING SMOKER
- Maximum temperature setting is 275°F (135°C).
- Do NOT move unit across uneven surfaces.
- Wood chip loader and wood chip tray MUST be in place when using smoker. This minimizes the chance of wood flare ups.
- Wood chips must be used in order to produce smoke and create the smoke flavor.
- Check grease tray often during cooking. Empty grease tray before it gets full. Grease tray may need to be emptied periodically during cooking.
- Do not open smoker door unless necessary. Opening smoker door causes heat to escape and may cause wood to flare up. Closing the door will re-stabilize the temperature and stop flare up.
- Do not leave old wood ashes in the wood chip tray. Once ashes are cold, empty tray. Tray should be cleaned out prior to, and after each use to prevent ash buildup.
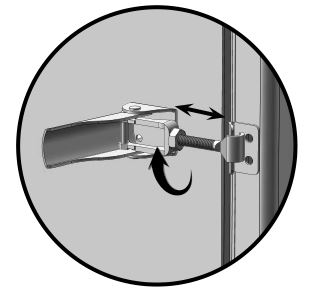
- This is a smoker. There will be a lot of smoke produced when using wood chips. Smoke will escape through seams and turn the inside of smoker black. This is normal. To minimize smoke loss around door, door latch can be adjusted to further tighten door seal against body.
- Opening smoker door during cooking process may extend cooking time due to heat loss.
- When outside temperature is cooler than 65°F (18°C) and/or altitude is above 3,500 feet (1067m), additional cooking time may be required. To insure that meat is completely cooked use a meat thermometer to test internal temperature.
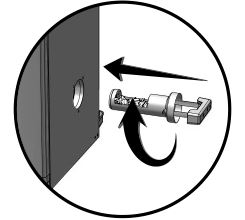
- To adjust door latch, loosen hex nut on door latch. Turn hook clockwise to tighten as shown. Secure hex nut firmly against door latch. (see diagram)
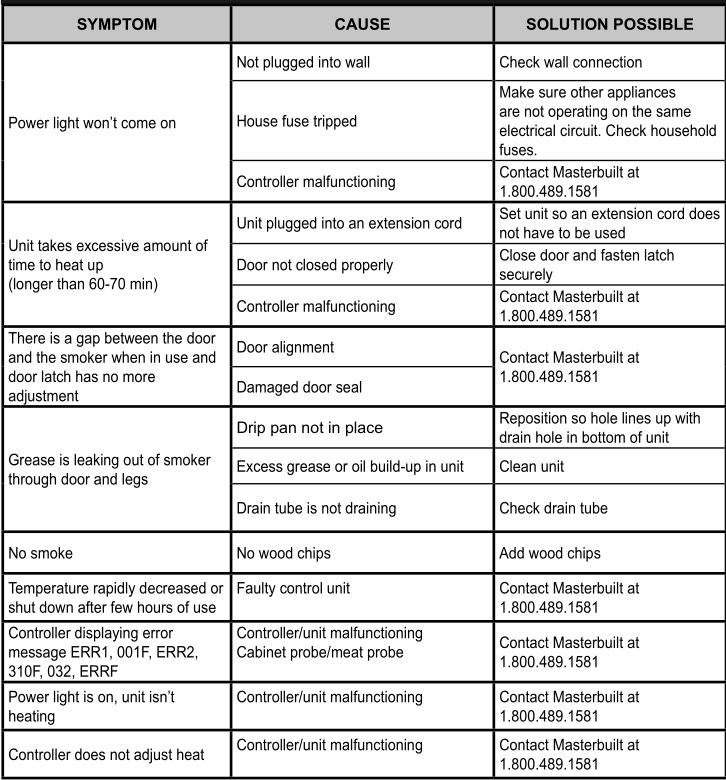
TROUBLESHOOTING GUIDE
LIMITED WARRANTY INFORMATION
Masterbuilt warrants its products to be free from defects in material and workmanship under proper assembly, normal use and recommended care for 90 days from the date of original retail purchase.
Masterbuilt warranty does not cover paint finish as it may burn off during normal use.
Masterbuilt warranty does not cover rust of the unit.
Masterbuilt requires reasonable proof of purchase for warranty claims and suggests that you keep your receipt. Upon the expiration of such warranty, all such liability shall terminate.
Within the stated warranty period, Masterbuilt, at its discretion, shall repair or replace defective components free of charge with owner being responsible for shipping. Should Masterbuilt require return of component(s) in question for inspection, Masterbuilt will be responsible for shipping charges to return requested item.
This warranty excludes property damage sustained due to misuse, abuse, accident, damage arising out of transportation, or damage incurred by commercial use of this product.
This expressed warranty is the sole warranty given by Masterbuilt and is in lieu of all other warranties, expressed or implied including implied warranty, merchantability, or fitness for a particular purpose.
Neither Masterbuilt nor the retail establishment selling this product, has authority to make any warranties or to promise remedies in addition to or inconsistent with those stated above.
Masterbuilt’s maximum liability, in any event, shall not exceed the purchase price of the product paid by the original consumer/ purchaser. Some states do not allow the exclusion or limitation of incidental or consequential damages. In such a case, the above limitations or exclusions may not be applicable.
California residents only: Not withstanding this limitation of warranty, the following specific restrictions apply; if service, repair, or replacement of the product is not commercially practical, the retailer selling the product or Masterbuilt will refund the purchase price paid for the product, less the amount directly attributable to use by the original buyer prior to the discovery of the nonconformity. Owner may take the product to the retail establishment selling this product in order to obtain performance under warranty.
This expressed warranty gives you specific legal rights, and you may also have other rights which vary from state to state.
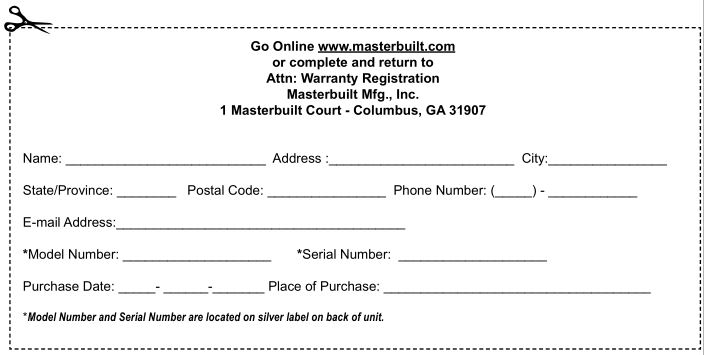

Masterbuilt Manufacturing, Inc.
1 Masterbuilt Ct.
Columbus, GA 31907
Customer Service 1-800-489-1581
www.masterbuilt.com
