MERKURY EW010 Smart Wi-Fi LED Strip

Thank you for purchasing your MERKURY smart home product.
Get started using your new devices by downloading Geeni. one convenient app that manages everything straight from your phone or tablet. Easily connect to your home Wi-Fi, and control multiple devices from the touch of your fingertips.
Can’t connect?
Need help?
WE CAN HELP DO NOT RETURN THIS PRODUCT TO THE STORE
support.mygeeni.com
(888)232-3143 Toll-free or tap ‘support’ for help in the Geeni app.
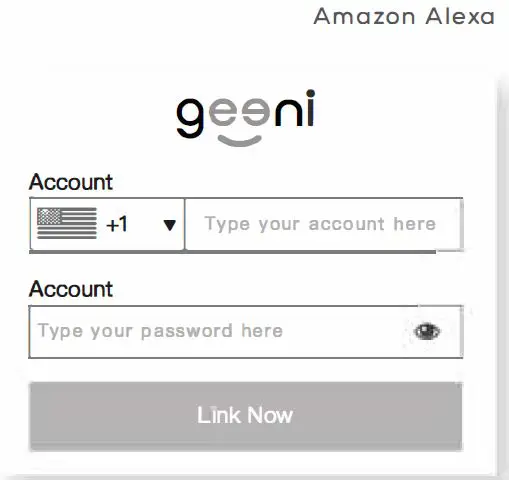
Authorize your account with Smart Home Skills using the username and password from your Geeni opp.
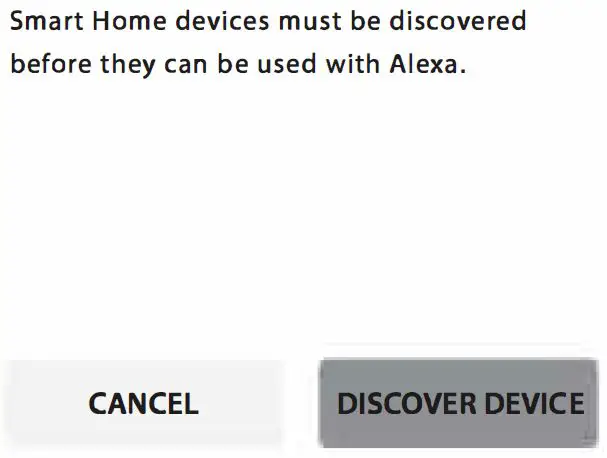
Choose “Discover Devices.” After a few seconds your MERKURY devices will be displayed under Smart Home in the Alexa opp.
You can rename your devices in the Geeni app, and Alexa will refer to them by the same name.
So if you rename o smart bulb to ·Living Room· or o nickname like s1ossom,” then Alexa will use that same name later on.
Alternatively, you can create an Alexa group, like “Bedroom· or “Downstairs,” and add the device to the group.
Alexa will recognize the group name in the Alexa app, or the device name in the Geeni opp.
More information is available at: http://tinyurl.com/olexo-smort-home-groups
FCC Notice:
This equipment has been tested and found to comply with the limits for a Class B digital device, pursuant to part 15 of the FCC Rules. These limits are designed to provide reasonable protection against harmful interference in a residential installation. This equipment generates, uses and con radiate radio frequency energy and, if not installed and used in accordance with the instructions, may cause harmful interference to radio communications. However, there is no guarantee that interference will not occur in a particular installation. If this equipment does cause harmful interference to radio or television reception, which can be determined by turning the equipment off and on, the user is encouraged to try to correct the interference by one or more of the following measures:
- Reorient or relocate the receiving antenna.
- Increase the separation between the equipment and receiver.
- Connect the equipment into an outlet on a circuit different from that to which the receiver is connected.
- Consult the dealer or on experienced radio/TV technician for help.
Caution: Any changes or modifications to this device not explicitly approved by manufacturer could void your authority to operate this equipment.
This device complies with port 15 of the FCC Rules. Operation is subject to the following two conditions: (1) This device may not cause harmful interference, and (2) this device must accept any interference received, including interference that may cause undesired operation.
The device has been evaluated to meet general RF exposure requirement. The device con be used in portable exposure condition without restriction.
FCC responsible party name : Merkury Innovations
Address : 45 Broadway 3rd Floor, New York, NY 10006
Telephone number : +(888) 232 3143
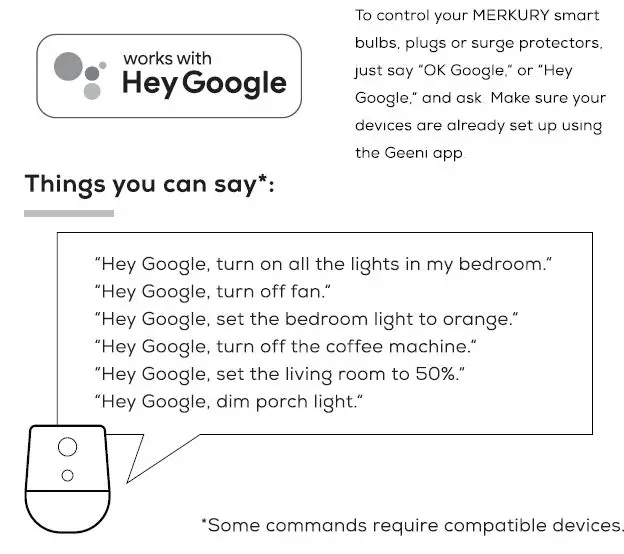
Things you can say:

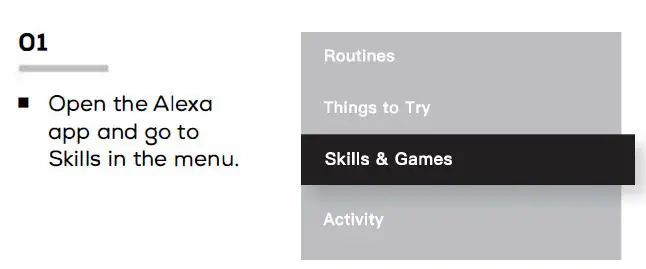
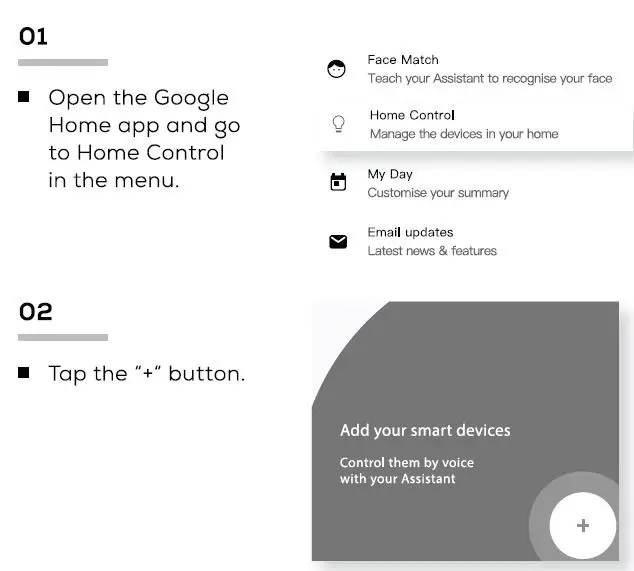
- Open the Alexa app and go to Skills in the menu.
- Search for Geeni then tap Enable.
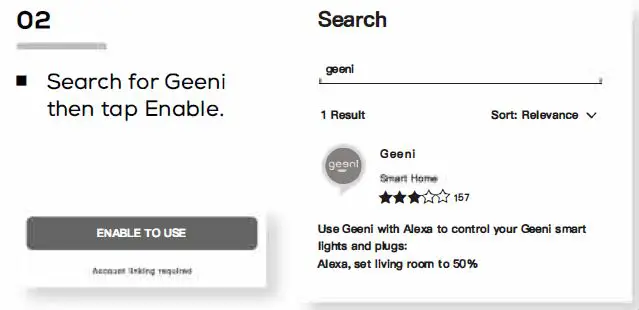
- Choose “Geeni” from the list of Home Control partners.

- Authorize your account with Google Assistant using the username and password from your Geeni app.
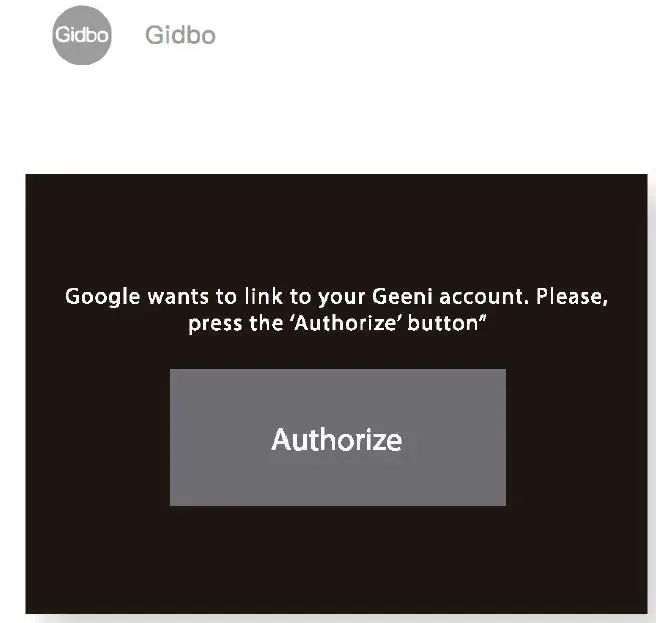
Now your Google Home app and MERKURY devices are linked!
You’re now able to say “Hey Google” and control your MERKURY devices.
At any time, go into the ·Home Control” section of the Google Home app to set nicknames and rooms for your devices. You can rename your devices in the Geeni app, and Google Assistant will refer to them by the same name.
So if you rename a smart bulb to “Living Room” or a nickname like Blossom: then Google Assistant will use that same name later on. You can always give it a nickname using the Google Home app as well. You can also assign bulbs to a specific room, like ·sedroom· or ·Kitchen.”
Google Assistant will be able to control devices by room.
Important Information:
Before installing or replacing a bulb. read and follow all precautions, including the following:CAUTION: RISK OF ELECTRIC SHOCK OR BURNS – USE IN A DRY LOCATION ONLY. The weather resistant IP44 rating only protects the LED strip from splashes in any direction. DO NOT IMMERSE IN WATER. WARNING: The LED strip must be unplugged when making any modifications to the device. Electrical currents are dangerous and may cause electrical shock, injury, or death (in some cases)
Support:
If you encounter any issues, please contact us at support.mygeeni.com for help. To explore our full selection of products, visit us at: www.mygeeni.com
(888) 232-3143 Toll-free
© 2021 Merkury Innovations, 45 Broadway 3rd FL, New York NY 10006. The illustrated product and specifications may differ slightly from those supplied. Geeni is a trademark of Merkury Innovations LLC. iPhone, Apple and the Apple logo are trademarks of Apple Inc .. registered in the U.S. and other countries. App Store is a service mark of Apple Inc. Google, Google Play, and related marks and logos are trademarks of Google LLC. iOS is a registered trademark of Cisco in the U.S. and other countries and is used under license. Amazon, Alexa and all related logos are trademarks of Amazon.com, Inc. or its affiliates. All other trademarks and trade names are those of their respective
Made in China
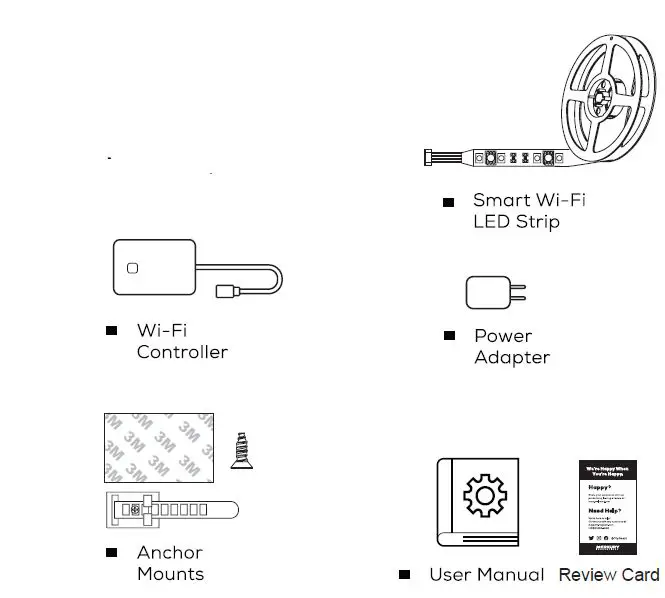
BOX CONTENT
VOICE CONTROL GUIDE
Thank you for purchasing your MERKURY smart home product. Make sure your devices are already set up using the Geeni opp, then follow these steps.
STEP 1
- Download the Geeni App from App Store or Google Play.
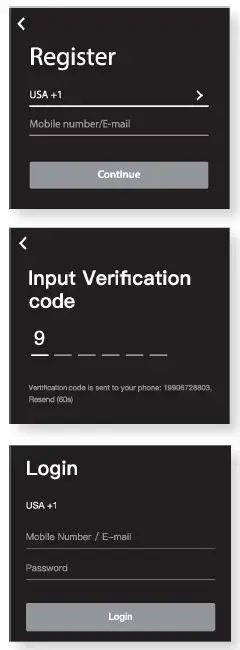
- Register an account on your Geeni App.
- Enter your mobile phone number or email address
- Enter the verification code and create a password.
- Log in to the App.
STEP2

- Plug the device into the wall.
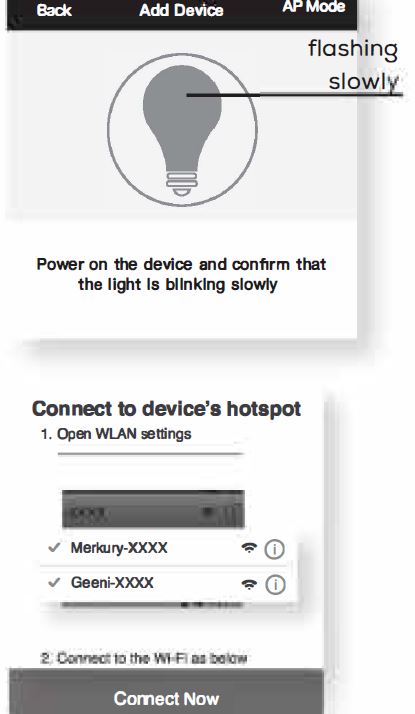
Make sure the indicator light on the device is flashing rapidly, indicating the device is ready to connect. See reset instructions on p. 5 - Measure the area yau wish ta attach the LED strip to. Ensure that the area has a clean. solid surface.
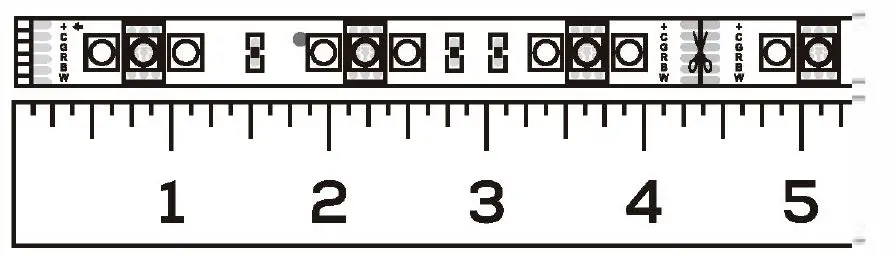
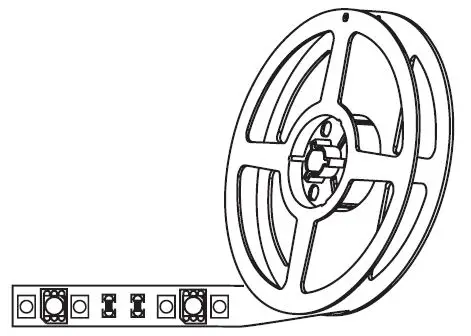
- Measure the LED strip for the desired length. starting at the end closest to the connector for the Wi-Fi Controller.
IMPORTANT: If you measure 6 cut from the opposite end, you will not be able to connect the LED strip to the Wi-Fi Controller.
Troubleshooting
Cannot connect to your Wi-Fi network.
Make sure you entered the correct Wi-Fi password during the Wi-Fi setup. Check whether there are any Internet connection problems. If the Wi-Fi signal is too weak. reset your Wi-Fi router and try again.
Reset the device
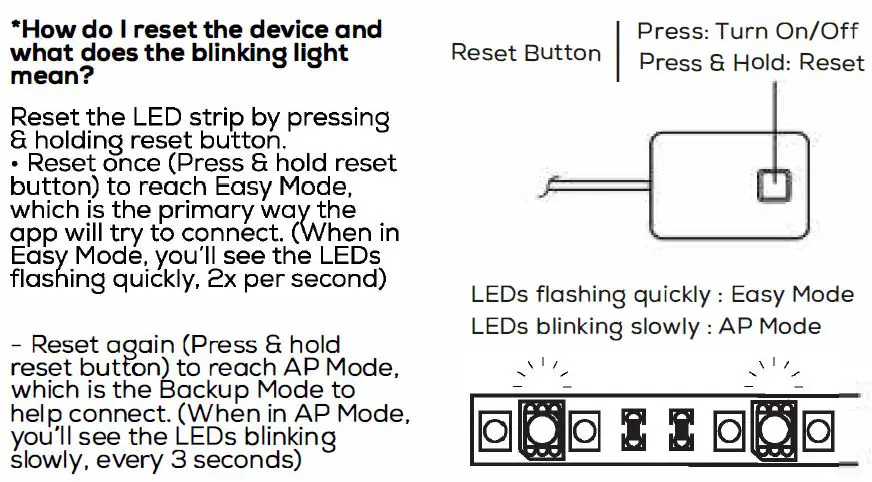
- Reset once (Press 6: hold reset button) to reach Easy Mode, which is the primary way the app will try to connect. (When in Easy Mode. you’ll see the LED flashing quickly. 2x per second)
- Reset again (Press 6 hold reset button) to reach AP, which is the Backup Mode to help connect. (When in AP Mode. you’ll see the LED blinking slowly, every 3 seconds)
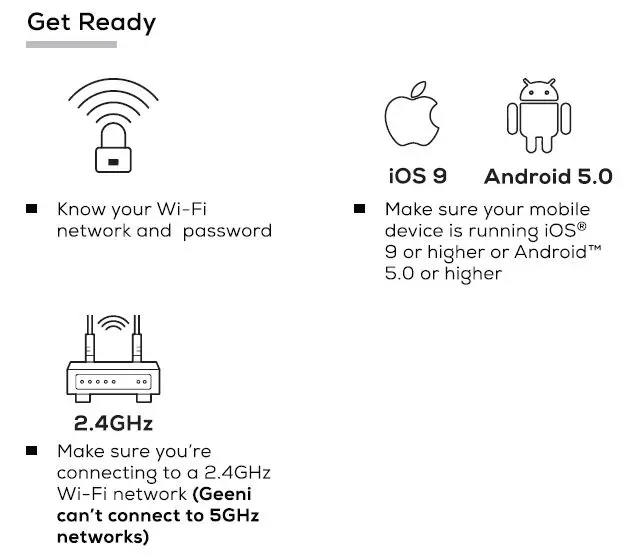
System Requirements
- Mobile device running iOS® 9 or higher or Android™ 5.0 or higher
- Existing Wi-Fi Network
Technical Specifications
- Size: 0.5in x 79in
- Input: 100-240V, 50/60Hz
- Life Span: 10000 Hours
- Weatherproof: IP44 (Strip), IP20 (Controller)
- Wi-Fi: IEEE 802.lln, 2.4GHz
(Not compatible with 5GHz Wi-Fi networks)
Frequently Asked Questions
- Can I share with family and friends?
Yes. you can share your bulbs with family and friends who will have access to control your bulbs, plugs, cameras, and other Merkury devices. In the Geeni opp, press the Profile button and click on the “Device Sharing” button, and you will be able to give or revoke sharing permissions.
In order to share, the other user should already have downloaded the Geeni opp and registered a new account. - Can I group multiple Merkury devices together?
Yes, you can group multiple devices of the same type together, by room, location, or however else you want. The same devices can be in multiple groups. (For example, create a group for “Bedroom” and another group for “Entire House”, and your Bedroom lights can be included in both groups). From your main device list, click on one of the devices you want to group. Press the ” … ” button on the top right for advanced settings, and click Create Group. You’ll then be able to choose which devices you’d like to group together and will be able to rename them. - How Many Devices Can I Control?
Geeni app can control an unlimited amount of devices in an unlimited amount of locations. Your router may have a limit of how many devices con be connected to one router. - My Merkury device has a funny name. How do I rename it? From your main device list, click on one of the devices you want to rename, press the “•••” button on the top right for advanced settings, and click Modify Device Name (or Modify Group Name, if applicable). You’ll then be able to choose a more familiar name.
- The device appears offline or unreachable, what should I do? Make sure your Wi-Fi router is online and in range.
Make sure you have the latest Geeni functionality by clicking “Check for firmware update” in your device settings. - What’s the Wireless Range?
The range of your home Wi-Fi is heavily dependent on your home router and the conditions of the room. Check with your router specifications for exact range data. - If my Wi-Fi/lnternet goes down, will Geeni still work? Merkury products need to be connected to Wi-Fi in order to use them remotely.
Each strip can be cut by every 10cm.
LED Strip Adhesive Installation *Follow Instructions Carefully

Be sure to thoroughly clean surface or wall with any standard rubbing alcohol before applying adhesive and let dry.

Peel adhesive lining from the back of the strip light.
Position LED strip upon surface and press every section firmly for at least 30 seconds ensuring a strong hold.
NOTE: 3M adhesive may not adhere well to vinyl surfaces nor to delicate wallpaper.

Installation Using Anchor Mounts
If you would like. you may utilize the included anchor mounts for an additional hold. Each mount can be screwed into the wall with a standard Phillips-head screwdriver (not included) or using the 3M adhesive backing.
The LED light strip light can be placed along each mount and then locked in place with the strap.
STEP3
Add device: Easy Mode
- In the Geeni app, on the top corner of the Devices screen, click 0 Choose “Smart LED Strip”.
- Mlight ake is sure flashing the indicator quickly, indicating it’s ready to connect. If not, turn the bulb off and on 3 times until it is flashing. Press “Next Step.”
- Enter your Wi-Fi network and password.
- The Geeni app will try to connect your device.
NOTE: Geeni can’t connect to 5GHz networks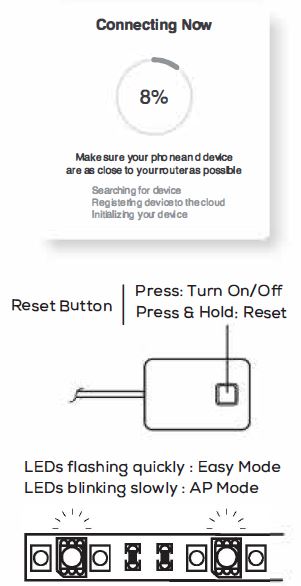


Add device
Backup AP Mode

How do I reset the device and what does the blinking light mean?
FCC WARNING
This device complies with part 15 of the FCC Rules. Operation is subject to the following two conditions: (1) this device may not cause harmful interference, and (2) this device must accept any interference received, including interference that may cause undesired operation.
Any changes or modifications not expressly approved by the party responsible for compliance could void the user’s authority to operate the equipment.
NOTE: This equipment has been tested and found to comply with the limits for a Class B digital device, pursuant to Part 15 of the FCC Rules. These limits are designed to provide reasonable protection against harmful interference in a residential installation. This equipment generates, uses and can radiate radio frequency energy and, if not installed and used in accordance with the instructions, may cause harmful interference to radio communications. However, there is no guarantee that interference will not occur in a particular installation.
If this equipment does cause harmful interference to radio or television reception,
which can be determined by turning the equipment off and on, the user is encouraged to try to correct the interference by one or more of the following measures:
- Reorient or relocate the receiving antenna.
- Increase the separation between the equipment and receiver.
- Connect the equipment into an outlet on a circuit different from that to which the receiver is connected.
- Consult the dealer or an experienced radio/TV technician for help.
To maintain compliance with FCC’s RF Exposure guidelines, This equipment should be installed and operated with minimum distance between 20cm the radiator your body: Use only the supplied antenna.