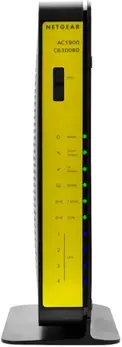
| 2.4 GHz
|
Solid Green |
None. WiFi is enabled at the 2.4 GHz frequency. |
| Blinking |
None. Data is flowing. |
| Off |
WiFi radio is disabled or not plugged in. To enable or disable the radio (2.4Ghz and 5 GHz), press and hold the WLAN button for three seconds. |
| 5 GHz

|
Solid Green |
None. WiFi enabled at the 5 GHz frequency |
| Blinking |
None. Data is flowing. |
| Off |
WiFi radio is disabled or not plugged in. To enable or disable the radio (2.4Ghz and 5 GHz), press and hold the WLAN button for three seconds. |
| Power

|
Off |
No power. Verify all cable connections and try resetting the modem. |
| Solid Green |
None. |
| Blinking |
Performing a power-on self-test |
| Red |
Performing a self-test or the thermal cutoff circuit has been triggered |
| DS
(Downstream)

|
Blinking Green |
Scanning for downstream channel – Verify all cable connections and try resetting the modem. |
| Solid Green |
None. Connection from the computer to the Internet established on one channel |
| Solid Blue |
None. Operating on more than one channel (downstream bond mode) |
| Off |
No downstream channel locked |
| US
(Upstream)

|
Off |
Upstream channel inactive – Verify all cable connections and try resetting the modem. |
| Blinking Green |
Scanning for upstream channel – Verify all cable connections and try resetting the modem. |
| Solid Green |
None. Connection from the Internet to the computer established on one channel |
| Solid Blue |
None. Operating on more than one channel (upstream bond mode) |
| Online

|
Off |
No connection. Verify all cable connections and try resetting the modem. |
| Solid Green |
None. Cable WiFi modem operational |
| Slow Blink |
None. Cable WiFi modem receiving DHCP information |
| Fast Blink |
None. Cable WiFi modem downloading a configuration file |
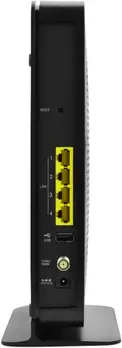
| LAN 1 – 4

|
Off |
No Ethernet link detected |
| Blinking Green |
None. Data is flowing. |
| Blinking Amber |
None. Data is flowing. |
| Solid Green |
None. Connected to 1000 Mbps |
| Solid Amber |
None. Connected at 10 or 100 Mbps |
| WPS
|
Off |
No WiFi client is associated with the cable modem via WPS. Enable WiFi. |
| Blinking Green |
None. WPS is in discovery mode; LED blinks for up to 2 minutes. |
| Solid Green |
None. WPS configuration is successful. |
| WiFi

|
Off |
WiFi card is disabled. Enable WiFi by pressing this button for 3 seconds. |
| Blinking Green |
None. Data is flowing |
| Solid Green |
None. WiFi is enabled. |