![]()

Draft October 2018
202-11665-xx
350 East Plumeria Drive
San Jose, CA 95134 USA
Support
Thank you for purchasing this NETGEAR product. You can visit www.netgear.com/support to register your product, get help, access the latest downloads and user manuals, and join our community. We recommend that you use only official NETGEAR support resources.
Conformity
For the current EU Declaration of Conformity, visit http://kb.netgear.com/app/answers/detail/a_id/11621.
Compliance
For regulatory compliance information, visit http://www.netgear.com/about/regulatory. See the regulatory compliance document before connecting the power supply.
Trademarks
© NETGEAR, Inc., NETGEAR and the NETGEAR Logo are trademarks of NETGEAR, Inc. Any non-NETGEAR trademarks are used for reference purposes only.
The NETGEAR High Speed Cable Modem provides a connection to high-speed cable Internet with speeds up to 1 Gbps.1 The cable modem is certified by all major cable Internet providers. A Gigabit Ethernet port provides fast access and downloads. The cable modem supports the assignment of IPv4 and IPv6 addresses by cable Internet providers.
This chapter covers the following topics:
-
-
- Unpack Your Cable Modem
- Front Panel
- Product Label
- Back Panel
- Install and Activate Your Cable Modem
- Connect Your Cable Modem to a Router After Installation and Activation
-
For more information about the topics covered in this manual, visit the support website at support.netgear.com.
Your package contains the following items.


The cable modem provides status LEDs on the front.

You can use the LEDs to verify the status and connections. The following table lists and describes each LED on the front panel of the cable modem.

The product label on the side of the cable modem displays the serial number and MAC address of the cable modem and login information, including the default IP address, default user name, and default password.

The back panel provides the connections and button shown the following figure.

The cable modem provides a connection between your cable Internet provider’s network and your computer, router, or WiFi router.
During the installation and activation, you must connect the cable modem directly to a computer. After installation and activation, you can connect the cable modem to a router (see Connect Your Cable Modem to a Router After Installation and Activation on page 12).

Note: Before you connect your cable modem and contact your cable Internet provider, collect your cable account number, account phone number, and login information (your email address or user name and password).

- Turn off existing modems and routers.
If you are replacing a modem that is currently connected to your home, unplug the modem and plug the new cable modem into the same outlet. - Connect a coaxial cable.
Use the coaxial cable that your cable company provided to connect the cable port on the cable modem to a cable wall outlet or a line splitter. Make sure that the cable is tightly connected.
If Comcast XFINITY is your cable Internet provider, Comcast XFINITY recommends connecting your cable modem directly to a cable wall outlet. - Connect the power adapter provided in the package to the cable modem and plug the power adapter into an electrical outlet.
When the startup procedure is completed, the Power LED lights green. - Wait for the cable modem to come online.
It takes at least 10 minutes for the cable modem to come online on the network. During this time, the LED behavior is as follows:
• The Downstream LED lights amber when one downstream channel is locked.
• The Downstream LED lights green when more than one downstream channel is locked.
• The Upstream LED lights amber when one upstream channel is locked.
• The Upstream LED lights green when more than one upstream channel is locked.
• After the cable modem registers with your cable Internet provider, the Internet LED lights green. - Turn off the computer to which you intend to connect the cable modem.
- Use the Ethernet cable provided in the package to connect the LAN port on the cable modem to an Ethernet port on the computer.
- Turn on the computer.
Even though an Internet connection is established, Internet service is available only after you set it up with your cable Internet provider.
For information about how to activate your Internet service, see Activate Your Internet Service.
- Visit your cable Internet provider’s website and follow the onscreen instructions to activate your Internet service.
-
- Bright House Networks
- http://support.brighthouse.com
- 1-866-898-9101
- Cablevision
- http://www.cablevision.com
- https://install.optimum.com/JointInstall/
- Telephone number depends on your region.
- Note: When you attempt to contact Cablevision online, you are directed to the Optimum web page. Optimum is a brand name of Cablevision.
- Comcast XFINITY
- http://www.comcast.com/activate
- http://www.XFINITY.com/internetsetup
- http://www.XFINITY.com/internetsupport
- 1-800-XFINITY (1-800-934-6489)
- For more information, see Activate Your Internet Service With Comcast XFINITY on page11.
- Cox
- https://activation.cox.net/selfactivation/newmodem.cox
- 1-888-556-1193
- Mediacom
- https://maestro.mediacomcc.com/walledgarden/page/login.jsp
- 1-844-2SIMPLE (1-844-274-6753)
- Time Warner Cable
- Bright House Networks
Your cable Internet provider’s contact information might change. You can also find the contact information in your monthly Internet service billing statement.
2. If you are unable to activate your Internet service using the instructions on your cable Internet provider’s website, call your cable Internet provider and do the following:
a. When asked, provide your account information and provide the cable modem’s model number, which is CM1000v2, serial number, and MAC address.
The serial number and MAC address are on the label on the cable modem, which is on the bottom of the cable modem.
b. Wait for your cable Internet provider to confirm that your cable modem is active.
c. If you do not get an Internet connection with the cable modem, ask your cable Internet provider to look for your cable modem online, and do one of the following depending on what your cable Internet provider tells you about your cable modem:
• If the cable modem is not visible, your cable Internet provider can give you instructions to verify why the cable modem does not connect with your high-speed Internet service.
• If the cable modem is visible to your cable Internet provider, reboot the cable modem. Check your online status again.
Set up Internet service by using Comcast XFINITY’s self-activation process. If you are unable to self-activate your cable modem, call Comcast XFINITY customer service. After you complete the setup, perform a speed test.
Before you start the self-activation process, make sure to collect your account number, account phone number, and login information (your email address or user name and password).
-
- Close all web browsers.
- Launch a web browser.
You are redirected to the XFINITY self-activation page. If you are not redirected to the XFINITY self-activation page, visit comcast.com/activate. - Provide your XFINITY credentials and complete the self-activation process.
This process might take up to 15 minutes, during which the cable modem reboots a few times. - If you are unable to activate your cable modem using the XFINITY self-activation process, call Comcast XFINITY customer service at 1-800-XFINITY (1-800-934-6489) and do the following:
a. When asked, provide your account information and provide the cable modem’s model number and MAC address, which are on the product label on the cable modem.
For more information, see Product Label on page 6.
b. Wait for Comcast XFINITY to confirm that your cable modem is active.
c. If you do not get an Internet connection with the cable modem, ask Comcast XFINITY to look for your cable modem online, and do one of the following depending on what Comcast XFINITY tells you about your cable modem:
• If the cable modem is not visible, Comcast XFINITY can give you instructions to verify why the cable modem does not connect with your high-speed Internet service.
• If the cable modem is visible to Comcast XFINITY, reboot the cable modem. Check your online status again.
To determine the accurate Internet speed, visit the speed test website of your cable Internet provider, and perform a speed test.
If your actual speed is lower than your subscribed speed, contact your cable Internet provider.
During the installation and activation, you must connect the cable modem directly to a computer. After installation and activation, you can connect the cable modem to a router.

-
- Reboot the cable modem by unplugging the power cable from the cable modem and plugging it back in.
Note: Do not disconnect the cable modem from the cable outlet.
When the startup procedure is completed, the Power LED lights green.
Wait for the Internet LED to stop blinking and light solid green. - Use an Ethernet cable to connect the Ethernet port on the cable modem to the WAN or Internet port on the router.
- Power on the router.
Wait until the router is ready. - Connect a computer to the router over a WiFi connection or with an Ethernet cable to a LAN port on the router.
- Reboot the cable modem by unplugging the power cable from the cable modem and plugging it back in.
After you set up the cable modem, you do not need to log in to the cable modem for normal operation. However, you can log in to the cable modem to change a very limited number of settings and monitor the cable modem. In the unlikely situation that you experience problems with the cable connection and cannot get an Internet connection, technical support might ask you to log in to the router.
This chapter contains the following sections:
-
-
- Log In to the Cable Modem
- View Cable Modem Initialization
- View Cable Modem Status
- View and Clear Event Logs
- Change the admin Password
- Reboot the Cable Modem
- Reset the Cable Modem to Factory Default Settings
- Change the Cable Connection Starting Frequency
-
After you set up the cable modem, you do not need to log in to the cable modem for normal operation.
To log in to the cable modem, you must use a web browser such as Microsoft Internet Explorer 5.0 or later, Firefox Mozilla 2.0 or later, Safari 1.4 or later, or Google Chrome 11.0 or later.
-
- Launch a web browser from a computer that is attached with an Ethernet cable to the cable modem or from a computer that is connected to a WiFi router that is attached with an Ethernet cable to the cable modem.
- Enter http://192.168.100.1.
A login window opens. - Enter the cable modem user name and password.
The user name is admin. The default password is password. The user name and password are case-sensitive.
The BASIC Home page displays.
You can track the initialization procedure of the cable modem and get details about the downstream and upstream cable channels. The time is displayed after the cable modem is initialized.
The cable modem automatically goes through the following steps in the provisioning process:
- Scans and locks the downstream frequency and then ranges the upstream channels.
- Obtains a WAN IP address for the cable modem.
- Connects to the Internet.
- Launch a web browser from a computer that is attached with an Ethernet cable to the cable modem or from a computer that is connected to a WiFi router that is attached with an Ethernet cable to the cable modem.
- Enter http://192.168.100.1.
A login window opens. - Enter the cable modem user name and password.
The user name is admin. The default password is password. The user name and password are case-sensitive.
The BASIC Home page displays. - Select Cable Connection.
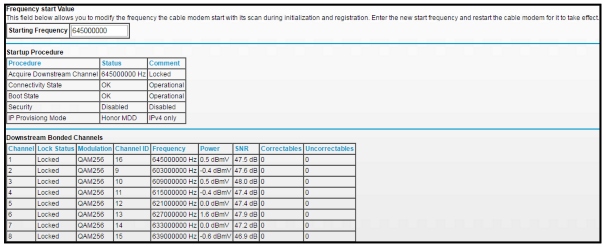
The Startup Procedure section displays the initialization progress. The Downstream Bonded Channels section displays the status of each downstream channel.. - To see the Upstream Bonded Channels section and system time, scroll down.


You can view some basic information about the cable modem.
- Launch a web browser from a computer that is attached with an Ethernet cable to the cable modem or from a computer that is connected to a WiFi router that is attached with an Ethernet cable to the cable modem.
- Enter http://192.168.100.1.
A login window opens. - Enter the cable modem user name and password.
The user name is admin. The default password is password. The user name and password are case-sensitive.
The BASIC Home page displays. - Select ADVANCED.

The Cable Information page displays the following:
- Hardware Version. The version of the cable modem hardware.
- Firmware Version. The version of the cable modem firmware.
- Cable Modem Serial Number. The serial number of the cable modem.
- CM Certificate. The status of the cable modem certificate. If Not installed displays as the status, contact your cable Internet provider.
- CM MAC. The MAC address of the cable modem.
For information about using the Reboot button, see Reboot the Cable Modem on page 19.
For information about using the Factory reset button, see Reset the Cable Modem to Factory Default Settings on page 20.
Event logs capture important cable modem events.
- Launch a web browser from a computer that is attached with an Ethernet cable to the cable modem or from a computer that is connected to a WiFi router that is attached with an Ethernet cable to the cable modem.
- Enter http://192.168.100.1.
A login window opens. - Enter the cable modem user name and password.
The user name is admin. The default password is password. The user name and password are case-sensitive.
The BASIC Home page displays. - Select ADVANCED > Administration > Event Log.
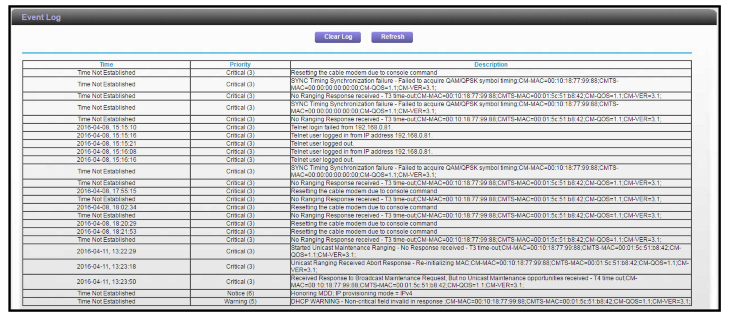
- The Event Log page shows the following information:
• Time. The time the event log entry was recorded.
The correct time displays only after the cable modem successfully connects to the cable Internet provider’s network.
• Priority. The severity of the event log entry.
• Description. A description of the event log entry. - To refresh the log page, click the Refresh button.
- To clear the log entries, click the Clear Log button.

You can change the default password that is used to log in to the cable modem with the user name admin.
- Launch a web browser from a computer that is attached with an Ethernet cable to the cable modem or from a computer that is connected to a WiFi router that is attached with an
Ethernet cable to the cable modem. - Enter http://192.168.100.1.
A login window opens. - Enter the cable modem user name and password.
The user name is admin. The default password is password. The user name and password are case-sensitive.
The BASIC Home page displays. - Select ADVANCED > Administration > Set Password.
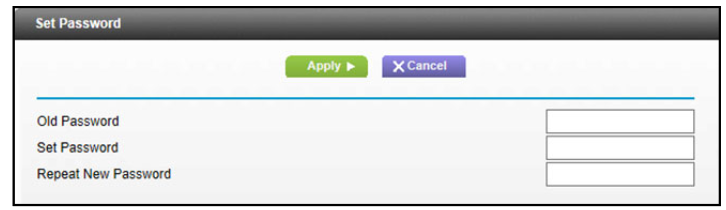
- Type the old password.
- Type the new password in the Set Password field.
- Type the new password in the Repeat New Password field.
- Click the Apply button.
Your change takes effect.

Rebooting the cable modem disconnects all computers from the cable modem’s local area network (LAN). After the cable modem is finished booting and reestablishes a connection with the cable Internet provider’s network, the devices reconnect to the cable modem’s LAN.
- Launch a web browser from a computer that is attached with an Ethernet cable to the cable modem or from a computer that is connected to a WiFi router that is attached with an Ethernet cable to the cable modem.
- Enter http://192.168.100.1.
A login window opens. - Enter the cable modem user name and password.
The user name is admin. The default password is password. The user name and password are case-sensitive.
The BASIC Home page displays. - Select ADVANCED.
The ADVANCED Home page displays the Cable Information pane. - Click the Reboot button.
A confirmation message displays. - Click the OK button.
The cable modem reboots.
To reset the cable modem to factory default settings, you can use either the Reset button on the back panel of the cable modem or the Factory reset software button. However, if you changed the default password to access the cable modem and lost the password, you must use the Reset button on the back panel.
After you reset the cable modem to factory default settings, the user name is admin, the password is password. The LAN IP address is always 192.168.100.1. You cannot change this LAN IP address.

This process erases all settings that you configured in the cable modem.
- Power on the cable modem.
- On the back of the cable modem, locate the Reset button.

3. Using a straightened paper clip, press and hold the Reset button for about seven seconds until all LEDs blink.
4. Release the Reset button. The configuration is reset to factory default settings. When the reset is complete, the cable modem reboots. This process takes about one minute.

To avoid the risk of corrupting the firmware, do not interrupt the reset. For example, if you are connected to the web management interface, do not close the browser, click a link, or load a new page. Do not turn off the cable modem.
This process erases all settings that you configured in the cable modem.
-
- Launch a web browser from a computer that is attached with an Ethernet cable to the cable modem or from a computer that is connected to a WiFi router that is attached with an Ethernet cable to the cable modem.
- Enter http://192.168.100.1.
A login window opens. - Enter the cable modem user name and password.
The user name is admin. The default password is password. The user name and password are case-sensitive.
The BASIC Home page displays. - Select ADVANCED.
The Cable Information pane displays. - Click the Factory reset button.
A confirmation message displays. - Click the OK button.
The configuration is reset to factory default settings. When the reset is complete, the cable modem reboots. This process takes about one minute.
To avoid the risk of corrupting the firmware, do not interrupt the reset. For example, do not close the browser, click a link, or load a new page. Do not turn off the cable modem.
The starting frequency for the cable connection is automatically generated. For most Internet connections, you do not need to change this information.
Do not change the starting frequency unless your cable Internet provider instructs you to do so. Changing the starting frequency incorrectly causes serious connection and Internet problems.
-
- Launch a web browser from a computer that is attached with an Ethernet cable to the cable modem or from a computer that is connected to a WiFi router that is attached with an Ethernet cable to the cable modem.
- Enter http://192.168.100.1.
A login window opens. - Enter the cable modem user name and password.
The user name is admin. The default password is password. The user name and password are case-sensitive.
The BASIC Home page displays. - Select Cable Connection.

- In the Starting Frequency field, type a number as instructed by your cable Internet provider.

Do not change the starting frequency unless your cable Internet provider instructs you to do so. Changing the starting frequency incorrectly causes serious connection and Internet problems.
6. Click the Apply button.
Your change takes effect.
This chapter provides information about troubleshooting your cable modem.
The chapter includes the following sections:
- Use LEDs to Troubleshoot
- Cannot Log In to the Cable Modem
- Troubleshoot the Cable Internet Connection
Note: NETGEAR provides helpful articles and documentation at support.netgear.com.
The following table provides help when you are using the LEDs for troubleshooting.

If you cannot access the cable modem from computer that is connected to the cable modem or to a router that is connected to the cable modem, check the following:
- If your computer is connected to the cable modem with an Ethernet cable, check the connection.
- Make sure that your computer’s IP address is on the same subnet as the cable modem. The IP address of your computer must be in the range of 192.168.100.2 to 192.168.100.254.
- Make sure that Java, JavaScript, or ActiveX is enabled in your browser. If you are using Internet Explorer, click the Refresh button to make sure that the Java applet is loaded.
- Try quitting the browser and launching it again.
- Make sure that you are using the correct login information. The cable modem user name admin is lowercase (Caps Lock is off). The default password is password.
If the cable modem does not save changes you made, do the following: - When entering configuration settings, be sure to click the Apply button before moving to another page, or your changes are lost.
- Click the Refresh or Reload button in the web browser. The changes occurred, but the web browser might be caching the old configuration.
If your cable modem cannot access the Internet but the Internet LED lights green, make sure that the cable MAC address or device MAC address of your cable modem is registered with your cable Internet provider (see Install and Activate Your Cable Modem on page 8).
The following table lists the technical specifications for the cable modem.