Setting up you onn 36" 5.1 Soundbar Subwoofer (serial number 100027812) is important to ensure you get the right sound. This instruction guide covers all aspects of setup include placement of the subwoofer and pairing it up.
Sections in this Manual
- DOS AND DON’TS
- BATTERY SAFETY GUIDELINES
- Safety Warnings
- IMPORTANT SAFETY INSTRUCTIONS
- SERVICE
- FCC Statement:
- Warranty
- What’s in the Box?
- Get to Know Your SOUNDBAR
- Battery Replacement
- Remote Control Operation Range
- LED Screen activity
- Adjusting the Volume
- Standby Mode
- Connecting to the Power Outlet
- Subwoofer and Satellites Connection
- Using the HDMI IN or HDMI ARC connection
- Using the AUX or Optical Connection
- Using the Bluetooth Connection
- Product Wall Mounting
- SPECIFICATIONS
- Hints and Tips
onn 100027812 36 Inch 5.1 Soundbar with Wireless Subwoofer User Manual

‘Thank you for purchasing your new onn. Soundbar. We recommend that you spend some time reading this instruction manual so that you fully
Understand all he operational features it offers. You will also find some hints and tips to help you resolve any issues. Read al the safety instructions carefully before use and keep this, instruction manual for future reference.
DOS AND DON’TS
- This equipment has been designed and manufactured to meet international safety standards but, like any electrical equipment, care must be taken if you are to obtain the best results and safety is to be assured,
- DO _read the operating instructions before you attempt to use the equipment.
- DO ensure that all electrical connections (including the mains plug, extension leads and inter-connections between the pieces of equipment) are properly made and In accordance with the manufacturer’s instructions. Switch off and withdraw the ‘mains plug before making or changing connections.
- DO consult your dealer if you are ever in doubt about the installation, operation or safety of your equipment.
- DO _be careful with glass panels of doors on the equipment.
- DO route the mains lead so that its not likely to be walked on, crushed, chafed, of subjected to excessive wear and tear or heat.
- DONT remove any fixed cover as this may expose dangerous voltages.
- DONT — obstruct the ventilation openings of the equipment with items such as newspapers, tablecloths, curtains, etc. Overheating will cause damage and shorten the life of the equipment.
- DON’T allow electrical equipment to be exposed to dripping or splashing, or objects filled with liquids, such as vases.
- DON’T place hot objects or naked flame sources such as lighted candles or nightlights (on, or close, to equipment. High temperatures can melt plastic and lead to fires.
- DON’T use makeshift stands and NEVER fix legs with wooden screws. To ensure complete safety always fit the manufacturer’ approved stand or legs with the fixings provided and according to the instructions.
- DON’T Use equipment such as personal stereos or radios that will distract you from the requirements of traffic safety.
- DON’T listen to headphones at high volume, as such use can permanently damage your hearing,
- DON’T leave equipment switched on when itis unattended unless it is specifically stated that is designed for unattended operation or has a stand-by mode. Switch off using the ON/OFF switch on the equipment or at the mains socket, and make sure that your family knows how to do this. Special arrangements may need to be made for infirm or handicapped people.
- DON’T continue to operate the equipment if you are in any doubt about it working normally, or if it is damaged in any way ~ switch off, remove the mains plug from the mains socket and consult your dealer.
ABOVE ALL
- NEVER let anyone especially children push anything into holes, slots or any other opening in the equipment – this could result in a fatal electric shock.
- NEVER guess or take chances with electrical equipment of any kind. It is better to be safe than sorry!
BATTERY SAFETY GUIDELINES
Used correctly, domestic batteries are safe and dependable source of portable power. Problems can occur they ae misused or abused resulting in leakage or in extreme cases, fie of explosion.
Here are some simple guidelines to safe battery use designed to eliminate any such problems.
- Take care to fit your batteries correctly, observing the plus and minus marks on the battery and appliance. Incorrect fitting can cause leakage or, in extreme cases, fire or even an explosion.

- Replace the whole set of batteries at one time, taking care not to mix old and new batteries or batteries of different types, since this can result in leakage or, in extreme cases fire or even explosion.
- Store unused batteries in their Packaging and away from metal object which may causes a Short-circuit resulting in leakage or, in extreme cases, fire or even an explosion.

- Remove dead batteries from equipment and all batteries from equipment you know you are not going to use for a long time.
Otherwise the batteries may leak and cause damage.

- Never dispose of batteries in fire as this can cause them explode.
Please recycle dead batteries, do not put with the normal household waste.

- Never attempt to recharge ordinary batteries. either in a charger or by applying heat to them. They may leak, cause fire or even explode. There are special rechargeable batteries which are clearly marked as such.

- Supervise children if they are replacing batteries themselves in order to ensure these guidelines are followed.

- Remember that small object such as used In some hearing aids, toys, games and other appliances are easily swallowed by young children and this can be dangerous.

- Keep loose small subject away from young children

- Make sure battery compartments are secure.

- Seek medical advice rt you believe a small °tied has been swallowed.


WARNING
‘The batteries shall not be exposed to excessive heat such as sunshine, fire or the like,
Notes for battery disposal
The batteries used with this product contain chemicals that are harmful to the environment. To preserve our environment, dispose of used batteries according to your local laws or regulations. Do not dispose of batteries with normal household waste
For more information, please contact the local authority or your retailer where you purchased the product.
‘The above mark is in compliance with the Waste Electrical and Electronic Equipment Directive 2012/19/80 (WEEE)
‘
In the unlikely event of a problem developing, please contact the store where you purchased your equipment.
We continually strive to improve our products; specifications may change without prior notice.
For advice on where to purchase accessories, please contact the store where you purchased your equipment.
All trademarks are the property of their respective owners and all rights are acknowledged.
Safety Warnings
- Read all the instructions carefully before using the unit and keep them for future reference.
- Retain the manual. If you pass the unit onto a third party make sure to include this manual.
- Check that the voltage marked on the rating label matches your mains voltage.
Damage - Please Inspect the unit for damage after unpacking.
- Do not continue to operate the unit if you are in any doubt about it working normally, or if it is damaged in any way- switch off, withdraw the mains plug and consult your dealer.
Location of Unit - The unit must be placed on a flat stable surface and should not be subjected to vibrations.
- Do not place the unit on sloped or unstable surfaces as the unit may fall off or tip over.
- The mains socket must be located near the unit and should be easily accessible.
Temperature - Avoid extreme degrees of temperature, either hot or cold. Place the unit well away from heat sources such as radiators or gas/electric fires.
- Avoid exposure to direct sunlight and other sources of heat.
Naked Flames - Never place any type of candle or naked flame on the top of or near the unit.
Moisture - To reduce the risk of fire, electric shock or product damage, do not expose this unit to rain, moisture, dripping or splashing. No objects filled with liquids, such as vases. should be placed on the unit
- If you spill any liquid into the unit, it can cause serious damage. Switch it off at the mains immediately. Withdraw the mains plug and consult your dealer.
Ventilation - To prevent the risk of electric shock or fire hazard due to overheating, ensure that curtains and other materials do not obstruct the ventilation vents.
- Do not install or place this unit in a bookcase, built-in cabinet or In another confined space. Ensure the unit is well ventilated.
Mains Adapter - The mains adapter will continue to draw electricity from the mains supply when plugged in the mains socket. In the interests of safety and to avoid unnecessary energy consumption, never leave the adapter plugged in the mains socket while for long periods of time. Disconnect the adapter from the power supply.
- Working ambient 0°C-35°C, voltage input range 100V-240V(for adaptor).
Safety - Always disconnect the unit from the mains supply before connecting/ disconnecting other devices or moving the unit.
- Unplug the unit from the mains socket before a lightning storm.
Mains Adapter Cable - Make sure the unit or unit stand is not resting on top of the mains adapter cable, as the weight of the unit may damage the cable and create a safety hazard.
Interference - Do not place the unit on or near appliances which may cause electromagnetic interference. If you do, it may adversely affect the operating performance of the unit, and cause a distorted picture or sound.
Batteries - Batteries used in the remote control for this unit are easily swallowed by young children and this Is dangerous.
- Please dispose of batteries correctly by following the guidance In this manual.
Supervision - Children should be supervised to ensure that they do not play with the unit and the remote control.
- Never let anyone especially children push anything Into the holes, slots or any other openings in the case – this could result In a fatal electric shock. Service
- To reduce the risk of electric shock, do not remove screws. The unit does not contain any user-serviceable parts. Please leave all maintenance work to qualified personnel.
- Do not open any fixed covers as this may expose dangerous voltages. Maintenance
- Ensure the unit is fully unplugged from the power supply before cleaning.
- Do not use any type of abrasive pad or abrasive cleaning solutions as these may damage the unit’s surface.
- Do not use liquids to clean the unit.
- No naked flame sources, such as lighted candles, should be placed on the apparatus.
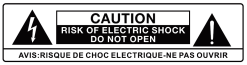
This lightning flash with arrowhead symbol within an equilateral triangle is intended to alert the user to the presence of non-insulated “dangerous voltage” within the products enclosure that may be of sufficient magnitude to constitute a risk of electric shock. Warning: To reduce the risk of electric shock, do not remove cover (or back) as there are no user-serviceable parts inside. Refer servicing to qualified personnel.
The exclamation point within an equilateral triangle is intended to alert the user to the presence of important operating and maintenance instructions in the literature accompanying the appliance. - No naked flame sources, such as lighted candle should be placed on the apparatus.
- Attention should be drawn to environmental aspects of battery disposal.
- The product is designed to use in moderate climates.

Handling the Battery
- Improper or incorrect use of batteries may cause corrosion or battery leakage, which could cause fire, personal injury or damage to property.
- Only use the battery type indicated in this manual.
- Do not Install new batteries with used ones and do not mix different types of batteries.
- Do not dispose of used batteries as domestic waste. Dispose of them in accordance with local regulations.
Handling the Remote Control
- Do not drop the remote control.
- Do not allow anything to impact the remote control.
- Do not spill water or any liquid on the remote control.
- Do not place the remote control on a wet object.
- Do not place the remote control under direct sunlight or near sources of excessive heat.
- Remove the battery from the remote control when not in use for a long period of time, as corrosion or battery leakage may occur and result in physical injury, and for property damage, and/or fire.
- When the battery is exhausted, the remote control will not function.
Manufactured under license from Dolby Laboratories. Dolby, Dolby Audio, and the double-0 symbol are trademarks of Dolby Laboratories.
The Bluetooth® word mark and logos are registered trademarks owned by the Bluetooth SIG, Inc. and any use of such marks by Walmart Inc. is under license. Other trademarks and trade names are those of their respective owners,
The Adopted Trademarks HDMI, HDMI High-Definition Multimedia Interface, and the HDMI Logo are trademarks or registered trademarks of HDMI Licensing Administrator, Inc. in the United States and other countries.
IMPORTANT SAFETY INSTRUCTIONS
- Read these instructions – All the safety and operating instructions should be read before this product is operated.
- Keep these instructions – The safety and operating instructions should be retained for future reference.
- Heed all warnings – All warnings on the appliance and in the operating instructions should be adhered to.
- Follow all instructions – All operating and use instructions should be followed.
- Do not use this apparatus near water – The appliance should not be used near water or moisture – for example, in a wet basement or near a swimming pool, and the like.
- Clean only with a dry cloth.
- Do not block any ventilation openings. Install in accordance with the manufacturer’s instructions.
- Do not install near any heat sources such as radiators, heat registers, stoves, or other apparatus (including amplifiers) that produce heat.
- Do not defeat the safety purpose of the polarized or grounding plug. A polarized plug has two blades with one wider than the other. A grounding plug has two blades and a third grounding prong. The wide blade or the third prong is provided for your safety.
If the provided plug does not fit into your outlet, consult an electrician for the replacement of the obsolete outlet. - Protect the power cord from being walked on or pinched particularly at the plugs, convenience receptacles, and at the point where they exit from the apparatus.
- Only use attachments/accessories specified by the manufacturer.
- Use only with the cart, stand, tripod, bracket, or table specified by the manufacturer, or sold with the apparatus. When a c art or rack is used, use caution when moving the cart/apparatus combination to avoid injury from tip-over.
- Unplug the apparatus during lightning storms or when unused for long periods of time.
- Refer all servicing to qualified personnel. Servicing is required when the apparatus has been damaged in any way, such as power supply cord or plug is damaged, liquid has been spilled or objects have fallen into the apparatus has been exposed to rain or moisture, does not operate normally, or has been dropped.

- CAUTION: These servicing instructions are for use by qualified service personnel only.
To reduce the risk of electric shock, do not perform any servicing other than that contained in the operating instructions unless you are qualified to do so. - Do not install this equipment in a confined or building-in space such as a book case or similar unit, and remain a well ventilation conditions at open site. The ventilation should not be impeded by covering the ventilation openings with items such as newspaper, table-cloths, curtains etc.
- WARNING: Only use attachments/accessories specified or provided by the manufacturer (such as the exclusive supply adapter, battery etc).
- WARNING: Please refer the information on exterior bottom enclosure for electrical and safety information before installing or operating the apparatus.
- WARNING: To reduce the risk of fire or electric shock, do not expose this apparatus to rain or moisture. The apparatus shall not be exposed to dripping or splashing and that objects filled with liquids, such as vases, shall not be placed on apparatus.
- WARNING: The mains plug or appliance coupler is used as disconnect device, the disconnect device shall remain readily operable.
- This equipment is a Class II or double-insulated electrical appliance. It has been designed in such a way that it does not require a safety connection to electrical earth.

SERVICE
How to get service:
- Ca li1-888-516-2630 contact: Walmart Inc. Walmart.com ,Benton ville, AR 72716
- Please have your original purchase receipt or proof of purchase (bill of sale or receipted invoice), the unit’s date of purchase, place of purchase and model/serial number ready. The model/serial number information can be found on the back of your unit.
- A representative will troubleshoot your problem over the telephone. If It Is determined that your unit requires service, the service location will be at the sole discretion of Walmart, Inc. based upon the Warman, Inc. Limited Warranty Statement.
- At the sole discretion of Walmart, Inc., item will either be repaired at an Authorized Service Centre or directly exchanged for a new or refurbished/remanufactured unit. If repaired at an Authorized Service Center, a pre-paid shipping label will be provided and Walmart, Inc. will pay for return shipping.
- Proof of purchase in the form of a bill of sale or receipted invoice from an Authorized Dealer which is evidence that the product is within the warranty period must be presented to obtain warranty service.
- PRE-AUTHORIZATION MUST BE OBTAINED BEFORE SENDING ANY PRODUCT TO AN AUTHORIZED SERVICE CENTER.
- A unit purchased or serviced outside the USA.
- A unit sold in “As-ls”, “Factory Reconditioned”, “Factory Re-Certified”, or “Refurbished” condition or with faults.
- Acts of nature or God, such as but not limited to earthquake or lightning damage.
- Special, Incidental or consequential damages.
FCC Statement:
This device complies with Part 15 of the FCC Rules.
Operation is subject to the following two conditions:
- this device may not cause harmful interference, and
- this device must accept any interference received, including interference that may cause undesired operation.
This equipment has been tested and found to comply with the limits for a Class B digital device, pursuant to Part 15 of the FCC Rules. These limits are designed to provide reasonable protection against harmful interference in a residential installation. This equipment generates, uses and can radiate radio frequency energy and, if not installed and used in accordance with the instructions, may cause harmful interference to radio communications.
However, there is no guarantee that interference will not occur in a particular installation. If this equipment does cause harmful interference to radio or television reception, which can be determined by turning the equipment off and on, the user is encouraged to try to correct the interference by one or more of the following measure.
- Reorient or relocate the receiving antenna.
- Increase the separation between the equipment and receiver.
- Connect the equipment into an outlet on a circuit different from that to which the receiver is connected.
- Consult the dealer or an experienced radio/TV technician for help.
FCC RF Radiation Exposure Statement
Caution: To maintain compliance with the FCC’s RF exposure guidelines, place the product at least 20cm from nearby persons.
Warning: Changes or modifications to this unit not expressly approved by the party responsible for compliance could void the user’s authority to operate the equipment.
Shielded cables must be used with this unit to ensure compliance with the Class B FCC limits.
Warranty
Walmart, Inc. Limited Warranty
LIMITATION OF WARRANTY THE WARRANTY STATED ABOVE IS THE ONLY WARRANTY APPLICABLE TO THIS PRODUCT. NO VERBAL OR WRITTEN INFORMATION GIVEN BY WAL-MART STORES, INC, ITS AGENTS OR EMPLOYEES SHALL CREATE A GUARANTEE OR IN ANY WAY INCREASE OR MODIFY THE SCOPE OF THIS WARRANTY.
REPAIR OR REPLACEMENT AS PROVIDED UNDER THIS WARRANTY IS THE EXCLUSIVE REMEDY OF THE CONSUMER. WAL-MART STORES, INC. SHALL NOT BE LIABLE FOR SPECIAL INCIDENTAL OR CONSEQUENTIAL DAMAGES RESULTING FROM THE USE OF THIS PRODUCT OR ARISING OUT OF ANY BREACH OF ANY EXPRESS OR IMPLIED WARRANTY ON THIS PRODUCT. THIS DISCLAIMER OF WARRANTIES AND LIMITED WARRANTY ARE GOVERNED BY THE LAWS OF THE STATE OF ARKANSAS. EXCEPT TO THE EXTENT PROHIBITED BY APPLICABLE LAW, ANY IMPLIED WARRANTY OF MERCHANTABILITY OR FITNESS FOR A PARTICULAR PURPOSE ON THIS PRODUCT IS LIMITED TO THE APPLICABLE WARRANTY AND WARRANTY PERIOD SET FORTH ABOVE. THIS WARRANTY IS SUBJECT TO CHANGE WITHOUT NOTICE.
How State Law relates to this warranty:
- Some states do not allow the exclusion or limitation of Incidental or consequential damages, or limitations on how long an implied warranty lasts, so the above limitations or exclusions may not apply to you.
- This warranty gives you specific legal rights, and you also may have other rights that vary from state to state.
If you purchased your unit outside the United States or seek warranty coverage outside the United States: This warranty does not apply. Contact your store for warranty information.
Service calls which do not involve defective materials or workmanship are not covered by this warranty. Costs of such service calls are the sole responsibility of the purchaser.
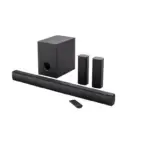
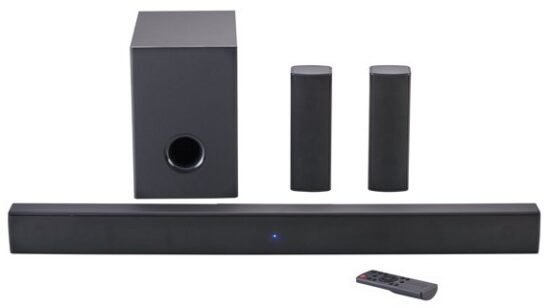
What’s in the Box?
Check to make sure you have everything below.


- Main unit
- Subwoofer
- Satellite Speaker x 2
- AAA Battery x 2
- Remote Control
- Power Cord x 2
- AUX Cable x 1
- RCA to RCA Cable x 2
- HDMI Cable x 1
- Optical Cable x 1
- QSG x 1
- User manual x 1
- Wall Mount Template
Get to Know Your SOUNDBAR


- Speaker
- LED Indicator
- Remote Control Sensor
- LED Display
- HDMI IN Port
- HDMI ARC Port
- OPTICAL Port
- AUX IN Port
- AC IN Port
- Power Button Switches the unit between ON and STANDBY modes
- SOURCE Button Selects the input source
- VOL- Button Decreases the volume
- VOL+ Button increases the volume
Rear View of Subwoofer

Rear View of Satellites

Remote Control Overview

- Button Switches the unit between ON and STANDBY modes.
- Press AUX button, device will play audio from aux input.
- Press OPTICAL button, device will play audio from optical input.
- VOL+ button increases the volume.


- VOL- button decreases the volume.
- ASS- button decrease bass
- REB- button decrease treb
- Press EQ button to select music, movie and talk EQ mode.

- Press HDMI IN button, device will play audio from HDMI IN input.
- Press HDMI ARC button, device will play audio from HDMI ARC input.


- BASS+ button increase bass
- TREB+ button increase treb


Battery Replacement
Battery Replacement for the Remote Control the First Step
Lift up the back cover to open the battery compartment of the remote control.

Battery Replacement for the Remote Control the Second Step
Insert two AAA size batteries. Make sure the (+) and (-) ends of the batteries match the (+) and (-) ends indicated in the battery compartment.

Battery Replacement for the Remote Control the Third Step
Close the battery compartment cover.

Remote Control Operation Range
The remote control sensor on the front unit is sensitive to the remote control’s commands up to a maximum of 15′ away and within a maximum of a 60 arc.

LED Screen activity
- LED Screen activity
Bluetooth mode: the screen display “BT”
Bluetooth is pairing: the screen display “PAIRING”
Bluetooth is paired: the screen display “PAIRED”
Bluetooth disconnected: the screen display “UNPAIR” - AUX IN: the screen display”AUX”
Optical: the screen display”OPTICAL”
HDMI IN: the screen display”HDMI IN”
HDMI ARC: the screen display”HDMI ARC”
Standby ON: the screen display”APS ON”
Standby OFF: the screen display”APS OFF”
Adjusting the Volume
- Press VOL +/- on the unit or the remote control to adjust the volume(Volume range Min to Max.), the screen shows like VOL MIN,VOL 1, VOL MAX
- If you wish to turn the sound off, press
Standby Mode
- The soundbar will be in standby mode if no audio source input in 15 minutes.
You can press “

Connecting to the Power Outlet
Connect the AC IN port to the power outlet power cable.


Ensure all audio connections of the unit are connected before connecting outlet.
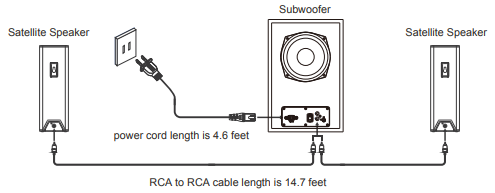
Subwoofer and Satellites Connection
Pairing the Subwoofer
When the soundbar is turned on, the devices will connect automatically;
If this does not happen, please pair the subwoofer to the soundbar manually.
Pair manually:
- Press and hold mute on the remote for 7 sec., soundbar’s LED display will show SUB LINK;
- Press and hold pairing button on subwoofer for 3 sec., the subwoofer’s LED will fast blink blue until paired with each other;
- The soundbar connected subwoofer, Blue Led indicator on the subwoofer remain solid and the LED dispaly on the front of the soundbar show LINKED 3s.
Connect Subwoofer and Satellites:
Connect the Satellite Speaker Ports between Subwwoofer and Satellites Via RCA cables(included) like the following illustration.

Using the HDMI IN or HDMI ARC connection
The best way to connect your soundbar is via HDMI/HDMI ARC, shown below.
Use DVD to connect via HDMI cable to sound bar HDMI IN. Sound bar connects to TV via HDMI cable in HDMI ARC. Same on the TV HDMI ARC. Sound bar needs to be on HDMI IN source.
The screen shows HDMI IN.

DVD connects via HDMI cable to TV HDMI IN. Sound bar connects to TV via HDMI cable in HDMI ARC. Same on the TV HDMI ARC. Sound bar needs to be on HDMI ARC source. You should have audio and video. The screen shows HDMI ARC

Using the AUX or Optical Connection
Use an AUX cable (included) to connect the TV’s headphone Port to the soundbar’s AUX IN port.

Use an optical cable (included) to connect the TV’s OPTICAL OUT Port to the soundbar’s OPTICAL Port.

When there is no sound through an HDMI or OPTICAL connection, please set the output of your TV or DVD to PCM.
Using the Bluetooth Connection
- When unit power on, press

- When unit power on, press
- Select the Bluetooth search function on your device, your device should discover the soundbar which is called onn. 36″ 5.1 Soundbar;
- Select onn. 36″ 5.1 Soundbar, your device is paired with the soundbar when LED display shows “PAIRED”;
- When Bluetooth connects successfully, the LED display shows “BT” for a while and then changes to “- -“;
- After the soundbar and your device are paired, you can stream music from your device to the Soundbar.

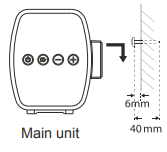
Product Wall Mounting
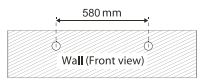
Product Wall Mounting
- Drill 2 parallel holes ( 0 8mm each according to wall type) in the wall. The distance between the holes should be 580 mm.
- Installation must be carried out by qualified personnel only. Incorrect assembly can result severe personal Injury and property damage (if you intend to install this product yourself, you must check for installations such as electrical wiring and plumbing that may be buride inside the wall). It Is the installer’s responsibility to verify that the wall will safely support the total load of the Soundbar.
- Additional tools (not included) are required for the installation.
- Do not overtighten screws.
- Keep this instruction manual for future reference.
- Use an electronic stud finder to check the wall type before drilling and mounting.
- Firmly fix 1 dowel D10.2*L3Omm (not included) into each hole in the wall if necessary
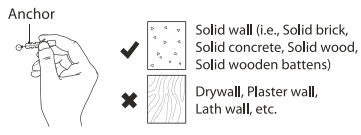
- Insert 1 screw TA 4*40mm (not included) into each anchor. Be sure to leave a 6mm gap between the wall and the screw’s head. Lift the unit over the heads of the screws and slot into place.


SPECIFICATIONS
| Model | 100027812 |
| AC IN | Input AC 100-240V 60Hz |
| Peak Power | 400W |
| Power Consumption | 100W |
| Net Weight | 7.9 Kg |
| Dimension | Main bar. 914mrn(VV) x 65mm(D) x 80mm(H) Subwookr. 200mrn(W)x 300mm(D) x 300mm(H) Satellite: 80mm(W) x 65mm(D) x 240mrri(H) |
Features and specifications are subject to change without prior notice.
Hints and Tips
| Problem | Solution |
| No power. |
|
| The remote control is not functioning. |
|
| Loud hum or noise is heard. | The Plugs and sockets are dirty. Wipe them with a cloth slightly and moistened with an appropriate non-abrasive cleaning solution. |
| Cannot find “onn. 36” 5.1 Soundbar on my Bluetooth – device. |
|
| Sound is not produced. |
|
| No woofer sound. |
|
| HDMI connection cannot be completed. |
|