
The parabolic reflector focuses energy like a satellite dish.
The warmth you can feel directly, almost instantly.
Tilts high, low, or anywhere in-between to direct the heat right where you want.
Heats you rather than the air.
Keeps you toasty warm even in a large, chilly room or open area.*
*Although it will keep you warm in a large, enclosed area, the heater is not designed to heat the entire room. Effective for heating enclosed rooms up to 10 by 12 feet (3 x 4m).
Visit www.GoPresto.com
©2021 National Presto Industries, Inc.
Form 4058-006C
INSTRUCTIONS
This is a UL Listed appliance. The following important safeguards are recommended by most portable appliance manufacturers.
IMPORTANT SAFEGUARDS
When using electrical appliances, basic precautions should always be followed to reduce the risk of fire, electrical shock, and injury to persons, including the following:
- Read all instructions before using this heater.
- This heater is hot when in use. To avoid burns, do not let bare skin touch hot surfaces. Use the handle when moving this heater. Keep combustible materials, such as furniture, pillows, bedding, papers, clothes, and curtains at least 3 feet (.9 m) from the front of the heater and keep them away from the sides and rear.
- Extreme caution is necessary when any heater is used by or near children or invalids and whenever the heater is left operating and unattended.
- Always unplug heater from wall outlet when not in use.
- Do not operate this heater with a broken element or ceramic cone, with a damaged cord or plug, after the heater malfunctions, or after it has been dropped or damaged in any manner. Discard the heater or return it to the Presto Factory Service Department for examination and/or repair.
- Do not use outdoors.
- This heater is not intended for use in bathrooms, laundry areas, and similar indoor locations. Never locate a heater where it may fall into a bathtub or other water container.
- Do not run cord under carpeting. Do not cover the cord with throw rugs, runners, or similar coverings. Do not route the cord under furniture or appliances. Arrange cord away from traffic area and where it will not be tripped over.
- To disconnect the heater, turn controls to OFF, then remove the plug from the wall outlet.
- Do not insert or allow foreign objects to enter the grille or any ventilation or exhaust opening as this may cause an electrical shock or fire, or damage the heater.
- To prevent a possible fire, do not block air intakes or exhaust in any manner. Do not use on soft surfaces, like a bed, where
openings may become blocked. - This heater has hot and arcing or sparking parts inside. Do not use it in areas where gasoline, paint, or flammable liquids are used or stored.
- Use this heater only as described in this folder. Any other use not recommended by the manufacturer may cause fire, electric
shock, or injury to persons. - Always plug heaters directly into a wall outlet/receptacle. Never use with an extension cord or relocatable power tap (outlet/
power strip). - This heater includes an audible alarm to warn that parts of the heater are getting excessively hot. If the alarm sounds, immediately turn the heater off and inspect for any objects on or adjacent to the heater that may cause high temperatures. DO NOT OPERATE THE HEATER WITH THE ALARM SOUNDING.
- Do not operate the heater with the base removed.
- Do not attempt to repair, adjust, or replace parts of the heater. The Presto Factory Service Department should check and repair broken heaters.
SAVE THESE INSTRUCTIONS
Important Cord and Plug Information
This appliance has a polarized plug (one blade is wider than the other). To reduce the risk of electric shock, this plug is intended to fit into a polarized outlet only one way. If the plug does not fit fully into the outlet, reverse the plug. If it still does not fit, contact a qualified electrician. Do not attempt to modify the plugin anyway.
Connect the power cord to a 120VAC electrical outlet only.
GETTING ACQUAINTED WITH YOUR HEATER
Before First Use
Familiarize yourself with the parts of the Presto ® HeatDish ® Plus Tilt parabolic electric (Fig. A) and read the information on the following pages.
For protection in shipping, a foam block is located between the heater base and the parabolic dish (Fig. B). Before using, stand the heater upright with the bottom of the base resting flat on the floor. Grasp the handle, press down, and tilt the parabolic reflector upward to release the heater from the storage position. Raise the parabolic reflector to the maximum tilt position, and remove the foam block.
Read the “Operating the Heater” instructions on page 4 before plugging the heater in.
Note:
The heater will not operate in the storage position and the buzzer will sound.
Adjusting Tilt Position/Carrying Heater
The heater features a tilt mechanism that allows you to adjust the angle of the heat output (Fig. C) with a feather touch. While holding onto the handle, tilt the parabolic reflector upward to aim the heat high, low, or anywhere in-between. Tilt the heater down for compact storage. It locks in place only in this position.
Thus, when carrying the heater from room to room, first place the heater in the storage position, then pick it up by its handle. Always adjust the parabolic dish to the desired tilt position before plugging in. Remember that when the heater is in the storage position, it will buzz and not heat.
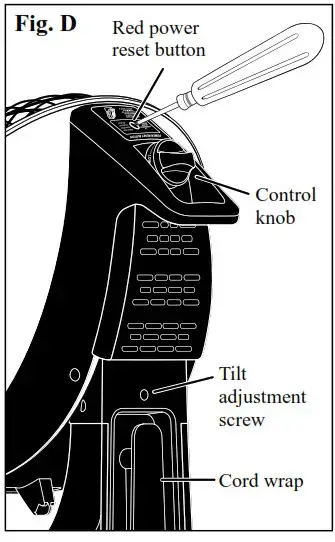
The tilt mechanism tension can be adjusted to suit your preference by turning the tilt adjustment screw located above the cord wrap (Fig D, page 3). To tilt with a lighter touch (less tension), insert a #2 Phillips screwdriver and turn the screw counterclockwise in ¼ turn increments to desired tension. If a more assertive touch (more tension) is preferred, turn the screw clockwise in ¼ turn increments.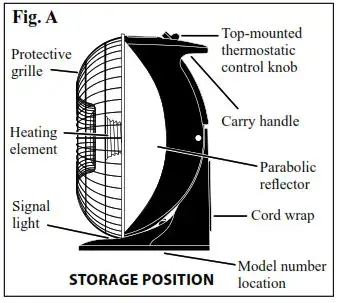
How the Parabolic Heater Keeps You Warm
The parabolic electric heater is designed to heat people and objects directly, without first heating the air space around them. The heater allows you to set the room temperature at a low level and still stay cozy warm.
Heat is produced by a coiled wire element wrapped around a ceramic cone. The heater’s parabolic reflector reflects this heat in a concentrated beam that shines directly on you.
The heat is controlled through an infinite switch that cycles the element on and off, in a fashion similar to your stove. The higher the setting, the longer the interval during which the element is energized. The ceramic cone retains the heat so that there is an even feeling of heat at each setting. At lower settings, the heat is less intense, while at higher ones, it is more intense.
How the Parabolic Heater Can Help Save Energy
The parabolic reflector focuses heat output like a satellite dish concentrates TV signals, so it requires less energy than convection
electric heaters to deliver all the warmth you’ll want.
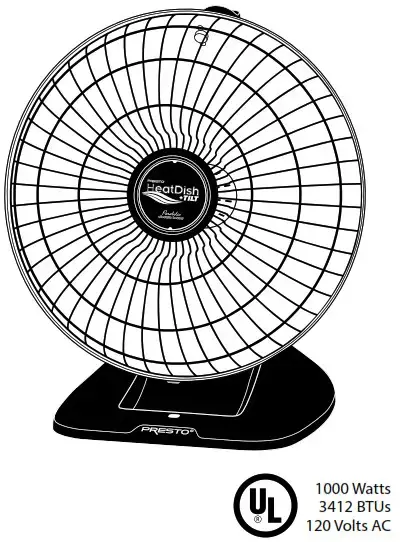
It provides super concentrated heat to keep you much warmer than 1500 watt convection heaters. Yet, because it uses just 1000 watts, it costs a third less to operate and could help you save money on electric bills.
A parabolic heater, coupled with other conservation measures, will help save energy in your home. For example, energy savings may be realized by keeping the thermostat on your central heating system at a lower than normal setting and thereby decreasing the average room temperature. Personal comfort can be maintained at these lower room temperatures by using a parabolic heater.
How the Parabolic Heater Works
An automatic control switch, or thermostat, is built into the heater to control the heat output. The control knob (Fig. D), located on the top of the heater, is used to adjust the thermostat. This thermostat works like the control for a burner on an electric stove by cycling the heating element on and off to regulate the amount of heat produced. At the highest setting, the element is on 100% of the time. At lower settings, the element will cycle on and off, automatically producing a lesser amount of heat. The lower the heat setting, the longer the element will remain off during the cycle. This is normal. Additionally, like the power control switch for any electric device, this thermostat may produce a small spark or flash of light each time it opens or closes to cycle the element on or off. While this visual flash is normal for any electric switch, it may be more noticeable in the heater, particularly if the room is darkened. Likewise, you may hear a slight humming sound at lower settings as the thermostat turns the element back on and the unit heats up. This is also normal.
Safety Features
The heater has three safety features: an automatic safety switch, a manual reset button, and a warning buzzer. The automatic safety switch turns the unit OFF and the warning buzzer sounds (if the element is energized) whenever the heater is moved or is placed on a non-level surface. The buzzer also sounds if the heater is turned on when in the storage position.
Although chiefly intended as a warning of tip-over, the switch shuts the heater off and the buzzer sounds as an additional safeguard, for example, when a child or animal moves the heater.
The heater is controlled by a thermostat that shuts the heater off if it overheats, e.g., it is placed too close to furniture or to a wall or if too much dust or dirt has accumulated on the parabolic reflector. To ensure that you are aware that an overheat situation has occurred, the heater will turn off and buzz until you manually reset it. To reset, press the red recessed POWER RESET button located on the top of the heater between the dish and the control knob (Fig. D).
If you hear continuous buzzing, confirm that the heater is on a level surface and not in the storage position. If it continues, the heater has overheated due to incorrect positioning or dirt or dust accumulation on the reflector.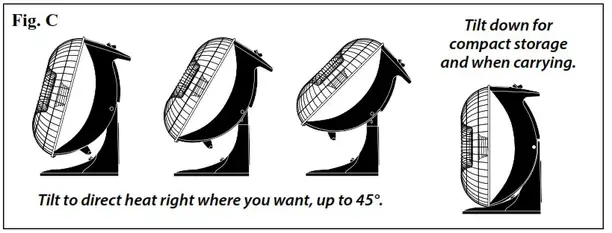
- Turn the thermostatic control knob dial to OFF.
- Wait 5 minutes to allow the heater to cool.
- Press the red recessed POWER RESET button with a Phillips screwdriver or similar tool (Fig. D).
Holding the screwdriver at about a 45° angle, press until you hear a click. If you do not hear the click, continue to press the button in. The click is an audible signal that the button has been reset. - Verify the heater is correctly positioned (see positioning instructions below) and clean the reflector if it is dirty or dusty, as instructed on pages 4 and 5.
- Plug the heater back in and try it again.
Positioning the Heater
When positioned correctly, the parabolic heater will keep you toasty warm. Follow these suggestions for maximum warmth:
- Point the front grille towards the area in which heat is desired and use the tilt feature to aim the heat right where you want it.
- Check to make sure there are no objects between you and the heater. Such objects will absorb the heat and prevent it from reaching you.
- Place the heater at least 3 feet but no more than 10 feet away. The parabolic design of the reflector focuses heat at persons 3 to 10 feet away. Thus, for your entire body to enjoy the heat produced by the heater, it must be placed at least 3 feet from you. Placing it closer will turn the heater into a foot warmer, rather than a body warmer. Experiment with various positions until you find the one that is right for you.
- Remember, this unit is primarily a people heater rather than a room heater, and using it to heat a large room or open area is not recommended. The infrared heat produced by this heater will travel through glass, just like the sun’s rays. If the heater is aimed at a window, objects outside will be heated.
When using any heater, the following safety precautions should always be observed:
- Close attention is necessary when the heater is used where children are present.
- The heater should always be in a stable, upright position with at least 3 feet of space between the front of the unit and any other surface.
- The heater should never be placed in a closed area such as beneath furniture, in cabinets, or beneath or behind curtains or drapes, nor should it be hung from a wall or ceiling.
- The heat produced by any heater tends to pull moisture from the air. It is recommended that you avoid sitting with your face directly in front of the heating element. The intense heat may dry your eyes and cause irritation.
WARNING! Some people with sensitive skin may develop certain skin conditions such as erythema ab igne when they are exposed to heat sources such as car heaters, electric blankets, heating pads, hot water bottles, and heaters. Symptoms may include irritation or discoloration of the skin. Some people may have nerve conditions that reduce their ability to feel direct heat. The heater is not recommended for use by or in close proximity to persons with these kinds of sensitive skin or nerve conditions. - Never use a heater with a damaged cord.
Operating the Heater
- Turn the thermostatic control knob (Fig. A, page 2) to the OFF position.
- Fully unwrap the power cord from the built-in cord storage before use. Grasp the handle, press down, and tilt the parabolic reflector upward to release the heater from the storage position.
Plug the power cord into a 120 volt, 60 cycle circuit which serves nothing else. Because the heater is a 1000 watt appliance, it is normal for the plug to feel warm to the touch during operation.
WARNING! If the heater is used with a loose or worn AC outlet, this poor connection may cause overheating and distortion of the plug. If the plug is distorted, please discontinue use of the heater, and we suggest you contact the Presto Consumer Service Department.
The signal light will glow whenever the cord is plugged into an outlet to indicate the heater is electrically activated.
CAUTION! Plug directly into a wall outlet.
This heater is not intended for use with an extension cord or relocatable power tap (outlet/power strip). - Turn the control knob to its HI position. There may be a vibrating or humming sound when the heater is turned on. This is normal and should last only about 30 seconds. When using for the first time, operate the heater on its HI setting for at least 3 minutes to bring the heating element to its optimum operating temperature and allow manufacturing coatings to burn off. It is normal to have a slight odor or light smoking during this time.
- Anytime after that and on subsequent uses, the control knob may be adjusted to a position that provides the desired comfort level. Use the carry handle to adjust the tilt of the heater’s dish to the position that is most comfortable for you.
Remember, after the control knob is turned to any ON position below HI, the heater will continually turn itself ON and OFF to control the heat output. This may not always be obvious; due to residual heat in the heating element, it will continue to glow at most settings. You may also hear a slight clicking or humming sound as the thermostat cycles the heating elements ON and OFF or see a small spark or flash of light when in a darkened room.
If additional heat is desired, turn the control knob to a higher setting. This will lengthen the ON cycle and the heater will produce more heat. If less heat is desired, turn the knob to a lower setting. The ON cycle will then be shortened, producing less heat. - After use, turn the control knob to the OFF position and disconnect the plug from the wall outlet. Always disconnect by grasping the plug, not the cord. Pulling on or yanking the cord can damage the cord’s insulation and wires, making the heater unsafe to use.
WARNING! Never use a heater with a damaged cord.
Care, Cleaning, and Storage
Allow the heater to cool completely before cleaning, caring for, or storing it. Also be sure the heater is turned off and unplugged.
- Do not pour or spray any water, cleaners, or any liquid on or into any portion of the heater. Do not submerge the heater in any liquid.
- Use a soft, lint-free, damp cloth and a mild detergent to clean the exterior surfaces. Harsh or abrasive cleaners will damage the finish.
- Occasionally, the parabolic reflector inside the grille will need to be cleaned to remove dust accumulation. To remove dust from the parabolic reflector, you may purchase a specially designed cleaning device such as the one offered on the Important Instructions sheet enclosed (see pages 6 and 7). You may also dust the reflector by following these simple steps: 1) Unplug the heater and allow to cool; 2) support the heater on its back; 3) slip a soft, lint-free cloth through the grille; 4) move the cloth over the surface of the parabolic reflector by inserting a long thin handle (such as a dowel or the handle portion of a wooden spoon) through the grille, using it to slide the cloth from spot to spot over the surface of the reflector; 5) remove the handle and the cloth when the surface is dust free.
NOTICE: If you allow dust to build upon the parabolic reflector, the dust accumulation may cause the heater to overheat and the warning buzzer to sound. If this should occur, follow the POWER RESET INSTRUCTIONS on the back of the unit. Then clean the parabolic reflector as previously instructed. - If the heater does not work properly after cleaning and following the reset instructions, contact the Consumer Service Department at 1-800-877-0441 or at www.GoPresto.com/contact.
- Wind the cord around the built-in cord wrap (Fig. A, page 2) for convenient storage. Keep the heater in a dry location.
- Grasp the handle and tilt the heater down to the storage position. You will feel and hear it lock in place.
Consumer Service Information
If you have any questions regarding the operation of your Presto appliance, contact us by any of these methods:
- Call 1-800-877-0441 weekdays 8:00 AM to 4:00 PM (Central Time)
- Email us through our website at www.GoPresto.com/contact
- Write: National Presto Industries, Inc.®
Consumer Service Department
3925 North Hastings Way, Eau Claire, WI 54703-3703
Inquiries will be answered promptly by telephone, email, or letter. When emailing or writing, please include a phone number and a time when you can be reached during weekdays if possible.
When contacting the Consumer Service Department, please indicate the model and series numbers for the heater. These numbers can be found on the bottom side of the plastic base.
Please record this information:
Model ______________________ Series ______________________ Date Purchased ______________________
The Presto Factory Service Department is equipped to service Presto ® appliances.
Canton Sales and Storage Company
Presto Factory Service Department
555 Matthews Drive, Canton, MS 39046-3251
Product Registration
IMPORTANT: Please go online and register this product within ten days of purchase. Proper registration will serve as proof of purchase in the event your original receipt becomes misplaced or lost. Registration will not affect warranty coverage, but it may expedite the processing of warranty claims. The additional information requested will help us develop new products that best meet your needs and desires. To register the product, visit www.GoPresto.com/registration or simply scan this QR code. If you do not have computer access, contact the Consumer Service Department at 1-800-877-0441.
Presto ®Limited Warranty
(Applies only in the United States)
This quality Presto® appliance is designed and built to provide many years of satisfactory performance under normal household use. Presto pledges to the original owner that should there be any defects in material or workmanship during the first year after purchase, we will repair or replace it at our option. Our pledge does not apply to damage caused by shipping. Outside the United States, this limited warranty does not apply.
To obtain service under the warranty, please call our Consumer Service Department at 1-800-877-0441. If unable to resolve the problem, you will be instructed to send your Presto ® appliance to the Presto Factory Service Department for a quality inspection; shipping costs will be your responsibility. When returning an appliance, please include your name, address, phone number, and the date you purchased the appliance as well as a description of the problem you are encountering with the appliance.
We want you to obtain maximum enjoyment from using this Presto ® appliance and ask that you read and follow the instructions enclosed. Failure to follow instructions, damage caused by improper replacement parts, abuse, misuse, disassembly, alterations, or neglect will void this pledge. This warranty gives you specific legal rights, and you may also have other rights which vary from state to state. This is Presto’s personal pledge to you and is being made in place of all other express warranties.
National Presto Industries, Inc., Eau Claire, WI 54703-3703
IMPORTANT INSTRUCTIONS
Presto ® HeatDish ® Plus Tilt parabolic electric heater
FIRST USE
The heater is shipped in the storage position. It will not operate in the storage position and the buzzer will sound. Grasp the handle, press down, and tilt the parabolic reflector upward to release the heater from the storage position.
When using the heater for the first couple of times, there may be a slight odor or light smoking as manufacturing coatings burn off. This is normal.
OPERATING IN A DARKENED ROOM
The thermostatic control contains a special switch that provides you with an infinite range of settings. This type of switch does produce a small spark or flash of light each time the thermostatic control cycles on and off. The flash always occurs but tends to
be more visible when the room is darkened. This is normal.
POSITIONING THE HEATER
Always place heater on a stable, level surface. The heater is designed with a warning buzzer which will sound if the heater is tipped or if it is not positioned on a level surface. The buzzer also sounds if the heater is turned on when in the storage position.
When positioned correctly, this heater will keep you toasty warm. Follow these suggestions for maximum warmth:
- Point the front of the grille directly towards the area in which heat is desired and use the tilt feature to aim the heat right where you want.
- Place the heater at least 3 feet, but no more than 10 feet, away. The parabolic design of the reflector focuses heat at persons
3 to 10 feet away. Thus, for your entire body to enjoy the heat produced by this heater, it must be positioned at least 3 feet from you.
Experiment with various positions until you find the one that is right for you.
ADJUSTING THE HEAT – THERMOSTAT CYCLES ELEMENT ON AND OFF
When you first turn the heater on, you will hear a vibrating or humming sound. This is normal and should last only about 30 seconds. Allow the heater to operate on its HI setting for at least 3 minutes to bring the heating element to its optimum operating temperature. Anytime after that, the control knob may be adjusted to a position that provides the desired comfort level.
An automatic control switch, or thermostat, is built into the heater to control the heat output. The control knob, located on the top of the heater, is used to adjust the thermostat. This thermostat works like the control for a burner on an electric stove by cycling the heating element on and off to regulate the amount of heat produced. At the highest setting, the element is on 100% of the time. At lower settings, the element will cycle on and off, automatically producing a lesser amount of heat. The lower the heat setting, the longer the element will remain off during the cycle. You may hear a clicking or humming sound each time the element cycles back on. This is normal.
POWER RESET INSTRUCTIONS
The heater is controlled by a thermostat that shuts the heater off if it overheats, e.g., it is placed too close to furniture or to a wall or if too much dust or dirt has accumulated on the parabolic reflector. To ensure that you are aware that an overheat situation has occurred, the heater will turn off and buzz until you manually reset it. To reset, press the red recessed POWER RESET button located on the top of the heater between the dish and the control knob (Fig. A). If you hear continuous buzzing, confirm that the heater is on a level surface and not in the storage position. If it continues, the heater has overheated due to incorrect positioning or dirt or dust accumulation on the reflector.
- Turn the heater control knob dial to OFF.
- Wait 5 minutes to allow the heater to cool.
- Press the red recessed Power Reset button with a Phillips screwdriver or similar tool (Fig. A).
Holding the screwdriver at about a 45° angle, press until you hear a click. If you do not hear the click, continue to press it in.
The click is an audible signal that the button has been reset. - Verify the heater is correctly positioned (see POSITIONING THE HEATER instructions on the reverse side of this sheet) and clean the reflector if needed, as instructed below.
- Plug the heater back in and try it again.
TILT TENSION ADJUSTMENT
The tilt mechanism tension can be adjusted to suit your preference by turning the tilt adjustment screw located above the cord wrap (Fig A). To tilt with a lighter touch (less tension), insert a #2 Phillips screwdriver and turn the screw counterclockwise in ¼ turn increments to desired tension. If a more assertive touch (more tension) is preferred, turn the screw clockwise in ¼ turn increments.
CLEANING THE PARABOLIC REFLECTOR
Turn heater off, unplug, and allow to cool completely before cleaning, caring for, or storing the heater.
Occasionally the parabolic reflector inside the grille will need to be cleaned to remove dust accumulation. To remove dust from the parabolic reflector you may purchase a specially designed cleaning device, such as the one offered below. You may also remove dust from the parabolic reflector by following these simple steps: 1) Unplug the heater and allow to cool; 2) support the heater on its back; 3) slip a soft, lint-free cloth through the grille; 4) move the cloth over the surface of the parabolic reflector by inserting a long thin handle (such as a dowel or the handle portion of a wooden spoon) through the grille, using it to slide the cloth from spot to spot over the surface of the reflector; 5) remove the handle and the cloth when the surface is dust free. NOTICE: If you allow dust to build up on the parabolic reflector, the dust accumulation may cause the heater to overheat and the warning buzzer to sound. If this should occur, follow the POWER RESET INSTRUCTIONS on the back of the unit. Then clean the parabolic reflector as previously instructed. If the heater does not work properly after cleaning and following the reset instructions, contact:
National Presto Industries, Inc.
3925 North Hastings Way, Eau Claire, WI 54703
1-800-877-0441
www.GoPresto.com/contact
It is recommended that you retain the heater carton for future storage.
MAKE CLEANING THE PARABOLIC REFLECTOR A LITTLE EASIER…
Presto is offering a Heater Duster which is convenient for dusting the parabolic reflector. The extra-long handle and soft mop make cleaning easy. To purchase a duster for cleaning your parabolic heater, see the information below.
HOW TO ORDER…

http://www.gopresto.com/registration/
► Visit www.GoPresto.com and search Heater Duster or simply scan this QR code.
► Call the Consumer Service Department at 1-800-877-0441 on weekdays 8:00 AM to 4:00 PM (Central Time). Please have your credit or debit card number and expiration date ready. Payment options on telephone orders are limited to credit and debit cards only.
©2021 National Presto Industries, Inc.