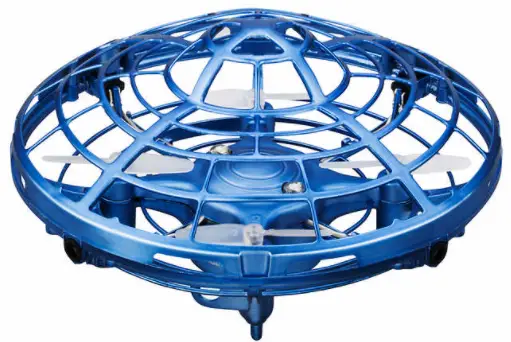
PROPEL 810031061631 Hover Star Motion Controlled UFO Drone

FEATURES
- Easy to Launch and Fun to Play
- Obstacle Avoidance Technology
- Hand Motion Control
- Infinite Spinning and Hovering
- Crash Proof Design for Extra Durability
CHARGING THE HOVER STAR™
- Make sure the power switch is turned off and then plug the UFO (smaller end) end of the charging cord into the charging socket of the HOVER STAR (see diagram A ).
- Next Connect the USB end of the charging cord to either your computers USB port or a UL listed USB wall charger (see diagram B).
- The USB cord has a RED colored LED light that will “turn off” during charging and “light up” when charging is complete (See diagram C).
Note: If the red LED lights up, either the charging is complete or the USB plug is not properly connected. If you have used the UFO for several minutes and have plugged in your charging cord and see a solid RED LED light chances are you have not plugged in the cord in correctly. - The charging time may vary depending on the remaining percentage of battery charge left after flying. The average charging time is approximately 30 minutes. The HOVER STAR operates for approximately 5-7 minutes per charge.
- LOW BATTERY INDICATION: When the battery is low, lights on the body of the HOVER STAR will begin to flash and will continue to flash for 30-60 seconds then the HOVER STAR will automatically land.
HOVER STAR™ DIAGRAM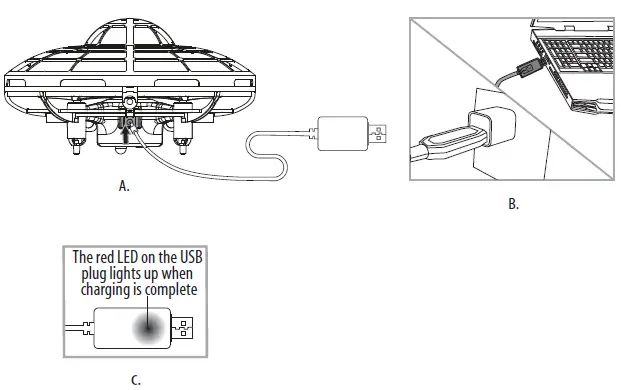
PREPARING FOR FLIGHT
- Verify that HOVER STAR has been fully charged.
- Make sure the empty space has no obstacles that would obstruct flight
DO NOT ATTEMPT TO FLY YOUR HOVER STAR OUTDOORS. IT COULD DAMAGE YOUR PRODUCT.
LETS GET STARTED!
Follow these simple steps in the order below and you will be successfully flying your HOVER STAR in no time!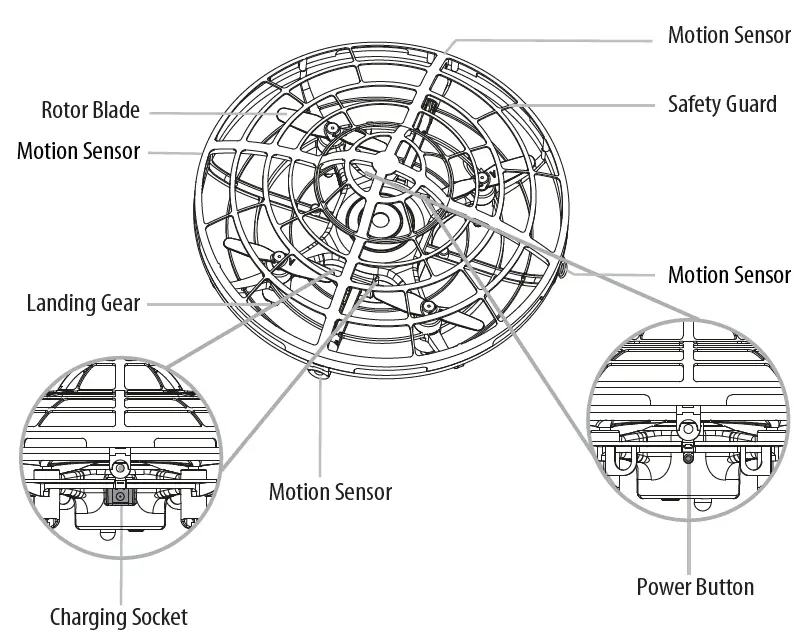
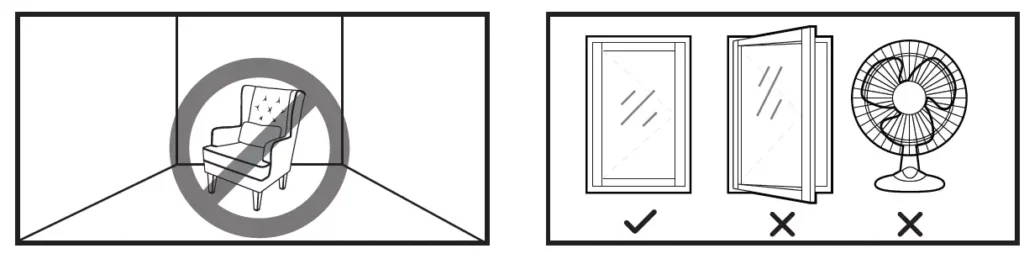
- When using the HOVER STAR, first find a room in your house with high ceilings and a large open space where you have room to walk around. You may need to move some furniture.
- Make sure all external sources of wind like ceiling fans, floor fans or opened windows are turned off and closed. Central Air conditioning should be okay but it is a good idea to stay away from strong drafty areas.
- Make sure your HOVER STAR is fully charged.
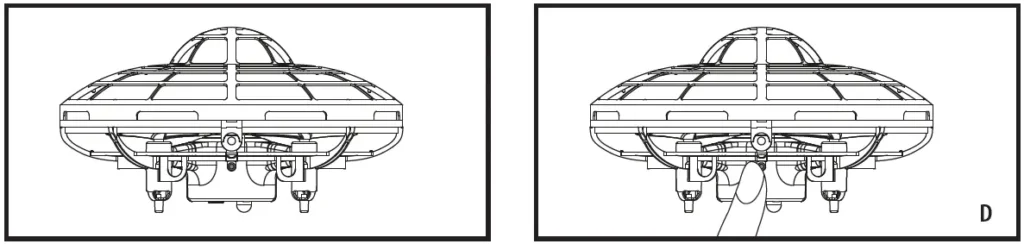
- Short press the Power Button until the LED lights on the HOVER STAR turn on and become solid green (see diagram D)
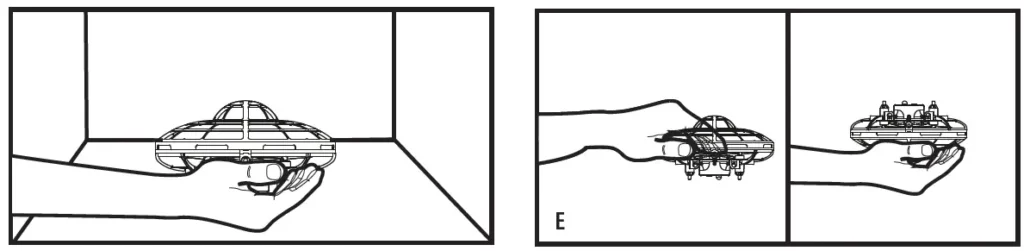
- Hold the HOVER STAR in the mid-air and then quickly release it as if you were dropping it from your hand, The HOVER STAR will automatically turn on and begin hovering.
- To stop the HOVER STAR quickly capture the HOVER STAR with your hand and turn it upside down (see diagram E) the blades will stop spinning.
- When done playing make sure to turn the power off by depressing the power button for 3 seconds (see power button diagram on pg. 3 ) All the lights will turn off.
HOW TO CONTROL YOUR HOVER STAR™
Your HOVER STAR is equipped with motion sensors and air pressure sensors which read your hand motions to determine its direction for flight.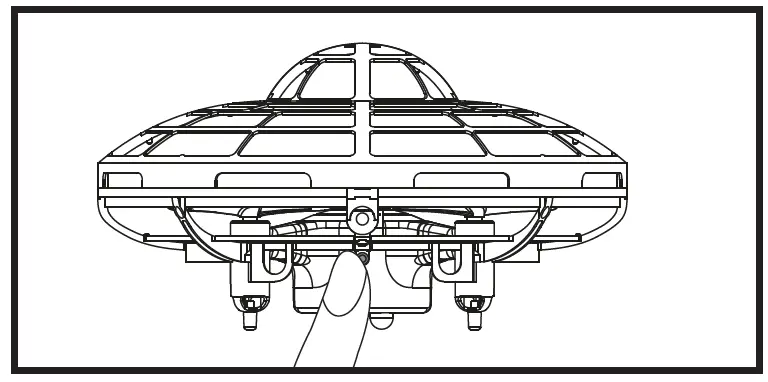
TO MAKE YOUR HOVER STAR™ GO UP:
There are 2 ways to make your HOVER STAR ascend:
- Place one hand palm side up directly underneath the bottom of the HOVER STAR and slowly move your hand straight up, HOVER STAR will rise upward (See Diagram F)
- The second way which will create a faster response, is to hold both your hands out simultaneously on both sides of the HOVER STAR about two inches from the body so the HOVER STAR is in the center space between your two hands. The drone will quickly ascend! (See Diagram G)
TO MAKE YOUR HOVER STAR™ FLY HORIZONTALLY ACROSS THE ROOM:
Hold your hand up vertically palm side facing the HOVER STAR like your going to push it away, but don’t actually touch it. The HOVER STAR will begin to move in the opposite direction of your hand (See Diagram H). 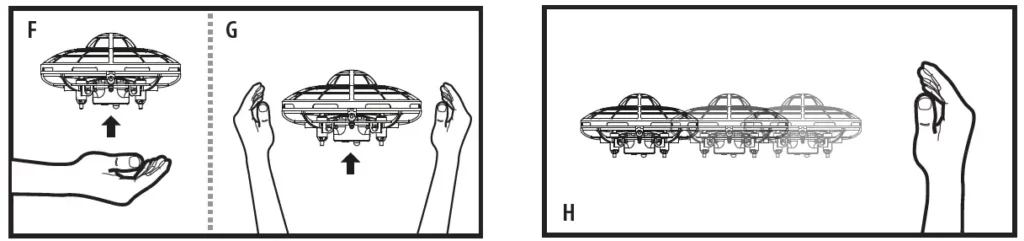
TO MAKE YOUR HOVER STAR™ MOVE FASTER AND FURTHER.
Once you have gotten the hang of controlling the direction of your HOVER STAR simply move your hand along outside of the HOVER STAR as it begins to fly away, literally follow the HOVER STAR with your hand. The longer and faster you move your hand behind the HOVER STAR the further and faster it will fly (See diagram I) Remember to follow behind it, not touch it.
TROUBLE SHOOTING:
If your HOVER STAR drifts uncontrollably or does not respond correctly to the hand movements as explained above you may need to recalibrate the internal gyro sensor.
HOW TO RECALIBRATE THE GYRO:
a) first start with the HOVER STAR in the power-off position. Next, hold the HOVER STAR upside down (See diagram J).
b) Quickly depress and release the power button 2 times and the lights on the body should begin to rapidly flash red and green, this is how you know that you are in “Calibration Mode”. (See diagram K).
c) While the lights are flashing turn the HOVER STAR back over right side up and set it on flat level surface (See diagram L).
d) When the lights stop flashing and you have solid green light on the body, you have successfully completed the calibration process and you are ready to fly!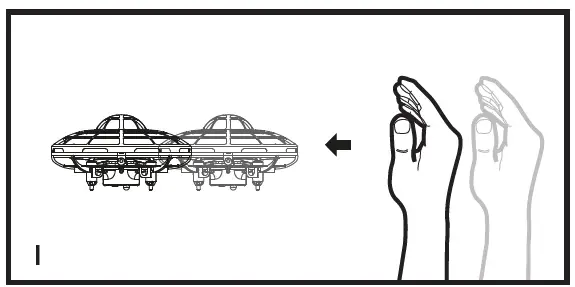
HOW TO PLAY SAFELY!
Safety is number one and should be taken seriously! Please carefully study the below DO’s and DON’Ts so that you may always enjoy the safe operation of your HOVER STAR.
IMPORTANT SAFETY INFORMATION: KEEP YOUR HOVER STAR™ AWAY FROM FACE AND EYES.
HOVER STAR™ WARNING:
Always play in a large open space and warn spectators that you will be flying your HOVER STAR so that they are aware of its position. Before flight, inspect the HOVER STAR to make certain that there is no obstruction to the propellers or damage to the product and that everything appears to be in good working order
WARNING!
• Choking/Cutting Hazard. Small Parts/Sharp Rotor Blades.
• Keep hands, hair and loose clothing away from the propeller when the power switch is turned to the ON position.
• Turn off the HOVER STAR power switch when not in use.
• The included charger is built specifically for the HOVER STAR Li-Poly battery. Do not use it to charge any other battery.
• Parental supervision recommended for children under 8 when flying HOVER STAR.
BATTERY WARNINGS
This HOVER STAR uses an internal Li-Poly rechargeable battery and is not replaceable. If the battery can no longer be charged, dispose it properly according to local disposal requirements.
CAUTION: If the rechargeable battery leaks fluid, avoid contact with eyes and dispose the HOVER STAR.
• Rechargeable batteries are to be removed from the item before being charged (if removable).
• Rechargeable batteries are only to be charged under adult supervision.
• Exhausted batteries should be removed immediately and must be recycled or disposed of properly according to state
or local government ordinances and regulations.
• The supply terminals are not to be short-circuited.
• Do not dispose batteries in a fire! Batteries may leak or explode.
Limited 90-Day Warranty
AMAX Group USA warrants to the original consumer that this product is free from any electrical or mechanical defects for a period of 90 DAYS from the date of purchase. If any such
defect is discovered within the warranty period, AMAX Group USA will repair or replace the unit free of charge upon receipt of the unit, shipped postage prepaid and insured to our warranty center ALONG WITH THE ORIGINAL RECEIPT evidencing that the product was purchased from an approved AMAX retail partner and that the product is still within the 90 day warranty period. The warranty covers normal consumer use and does not cover damage that occurs in shipment or failure that results from alterations, accident, misuse, abuse, neglect, wear and tear, inadequate maintenance, commercial use or unreasonable use of the unit. Removal of any parts/components voids all warranties. This warranty does not cover cost of repairs made or attempted outside by third-party individuals or companies. Any applicable implied warranties, including warranties of merchantability and fitness, are hereby limited to 90 DAYS from the date of purchase. Consequential or incidental damages resulting from a breach of any applicable express or implied warranties are hereby excluded. Some states do not allow limitations on the duration of implied warranties and do not allow exclusion of incidental or consequential damages, so the above limitations and exclusions in these instances may not apply.
REPAIR/REPLACE PRODUCT
If your product begins to malfunction or stop working, immediately contact our warranty center (contact details listed below). If it is determined that a return is necessary, our warranty department will issue you an RMA number/form and an address to the nearest return center for shipping the product to us. When honoring the warranty, AMAX reserves the right to either repair, replace or refund the product.
IMPORTANT NOTICE:
We will reject and return to sender returns that are not accompanied by an AMAX issued RMA form and RMA number so make sure to contact our warranty center before attempting to return your product!
PREPARATION FOR SHIPPING YOUR PRODUCT:
Please repack your product in a durable box, preferably in the original carton, and send it prepaid, and adequately insured. Include the RMA form that was issued by our warranty department along with your daytime telephone number and email address inside the shipping carton. If your warranty has expired and you still require service please contact our customer care team For further information please send all inquiries to: [email protected]
IMPORTANT NOTICE!
DO NOT ATTEMPT TO SHIP YOUR PRODUCT BACK WITHOUT FIRST CONTACTING OUR WARRANTY DEPARTMENT AT: www.amaxbrands.com
Email: [email protected]