Propel GYROPTER 2.4Ghz Motion Controlled Helicopter

WARNING: Never leave product charging unattended for extended periods of time. Always disconnect helicopter from charger immediately after the helicopter is fully charged. Please refer to enclosed safety instructions.
THIS PACKAGE CONTAINS:
Thank you for purchasing the GYROPTER™ 2.4Ghz Motion Controlled Helicopter from Propel RC. Please read this instruction booklet carefully as it contains valuable information on how to properly fly and care for your helicopter.
FEATURES
- Brand new motion control technology is extremely intuitive and makes flying fun and easy.
- Air pressure sensor locks flight altitude.
- Built-in gyroscopic chip for extreme stability and control.
- Banks like a real helicopter even hovers in mid-air!
- 2.4Ghz motion controlled: fly left, right, forward, backward and hover.
REMOTE CONTROL BATTERY INSTALLATION
- Twist off the battery cover from the remote control.
- Use a screwdriver to remove the screw securing the battery tray.
- Install 4 “AAA” alkaline batteries as shown in the diagram.
- Insert the battery tray back to the remote control and tighten the screw.
- Replace the battery cover.
CHARGING THE HELICOPTER
- Make sure the helicopter’s power switch is in the “OFF” position and plug the USB charging cord into the charging socket of the helicopter(see diagram A ).
Caution: The USB plug fits the charging socket only in one way. Do not force it. - Connect the USB end of the cable to your computers USB port or a USB wall charger (see diagram B).
- The red LED on the USB plug lights up when charging is complete (See diagram C).
Note: If the red LED lights up, either the charging is complete or the USB plug is not properly connected. - The charging time will vary depending on the percentage of battery already charged. The average charging time is approximately 30-50 minutes. The helicopter operates for approximately 5-8 minutes per charge.

IMPORTANT: ALWAYS DISCONNECT CHARGER CORD AFTER CHARGING. NEVER LEAVE CHARGER CONNECTED TO HELICOPTER OVERNIGHT OR FOR EXTENDED PERIODS OF TIME.
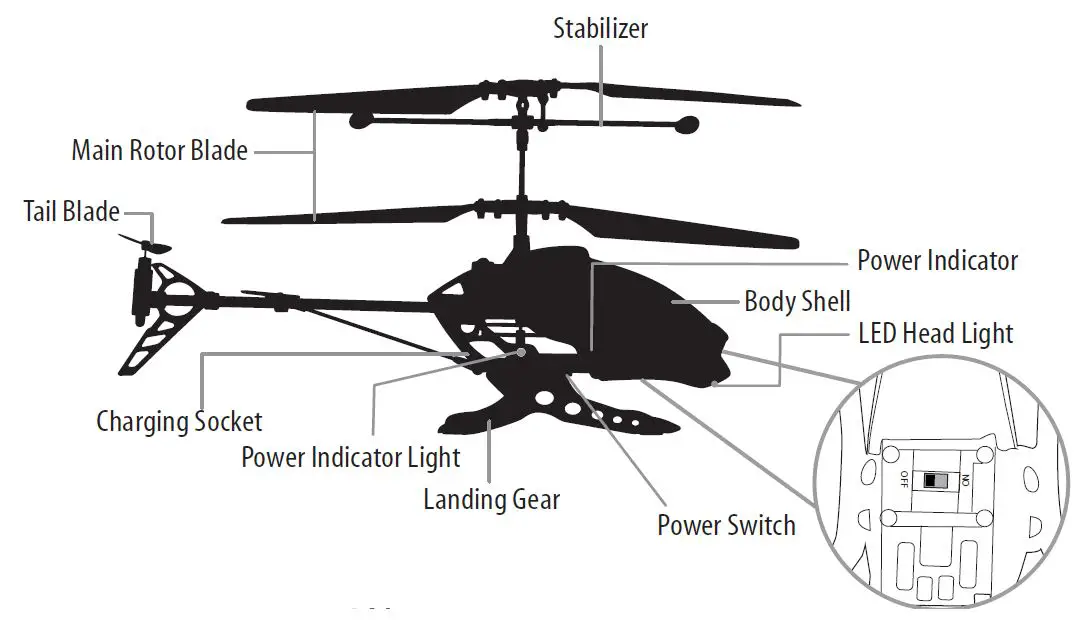
HELICOPTER DIAGRAM
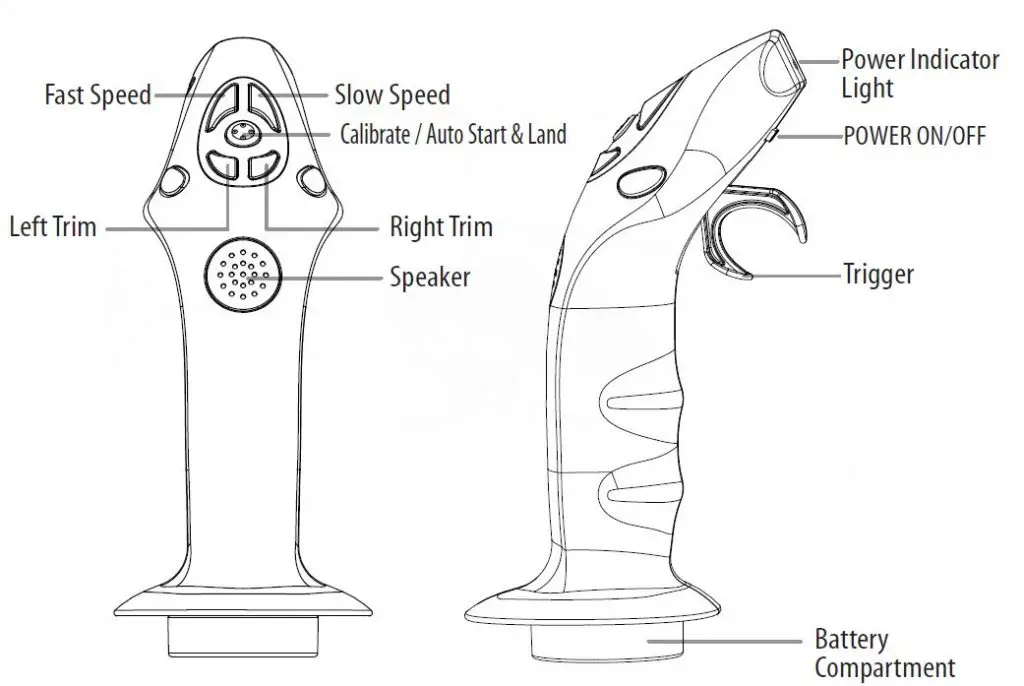
REMOTE CONTROL DIAGRAM
PREPARING FOR FLIGHT
- Verify that there are 4 “AAA” fresh batteries inside the remote control unit and the helicopter has been fully charged.
- Make sure your helicopter is turned on and properly synced to your remote control (See “SYNC YOUR HELICOPTER” next page).
- Fly only in a large room free of obstacles with an open radius of at least 25 feet. Close all windows and doors, turn off fans and close air ducts or any other openings that may cause drafts in the room.
FLYING TIPS
- Parental guidance or adult supervision is suggested at all times.
- If you are flying the helicopter with others, make sure all spectators are behind you.
SYNCING YOUR HELICOPTER
Your GYROPTER™ utilizes an automatic 2.4G channel selection system that allows up to 8 people to fly side by side in the same wireless range.
FOR ONE PERSON PLAY:
- Before starting, make sure that both your remote control and helicopter are turned OFF. Make sure that there are no other 2.4G devices nearby.
- Turn ON the helicopter and set it down on a flat surface. The white LED head light will start to flash rapidly.This means your helicopter is searching for a controller to pair with.
- Turn ON your remote control. The controller power indicator will light on. Now pull the trigger all the way down then up. The white LED head light of the helicopter will stary solid indicating that the helicopter and remote control are synced. When this happens you have properly synced your helicopter and you are ready to fly.
Note: If the white LED head light do not stay solid, repeat steps 1-3 to sync the helicopter again.
FOR MULTI-PERSON PLAY: - Before starting, make sure that all of the helicopters and remote controls are turned off. Make sure that there are no other 2.4G devices nearby.
- Players must sync their helicopters successively. Make sure that no one else is syncing while you sync your helicopter by following steps 1 to 3 above.
- When a player’s helicopter is synced and working it should be left ON while the other players sync their helicopters.
- Should there be a mistake or interference, all players must turn off their remote controls and helicopters and start the process all over again.
Before syncing, make sure the remote control’s trigger is at its default position.
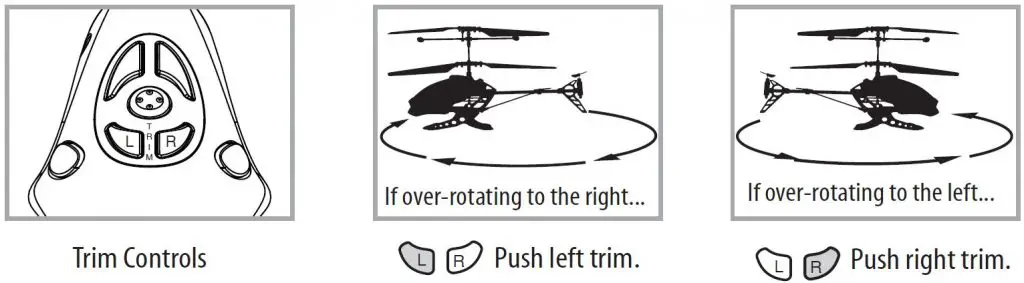
UNDERSTANDING HELICOPTER TRIM ADJUSTMENTS
If your helicopter over-rotates CLOCKWISE (to the right), push and release the LEFT trim button repeatedly until the turning stops and proper flight is maintained. If your helicopter over-rotates COUNTERCLOCKWISE (to the left), push and release the RIGHT trim button in the same manner until the problem is resolved. Occasionally, you may need to adjust the left and right trim to ensure the helicopter flies straight and responds accurately to control commands.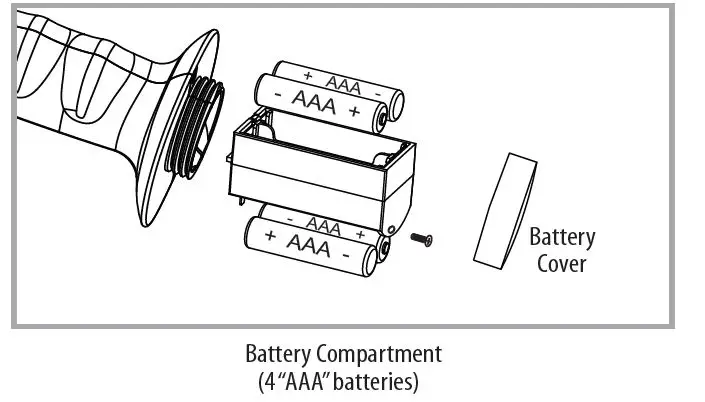
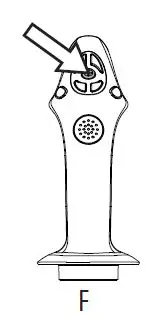
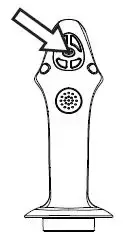
CALIBRATING THE HELICOPTER
If the HELICOPTER becomes unstable during the course of flying, you may need to calibrate the internal gyros. To do this place the HELICOPTER on a flat level surface. press and hold the Calibrate button. The LEDs on the HELICOPTER will flash quickly and then remain solid, this indicates your drone has been recalibrated (see diagram F). 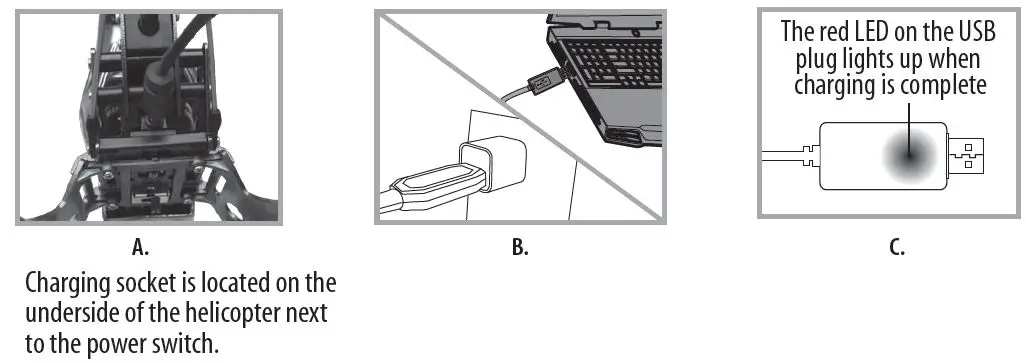
AUTOMATICALLY TAKE OFF / LAND
Make sure you have properly synced The HELICOPTER.
- Simply press the “start/land” button on the top of controller, your HELICOPTER will automatically take off.
- To stop or land the HELICOPTER just press the “START/LAND” button again and the HELICOPTER will descend and land automatically.
FLIGHT CONTROLS
While you’re learning to fly your helicopter, it is best to start with a large room until you get used to the basic controls.
One-handed free from flight.
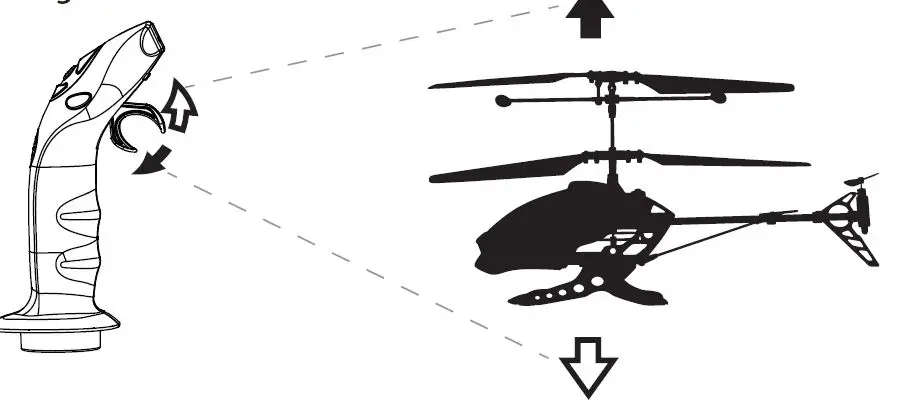
Pull the trigger to increase the speed of the main rotor, and release the trigger to decrease the speed of the main rotor. The helicopter will rise or descend accordingly.
Tilt the controller forward and to move forward.
Tilt the controller backward to move backward.
SPEED CONTROLS: Your air combat helicopter can operate in beginner (slower) or advanced (faster) speed mode. Simply press the SLOW button (green LED lights on) or FAST button (red LED lights on) .
HELICOPTER WARNING AND SAFETY PRECAUTIONS
The helicopter blades revolve at high speeds and can cause damage to the user, spectators, and animals. Stand away from the helicopter to reduce the risk of getting into the flight path. Warn spectators that you will be flying your helicopter so that they are aware of its position. Before flight, inspect the rotor blades to make certain that the blades are securely fastened to the helicopter.
WARNINGS
- Choking/Cutting Hazard. Small Parts/Sharp Rotor Blades.
- Keep hands, hair, and loose clothing away from the propeller when the power switch is turned to the ON position.
- Turn off the transmitter and helicopter power switches when not in use.
- The charging cable is for charging the helicopter’s Li-poly battery. Do not use it to charge any other battery.
- New alkaline batteries are recommended for maximum performance.
- Parental supervision recommended when flying the helicopter.
PART REPLACEMENT INSTRUCTIONS
CONTENTS:
- upper rotor blade set
- bottom rotor blade set
- connecting rods
- screws
GYROPTER™ PROPELLER SYSTEM
Your GYROPTER™ propeller system is a precision instrument that may need repair or replacement from time to time for optimal flight function. Crash landing from high-speed aerial flights may damage your GYROPTER™ rotor blades or connecting rods.
TROUBLESHOOTING:
If your GYROPTER™ loses its ability to fly correctly, inspect the propeller system carefully for the following two common issues:
- Replacing The Connecting Rod: The connecting rod is a small “handcuff” style device that stabilizes the “upper” rotors. There is one connecting rod on the upper rotor. Please see Diagram 1. If a connecting rod is broken or missing simply replace it by removing the existing broken unit and replacing it with a new one. You may have to use slight pressure when reattaching both ends of the new connecting rod. Make sure that the new connecting rod is secured and locked in place. See Diagram 2. Make sure there is no damage to the actual blade or arm that holds the connecting rod in place. If there is, you must replace the entire blade system.
- Replacing The Upper and Bottom rotor blades: The rotor is subject to damage as you learn to properly fly and control your GYROPTER™. If after a crash your helicopter has loss of control or flies erratically you should carefully inspect your entire propeller system for any sign of damage. Most common are cracked or chipped blade, broken connecting rod, and frozen balance bar (this is when the balancing bar and blade are jammed and can not move freely up and down). See diagrams 3 through 12.
REPLACING CONNECTING RODS
REPLACING THE UPPER ROTOR BLADE
REPLACING THE BOTTOM ROTOR BLADE
BATTERY WARNINGS
RECHARGEABLE BATTERY:
This helicopter uses an internal Li-Poly rechargeable battery and is not replaceable. If the battery can no longer be charged, dispose of the helicopter properly according to local disposal requirements.
CONTROLLER BATTERIES:
Remote control requires 4 “AAA” batteries (not included). Please read the important battery safety warning below.
- Do not mix alkaline, standard (carbon-zinc) and rechargeable batteries (Nickel Metal Hydride).
- Do not mix old and new batteries.
- Non-rechargeable batteries are not to be recharged.
- Rechargeable batteries are to be removed from the item before being charged (if removable).
- Rechargeable batteries are only to be charged under adult supervision.
- Exhausted batteries should be removed immediately and must be recycled or disposed of properly according to state or local government ordinances and regulations.
- The supply terminals are not to be short-circuited.
- Only batteries of the same or equivalent type as recommended are to be used.
- Batteries are to be inserted with the correct polarity.
- Do not dispose batteries in a fire – batteries may leak or explode.
CARE AND MAINTENANCE
- Always remove the batteries from the remote control when it is not being used for an extended period of time.
- To clean, gently wipe the remote control and helicopter with a clean damp cloth.
- Keep the toy away from direct heat or sunlight.
- Do not submerge the toy into water. This can damage the unit beyond repair.
- Parental guidance recommended when installing or replacing the batteries.
Limited 90-Day Warranty
AMAX Group USA warrants to the original consumer that this product is free from any electrical or mechanical defects for a period of 90 DAYS from the date of purchase. If any such defect is discovered within the warranty period, AMAX Group USA will repair or replace the unit free of charge upon receipt of the unit, shipped postage prepaid and insured to our warranty center. The warranty covers normal consumer use and does not cover damage that occurs in shipment or failure that results from alterations, accident, misuse, abuse, neglect, wear and tear, inadequate maintenance, commercial use or unreasonable use of the unit. Removal of any parts/components voids all warranties. This warranty does not cover cost of repairs made or attempted outside by third-party individuals or companies. Any applicable implied warranties, including warranties of merchantability and fitness, are hereby limited to 90 DAYS from the date of purchase. Consequential or incidental damages resulting from a breach of any applicable express or implied warranties are hereby excluded. Some states do not allow limitations on the duration of implied warranties and do not allow exclusion of incidental or consequential damages, so the above limitations and exclusions in these instances may not apply.
REPAIR/REPLACE PRODUCT
If your product begins to malfunction or stop working, immediately email our warranty center at the email listed below. If it is determined that a return is necessary, our warranty department will issue you an RMA number/form and an address to the nearest return center for shipping the product to. IMPORTANT NOTICE: We will reject all returns that are not accompanied by an issued RMA form and number so make sure to contact our warranty center before attempting to return your product!
PREPARATION FOR SHIPPING YOUR PRODUCT
Please repack your product in a durable box, preferably in the original carton, and send it prepaid, and adequately insured. Include the RMA form that was issued by our warranty department along with your daytime telephone number and email address inside the shipping carton. If your warranty has expired, contact our warranty center for charged service. For further information please send all inquiries to: [email protected]
IMPORTANT NOTICE! DO NOT ATTEMPT TO SHIP YOUR PRODUCT BACK WITHOUT FIRST CONTACTING OUR WARRANTY DEPARTMENT BY EMAIL AT: [email protected]
![]()