Should you need assistance, please call our technical helpline at 1-646-758-0144, Monday through Thursday, 9 am to 10 pm EST, and Fridays, 9:00 am to 3 pm EST.
 Go to vimeo.com/showcase/6761895 or scan the QR code to watch the video, which covers · everything you need to know to set up this item.
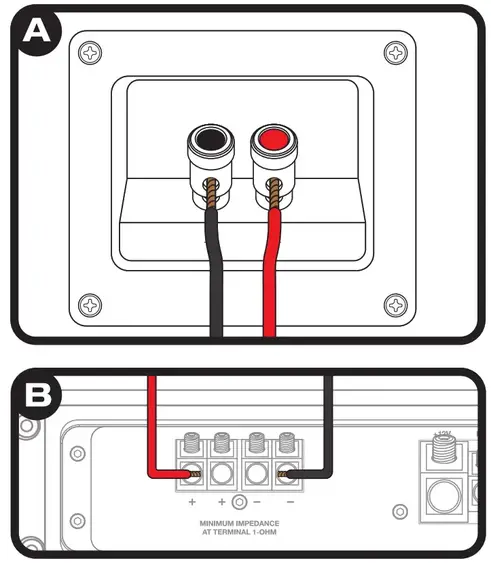
- Using a 16 gauge speaker wire, connect the negative and positive push terminals of the enclosure (diagram A) to the negative and positive speaker terminals of the amplifier (diagram B). Make sure to observe correct polarity.

DV12K6 WIRING and LED OPERATION GUIDE
- The LED wiring harness comes preconnected to the LED power terminal (diagram A). To connect the harness to your amplifier, follow the steps below.
- If you are connecting to an amplifier with block terminals (diagram B): Cut the spade connector off of the ends of the LED wiring harness cables and peel away 1 to 1.5 inches of sheathing. Now splice the negative wire (black/grey) to the ground wire and insert both into the ground terminal (GND) of the amplifier (fig. a). Splice the positive wire (black/white) to the remote wire and insert both into the remote terminal (REM) of the amplifier (fig. b).
- If you are connecting to an amplifier with screw-down terminals (diagram C). Place the spade connector of the negative wire (black/grey) on top of the spade connector of the ground wire and connect them to the ground terminal (GND) of the amplifier (fig. c). place the spade connector of the positive wire (black/white) on top of the spade connector of the remote wire and connect them to the remote terminal (REM) of the amplifier (fig d).
- Use the three-position toggle switch to set the LED color (diagram D). Set the switch to the left for white LEDs, the middle to turn off the LEDs, and the right for blue LEDs.

©2021 ROCKVILLE// The information presented is subject to change and/or improvement without notice.


